Nothing ruins a morning treat faster than a scone that eats like a leaden brick. Most of us have been there, biting into a beautiful-looking pastry only to find a gummy, doughy center and a bottom that’s more mush than crunch. It’s a common frustration that usually stems from over-handling the dough or letting the butter get just a few degrees too warm before it hits the oven.
These Glazed Pistachio Cranberry Scones solve that problem by balancing the earthy, salty crunch of pistachios with the bright, tart pop of dried cranberries. We aren’t just mixing ingredients here; we’re building a specific structure designed to stay light and airy. By focusing on the “Anti-Soggy Bottom” philosophy, you’ll create a scone that boasts a shatter-crisp exterior and a tender, cloud-like crumb.
The secret to this professional-grade texture is the “cold shock” method. By freezing the shaped dough for fifteen minutes right before baking, you ensure the butter stays solid until the very last second. This creates a dramatic lift in the oven, preventing the scones from spreading into flat, greasy puddles on your baking sheet.
The Science of Flaky Scone Architecture
Baking is essentially a series of chemical reactions, and scones rely on the power of steam. When tiny pockets of cold butter hit a 400°F oven, the water in the butter evaporates instantly. This creates a burst of steam that pushes the layers of dough apart, resulting in those coveted flaky ridges. If the butter is room temperature, it simply melts into the flour, creating a heavy, greasy texture instead of a lift.
In addition to steam, we rely on the carbon dioxide produced by a generous tablespoon of baking powder. This leavening agent works alongside the high heat to ensure the scones rise vertically rather than expanding horizontally. Therefore, a hot, preheated oven is non-negotiable. Without that immediate blast of heat, the scones will sit and soften, losing their structural integrity before they have a chance to set.
Why Frozen Butter Outperforms Chilled Butter
Frozen butter has a much higher thermal mass than butter straight from the fridge. This means it stays cold longer while you’re working the dough, giving you a wider margin for error. When you grate frozen butter, you create hundreds of tiny “shreds” that distribute evenly throughout the flour without the need for a pastry cutter.
Grating increases the surface area of the fat, allowing it to coat the flour particles more efficiently. However, you must work quickly. The goal is to keep those shreds intact so they can create individual steam vents during the bake. If you use your hands, the heat from your palms will melt the butter, leading to a dense and gummy result.
The Role of Protein in Flour Selection
All-purpose flour is the gold standard for this recipe because it hits the “sweet spot” of protein content. You need enough protein to provide structure so the scone can support the weight of the pistachios and cranberries. However, you don’t want so much protein that the scone becomes chewy like a bagel.
Bread flour contains too much gluten, which would make these scones tough and bread-like. On the other hand, cake flour is too delicate and might cause the scones to crumble under the weight of the heavy mix-ins. Stick with a standard all-purpose flour to ensure a sturdy yet tender bite.
Essential Components for Glazed Pistachio Cranberry Scones
Every ingredient in this list serves a specific structural or flavor purpose. We use heavy cream with at least 36% milkfat because the fat coats the flour proteins, preventing too much gluten from forming. This is what gives the scone its “short” and tender crumb. If you substitute with low-fat milk, you’ll likely end up with a much tougher, drier pastry.
The dried cranberries provide a chewy contrast to the crunch of the nuts, but they also add necessary acidity to balance the sugar. We use shelled, unsalted pistachios to keep the sodium levels in check. This allows the natural, buttery flavor of the nut to shine through without making the scone taste overly salty.
For a different take on those lovely flavors, check out these cranberry pistachio cookies.
Selecting High-Quality Dried Fruit and Nuts
When shopping for cranberries, look for bags where the fruit appears plump and dark red. If they look shriveled or brownish, they may be old and will absorb too much moisture from the dough, making the area around the fruit soggy. Fresh, vibrant dried fruit provides the best flavor and texture.
For the pistachios, a quick five-minute toast in a dry pan before chopping can make a world of difference. This releases the volatile oils within the nut, deepening the flavor and ensuring they stay crunchy even after being tucked into the moist dough. Just be sure to let them cool completely before adding them to the flour mixture.
The Heavy Cream and Egg Emulsion
Whisking the egg directly into the cold heavy cream is a vital step for even hydration. If you add the egg separately, it’s much harder to distribute it evenly throughout the dry ingredients. This often leads to “dry spots” where the flour hasn’t fully incorporated, resulting in chalky pockets in your finished scone.
By creating an emulsion first, you ensure that every crumb of flour is coated in a consistent mixture of fat and moisture. This leads to a more uniform rise and a better overall mouthfeel. Always use a cold egg straight from the refrigerator to keep the overall temperature of the dough as low as possible.
Step-by-Step: Executing the Drop-Scone Method
The drop-scone method is a game-changer for home bakers because it minimizes the amount of handling the dough requires. Traditional scones are rolled out and cut with a biscuit cutter, which often compresses the edges and prevents a full rise. By simply “dropping” mounds of dough, you preserve the airy pockets you’ve worked so hard to create.
When you mix the wet and dry ingredients, you are looking for a “shaggy mass.” This means the dough should just barely hold together, with a few craggy bits still visible. If the dough looks smooth and perfectly uniform in the bowl, you have likely over-mixed it. Stop the moment the flour streaks disappear to ensure a light, flaky texture.
Phase 1: The Grated Butter Technique
Hold your frozen stick of butter with a piece of the wrapper to keep your hand heat away from the fat. Grate it directly into the bowl of flour using the large holes of a box grater. Every few seconds, stop and toss the butter shreds with a fork so they don’t clump together.
You want each individual shred of butter to be “insulated” by a coating of flour. This prevents the butter from merging into one large mass. Once all the butter is in, the mixture should look like coarse crumbs or wet sand, with visible bits of butter throughout.
Phase 2: Incorporating the Mix-ins Without Crushing
Add your chopped pistachios and cranberries after the butter is incorporated but before the liquid goes in. Use a large spatula to fold them in gently. You want to distribute them evenly without pressing down on the dough, which could flatten those delicate butter shreds.
Think of this as a light “lifting” motion rather than a stirring motion. By adding the mix-ins now, you ensure they are evenly suspended in the flour. This prevents them from all sinking to the bottom of the scone during the baking process.
Phase 3: The Drop-Style Shaping Advantage
Use a large cookie scoop or a 1/3 cup measure to portion the dough onto your baking sheet. Don’t worry about making them look perfect; the craggy, uneven surface is exactly what you want. These “nooks and crannies” create more surface area for the oven’s heat to crisp up.
Furthermore, these irregular surfaces are perfect for catching the glaze later on. Instead of the glaze sliding off a smooth surface, it will pool in the little valleys of the scone. This creates a beautiful, professional look and ensures every bite has a hit of sweet vanilla icing.
The “Cold Shock” and Baking Protocol
Once your scones are shaped on the tray, put the entire tray into the freezer for 15 minutes. This is the most important step for preventing a soggy bottom. This “cold shock” firms up the butter shreds so they don’t melt the instant they feel the heat of the oven.
When the chilled dough finally hits the 400°F air, the outside sets quickly while the inside begins its dramatic steam-powered rise. This creates a sturdy base that can support the weight of the scone without collapsing or becoming greasy. It’s the difference between a professional pastry and a flat, heavy biscuit.
Calibrating Your Oven for a Golden Base
Position your oven rack in the middle-upper third of the oven. This allows the hot air to circulate around the tops of the scones for browning while preventing the bottoms from burning. Use a heavy-gauge baking sheet if possible, as thin sheets can warp and cause uneven cooking.
Parchment paper is your best friend here. Unlike silicone mats, which can sometimes trap moisture and lead to a softer base, parchment paper allows for a dry heat environment. This ensures the bottoms of your scones become firm, toasted, and perfectly crisp.
Achieving the Perfect Opaque Vanilla Glaze
A great glaze should be thick enough to sit on top of the scone rather than soaking into it. If your glaze is too thin, it will disappear into the crumb, making the scone mushy. You are looking for a consistency that resembles heavy glue or thick maple syrup.
Use the “15-second rule” to test your glaze. Drizzle a bit of the glaze back into the bowl; it should take about 15 seconds for the trail to completely disappear. If it vanishes instantly, add more powdered sugar. If it sits on top forever, add a few more drops of milk.
Timing the Drizzle for Maximum Adhesion
Wait until the scones are just barely warm to the touch before glazing. If the scones are piping hot, the glaze will melt and run right off onto the parchment paper. If they are completely cold, the glaze won’t “bond” to the surface and might flake off later.
Target that “sweet spot” of warmth where the scone is comfortable to hold. Drizzle the glaze generously and immediately sprinkle the remaining pistachios on top. The slight warmth helps the glaze set into a beautiful, opaque shell that locks in the moisture of the scone.
Troubleshooting Common Scone Failures
If your scones spread into flat pancakes, your butter was likely too warm or your oven wasn’t fully preheated. Always use a thermometer to verify your oven temperature, as many home ovens run cool. Also, never skip the 15-minute freezer rest!
A tough, bread-like texture is almost always the result of over-mixing. Remember, the dough should look messy and shaggy when you stop mixing. If you see pale, soft bottoms, your baking sheet might be too thin, or you may need to move the rack down one level for the last few minutes of baking.
Finally, if you notice a bitter aftertaste, check the expiration date on your baking powder. Old leavening agents can lose their potency and leave behind a metallic flavor. Also, ensure your pistachios are fresh, as the oils in nuts can turn rancid over time if not stored in a cool, dark place.
Make-Ahead Strategies and Storage
You can easily prep these in advance by freezing the raw dough mounds on a tray. Once they are frozen solid, transfer them to a freezer-safe bag. When you’re ready for a fresh scone, just bake them straight from the freezer, adding 2-3 minutes to the total baking time.
For baked scones, store them in an airtight container at room temperature for up to two days. To restore that “just-baked” crunch, pop them into a 350°F oven for about 5 minutes. Avoid the microwave, as it will turn the crisp exterior soft and rubbery.
Expert Tips for Flavor Customization
While the pistachio and cranberry combo is a classic, you can easily tweak the flavor profile. Try rubbing fresh orange zest into the sugar before mixing the dough. The citrus oils pair beautifully with the tart cranberries and add a bright aroma to every bite.
For a more sophisticated twist, add a half-teaspoon of ground cardamom to the dry ingredients. Cardamom has a floral, spicy quality that elevates the nuttiness of the pistachios. These small additions can make the recipe feel entirely new without changing the fundamental technique.
Pairing Suggestions for Morning Service
These scones are rich enough to stand on their own, but they are incredible when served with a dollop of clotted cream or high-quality salted butter. The extra fat complements the lean, fruity interior of the scone perfectly.
The salty-sweet profile of the pistachio and glaze pairs wonderfully with a dark roast coffee or a robust herbal tea. If you’re serving these for a brunch, a side of sharp fruit preserves, like raspberry or apricot, can provide an extra layer of tartness that cuts through the buttery crumb.
How should I store leftover scones to keep them from getting soft?
Store your scones in an airtight container at room temperature for up to 48 hours. To prevent the glaze from making the scone soft, place a piece of parchment paper between layers. For the best texture, always reheat them in a 350°F oven for 5 minutes before eating to crisp up the edges again.
Why did my scones turn out dry and crumbly instead of flaky?
Dry scones usually happen if you measured the flour by scooping the measuring cup directly into the bag, which packs the flour down and adds too much to the recipe. Instead, spoon the flour into the cup and level it off. Additionally, ensure you are using heavy cream; using a lower-fat milk will result in a much drier, less tender crumb.
Can I use frozen cranberries instead of dried ones?
It is best to stick with dried cranberries for this specific recipe. Frozen berries release a lot of moisture as they bake, which can interfere with the “Anti-Soggy Bottom” goal and lead to purple streaks in your dough. If you must use frozen, do not thaw them first, and toss them in a tablespoon of flour before adding them to the mix.
What is the best substitute for heavy cream?
If you don’t have heavy cream, the best substitute is a mixture of 1/4 cup melted butter and 3/4 cup whole milk, though this can be tricky to keep cold. A better option is full-fat canned coconut milk or even Greek yogurt thinned with a little milk. However, for the absolute best “shatter-crisp” texture, heavy cream is highly recommended.
My dough is very sticky and hard to handle, what did I do wrong?
Sticky dough usually means the butter has started to melt or the environment is too warm. If the dough feels tacky, don’t add more flour! Instead, pop the entire bowl into the fridge for 10 minutes to firm up the fats. Using the “drop scone” method with a scoop helps you avoid touching the dough, which keeps it from sticking to your hands.
Can I make these scones gluten-free?
Yes, you can substitute the all-purpose flour with a high-quality 1:1 gluten-free flour blend that contains xanthan gum. Be aware that gluten-free dough often requires a bit more moisture, so you might need an extra tablespoon of cream. The texture will be slightly more “shortbread-like” but still delicious.
Scones
Course: Breakfast and BrunchCuisine: AmericanDifficulty: easy8
scones20
minutes18
minutes350
kcal38
MinutesThese scones are designed to be tall, airy, and perfectly crisp. By using frozen grated butter and a cold-shock freezing step before baking, you achieve a professional flaky texture complemented by tart cranberries, crunchy pistachios, and a sweet vanilla glaze.
Ingredients
2 cups all-purpose flour
1/3 cup granulated sugar
1 tablespoon baking powder
1/2 teaspoon salt
1/2 cup unsalted butter, frozen
1/2 cup heavy cream, cold (plus 1 tbsp for brushing)
1 large egg
1/2 cup dried cranberries
1/2 cup shelled pistachios, roughly chopped
1 cup powdered sugar
1.5 tablespoons whole milk
1/2 teaspoon vanilla extract
Directions
- To prevent the dreaded soggy bottom, start by placing your stick of butter in the freezer for at least 30 minutes before starting. Cold fat is the only way to achieve the steam pockets needed for a flaky lift.
- Preheat your oven to 400°F (200°C) and line a heavy baking sheet with parchment paper.
- In a large bowl, whisk together the flour, sugar, baking powder, and salt.
- Use a box grater to grate the frozen butter directly into the flour mixture. This is the secret to perfect texture. Toss the butter shreds lightly with a fork until coated. Do not use your hands, as body heat will melt the butter and cause a dense, gummy result.
- Stir in the cranberries and 1/4 cup of the chopped pistachios.
- In a small bowl, whisk the cold heavy cream and egg together. Pour this into the flour mixture.
- Use a spatula to fold the dough just until it comes together. Over-mixing develops gluten, which leads to tough scones. If the dough looks slightly shaggy and craggy, it is perfect.
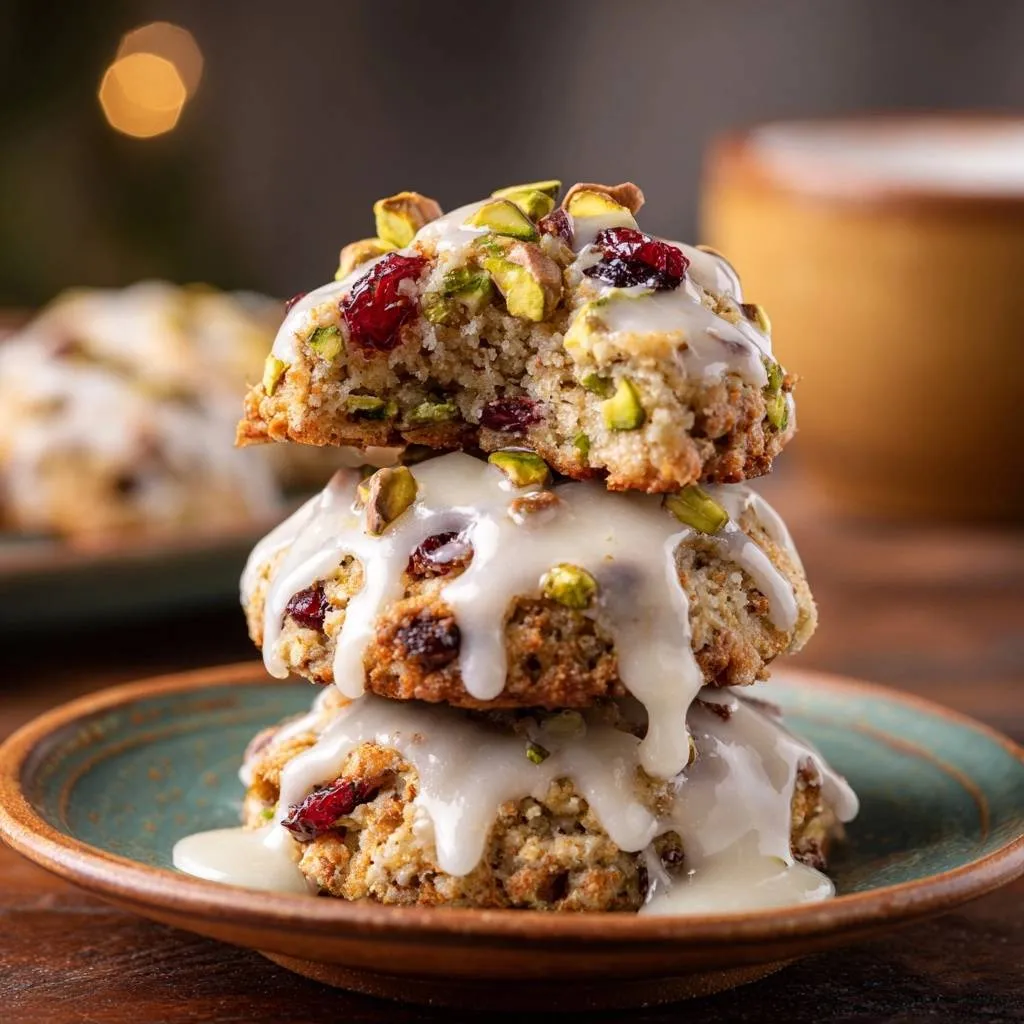
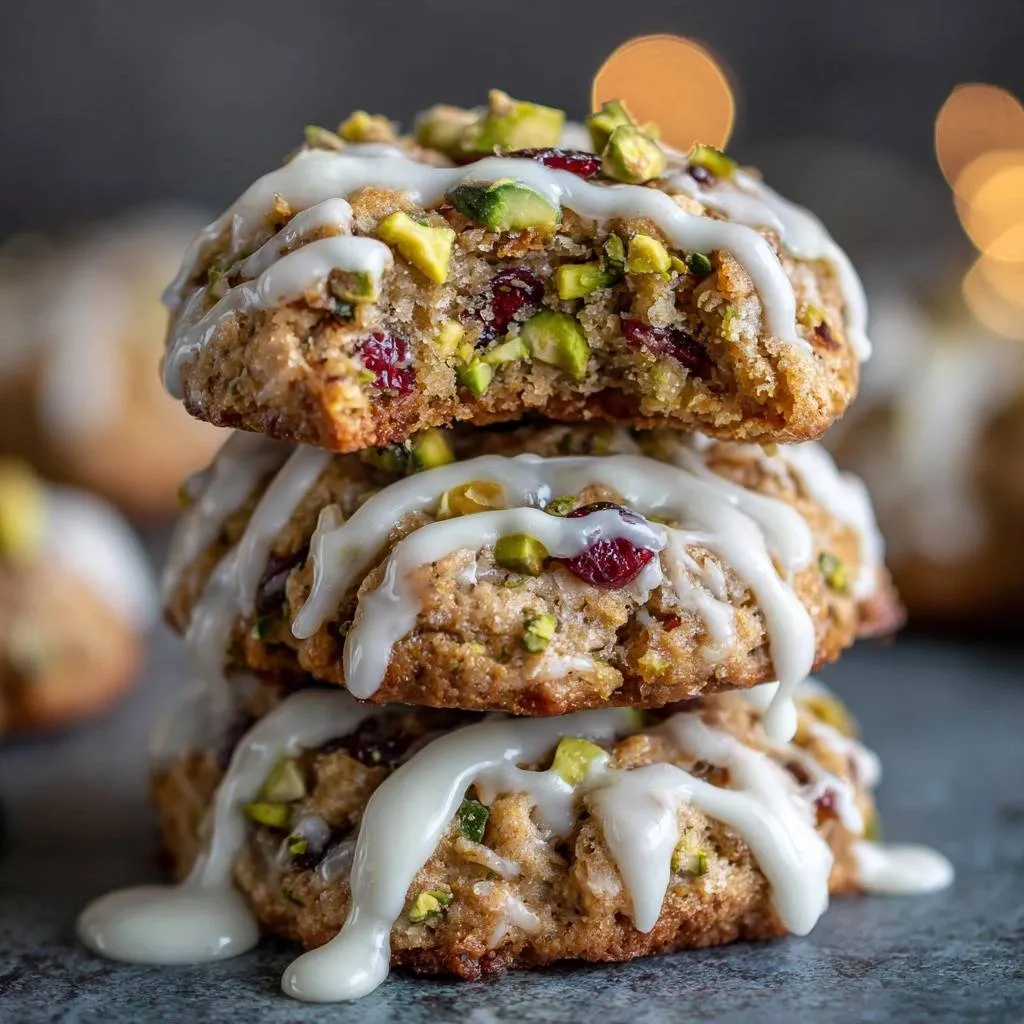
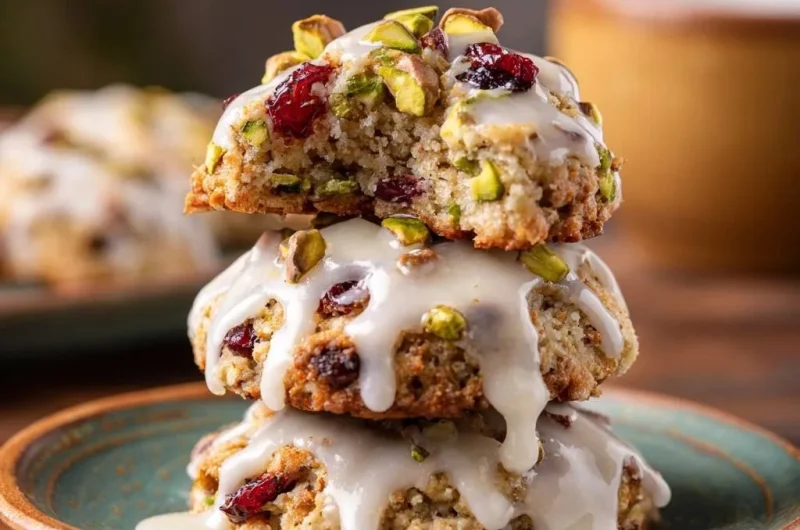
- Instead of rolling and cutting, use a large cookie scoop or a 1/3 cup measure to drop mounds of dough onto the prepared baking sheet. This “drop scone” method creates the craggy, textured surface seen in the image, which allows the glaze to pool beautifully.
- Place the tray in the freezer for 15 minutes. This “cold shock” ensures the butter remains solid until it hits the oven heat, preventing the scones from spreading into flat puddles.
- Lightly brush the tops with a teaspoon of heavy cream and bake for 18 to 20 minutes until the edges are deeply golden and the bottoms are firm and toasted.
- While cooling, whisk the powdered sugar, milk, and vanilla to create a thick, opaque glaze.
- Once the scones are slightly warm but not hot, drizzle the glaze generously over the tops, allowing it to drip down the craggy sides. Immediately top with the remaining chopped pistachios so they stick to the wet glaze. The glaze will set as they cool, locking in moisture while maintaining the crisp exterior.
Notes
- The secret to the perfect texture is using a box grater for the frozen butter and avoiding hand contact to keep the fat cold. The 15-minute freezer rest before baking is essential to prevent spreading.