You know that feeling when you pull a tray of cookies out of the oven, only to find they’ve melted into a single, flat puddle? It’s heartbreaking, especially when you’re aiming for those beautiful, tall thumbprints you see in high-end bakeries. Most shortbread recipes rely on luck, but these Glazed Raspberry Thumbprint Cookies are engineered for structural perfection.
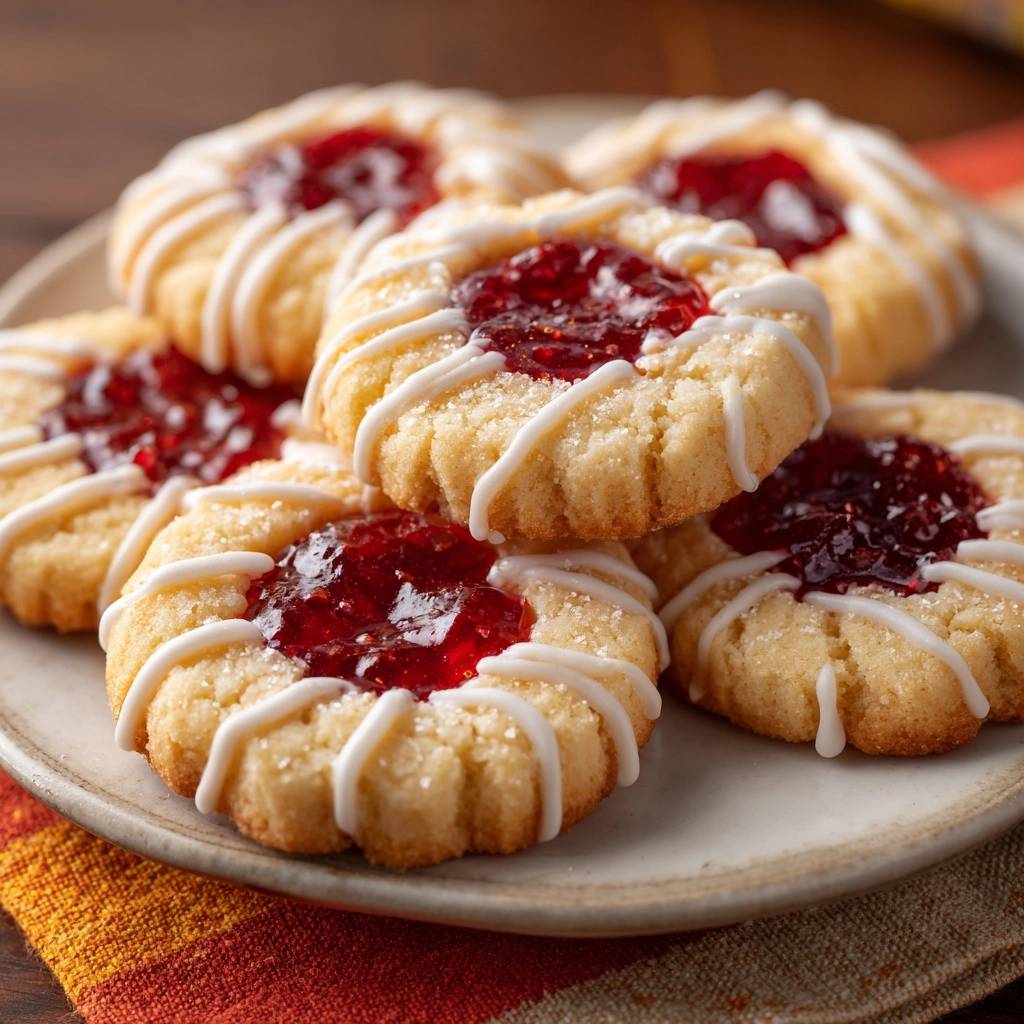
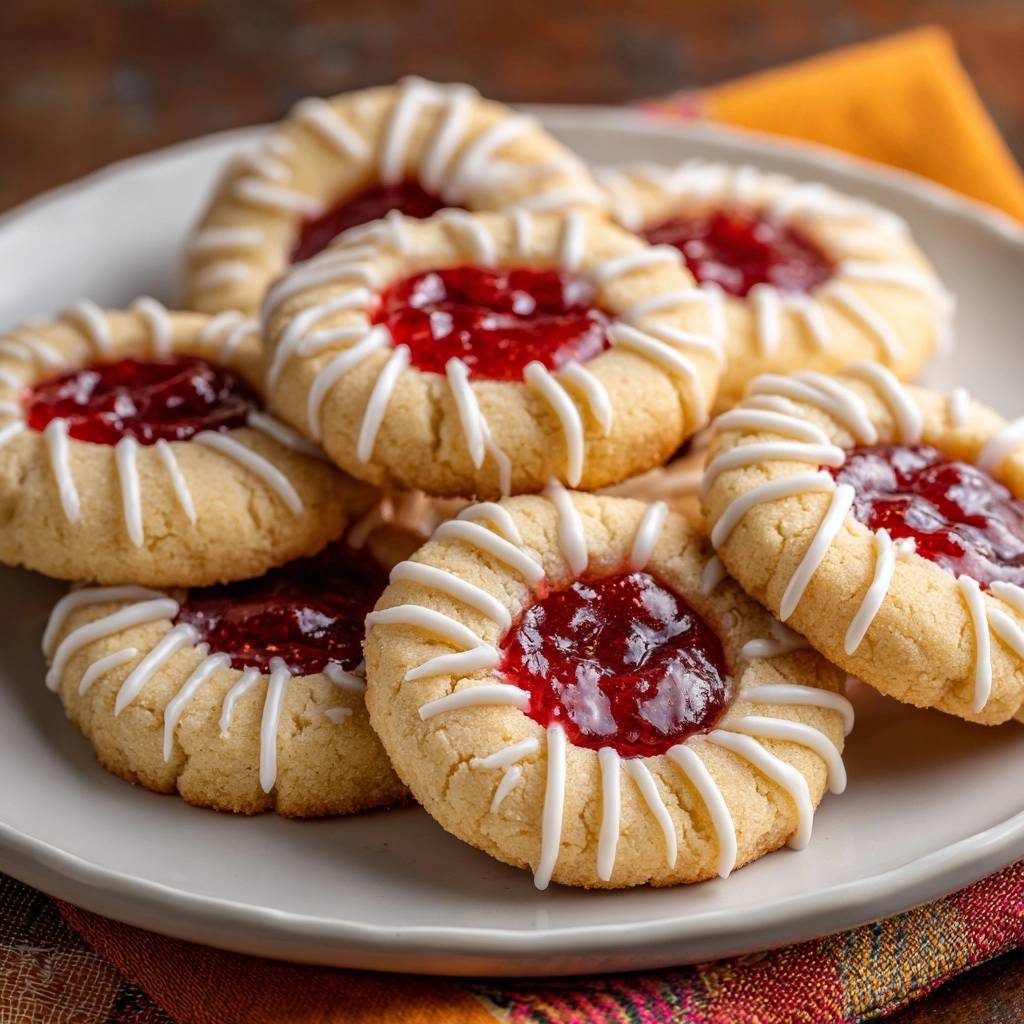
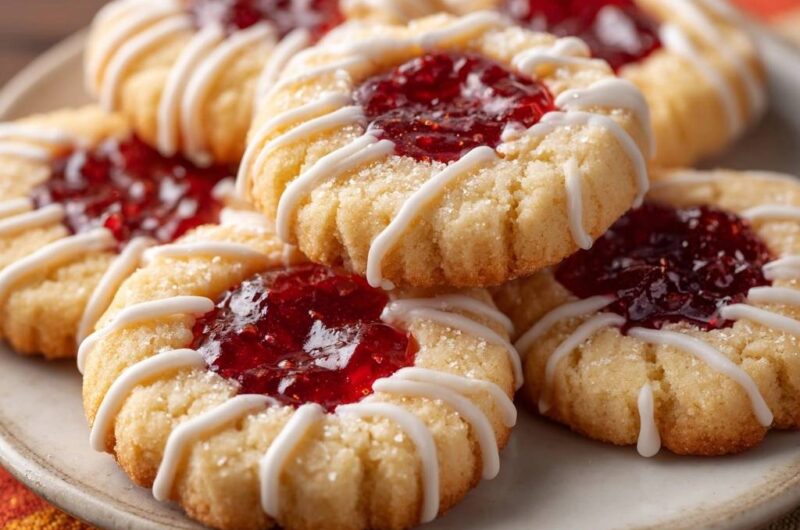
The secret to this recipe lies in the contrast between the buttery, crisp base and the bright, tart raspberry center. We aren’t just making a cookie; we’re creating a miniature pastry with a professional fluted aesthetic. By using a specific double-indentation technique and a fork-crimping method, you get a cookie that looks as good as it tastes.
I’ve found that the real trick to success is the temperature of your fat. If your butter is too warm when it hits the oven, the cookies will lose their shape instantly. We solve this with a strategic “flash freeze” that locks the dough in place. This ensures those vertical ridges stay sharp and the center remains deep enough to hold a generous pool of jam.
Essential Components for Glazed Raspberry Thumbprint Cookies
Quality ingredients are the backbone of any shortbread-style cookie. Firstly, you must use unsalted butter. This allows you to control the exact amount of salt in the dough, ensuring the flavor remains sweet and creamy rather than accidentally salty. Make sure it’s softened just enough to cream, but not so warm that it’s oily.
All-purpose flour provides the necessary protein structure to hold those fluted edges. In addition, the granulated sugar coating isn’t just for sparkle; it adds a crucial crunch that contrasts with the soft jam. Therefore, don’t skip the step of rolling the dough balls in extra sugar before you shape them.
For the filling, high-quality seedless raspberry preserves are a must. Seedless varieties offer a much smoother mouthfeel and a cleaner look. Finally, the almond extract in the glaze is the “secret” ingredient. While vanilla is great, almond extract provides that classic “wedding cake” aroma that pairs perfectly with tart berries.
For more fruity goodness, see these blueberry biscuits with glaze.
The Role of the Egg Yolk
You might wonder why we’re ditching the egg white. The yolk is pure fat and lecithin, which creates a tender, “short” texture that melts in your mouth. However, adding the white would introduce water and protein that could make the cookie tough or cakey. By using only the yolk, we ensure the base remains rich and crumbly, exactly like a premium shortbread should be.
The Science of Preventing Cookie Spread
Cookie spread happens when the butter melts before the flour structure has a chance to set. In a 350°F oven, standard dough often collapses under its own weight. To combat this, we use the “Flash Freeze” technique. By placing the shaped dough in the freezer for 15 minutes, you significantly lower the starting temperature of the fat molecules.
This extra step gives the flour and egg yolk time to firm up and create a solid “wall” before the butter reaches its melting point. Consequently, the cookies hold their tall, fluted height instead of slumping outward. It’s a simple bit of physics that makes the difference between a professional-looking treat and a flat mess.
Step-by-Step: Mixing and Shaping the Dough
Start by creaming your butter and sugar until the mixture looks pale and fluffy. You’ll know it’s ready when it looks like whipped frosting and you can no longer feel large grains of sugar. Afterward, beat in your yolk and extracts. When you add the flour, mix just until the white streaks disappear. Overmixing at this stage develops gluten, which will make your cookies hard.
The dough should feel firm and pliable, almost like playdough. If it feels sticky or greasy, your kitchen might be too warm; just pop the bowl in the fridge for ten minutes. Roll the dough into uniform 1-inch balls. Consistency is key here because different sizes will bake at different rates, leading to some burnt edges and some raw centers.
Creating the Signature Fluted Edge
Instead of using your thumb, which can be inconsistent, use the back of a rounded measuring spoon to press the well. This creates a perfectly circular, deep reservoir for the jam. To get that professional look, take a fork and gently press the tines downward around the perimeter. This creates beautiful vertical ridges. If the dough cracks slightly, just pinch it back together with your fingers before freezing.
The Two-Stage Baking and Filling Process
We bake these cookies in two stages to ensure the best texture. Firstly, bake the plain dough for 10 minutes. You’ll notice the centers puff up slightly as the air in the dough expands. Therefore, you must remove the tray and quickly re-press the centers with your measuring spoon. This creates a permanent home for the preserves.
Next, fill each well with about a half-teaspoon of jam. Return them to the oven for the final 4 minutes. This short burst of heat “sets” the preserves by evaporating a bit of the moisture. This prevents the jam from soaking into the cookie base, keeping the shortbread crisp and the raspberry center bright and tacky rather than runny.
Achieving a Professional Radial Glaze Pattern
The glaze needs to be thick—think the consistency of toothpaste rather than maple syrup. If it’s too thin, it will just run off the cookie and disappear. Use a heavy cream or milk to thin the powdered sugar slowly, one drop at a time. Once it’s ready, transfer it to a small plastic bag and snip off a tiny corner.
To get that bakery-style radial pattern, start from the center of the jam and drizzle outward toward the edges. Move your hand in a steady, back-and-forth motion. This highlights the fluted ridges we worked so hard to create. Let the glaze sit for at least 20 minutes so it can develop a thin “crust” before you try to stack or serve them.
Troubleshooting Common Shortbread Obstacles
If your dough cracks significantly when you press the well, it’s likely too cold or a bit too dry. Simply let it sit at room temperature for five minutes or work the ball in your hands to warm it up before pressing. On the other hand, if your glaze looks translucent, you need more powdered sugar. A good glaze should be bright white and opaque.
Watch out for oven hot spots, too. Since these cookies have a high sugar content on the outside, they can brown quickly. If you notice one side of the tray getting darker than the other, rotate the pan halfway through the first 10 minutes of baking. This ensures every cookie has that perfect, golden-sandy hue.
Storage Solutions and Make-Ahead Instructions
These cookies stay fresh at room temperature for about 3 to 4 days if kept in an airtight container. However, you should store them in a single layer. If you must stack them, place a sheet of parchment paper between the layers to protect the delicate glaze and jam centers. They don’t require refrigeration, which can actually make the shortbread go soft.
If you want to plan ahead, you can freeze the unbaked, shaped dough balls (without the jam). When you’re ready for a fresh batch, just bake them straight from the freezer, adding a couple of extra minutes to the initial bake time. This is a fantastic way to have “on-demand” treats for unexpected guests or late-night cravings.
Expert Baking Troubleshooting
Can I use frozen raspberries instead of preserves?
No, I don’t recommend using fresh or frozen berries. They release too much moisture as they cook, which will turn your crisp shortbread into a soggy mess. High-quality preserves have already been reduced, meaning the flavor is concentrated and the moisture content is low enough to keep the cookie base crunchy.
Why did my sugar coating melt during baking?
This usually happens if the dough was over-handled or if your kitchen is very humid. If the butter starts to leak out of the dough before it hits the oven, it dissolves the sugar. To prevent this, make sure you follow the 15-minute flash-freeze step strictly. This keeps the butter solid and the sugar crystals intact for that signature sparkle.
Can I substitute the almond extract in the glaze?
Absolutely. While almond is traditional for that professional flavor profile, you can use vanilla extract for a more mellow taste. If you want something brighter, try a teaspoon of fresh lemon zest in the dough and a little lemon juice in the glaze. Just remember that almond extract is much stronger than vanilla, so adjust your measurements accordingly.
My cookies are still spreading; what happened?
If your cookies are still losing their shape, your oven might be running cool. If the oven isn’t hot enough, the butter melts slowly and leaks out before the flour can set. I suggest using an oven thermometer to check your calibration. Also, ensure you aren’t skipping the freezer step; those 15 minutes are vital for stabilizing the fats.
How do I store leftovers so they don’t get soft?
The best way to keep them crisp is to store them in a cool, dry place in an airtight container. Avoid the refrigerator, as the humidity can make the sugar coating weep and the jam get sticky. If they do soften up, you can pop them in a 300°F oven for 2 or 3 minutes to crisp the edges back up, though the glaze may melt slightly.
Why is my glaze too runny or disappearing?
This happens when the cookies are still too warm when you apply the glaze, or the glaze itself has too much liquid. Ensure the cookies are completely cool to the touch. When mixing the glaze, add your liquid half a teaspoon at a time. It should be thick enough that a ribbon dropped from a spoon holds its shape for several seconds.
Raspberry Thumbprint Cookies
Course: DessertCuisine: AmericanDifficulty: medium24
cookies25
minutes14
minutes155
kcal39
MinutesA professional-style thumbprint cookie that uses a flash-freezing technique and double-indentation process to ensure the cookies maintain their shape and height. These treats are rolled in sugar, filled with seedless raspberry preserves, and finished with a radial almond glaze drizzle.
Ingredients
1 cup unsalted butter, softened
2/3 cup granulated sugar (plus 1/4 cup extra for rolling)
1 large egg yolk
1 teaspoon vanilla extract
1/4 teaspoon salt
2 1/4 cups all-purpose flour
1/2 cup high-quality seedless raspberry preserves
1 cup powdered sugar
1 tablespoon heavy cream or milk
1/2 teaspoon almond extract
Directions
- Cream the butter and 2/3 cup granulated sugar in a large bowl until pale and fluffy. Beat in the egg yolk, vanilla extract, and salt.
- Gradually add the flour, mixing just until a stiff dough forms. If the dough feels too soft, add 2 more tablespoons of flour; it must be firm enough to hold a shape.
- Roll the dough into 1-inch balls. Roll each ball in the extra 1/4 cup of granulated sugar until evenly coated.
- Place balls on a parchment-lined baking sheet. Use the back of a rounded measuring spoon to press a deep well into the center.
- To achieve the visual fluted edge: Use the tines of a fork to gently press downward around the perimeter of each cookie, creating the vertical ridges seen in the image.
- The No-Spread Secret: Place the tray of shaped dough in the freezer for exactly 15 minutes. This flash-freezes the butter, ensuring the cookies hold their tall, fluted height rather than melting outward.
- Preheat your oven to 350°F (175°C) while the dough chills.
- Remove from the freezer and bake for 10 minutes. Remove the tray and quickly use the measuring spoon to re-press the centers, as they will have puffed slightly.
- Fill each center with a generous half-teaspoon of raspberry preserves. Return to the oven for 4 more minutes to set the jam.
- Let the cookies cool completely on the pan.
- Whisk together the powdered sugar, cream, and almond extract to create a very thick, pipeable glaze. Transfer to a piping bag or small plastic bag with the corner snipped.
- Drizzle the glaze in a clean, radial pattern from the center toward the edges to match the visual style. Let the glaze set for 20 minutes before serving.
Notes
- The secret to the fluted edges is using fork tines to crimp the perimeter and freezing the dough for 15 minutes before baking to prevent spreading. Ensure the glaze is thick enough to hold its shape when piped.