Nothing ruins a holiday meal faster than a mushy, paste-like stuffing. Most recipes fail because they use soft bread or too much liquid, resulting in a heavy mess that lacks character. We’ve all been there, staring at a side dish that looks more like mashed potatoes than the vibrant, textured bread pudding it’s supposed to be.
Golden Cornbread and Herb Stuffing is the ultimate solution to the “mushy stuffing” epidemic. Cornbread offers a sturdy, porous structural base that stands up to broth much better than standard white bread. It provides a beautiful balance of savory herbs and a hint of sweetness that complements any festive spread.
The goal here is a specific contrast: a crunchy, toasted exterior that shatters slightly when you bite into it, paired with a savory, moist interior. The secret is the double-toast technique. By drying the bread out completely before it ever touches the liquid, you create a sponge that absorbs flavor without losing its shape.
The Science of the Anti-Soggy Technique
To understand why stuffing often fails, you have to look at the physics of bread saturation. When you pour broth over fresh or even “stale” bread, the moisture immediately collapses the air pockets in the crumb. This turns the starches into a gummy paste that never recovers, no matter how long you bake it.
Toasted bread is fundamentally different because the heat creates a moisture barrier. By baking the cubes at a low temperature first, you are dehydrating the bread from the inside out. This makes the cubes rigid and thirsty, allowing them to soak up the aromatic butter and broth while maintaining their individual integrity.
Therefore, the double-toast method is your best friend for texture. The first bake removes the water, and the second bake (uncovered) creates the Maillard reaction. This chemical reaction between amino acids and reducing sugars is what gives the top of your stuffing those deep, golden-brown peaks and incredible toasted flavor.
Why Cornbread Requires Specific Handling
Cornbread has a much more delicate and porous crumb structure than sourdough or brioche. Because it is naturally more crumbly, you must cut it into generous 1-inch cubes. Smaller pieces will simply disintegrate during the mixing process, leaving you with a bowl of wet crumbs instead of distinct bites.
In addition, you must use a gentle folding technique when incorporating your ingredients. Think of it like folding egg whites into a cake batter. You want to lift the cubes from the bottom of the bowl and turn them over, rather than stirring vigorously, to keep those beautiful golden squares intact.
Essential Components for Golden Cornbread and Herb Stuffing
Quality ingredients are the backbone of this dish, starting with the onions. Use yellow onions for their high sugar content, which provides a lovely sweetness once sautéed. I prefer a large dice for the vegetables to match the size of the bread cubes, ensuring you get a bit of everything in every forkful.
Celery and carrots add the essential “mirepoix” crunch and earthy depth. However, make sure your carrot coins are sliced relatively thick. If they are too thin, they will disappear into the mix; if they are too thick, they won’t soften in time. Aim for a uniform size across all your aromatics for even cooking.
Fresh vs. Dried Herb Ratios
Fresh herbs are non-negotiable if you want to avoid that “dusty” flavor found in pre-packaged poultry seasonings. Sage provides that classic holiday aroma, while rosemary adds a piney, resinous backbone. Parsley brings a necessary brightness that cuts through the richness of the butter.
If you absolutely must use dried herbs, remember the 1:3 ratio rule. Since dried herbs are more concentrated, you only need one teaspoon of dried herbs for every tablespoon of fresh. However, the texture of fresh leaves mixed into the golden bread is part of what makes this dish look so professional.
Selecting the Right Broth and Binder
The egg is the unsung hero of this recipe, acting as a protein binder that provides lift. Without it, the stuffing can feel dense and heavy. The egg helps the mixture “set” in the oven, creating a light, airy texture that feels more like a savory bread pudding than a pile of wet bread.
Furthermore, always reach for low-sodium chicken or vegetable broth. This gives you total control over the seasoning profile. You can always add more salt, but you can’t take it away once the bread has soaked it up. This ensures the herbs and the natural sweetness of the corn stay front and center.
Phase One: Dehydrating the Cornbread Base
Start by preheating your oven to 300 degrees F. This low temperature is key because you want to dry the bread, not brown it yet. Spread your 1-inch cornbread cubes across two large baking sheets. Overcrowding the pan will trap steam, which is exactly what we are trying to avoid.
Bake for about 20 to 25 minutes. You’ll know they are ready when the cubes feel dry and firm to the touch, almost like a soft crouton. They shouldn’t be rock hard, but they should no longer feel squishy. This step is the most important part of the entire process for preventing a soggy bottom.
Phase Two: Building the Aromatic Foundation
While the bread is drying, melt your butter in a large skillet over medium heat. It’s tempting to crank up the heat, but keeping it at medium prevents the butter from browning too quickly. You want the vegetables to sweat and soften slowly, releasing their natural juices into the fat.
Sauté the onions, celery, and carrots for about 8 to 10 minutes. You aren’t looking for a deep sear here; you want the onions to be translucent and the carrots to be tender-crisp. Once the herbs hit the hot butter in the final minute, the aroma in your kitchen will be absolutely incredible.
Phase Three: The Gentle Incorporation Method
This is the most critical moment for maintaining texture. Place your dried cornbread cubes into a massive mixing bowl—larger than you think you need. Pour the buttery vegetable mixture over the top and use a large spatula to gently toss the ingredients together until the bread is coated.
Slowly drizzle your broth and egg mixture over the bowl while continuing to toss. Stop as soon as the bread looks moistened but before you see any liquid pooling at the bottom of the bowl. The bread should look hydrated and plump, but it should still hold its cube shape perfectly.
For a deeply satisfying meal perfect for a chilly evening, explore the secrets to hearty slow-cooked beef stew.
Phase Four: The Two-Stage Baking Process
We use a “Steam and Crisp” method to get the best of both worlds. First, cover the baking dish tightly with foil and bake at 350 degrees F for 20 minutes. This traps the moisture and allows the egg binder to set, ensuring the interior of the stuffing is tender and fully cooked through.
For the final 20 to 25 minutes, remove the foil. This is where the magic happens. The dry heat of the oven will crisp up the top layer of bread cubes, creating those coveted crunchy bits. You are looking for a deep, golden-brown color on the edges and a fragrant, toasted smell.
Troubleshooting Common Stuffing Failures
If your stuffing looks too dry before it goes into the oven, don’t panic. Simply drizzle an extra quarter-cup of broth over the top. Cornbread dryness can vary depending on whether it was store-bought or homemade, so use your eyes as the ultimate judge. It should look like a damp sponge, not a dry one.
On the flip side, if you accidentally added too much liquid, bake it uncovered for an extra 10 minutes. Also, keep in mind that ceramic baking dishes hold heat longer than metal ones. If you’re using a heavy ceramic dish, you might need a few extra minutes of bake time to get the center perfectly set.
Flavor Variations and Ingredient Swaps
This recipe is a fantastic canvas for variations. For a bit of crunch, try adding a half-cup of toasted pecans or walnuts during the mixing phase. If you love a sweet and savory contrast, dried cranberries or diced tart apples work beautifully with the sage and rosemary profile.
For an extra hit of umami, you can sauté a cup of sliced cremini mushrooms along with the onions and celery. Just make sure to cook the mushrooms until all their moisture has evaporated, or they might contribute to the sogginess we worked so hard to avoid. These additions keep the dish fresh and exciting.
Make-Ahead Strategies and Storage
Holiday cooking is all about timing, and you can definitely prep this in advance. You can cube and toast the cornbread up to two days early; just store the dried cubes in a sealed bag at room temperature. The vegetables can also be sautéed a day ahead and kept in the fridge.
However, do not combine the liquid broth and the dry bread until you are actually ready to put the dish in the oven. If the bread sits in the liquid for hours in the fridge, it will break down and become mushy. For the best results, mix the wet and dry components right before baking.
Expert Tips for the Perfect Holiday Table
To achieve extra crispy edges that everyone fights over, dot the top of the stuffing with small pieces of cold butter right before the final uncovered bake. As the butter melts, it basically “fries” the top layer of bread, creating an incredible golden crust that stays crunchy even under gravy.
Always let the stuffing rest for at least 5 minutes after taking it out of the oven. This allows the steam to settle and the flavors to meld. If you scoop into it immediately, the structure might crumble. A short rest ensures you get clean, beautiful servings that look great on the plate.
Using a wide, shallow 9×13 inch baking dish is better than using a deep, narrow one. A wider dish provides more surface area, which means more crispy top bits for everyone. If you prefer a softer stuffing, you can use a deeper dish, but the shallow pan is the secret to that “Golden” finish.
Pairing Your Herb-Forward Side Dish
This stuffing is the perfect partner for roasted poultry, but it also shines alongside a hearty root vegetable roast. The earthy rosemary and sage notes pair beautifully with roasted carrots, parsnips, or a savory mushroom gravy. It’s a versatile side that anchors the entire meal.
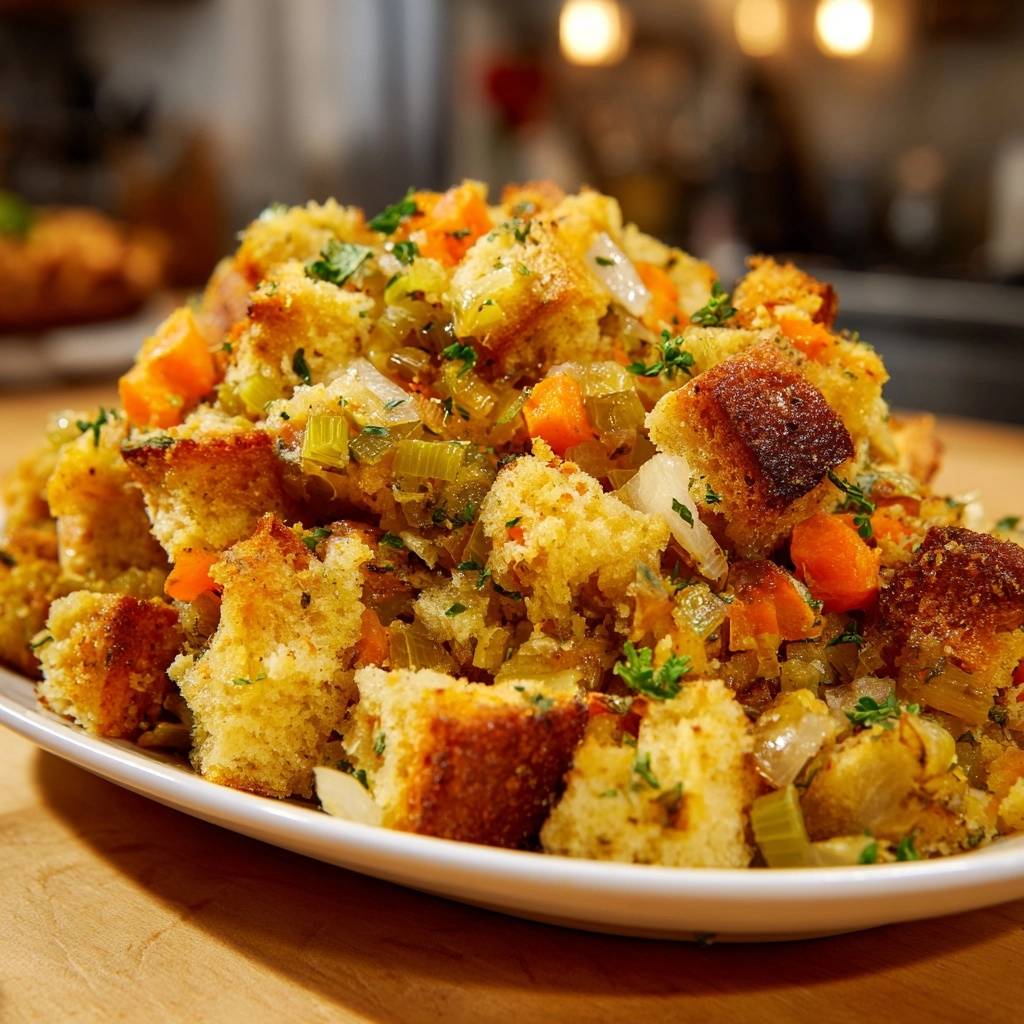
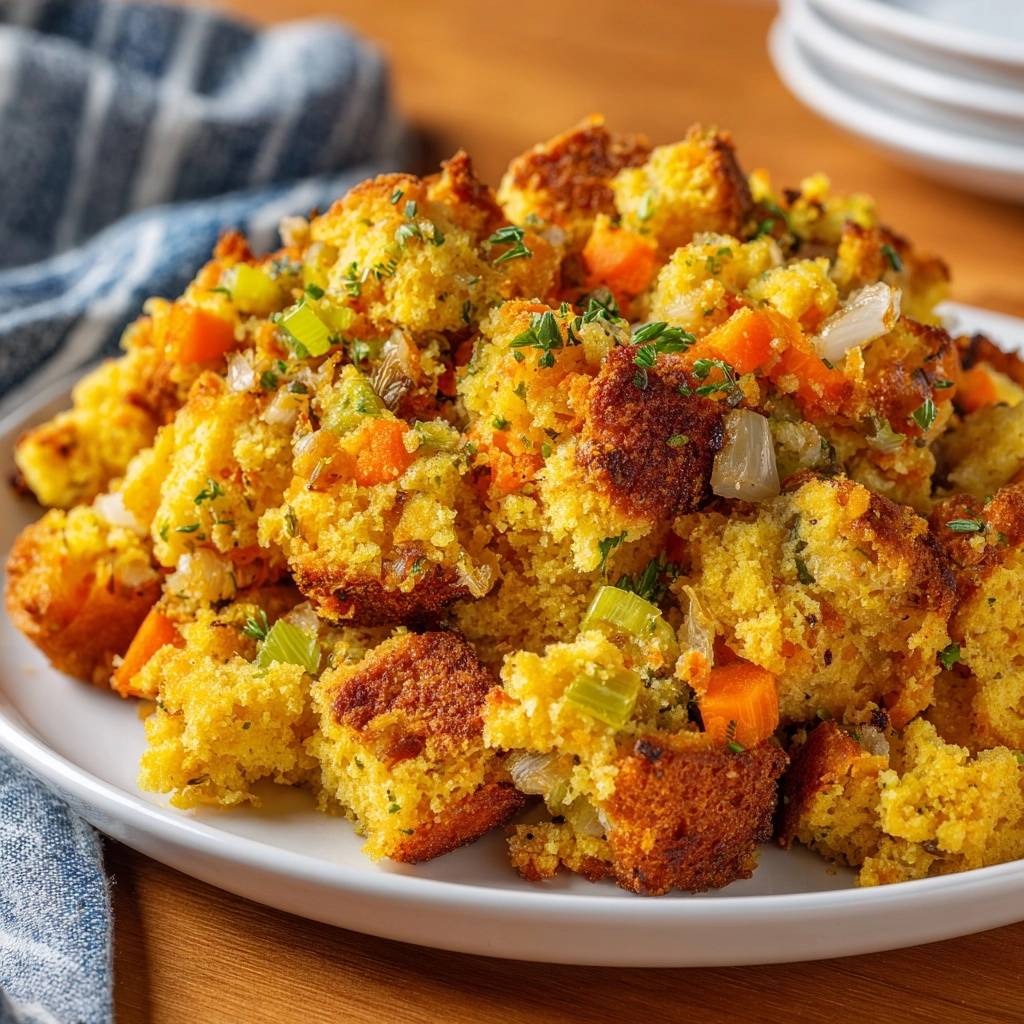
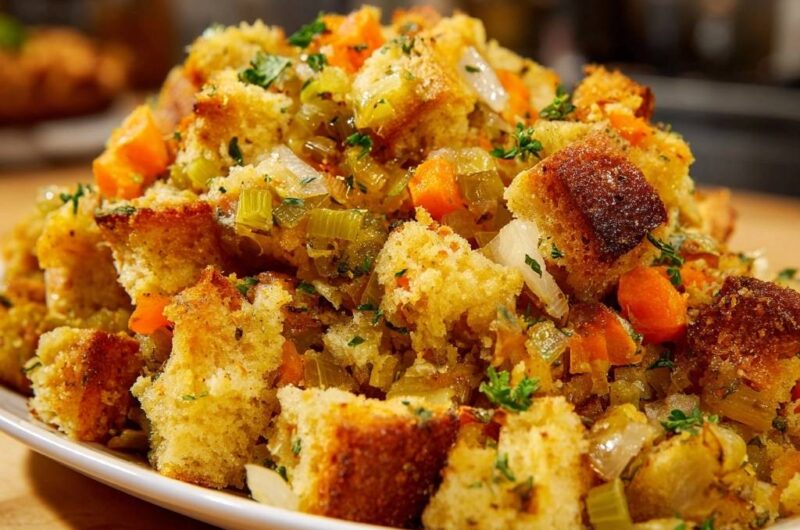
Before serving, hit the dish with a final sprinkle of fresh chopped parsley. The pop of bright green against the deep golden-brown bread makes the dish look vibrant and fresh. It’s a simple touch that signals to your guests that this isn’t just any ordinary stuffing—it’s the star of the show.
How should I store leftovers and does this freeze well?
Store any leftover stuffing in an airtight container in the refrigerator for up to 3 to 4 days. To reheat, place it in an oven-safe dish, splash a little extra broth over the top to prevent drying, and bake at 350°F until heated through. While you can freeze it for up to a month, the texture of cornbread can become slightly more crumbly after thawing, so it is best enjoyed fresh.
Why did my stuffing turn out dry even though I followed the recipe?
The most common reason for dry stuffing is the moisture content of the cornbread itself. Homemade cornbread is often moister than store-bought varieties. If your bread cubes seem to soak up the broth instantly and still feel hard, don’t be afraid to add an extra 1/2 cup of broth before baking. The cubes should feel like a damp, wrung-out sponge before they go into the oven.
Can I use a different type of bread if I don’t have cornbread?
Yes, you can substitute a sturdy bread like sourdough or a French loaf, but the flavor profile will change. If you use white bread, ensure you follow the toasting step strictly, as these breads are even more prone to becoming mushy than cornbread. Avoid using soft sandwich bread, as it lacks the structural integrity needed for this specific technique.
What can I use instead of chicken broth to keep it vegetarian?
A high-quality vegetable broth is a perfect 1:1 substitute for chicken broth. For the best flavor, look for a “roasted” vegetable broth, which has a deeper, more savory profile that mimics the richness of meat-based stocks. You can also add a splash of soy sauce or a teaspoon of nutritional yeast to the vegetable broth to boost the umami depth.
My stuffing isn’t browning on top, what should I do?
If your stuffing is cooked through but lacks that golden crust, move your oven rack to the top position for the last 5 minutes of baking. You can also turn on the broiler for 1 to 2 minutes, but watch it very closely! The high sugar content in cornbread means it can go from perfectly golden to burnt in a matter of seconds.
Cornbread Stuffing
Course: Side DishCuisine: AmericanDifficulty: medium8
servings20
minutes45
minutes310
kcal65
MinutesThis recipe solves the common problem of mushy stuffing by using sturdy cornbread cubes and a specific drying process. Combined with fresh herbs, sautéed vegetables, and a light egg binder, it delivers a perfect texture and rich holiday flavor.
Ingredients
1 pound loaf of prepared cornbread (slightly sweet or savory), cut into 1-inch cubes
1/2 cup unsalted butter
2 cups diced yellow onion (large dice to match the image)
1.5 cups diced celery
1 cup diced carrots (thick coins or chunks)
2 tablespoons chopped fresh parsley
1 tablespoon chopped fresh sage
1 tablespoon chopped fresh rosemary
1 teaspoon salt
1/2 teaspoon black pepper
1.5 to 2 cups low-sodium chicken or vegetable broth
1 large egg, beaten
Directions
- The secret to avoiding sogginess starts with the bread. Preheat your oven to 300 degrees F. Spread the cornbread cubes in a single layer on two large baking sheets. Bake for 20 to 25 minutes until the cubes are dry to the touch and slightly toasted. This removes the moisture that causes gummy stuffing.
- While the bread toasts, melt the butter in a large skillet over medium heat. Add the onions, celery, and carrots. Saute for 8 to 10 minutes until the vegetables are tender but still hold their shape.
- Stir the parsley, sage, rosemary, salt, and pepper into the vegetable mixture. Cook for 1 minute until fragrant.
- Increase oven temperature to 350 degrees F. Place the dried cornbread cubes into a very large mixing bowl. Pour the vegetable and butter mixture over the bread and toss gently, being careful not to break the cubes.
- In a small bowl, whisk the egg into 1.5 cups of the broth. The egg acts as a binder to keep the stuffing light and airy rather than dense.
- Slowly drizzle the broth mixture over the bread while tossing. Stop as soon as the bread is moistened but not sitting in a pool of liquid. If the cornbread is particularly dry, add the remaining 1/2 cup of broth.
- Transfer the mixture to a greased 9×13 inch baking dish. Cover with foil and bake for 20 minutes to steam the interior.
- Remove the foil and bake for another 20 to 25 minutes. This final uncovered step is crucial for achieving those deep golden-brown, crispy edges shown in the photo. Serve immediately, garnished with extra fresh parsley.
Notes
- The secret to the texture is the initial 300 degree F bake which removes moisture from the bread cubes. Ensure you do not over-saturate the bread with broth; stop as soon as the cubes are moistened.