You know that disappointing, rubbery texture of a typical chicken breast? We’ve all been there, staring at a dry piece of poultry that requires a gallon of water just to swallow. This recipe changes that narrative forever by focusing on a high-heat sear and a luxurious butter-basting finish.
Imagine slicing into a golden, herb-crusted exterior to find meat so succulent it practically melts. When you pair that with a velvety, garlic-infused potato mash and caramelized carrots, you aren’t just making dinner; you’re creating a restaurant-quality experience right in your own kitchen. The aroma of sizzling thyme and garlic will fill your home before you even take the first bite.
The secret to this transformation lies in the “Arrosé” technique, a French method of spooning foaming butter over the meat. This doesn’t just add flavor; it creates a gentle, convective heat that finishes the chicken perfectly while keeping the fibers relaxed. Always pat your chicken bone-dry with paper towels before it hits the pan, as any surface moisture will steam the meat rather than sear it.
The Science of Succulent Herb Roasted Chicken
Achieving that deep, mahogany crust on your chicken involves the Maillard reaction. This chemical reaction between amino acids and reducing sugars occurs at high heat, creating hundreds of different flavor compounds. If your chicken is damp, the energy from the pan goes into evaporating water instead of browning the meat, leaving you with a grey, unappealing texture.
Once you achieve that crust, you must manage the internal temperature with precision. We pull the chicken off the heat at 160°F because of carry-over cooking. While the meat rests, the residual heat on the surface continues to travel inward, bringing the center to a safe and juicy 165°F without over-tightening the proteins.
Resting the meat for at least eight minutes is a non-negotiable step in this process. During cooking, the muscle fibers contract and push juices toward the center. If you cut it immediately, those juices will flood your plate. Resting allows the fibers to relax and reabsorb that moisture, ensuring every slice is consistently tender.
Essential Components for Herb Roasted Chicken and Garlic Mash
Quality ingredients are the backbone of this dish, starting with the potatoes. Yukon Golds are the undisputed champions here because they possess a naturally buttery flavor and a medium starch content. Unlike Russets, which can turn mealy, Yukon Golds create a dense, creamy mash that holds its shape while remaining incredibly smooth.
Fresh herbs are another critical factor that you shouldn’t compromise on. While dried herbs work in slow-cooked stews, the high-heat basting stage requires the volatile oils found in fresh thyme and parsley. These fresh aromatics infuse the butter without the dusty, bitter aftertaste that dried herbs can sometimes leave behind when fried.
Using unsalted butter is a strategic choice for the home cook. It allows you to season the chicken and the potatoes independently without the risk of the pan sauce becoming overly salty as it reduces. This control ensures that the garlic and herb flavors remain the stars of the show rather than being overshadowed by sodium.
Selecting the Right Poultry Cuts
When shopping, look for chicken breasts that are relatively uniform in size. If you have one breast that is significantly thicker than the others, it will remain raw in the middle while the smaller ones dry out. You can easily fix this by placing the chicken between pieces of plastic wrap and gently pounding the thickest part with a meat mallet or a heavy skillet.
Uniform thickness ensures that every piece reaches the 160°F mark at the same time. If you prefer not to pound the meat, you can butterfly the thicker breasts by slicing them halfway through the middle and opening them like a book. This increases the surface area for that delicious herb crust while shortening the cooking time.
The Role of High-Fat Dairy in Texture
We use heavy cream and butter for the mash because fat is the enemy of “gluey” potatoes. When you mash a potato, you break down starch granules. If you use a low-fat liquid like skim milk, those starches can easily bond together into a sticky, wallpaper-paste consistency.
The fat molecules in heavy cream coat the starch granules, preventing them from sticking to one another. This results in a luxurious, emulsified texture that feels light on the tongue despite its richness. Always warm your cream and butter before adding them to the potatoes to keep the temperature consistent and ensure a smooth blend.
Step-by-Step: Preparing the Garlic Mash and Carrots
Start your potatoes in cold, salted water rather than dropping them into a boiling pot. This ensures the outside of the potato doesn’t turn to mush before the center is cooked through. Once they are fork-tender, drain them thoroughly; any excess water left in the pot will dilute the flavor of your cream and butter.
While the potatoes simmer, focus on the carrots. Roasting them at 400°F is the sweet spot for caramelization. You’ll notice the edges start to turn dark brown and the texture becomes tender-crisp. This high heat coaxes out the natural sugars in the carrots, providing a sweet counterpoint to the savory garlic chicken.
The Butter-Basting Technique for Maximum Flavor
The butter-basting stage, or “Arrosé,” is where the magic happens. After flipping the chicken, you’ll drop in the butter, garlic, and herbs. Once the butter begins to foam and turn a light nutty brown, tilt your skillet slightly so the fat pools at the bottom edge. Use a large spoon to continuously drench the chicken in this liquid gold.
This technique does two things: it keeps the meat incredibly moist and it deeply infuses the crust with the flavor of toasted garlic and thyme. You should hear a gentle sizzling sound as the butter hits the meat. If the butter starts to smoke or turn black, turn your heat down immediately to prevent the garlic from becoming acrid.
Phase-by-Phase: Executing Herb Roasted Chicken and Garlic Mash
Phase one is all about the sear. Once you place the chicken in the shimmering oil, leave it alone. It’s tempting to peek, but moving the meat prevents that crust from forming. You’re looking for the meat to naturally release from the pan surface, which usually happens around the five-minute mark.
Phase-two begins the moment you flip. Add your aromatics quickly. The garlic should dance in the foaming butter, turning a pale golden color. This is the most sensory part of the process; you’ll smell the garlic mellowing and the thyme becoming fragrant as you spoon the mixture over the seared breasts.
Phase-three is the rest. Transfer the chicken to a warm plate and cover it loosely with foil. This “tenting” traps just enough heat to finish the cooking process while preventing the crust from getting soggy. Use these eight minutes to finish mashing your potatoes, ensuring everything hits the table at the perfect temperature.
Troubleshooting Common Texture Issues
If your chicken feels “stringy,” it’s likely overcooked. Next time, use a meat thermometer to pull it at exactly 160°F. If the chicken is rubbery and lacks color, your pan wasn’t hot enough when you started. Wait for the oil to shimmer and almost reach the smoke point before adding the protein.
For consistently juicy chicken, consider trying juicy sheet pan chicken & veggies sometime.
For lumpy potatoes, ensure you are mashing them while they are piping hot. As potatoes cool, the starches set, making it much harder to achieve a smooth consistency. If your garlic butter sauce tastes bitter, the garlic likely burned in the pan. To fix this, you can quickly whisk in a tablespoon of water or broth to cool the pan and mellow the flavor.
Optimal Tools for Searing and Mashing
A heavy-bottomed skillet is your best friend for this recipe. Cast iron or stainless steel are ideal because they retain heat exceptionally well. This prevents the pan temperature from dropping when you add the cold chicken, which is essential for maintaining a consistent sear and a proper butter foam.
When it comes to the mash, a traditional hand masher works great for a rustic texture. However, if you want that ultra-smooth, cloud-like consistency, use a potato ricer. A ricer forces the potato through tiny holes, breaking up every single lump without overworking the starch. Whatever you do, stay away from the food processor, which will turn your potatoes into a gummy mess.
Flavor Variations and Herb Substitutions
While thyme and parsley are classics, you can easily pivot the flavor profile. For a more autumnal, earthy vibe, substitute the thyme with fresh sage and rosemary. If you want a brighter, Mediterranean feel, add a teaspoon of lemon zest to the butter during the basting phase and finish the dish with a squeeze of fresh lemon juice.
Complementary Dishes
To round out your herb roasted chicken and garlic mash meal, consider these dishes.
- For a different take on creamy potatoes, explore fluffy loaded garlic mashed potatoes, featuring similar garlic notes.
- If you enjoy roasted root vegetables, try roasted garlic and rosemary mashed potatoes for a fragrant addition.
If you find raw garlic too pungent, try roasting a whole head of garlic in the oven alongside the carrots. Once soft, squeeze the caramelized cloves directly into the potatoes during the mashing process. This creates a much sweeter, deeper garlic flavor that permeates the entire mash without the sharp bite of minced garlic.
Plating for Visual Impact
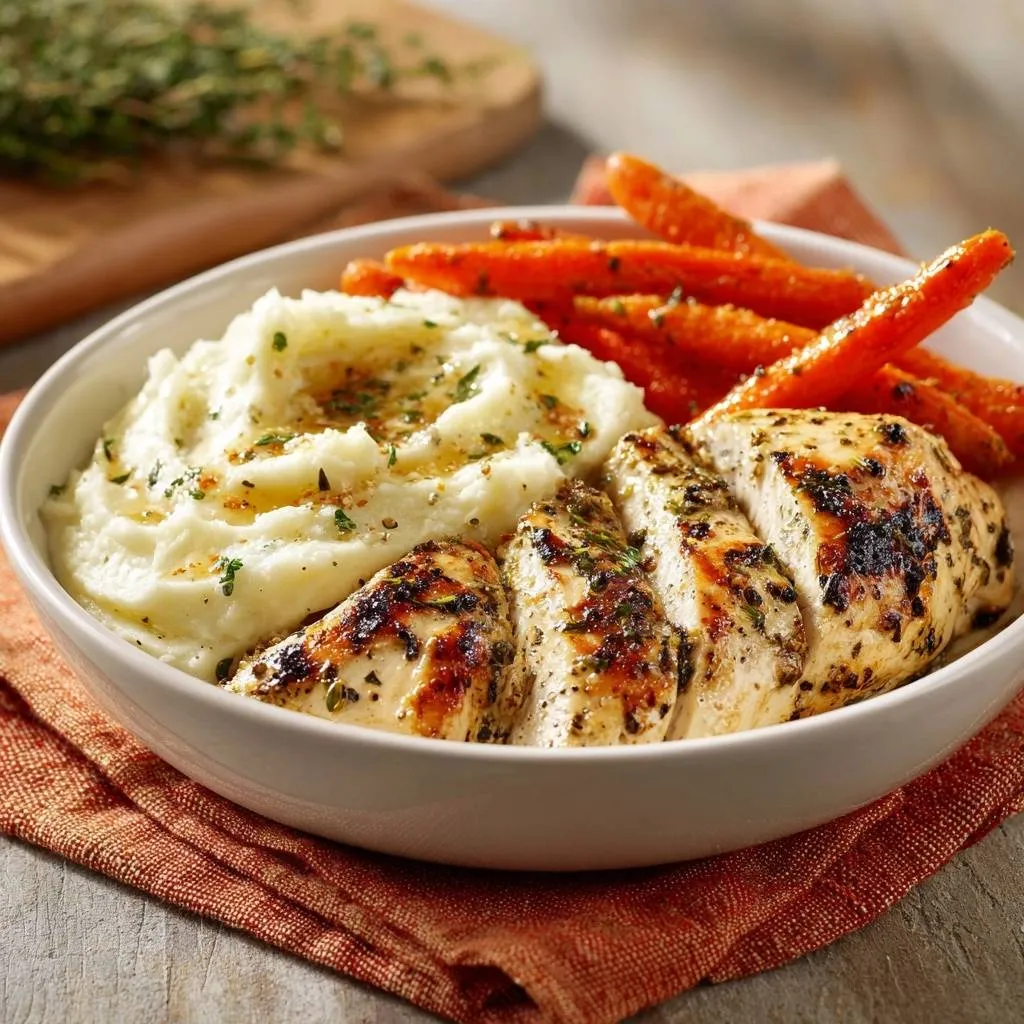
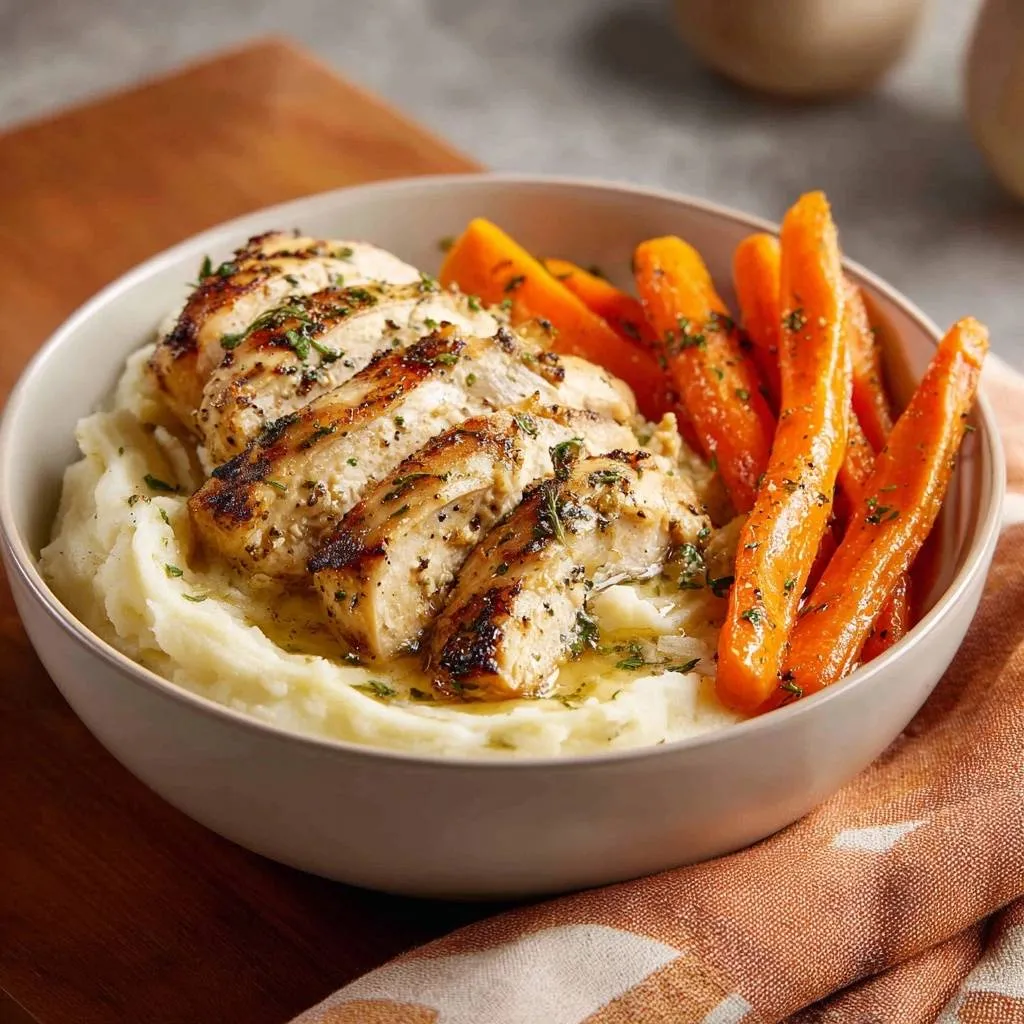
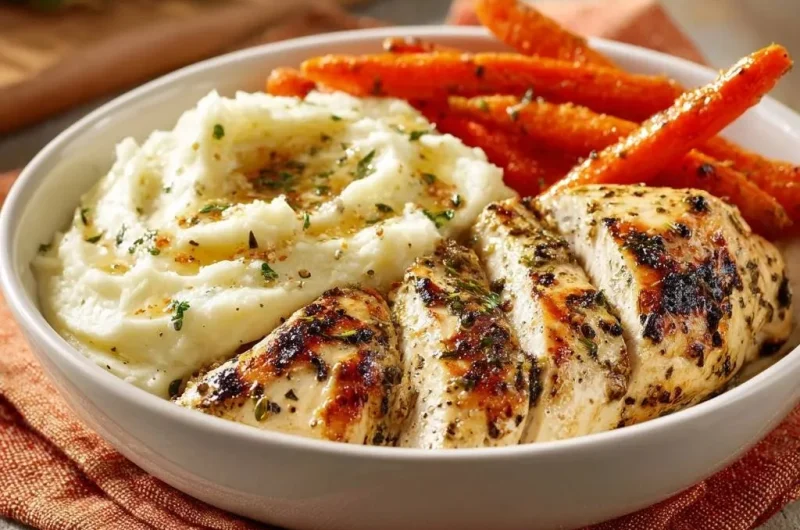
To plate like a pro, start with a generous scoop of the garlic mash. Use the back of your spoon to create a shallow well in the center. This isn’t just for looks; it acts as a reservoir for the leftover garlic butter from your skillet. Place the roasted carrots to the side, fanning them out for a pop of bright orange color.
Slice the rested chicken against the grain into thick, diagonal strips. This ensures the most tender bite and shows off the juicy interior. Fan the chicken slices over the mash, then drizzle that golden pan butter over everything. A final sprinkle of fresh parsley and a pinch of red pepper flakes adds the perfect contrast of color and a tiny hint of heat.
Expert Tips for Professional Results
If you don’t have a thermometer, use the “press test.” Properly cooked chicken should feel firm but have a slight spring to it, similar to the feel of the fleshy part of your palm when you touch your thumb to your ring finger. If it feels soft like a sponge, it needs more time; if it feels hard like a rock, it’s overdone.
Always take your chicken out of the fridge about 15 to 20 minutes before cooking. Taking the chill off the meat allows the center to cook more evenly with the exterior. If the meat is ice-cold, you’ll often end up with a burnt outside and a raw middle.
When mashing, never overwork the potatoes. Mix in your cream and butter until just combined. The more you stir and mash, the more starch is released, which leads to a heavy, sticky texture. A light touch is the key to that sought-after velvety mouthfeel.
Frequently Asked Questions
Can I use chicken thighs instead of breasts?
Yes, you certainly can! Chicken thighs are more forgiving because they have a higher fat content. However, they take slightly longer to cook. If you use skin-on thighs, start them skin-side down in a cold pan and gradually raise the heat to render the fat and get the skin extra crispy before following the basting steps.
For an extra kick of flavor, see this recipe for garlic butter chicken thighs.
How do I prevent the garlic from burning during basting?
The trick is timing and placement. Only add the minced garlic after you have flipped the chicken and the pan temperature has stabilized. Keep the garlic moving in the foaming butter and try to keep it on top of the chicken or submerged in the butter pool rather than sitting directly on the hot metal surface of the skillet.
What is the best way to reheat leftovers?
To keep the chicken from drying out, avoid the microwave if possible. Place the chicken and mash in an oven-safe dish with a splash of chicken broth or water. Cover tightly with foil and heat in a 300°F oven until warmed through. This creates a steam-room effect that rehydrates the meat and keeps the potatoes creamy.
Can I make the garlic mash ahead of time?
You can make the mash up to two hours in advance. Keep it warm by placing the mash in a heat-proof bowl over a pot of simmering water (a double boiler). This keeps the potatoes at a safe temperature without scorching the bottom or breaking the dairy emulsion. Stir in a tiny splash of warm cream just before serving to loosen them up.
Why are my roasted carrots shriveled instead of tender?
This usually happens if the carrots are very thin or if the oven is too hot for too long. If you have slender carrots, try roasting them at 400°F but check them at the 12-minute mark. You can also toss them with a tiny bit more oil to create a protective barrier that locks in moisture while the outside browns.
Herb Roasted Chicken
Course: Main CourseCuisine: AmericanDifficulty: medium4
servings15
minutes25
minutes850
kcal40
MinutesA succulent herb-crusted chicken dish featuring a professional butter-basting method to ensure moisture, paired with smooth Yukon Gold mashed potatoes and caramelized roasted carrots.
Ingredients
4 boneless skinless chicken breasts
2 pounds Yukon Gold potatoes, peeled and cubed
1 pound whole carrots, peeled and halved lengthwise
6 tablespoons unsalted butter (divided)
1/2 cup heavy cream
3 tablespoons olive oil (divided)
2 tablespoons fresh thyme, chopped
2 tablespoons fresh parsley, chopped
4 cloves garlic, minced
1 teaspoon salt
1/2 teaspoon black pepper
1/2 teaspoon red pepper flakes (optional, for garnish)
Directions
- Start the potatoes in a large pot of salted cold water. Bring to a boil and cook until fork-tender, about 15 minutes.
- While potatoes boil, toss carrots with 1 tablespoon olive oil, salt, and pepper. Roast in a 400-degree oven for 20 minutes until tender and caramelized.
- To solve the dry chicken problem, pat the meat completely dry with paper towels. Season heavily with salt, pepper, and half of the fresh herbs.
- Heat 2 tablespoons of olive oil in a heavy skillet over medium-high heat. Once the oil shimmers, add the chicken. Do not move it for 5 minutes to develop the deep golden, charred crust seen in the image.
- Flip the chicken and immediately add 3 tablespoons of butter, the minced garlic, and the remaining thyme to the pan. As the butter foams, use a spoon to continuously pour the hot garlic butter over the chicken for the final 4 to 5 minutes of cooking.
- Remove chicken from the pan when it reaches 160 degrees internal temperature. Transfer to a plate and tent loosely with foil. Resting for 8 minutes is mandatory; it allows the juices to redistribute so they don’t run out when you slice it.
- Drain the potatoes and mash with the remaining 3 tablespoons of butter and the heavy cream until perfectly smooth.
- Slice the rested chicken against the grain. Plate the mash and create a small well in the center; fill with the remaining garlic butter from the chicken pan.
- Serve the chicken alongside the garlic mash and roasted carrots, garnishing with fresh parsley and a pinch of red pepper flakes for the finished look.
Notes
- Resting the chicken for 8 minutes is mandatory to allow juices to redistribute. Slice against the grain for maximum tenderness.