Nothing ruins a Tuesday night faster than a plate of dry, chalky chicken breasts. Most home cooks struggle with poultry because they treat it like a “set it and forget it” protein, but chicken breast is lean and unforgiving. If you’ve ever cut into a piece of meat only to find it has the texture of a pencil eraser, you know exactly why this recipe is a game changer.
The secret to this Honey Mustard Glazed Chicken and Roasted Potatoes lies in a three-step “Skyscraper” approach. We start with a high-heat sear to build a savory crust, apply a thick, emulsified glaze to lock in moisture, and finish with a precise rest. This method ensures the meat stays incredibly juicy while the baby gold potatoes turn into crispy, salt-flecked gems right on the same pan.
I’ve found that the real magic happens during the resting phase, but the foundation is the glaze itself. You aren’t just brushing on mustard; you’re creating a culinary barrier. By whisking a bit of butter into your honey and mustard mixture, you create a stable emulsion that clings to the chicken rather than watery sauce that pools at the bottom of your sheet pan.
The Chemistry of a Non-Greasy Honey Mustard Glaze
A great glaze should be glossy and thick, not oily or thin. When you combine honey and mustard, they don’t naturally want to stay together in a smooth coating. However, by simmering them with a tablespoon of unsalted butter, you create an emulsion. The fats in the butter bind with the sugars in the honey and the solids in the mustard to create a velvet-like sauce.
The honey does more than just provide sweetness; it’s packed with glucose. When that glucose hits the heat of the oven, it undergoes rapid caramelization. This creates that beautiful, deep amber color and a sticky texture that helps the chopped bacon and parsley adhere to every single bite. It’s the difference between a “sauce” and a true “glaze.”
Why Two Types of Mustard Matter
You might be tempted to just grab whatever mustard is in the fridge door, but using both Dijon and yellow mustard is vital. Dijon provides a sophisticated, sulfurous heat and a complex depth of flavor that lingers on the back of the palate. It gives the dish its “grown-up” savory profile.
Standard yellow mustard serves a different purpose entirely. It has a high vinegar content, which provides the necessary acidity to cut through the heavy sweetness of the honey. Additionally, the turmeric in yellow mustard provides that vibrant, golden-yellow hue that makes the dish look like it came straight out of a professional kitchen.
Essential Components for the Sheet Pan Base
For the best results, you need baby gold potatoes. Unlike Russets, which are starchy and can turn mealy, gold potatoes have a waxy texture and very thin skins. This means they hold their shape perfectly during the 35-minute roasting process and develop a creamy interior that contrasts beautifully with the crispy exterior.
When it comes to the oil, reach for standard olive oil or avocado oil rather than your expensive extra virgin bottle. Since we are roasting at 400°F, you need an oil with a higher smoke point. Extra virgin olive oil can burn at these temperatures, which might leave your potatoes with a slightly bitter, scorched aftertaste.
Selecting and Prepping the Poultry
Chicken breasts are rarely uniform in shape; they’re usually thick at one end and tapered at the other. To ensure every piece cooks at the exact same rate, I recommend giving the thicker end a gentle pound with a meat mallet. You aren’t trying to make a cutlet, just evening out the thickness to about an inch.
If one breast is significantly larger than the others, the smaller ones will dry out before the big one is safe to eat. Taking thirty seconds to even them out ensures that when the timer goes off, every person at the table gets a perfectly cooked, tender piece of chicken.
Phase One: Achieving the Perfect Potato Roast
The potatoes need a head start because they take longer to soften than the chicken takes to cook. The “Single Layer Rule” is your best friend here. If you crowd the pan, the moisture escaping the potatoes will get trapped, and they will steam instead of roast. You want them spread out so the hot air can hit every surface.
During these first 15 minutes, the Maillard reaction begins on the cut side of the potatoes. This is the chemical reaction between amino acids and reducing sugars that gives browned food its distinctive flavor. You’re looking for a light golden color and the beginning of a crisp edge before you even think about adding the chicken.
Phase Two: The High-Heat Skillet Sear
Many people skip the skillet and put raw chicken straight onto the sheet pan, but that’s a mistake. Searing the chicken for 3 minutes per side over medium-high heat is about building flavor, not cooking it through. This creates a “fond,” or a layer of browned proteins, that acts as a savory base for the honey mustard glaze.
You need a heavy-bottomed skillet for this, like cast iron or stainless steel. These materials hold heat much better than thin non-stick pans. When the chicken hits the oil, you should hear a loud sizzle immediately. If it’s quiet, your pan isn’t hot enough, and you’ll end up boiling the meat in its own juices instead of searing it.
Phase Three: The Glaze Application and Oven Finish
Once the chicken is seared and the potatoes have had their head start, it’s time to bring them together. Move the potatoes to the side and nestle the chicken onto the hot pan. Brush the glaze on thick. You want a heavy coating because it acts as a moisture barrier, protecting the delicate meat from the dry heat of the oven.
The most important tool in your kitchen right now is a meat thermometer. Pull the chicken out of the oven when it hits 160°F. Don’t wait for 165°F! Because the pan and the meat are hot, the temperature will continue to rise another 5 degrees while it sits on the counter. This is called carry-over cooking, and it’s the secret to juicy poultry.
For perfectly juicy chicken and tender potatoes every time, check out this one-pan glazed chicken & potatoes.
The Resting Period: Why Patience Prevents Dryness
I know you’re hungry, but you must let the chicken rest for at least 5 to 7 minutes. Think of the chicken breast like a sponge. When it’s cooking, the heat tightens the muscle fibers and pushes all the liquid into the center. If you slice it immediately, all that juice will pour out onto the board, leaving the meat dry.
By waiting, you allow the muscle fibers to relax and reabsorb those juices. When you finally do slice into it, the moisture stays inside the meat where it belongs. A rested chicken breast is supple and tender, while an unrested one is tough and stringy. Trust the process and give it those few minutes of peace.
Troubleshooting Common Texture Issues
If your potatoes come out mushy, you likely overcrowded the pan or didn’t use enough oil. Remember, they need space for the moisture to evaporate. If the glaze starts to burn or look too dark before the chicken is done, your oven rack might be too high. Move it to the center position to ensure even heat distribution.
For chicken that feels rubbery, the culprit is usually skipping the sear or undercooking. If your mustard sauce looks “broken” or oily, it means the butter didn’t fully emulsify. You can usually fix this by giving it a very vigorous whisk with a teaspoon of warm water to bring the fats and liquids back together.
Flavor Variations and Dietary Swaps
While bacon adds a wonderful smoky crunch, you can easily swap it out. Toasted pecans or walnuts provide a similar texture and a lovely earthy flavor that pairs beautifully with honey. If you want a deeper, more autumnal sweetness, try replacing the honey with pure maple syrup.
If you prefer chicken thighs, you can absolutely use them. Just keep in mind that bone-in, skin-on thighs will need about 8 to 10 minutes more in the oven than breasts. Thighs are also much more forgiving, as they have a higher fat content and won’t dry out as quickly if you overcook them by a minute or two.
Optimal Side Dish Pairings
Since this dish is rich, sweet, and savory, you want a side dish that offers some brightness or bitterness. A shaved Brussels sprout salad with a lemon vinaigrette is a fantastic choice. The crunch of the raw sprouts cuts right through the sticky glaze of the chicken.
Steamed haricots verts (thin French green beans) with a squeeze of fresh lemon and a pinch of sea salt also work well. If you want something even simpler, a basic arugula salad with a light balsamic dressing provides a peppery bite that balances the honey perfectly. Avoid heavy, creamy sides, as the dish already has plenty of richness.
Make Ahead and Reheating Strategy
Leftover chicken can often turn into “cardboard” in the microwave. To avoid this, store the chicken and potatoes in an airtight container for up to three days. When you’re ready to eat, the best way to reheat the potatoes is in an air fryer for 3-4 minutes to bring back that signature crunch.
For the chicken, place it in a shallow baking dish with a splash of water or a little extra glaze. Cover the dish tightly with foil and warm it in a 300°F oven until just heated through. The steam trapped under the foil will keep the meat moist, preventing it from becoming tough and dry.
Expert Tips for Professional Presentation
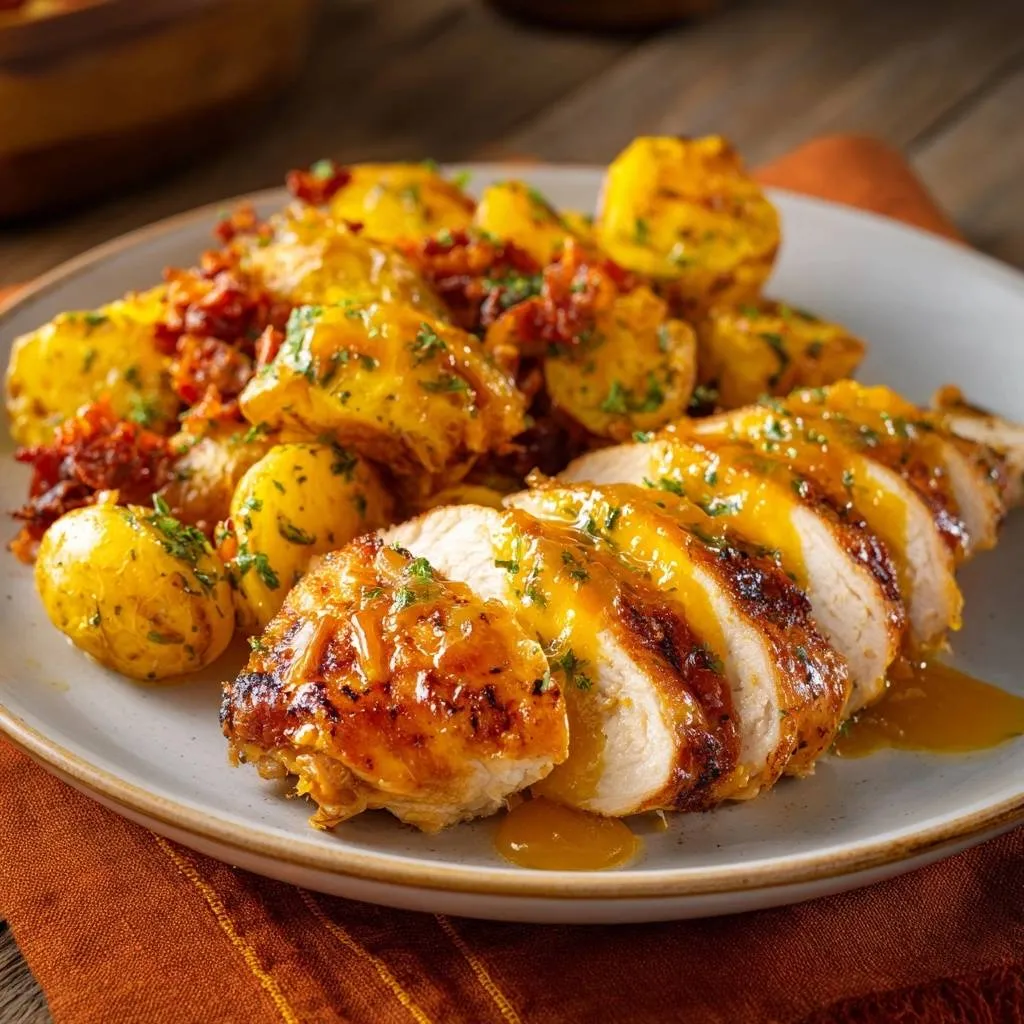
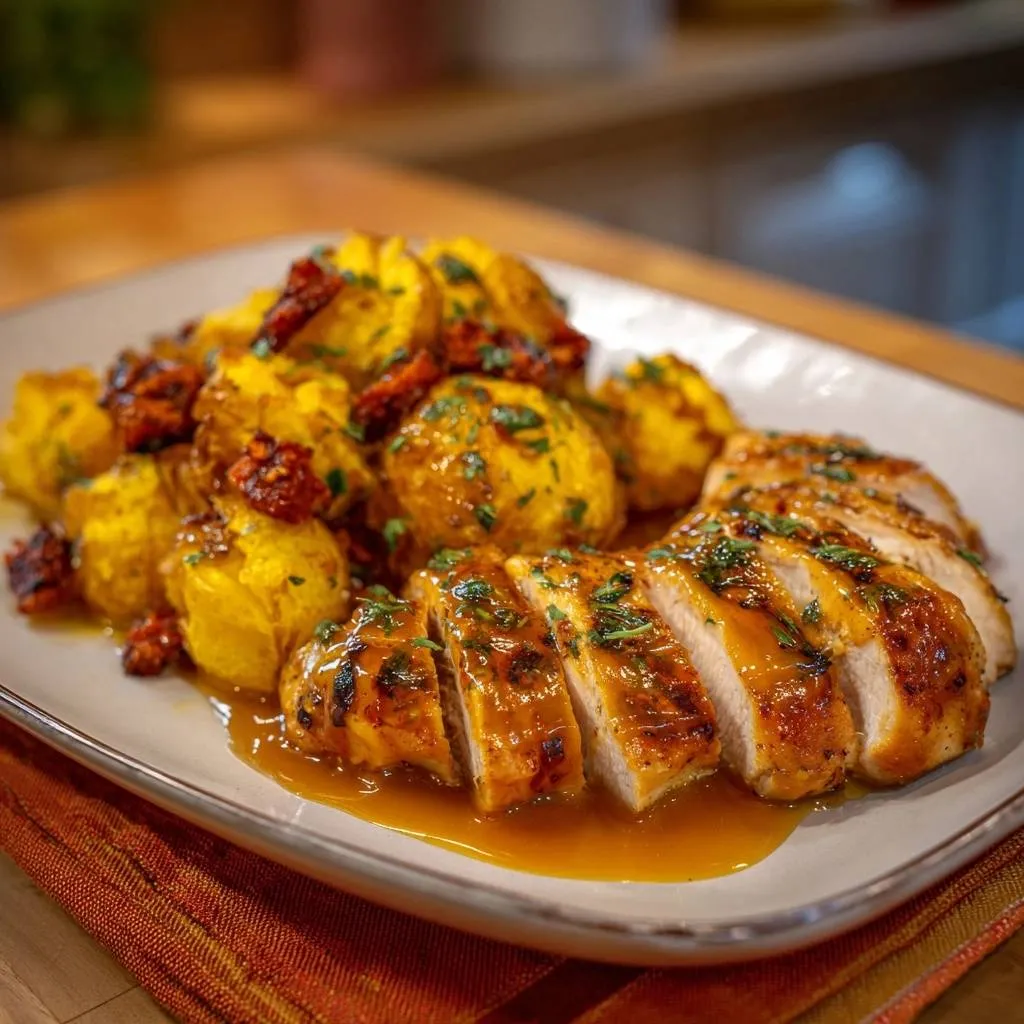
To make this look like a restaurant-quality meal, use the “Medallion Slice” technique. Instead of cutting straight down, tilt your knife at a 45-degree angle and slice against the grain. This creates wide, beautiful slices that show off the juicy interior and the golden crust.
Arrange the chicken slices so they slightly overlap next to a pile of the roasted potatoes. Drizzle the remaining warm glaze so it pools slightly on the plate. Finally, the contrast of the bright green parsley against the smoked paprika-stained potatoes makes the colors pop. It’s a feast for the eyes before the first bite.
Frequently Asked Questions
Can I use frozen chicken breasts for this recipe?
You can, but they must be completely thawed first. If you try to sear frozen or partially frozen chicken, the outside will burn before the inside even begins to warm up. Thaw them overnight in the refrigerator and pat them extremely dry with paper towels before seasoning to ensure you get a good sear.
My glaze is too thin; how do I thicken it?
If your glaze looks more like a thin liquid than a syrup, simply simmer it on the stove for an extra 2 or 3 minutes. This allows the water in the mustard and honey to evaporate, concentrating the sugars and thickening the texture. It should be thick enough to coat the back of a spoon easily.
Can I use sweet potatoes instead of gold potatoes?
Yes, but be aware that sweet potatoes are denser and have a higher sugar content. They may need to be cut into slightly smaller cubes to cook in the same timeframe, and they will brown much faster than gold potatoes. Keep a close eye on them during the final 10 minutes to prevent burning.
Is there a substitute for the butter in the glaze?
If you don’t want to use butter, ghee is an excellent alternative that provides a similar nutty flavor and emulsification property. You could also use a high-quality avocado oil, though the glaze won’t be quite as creamy or thick as it would be with a solid fat like butter.

Honey Mustard Chicken
Course: Main CourseCuisine: AmericanDifficulty: medium4
servings15
minutes35
minutes510
kcal50
MinutesA flavorful sheet-pan style meal featuring seared chicken breasts finished in the oven with a rich honey mustard glaze, served alongside crispy roasted baby gold potatoes and topped with bacon.
Ingredients
1.5 lbs boneless skinless chicken breasts
1.5 lbs baby gold potatoes, halved
4 tablespoons olive oil, divided
1/4 cup honey
3 tablespoons Dijon mustard
1 tablespoon yellow mustard (for color and tang)
1 teaspoon garlic powder
1 teaspoon smoked paprika
1/2 teaspoon salt
1/2 teaspoon black pepper
2 tablespoons fresh parsley, finely chopped
6 slices cooked crispy bacon, roughly chopped
1 tablespoon unsalted butter (for the glaze finish)
Directions
- Preheat your oven to 400°F (200°C). On a large rimmed sheet pan, toss the halved potatoes with 2 tablespoons of olive oil, salt, pepper, and half of the smoked paprika. Spread them in a single layer and roast for 15 minutes.
- While the potatoes roast, prepare the glaze. In a small saucepan over low heat, whisk together the honey, Dijon mustard, yellow mustard, garlic powder, and butter. Simmer for 2 minutes until thickened and glossy. Set aside.
- Season the chicken breasts evenly with the remaining smoked paprika, salt, and pepper.
- Heat the remaining 2 tablespoons of olive oil in a large heavy-bottomed skillet over medium-high heat. Sear the chicken for 3 minutes per side until a deep golden-brown crust forms. Do not cook the chicken through at this stage.
- Remove the sheet pan from the oven. Move the potatoes to one side and place the seared chicken breasts on the other side. Brush a thick layer of the honey mustard glaze over the chicken and drizzle a small amount over the potatoes.
- Return the pan to the oven and bake for 10-12 minutes, or until the chicken reaches an internal temperature of 160°F (it will rise to 165°F while resting).
- Crucial Step: Remove the pan from the oven. Transfer the chicken to a cutting board and let it rest for a full 5-7 minutes. This allows the muscle fibers to relax and reabsorb the juices, preventing dry meat.
- Slice the chicken into thick medallions as shown in the image. Arrange on a plate next to the potatoes. Drizzle the remaining warm glaze generously over the sliced chicken so it pools slightly. Top the entire dish with the chopped crispy bacon and fresh parsley. Serve immediately.
Notes
- The secret to preventing dry meat is the 5-7 minute resting period after baking, which allows the juices to redistribute. Ensure the chicken reaches an internal temperature of 160°F before resting.