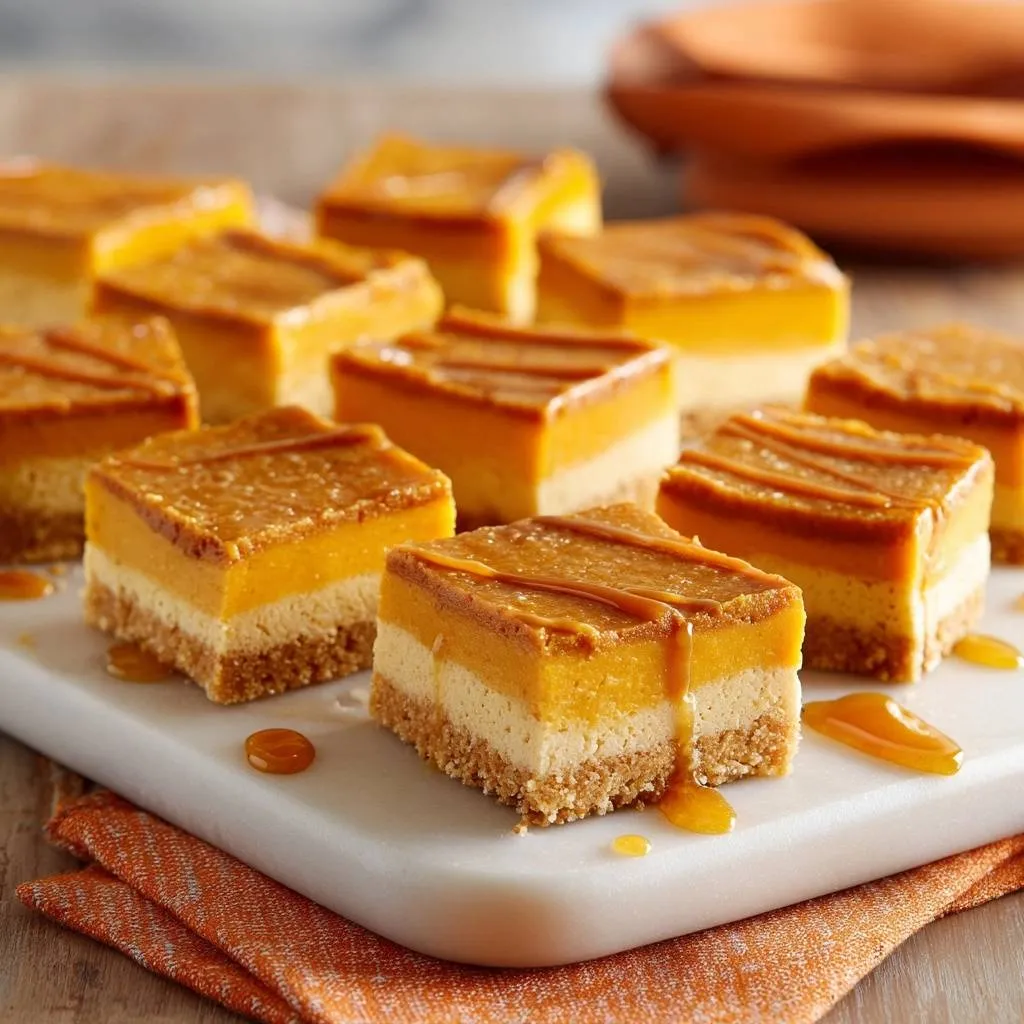
Most homemade dessert bars suffer from a tragic flaw: the soggy bottom. You spend hours in the kitchen only to end up with a wet, mushy graham cracker base that collapses under the weight of the filling. These Layered Pumpkin Cheesecake Bars solve that problem entirely by focusing on a structural moisture barrier that keeps the crust snappy and the filling silky.
The magic lies in the contrast between the buttery crunch of the base and the dense, velvety tiers of spiced pumpkin and classic cream cheese. By treating the crust as a foundation rather than an afterthought, you get a professional, bakery-style result that holds its shape from the pan to the plate. It is the ultimate textural experience for anyone who loves the deep warmth of autumn spices.
The secret to this “anti-soggy” philosophy is a quick ten-minute pre-bake. This step par-bakes the sugar and butter into a waterproof seal, preventing the wet cheesecake batter from migrating into the crumbs. If you skip this, the moisture from the pumpkin will turn your crust into a paste. Trust the process, and you will be rewarded with a clean, audible snap in every bite.
The Structural Foundation: Graham Crackers and Butter
A great bar starts with a sturdy floor. Using exactly 1.5 cups of graham cracker crumbs provides the perfect thickness for an 8×8 pan, ensuring the crust is thick enough to support the heavy cheesecake layers without being overwhelming. If the crust is too thin, it will crack; if it is too thick, it becomes difficult to bite through.
Melted butter acts as the primary binding agent, essentially “gluing” the crumbs together as it cools and solidifies. However, the granulated sugar is just as important for the final texture. As the sugar heats up in the oven, it melts and then recrystallizes, creating a crisp “snap” that prevents the base from feeling greasy or soft.
When you press the mixture into the pan, don’t be afraid to use some muscle. I always use the bottom of a flat measuring cup to pack the crumbs down firmly. This compression ensures that the butter and sugar are evenly distributed, creating a dense, uniform layer that won’t crumble when you lift the bars out of the pan later.
Why Pre-Baking Prevents a Soggy Base
Pre-baking is the most critical technical step in this entire recipe. When you slide that crust into the oven for ten minutes, you are creating a moisture barrier. The heat causes the butter and sugar to fuse with the graham cracker particles, forming a semi-permeable seal that protects the crumbs from the wet filling.
Without this step, the raw cheesecake batter would immediately begin to soak into the dry crumbs. By the time the bars are finished baking, the crust would be saturated and soft. This ten-minute investment ensures the base stays distinct and crunchy, providing a necessary structural contrast to the creamy layers above.
Essential Components for the Creamy Filling
The heart of this dessert is the 16 ounces of cream cheese. For a perfectly smooth filling, the cream cheese must be completely softened to room temperature. If it is even slightly cold, you will end up with tiny white lumps that are impossible to whisk out once the eggs are added. Softened cheese aerates better, giving you that light yet rich mouthfeel.
Sour cream is the “secret weapon” here. It introduces a subtle tang that cuts through the heavy fat of the cream cheese and sugar. More importantly, the acid in the sour cream helps soften the protein structure of the eggs, resulting in a creamier, less “rubbery” cheesecake texture. It makes the bars feel luxurious rather than just heavy.
Using room temperature eggs is another non-negotiable rule. Cold eggs can cause the softened fats in the cream cheese to seize up, leading to a curdled appearance. When everything is at the same temperature, the batter emulsifies into a glossy, uniform liquid that bakes up beautifully without any unsightly air pockets or cracks.
Puree vs. Pie Filling: The Moisture Trap
Always check your labels carefully because pumpkin puree and pumpkin pie filling are not the same thing. Puree is 100% cooked pumpkin with no additives. Pie filling, however, is loaded with extra sugar, water, and thickeners that can completely ruin the structural integrity of your cheesecake layers.
The extra moisture in pie filling often prevents the pumpkin layer from setting properly, leading to a “weeping” effect where the layers separate. By using pure pumpkin, you maintain total control over the moisture content and the spice levels. This ensures the pumpkin tier is just as dense and stable as the plain cheesecake tier below it.
The Warm Spice Profile
The spice blend of cinnamon, ginger, and cloves is designed to “bloom” in the oven. As the batter heats up, the oils in these spices release, permeating the pumpkin layer with a deep, aromatic warmth. Cinnamon provides the base, ginger adds a tiny bit of heat, and cloves offer that classic autumnal earthiness.
Don’t overlook the salt! While it might seem counterintuitive in a sweet dessert, salt is the most important ingredient for balance. It sharpens the flavor of the spices and prevents the sugar from feeling cloying. A half-teaspoon of salt makes the pumpkin taste more like pumpkin and less like a generic sugar bomb.
Step-by-Step: Building the Perfect Layers
When you start mixing the filling, keep your mixer on low speed once the eggs go in. Beating the batter too vigorously at this stage incorporates excess air. Those air bubbles will expand in the oven and then collapse as the bars cool, which is the primary cause of surface cracking. Slow and steady is the way to go.
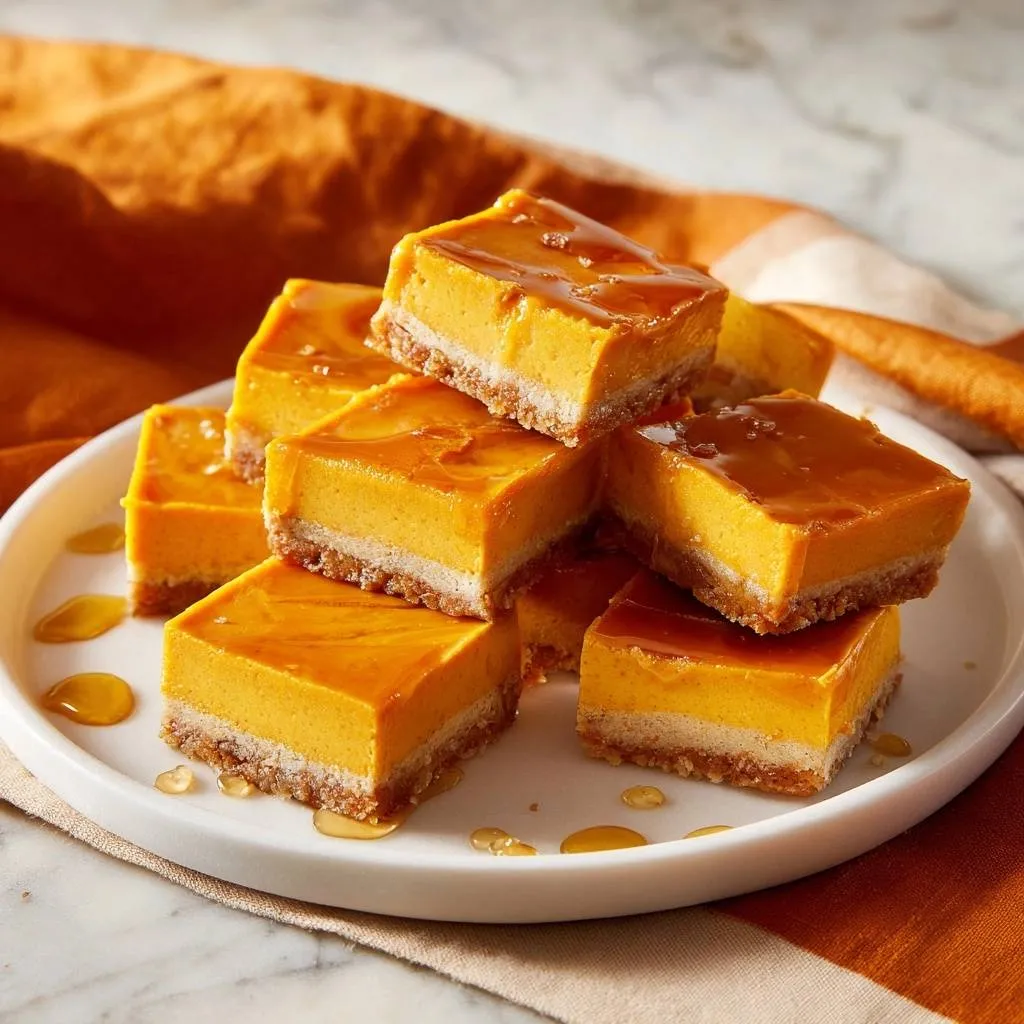
To achieve those beautiful, distinct tiers, you need to divide the batter precisely. Pour half of the plain white mixture over the warm crust first. This creates a clean, bright base layer. Then, gently fold your pumpkin and spices into the remaining half. Folding by hand ensures you don’t overwork the batter or add more air.
The physical act of layering requires a gentle touch. If you just dump the pumpkin mixture on top, it will sink into the white layer and create a marbled effect. While marbling is pretty, it doesn’t provide the same sophisticated look as two sharp, horizontal tiers. Take your time with the transition to keep the colors separate.
Techniques for a Smooth Surface
The best tool for this job is an offset spatula. After you spoon the pumpkin mixture over the white base, use the spatula to glide the batter to the edges of the pan. Use a light hand; you want to “float” the pumpkin layer on top without disturbing the white cheesecake underneath.
If you don’t have an offset spatula, the back of a large spoon works too. Start from the center and work your way out in a spiral motion. This “spoon and spread” method ensures the top is level, which is vital for when you eventually drizzle the caramel sauce. A flat surface makes for a much more professional presentation.
The Science of the Slow Cool
Cheesecake is technically a baked custard, which means it is very sensitive to temperature changes. When the timer goes off, the bars aren’t actually finished cooking. The “carry-over cooking” that happens while the bars sit in the cooling oven is what finishes the center without overbaking the edges.
For a smooth, crack-free finish on your next cheesecake, consider trying this raspberry pistachio cheesecake.
If you pull the bars out into a cold kitchen immediately, the protein bonds in the eggs will contract too quickly. This sudden shock causes the surface to pull apart, resulting in deep cracks. By cracking the oven door and letting them sit for 30 minutes, you allow the temperature to drop gradually, keeping the top smooth and intact.
This slow cooling process also helps the layers bond together. As the fats begin to solidify at a controlled rate, the pumpkin and white layers “grip” each other. This prevents the tiers from sliding apart when you eventually go to slice them. Patience in the cooling phase is just as important as the baking itself.
The 6-Hour Refrigeration Rule
You might be tempted to cut into these while they are still slightly warm, but you must resist. The fats and proteins need at least six hours in the fridge to fully set. During this time, the texture transforms from a soft, mousse-like consistency into a dense, fudgy bar that melts in your mouth.
Chilling also develops the flavor. The spices in the pumpkin layer need time to meld with the creaminess of the cheese. If you cut them too early, the mouthfeel will be “mushy” and the crust might still feel a bit greasy. Overnight is always best for the cleanest, sharpest layers and the most developed flavor profile.
Troubleshooting Common Layered Cheesecake Issues
If your layers are bleeding together, it usually means the batter was too thin. This happens if the cream cheese wasn’t softened properly or if you used pumpkin pie filling instead of puree. To fix this next time, ensure your ingredients are room temperature and your pumpkin is the thick, canned variety.
A crumbling crust is usually the result of poor compression. If you don’t pack the crumbs down firmly enough with a flat object, the butter won’t be able to hold the particles together once the bars are sliced. Make sure you press into the corners of the pan especially well to create a solid frame.
Surface weeping or condensation occurs when the bars are put into the fridge while they are still too warm. This traps steam under the plastic wrap, which then turns into water droplets on the surface. Always let the pan reach true room temperature on the counter before you cover it and move it to the refrigerator.
Slicing and Finishing for a Professional Look
To get those sharp, clean edges you see in bakeries, use the “hot knife” technique. Dip a long, sharp knife into a tall glass of very hot water, then wipe it completely dry with a clean towel. Make one long, decisive cut through the bars. The heat from the blade slices through the fat of the cheesecake like butter.
You must clean and re-dip the knife between every single cut. If you don’t, the residue from the previous slice will smear across the top of the next one, ruining the clean white and orange contrast. It takes a little extra time, but the visual result is worth the effort for a stunning holiday platter.
The final touch is the salted caramel drizzle and a pinch of coarse sea salt. This adds a “third dimension” of flavor. The caramel provides a deep, buttery sweetness, while the salt crystals provide a tiny crunch and a savory pop that wakes up the palate. Add these garnishes just before serving to keep the salt from melting.
Make-Ahead Strategy and Storage Guidelines
These bars are the perfect make-ahead dessert because they actually improve after a day or two in the fridge. You can store them in an airtight container for up to five days. Just be sure to wait until the moment of service to add the caramel and salt, as the caramel can become runny if it sits in the fridge too long.
If you want to freeze them, these bars hold up surprisingly well. Wrap individual, un-garnished squares tightly in plastic wrap and then place them in a freezer-safe bag. They will stay fresh for up to three months. When you’re ready for a treat, thaw a bar in the fridge for a few hours before drizzling with caramel.
Avoid freezing the bars with the caramel already on top. The sugar in the sauce doesn’t freeze at the same rate as the cheesecake, which can lead to a sticky, messy situation during the thawing process. Keep the toppings fresh for the best texture and appearance.
Expert Tips for Success
How do I know if the “jiggle” is right?
Use the “Nudge Test.” Gently shake the pan; the edges should be firm and slightly puffed, but the center 2-inch circle should wobble slightly like Jell-O. It shouldn’t look liquid, but it shouldn’t be stiff either. The center will firm up completely during the slow cooling process in the oven.
Why are room temperature eggs mandatory?
Eggs are the primary emulsifier in this recipe. When they are at room temperature, they incorporate smoothly into the fat-heavy cream cheese. Cold eggs will cause the batter to break and look curdled, which leads to a grainy texture after baking. Take them out of the fridge at least an hour before you start.
How do I remove the bars without breaking them?
Always use a parchment “sling.” Cut a piece of parchment paper so it covers the bottom and two sides of the pan with a few inches of overhang. Once the bars are fully chilled and firm, you can simply grab the edges of the paper and lift the entire block out of the pan onto a cutting board.
Can I make these more spicy?
If you prefer a bolder ginger kick, you can increase the ground ginger to 3/4 of a teaspoon or add a teaspoon of freshly grated ginger to the pumpkin mixture. Just be careful not to overdo the cloves, as they can quickly become overpowering and bitter if the ratio is too high.
What is the best salt for the garnish?
Look for a high-quality flaky sea salt or a coarse Maldon salt. You want a salt with a large grain size so it provides a distinct crunch and doesn’t immediately dissolve into the caramel. This creates a beautiful visual contrast against the dark caramel and the bright orange pumpkin layer.
How do I store leftovers?
Store any remaining bars in an airtight container in the refrigerator for up to 5 days. If you have already drizzled them with caramel, place a piece of parchment paper between layers if you need to stack them, though it is best to keep them in a single layer to prevent the toppings from sticking.
Why did my crust crumble when I sliced it?
This usually happens if the crust wasn’t pressed down firmly enough or if it wasn’t baked long enough to set the sugar. Next time, use more pressure when packing the crumbs into the pan. Also, ensure you are using a very sharp knife and slicing while the bars are cold, as the butter in the crust is sturdiest when chilled.
Can I use a different type of cookie for the crust?
Yes, you can substitute the graham crackers with gingersnaps or vanilla wafers. Use the same 1.5 cup measurement for the crumbs. Gingersnaps are particularly delicious with the pumpkin layers, but they contain more sugar, so you may want to reduce the added sugar in the crust by a tablespoon to compensate.
Pumpkin Cheesecake Bars
Course: DessertCuisine: AmericanDifficulty: medium16
bars25
minutes55
minutes310
kcal60
MinutesThese layered bars solve the common problem of soggy pumpkin desserts by using a moisture barrier technique. Featuring a buttery graham cracker base, a classic cheesecake layer, and a spiced pumpkin top, they are finished with salted caramel for a sophisticated autumn treat.
Ingredients
1.5 cups graham cracker crumbs
6 tablespoons unsalted butter, melted
1/4 cup granulated sugar
16 ounces cream cheese, softened to room temperature
1/2 cup sour cream, room temperature
3/4 cup granulated sugar (for filling)
2 large eggs, room temperature
1 teaspoon vanilla extract
1 cup pumpkin puree (not pumpkin pie filling)
1 teaspoon ground cinnamon
1/2 teaspoon ground ginger
1/4 teaspoon ground cloves
1/2 teaspoon salt
1/4 cup salted caramel sauce for drizzling
Optional: Coarse sea salt for finishing
Directions
- Preheat your oven to 325°F (165°C). Line an 8×8 inch square baking pan with parchment paper, leaving an overhang on two sides for easy removal.
- In a medium bowl, combine graham cracker crumbs, melted butter, and 1/4 cup sugar. Press the mixture very firmly into the bottom of the prepared pan using the bottom of a flat measuring cup.
- Bake the crust for 10 minutes. Remove from the oven and let it cool for 5 minutes. This pre-bake is the essential step to prevent a soggy bottom by sealing the crust before the wet filling is added.
- In a large bowl, beat the softened cream cheese and 3/4 cup sugar on medium speed until completely smooth and fluffy (about 3 minutes). Scrape down the sides of the bowl.
- Add eggs one at a time, beating on low speed just until incorporated. Stir in the sour cream, vanilla, and salt by hand. Do not overmix, as excess air causes cracking.
- Divide the batter: Pour exactly half of the plain cheesecake mixture over the warm crust and spread evenly to the edges.
- To the remaining half of the mixture, gently fold in the pumpkin puree, cinnamon, ginger, and cloves until the color is uniform and deep orange.
- Carefully spoon the pumpkin mixture over the white cheesecake layer. Use an offset spatula to smooth the top gently without disturbing the bottom layer to maintain the distinct visual tiers shown in the image.
- Bake for 40 to 45 minutes. The edges should be slightly puffed and set, but the center should still have a slight jiggle when the pan is gently shaken.
- Turn off the oven and crack the door open for 30 minutes to allow the bars to cool slowly (this prevents the layers from separating).
- Remove from the oven and cool to room temperature in the pan, then refrigerate for at least 6 hours, preferably overnight. This cooling process is vital for the clean, sharp layers and firm texture.
- Once fully chilled, lift the bars out using the parchment overhang. Using a hot, clean knife, slice into 16 squares. Drizzle generously with caramel sauce and a pinch of coarse salt just before serving.
Notes
- The pre-bake step is essential for sealing the crust. Ensure all dairy ingredients are at room temperature to prevent lumps and overmixing.