
Nothing ruins a party appetizer faster than a mushy, limp potato skin that falls apart the moment you pick it up. Most recipes trap steam inside the potato, leading to a wet texture that lacks that satisfying crunch. You’ve likely experienced that disappointing “soggy boat” before, but this method changes the game entirely.
The secret lies in a specific high-heat salt-rub technique designed to draw out moisture before the filling ever touches the shell. By using a wire rack and a second “sear” of the empty skins, we ensure these Loaded Mini Twice-Baked Potatoes stay crackly and sturdy. They’re strong enough to hold every bit of that creamy, whipped filling without buckling under the weight.
I’ve found that Yukon Gold potatoes are the absolute best choice for this texture profile. Their naturally buttery flesh mashes into a velvety dream, while their thin skins crisp up much faster than thick-skinned Russets. The result is a two-bite masterpiece that offers a distinct contrast between the shatter-crisp exterior and the cloud-like interior.
The Science of the Perfect Potato Shell
To get that professional-grade crunch, you have to understand how moisture behaves during the baking process. When you wrap a potato in foil, you’re essentially steaming it in its own juices, which results in a soft, wet skin. To avoid this, we treat the skin like a piece of fine crackling by using coarse sea salt as a desiccant.
The salt pulls water molecules to the surface of the skin where the dry oven heat can evaporate them quickly. This dehydration process is what allows the skin to transition from leathery to crispy. Without that salt rub, the starch in the skin stays hydrated and chewy rather than becoming firm and seasoned.
Airflow is the other half of the equation, which is why the wire rack is non-negotiable. Placing potatoes directly on a flat baking sheet creates a “hot spot” where the potato touches the metal, often leading to burning on the bottom while the top stays soft. A wire rack allows 360-degree heat circulation, ensuring the entire circumference of the potato dries out evenly.
Therefore, you’re effectively roasting the potato from all angles simultaneously. This constant movement of hot air prevents steam from settling back onto the skin. If you skip the rack, you’ll likely end up with a potato that is crispy on top but damp and sad on the bottom.
Essential Components for Loaded Mini Twice-Baked Potatoes
Quality ingredients make or break a simple dish like this, so let’s talk about the starch. Yukon Golds are medium-starch potatoes, meaning they provide more moisture and a creamier mouthfeel than the floury Russet. This makes them ideal for “mini” versions where you want a rich, dense flavor in a small package.
When it comes to the filling, temperature is your best friend. You should always use softened butter and room-temperature sour cream to ensure a smooth emulsion. If you add cold dairy to hot potatoes, the temperature shock can cause the starches to seize, resulting in a “gluey” or gummy texture that feels heavy on the tongue.
In addition, don’t overlook the smoked paprika. While many see it as a simple garnish, it actually provides a deep, earthy counterpoint to the richness of the heavy cream and cheddar. It adds a layer of complexity that makes these taste like they’ve been slow-cooked over a fire rather than just popped in the oven.
Selecting Uniform Yukon Golds
Consistency is key when you’re cooking twelve potatoes at once. You want to select potatoes that are roughly the size of a large lemon or a small fist. If your potatoes vary in size, the smaller ones will overcook and become hollow before the larger ones are tender.
The ideal “mini” potato should be about two to three inches in length. This size ensures that once halved, each piece is a perfect two-bite appetizer. It also allows for the perfect ratio of crispy skin to fluffy filling in every single mouthful.
Dairy Ratios for a Fluffy Filling
The balance between heavy cream and sour cream is what gives the filling its structural integrity. Sour cream provides the necessary tang and thickness, while the heavy cream adds enough liquid to make the mash pipeable. This fat content stabilizes the potato, allowing it to hold those beautiful “peaks” during the final bake.
If you use too much liquid, the filling will slump and lose its shape. However, by sticking to the 4:2 ratio of sour cream to heavy cream, you create a mousse-like consistency. This mixture stays aerated and light, even after it’s been mounded high into the shells.
Phase One: The Initial High-Heat Roast
Before you even think about the oven, you must scrub and dry your potatoes. I mean really dry them. Any surface water left on the skin will mix with the oil and create steam, which ruins the oil-salt bond we’re trying to build.
Once they’re bone-dry, toss them thoroughly in the olive oil and salt. You’ll bake them at 400°F for about 35 to 40 minutes. You aren’t just looking for tenderness here; you’re looking for visual cues like wrinkled skins and a slight darkening of the color.
When you pierce them with a fork, there should be zero resistance in the center. If they feel even slightly firm, give them another five minutes. That internal softness is what makes the scooping process easy and prevents the skins from tearing.
The “Second Sear” Technique for Maximum Crunch
This is the most critical step for achieving that “Skyscraper” depth of flavor and texture. After you’ve scooped out the flesh, you’ll increase the oven temperature to 425°F. Place those empty shells back on the wire rack for a quick flash-bake.
This “second sear” dehydrates the interior “wall” of the potato shell. By drying out the inside of the skin, you’re creating a moisture barrier. This barrier prevents the damp filling from soaking into the skin and making it soggy while it sits on a serving platter.
You only need about 5 to 8 minutes for this step. You’ll notice the edges of the shells starting to turn a golden brown and the texture becoming firm to the touch. This is the secret to an appetizer that stays crunchy for the entire duration of a party.
Achieving the Signature Whipped Texture
When it’s time to mash, less is definitely more. If you over-process the potato flesh, you’ll release too much starch, which turns the filling into a gummy, sticky paste. For the best results, use a simple fork-mash or a hand mixer on the lowest possible speed.
You want to see tiny bits of potato texture rather than a perfectly smooth puree. This creates air pockets that make the filling feel lighter. When you fold in your shredded cheese, do it gently with a spatula to keep those air pockets intact.
Freshly grated sharp cheddar is always better than the pre-shredded bagged stuff. Pre-shredded cheese is coated in potato starch to prevent clumping, which can interfere with the creamy melt of your filling. Grating it yourself ensures a silky, cohesive bind.
If you enjoy a good cheese topping, you’ll also appreciate this cheesy potato casserole.
Assembling and Creating the Textured Peaks
Now comes the fun part: mounding the filling. Don’t just smooth the top over with a spoon. Instead, use the back of a small spoon to “flick” the potato mixture upward, creating little ridges and peaks across the surface.
These ridges aren’t just for looks; they serve a culinary purpose. The high points of the peaks will catch the heat in the final bake, browning slightly and adding a toasted flavor. It creates a beautiful topographical map of deliciousness on every potato.
Before they go back in for the final warm-through, give them a generous dusting of smoked paprika. The red spice will settle into the valleys of your textured peaks. This makes the final product look like it came straight out of a high-end bistro kitchen.
Troubleshooting Common Potato Prep Issues
If your shells crack while you’re scooping, don’t panic. You can usually “glue” them back together with a little bit of the potato filling. Once the cheese melts in the final bake, it will act as a structural adhesive to hold the shell in place.
If your filling feels too dry or crumbly, add heavy cream one teaspoon at a time. The moisture level of potatoes can vary depending on how long they’ve been in storage. You’re looking for a consistency that holds its shape but still feels moist and supple.
For those using slightly larger potatoes, simply extend the initial bake time by 10 minutes. The “fork-tender” test is your ultimate guide regardless of the size. If the cheese isn’t melting properly, ensure you’re using a high-fat cheddar and that the potatoes are hot when you fill them.
Lastly, if the skins aren’t as crispy as you’d like, check your oven temperature with a thermometer. Many ovens run cool, and you really need that 400°F+ heat to trigger the moisture evaporation. Don’t be afraid to let the empty shells stay in for an extra two minutes during the second sear.
Make-Ahead Strategies and Storage Logistics
These are fantastic for party prep because you can do most of the work in advance. You can roast the potatoes, scoop them, and prepare the filling up to 24 hours before your event. Store the empty shells and the filling in separate airtight containers in the fridge.
When you’re ready to serve, perform the “second sear” on the cold shells to crisp them back up. Then, warm the filling slightly in the microwave before mounding it into the hot shells. This ensures everything heats through evenly without overcooking the skins.
To reheat leftovers, avoid the microwave at all costs, as it will turn the skins rubbery. Instead, pop them back into a 350°F oven for about 10 minutes. This will revive the crunch of the skin while gently warming the creamy center back to perfection.
Pairing Suggestions for a Balanced Appetizer Spread
Since these potatoes are incredibly rich and savory, you’ll want to pair them with something bright and acidic. A sharp vinegar-based slaw or a tray of crisp raw vegetables like radishes and cucumbers works wonders. The crunch of fresh veggies cuts through the density of the potato and cheese.
For drinks, sparkling apple cider or a tart cranberry spritzer provides a refreshing contrast. The carbonation helps cleanse the palate between bites of the buttery filling. You want something that lifts the meal rather than adding more weight to it.
In addition, consider serving these alongside a lean protein like grilled chicken skewers. The potatoes act as the “comfort” element of the meal, while the protein keeps the spread feeling balanced and substantial for your guests.
Expert Tips for Scaling the Recipe
If you’re doubling or tripling this recipe for a large crowd, pay close attention to your oven racks. Do not crowd the potatoes on a single tray, or they will steam each other. Use two separate baking sheets and rotate them halfway through the baking time.
When the oven is full, the temperature can drop significantly. You might need to add 5 to 10 minutes to the initial roasting phase. Always ensure there is at least two inches of space between each potato on the wire rack to maintain that vital airflow.
Lastly, if you’re making a massive batch, use a piping bag with a large star tip to fill the shells. It’s much faster than using a spoon and automatically creates those beautiful ridges and peaks. It gives the whole platter a uniform, professional appearance that will wow your guests.
How should I store leftover twice-baked potatoes?
Store any leftovers in an airtight container in the refrigerator for up to 3 days. For the best results, do not freeze them, as the sour cream and heavy cream in the filling can separate and become grainy upon thawing. When you are ready to eat them again, use an oven or air fryer at 350°F to ensure the skin regains its signature crunch.
Why did my potato skins turn out soft instead of crispy?
Soft skins usually happen for two reasons: trapped moisture or low heat. If you didn’t pat the potatoes completely dry after washing, or if you skipped the wire rack, steam likely built up around the base. Additionally, ensure your oven is fully preheated to 400°F before the potatoes go in, as the initial blast of high heat is what sets the texture of the skin.
Can I use a different type of potato if I can’t find Yukon Golds?
Yes, you can use Russet potatoes, but keep in mind the texture will be different. Russets have a much thicker, tougher skin and a fluffier, drier interior. If you use Russets, you may need to add an extra tablespoon of heavy cream to the filling to compensate for their lower moisture content. Avoid red potatoes, as they are too waxy and will result in a heavy, translucent filling.
What is the best way to prevent the filling from becoming gummy?
The key to a fluffy filling is avoiding over-manipulation of the potato starch. Use a hand masher or a fork rather than a food processor or blender. High-speed blades break down the starch granules too much, releasing a sticky substance that creates a glue-like consistency. Also, always ensure your butter and sour cream are at room temperature so they incorporate quickly without excessive stirring.
Can I make these without a wire rack?
While a wire rack is highly recommended for 360-degree airflow, you can bake them directly on a baking sheet if necessary. However, you must flip the potatoes every 15 minutes to ensure the bottom doesn’t get soggy or burnt. The “second sear” step becomes even more important in this case to help dry out the interior of the shell after scooping.
How do I keep the potatoes from rolling over on the serving platter?
If your mini potatoes are a bit wobbly, you can slice a tiny sliver off the bottom of the potato skin before the second bake. This creates a small, flat “base” that allows the potato to sit upright. Just be careful not to cut too deep, or the filling will leak out of the bottom during the final warming stage.

Twice-Baked Potatoes
Course: AppetizerCuisine: AmericanDifficulty: medium6
servings15
minutes55
minutes210
kcal70
MinutesThese mini twice-baked potatoes feature a crackly, sturdy skin achieved through a salt-rub technique and a secondary shell bake. The filling is a creamy, whipped blend of Yukon Gold potatoes, sour cream, butter, and sharp cheddar, finished with smoked paprika and fresh chives.
Ingredients
12 small yellow or Yukon Gold potatoes (uniform in size)
2 tablespoons olive oil
1 teaspoon coarse sea salt
1/2 cup sour cream
4 tablespoons unsalted butter, softened
2 tablespoons heavy cream
1/2 cup shredded sharp cheddar cheese (optional, for extra binding)
1 teaspoon garlic powder
Salt and black pepper to taste
2 tablespoons fresh chives, finely chopped
1 teaspoon smoked paprika
Directions
- Preheat your oven to 400°F (200°C). Scrub the potatoes thoroughly and pat them completely dry with a paper towel. Moisture on the skin is the enemy of crispiness.
- Place potatoes in a bowl and toss with olive oil and coarse sea salt. The salt acts as a desiccant, pulling moisture from the skin as it bakes to create a firm, seasoned exterior.
- Place potatoes directly on a wire rack set over a baking sheet. This allows hot air to circulate 360 degrees around the potato. Bake for 35 to 40 minutes until the skins are wrinkled and the centers are tender when pierced with a fork.
- Remove from the oven and let cool for 5 to 10 minutes until safe to handle. Slice each potato in half horizontally.
- Use a small spoon or melon baller to scoop out the warm potato flesh into a mixing bowl, leaving a 1/4 inch thick shell.
- Increase oven temperature to 425°F. Place the empty shells back on the wire rack and bake for an additional 5-8 minutes. This “second sear” ensures the interior of the shell dries out and stays crisp once filled.
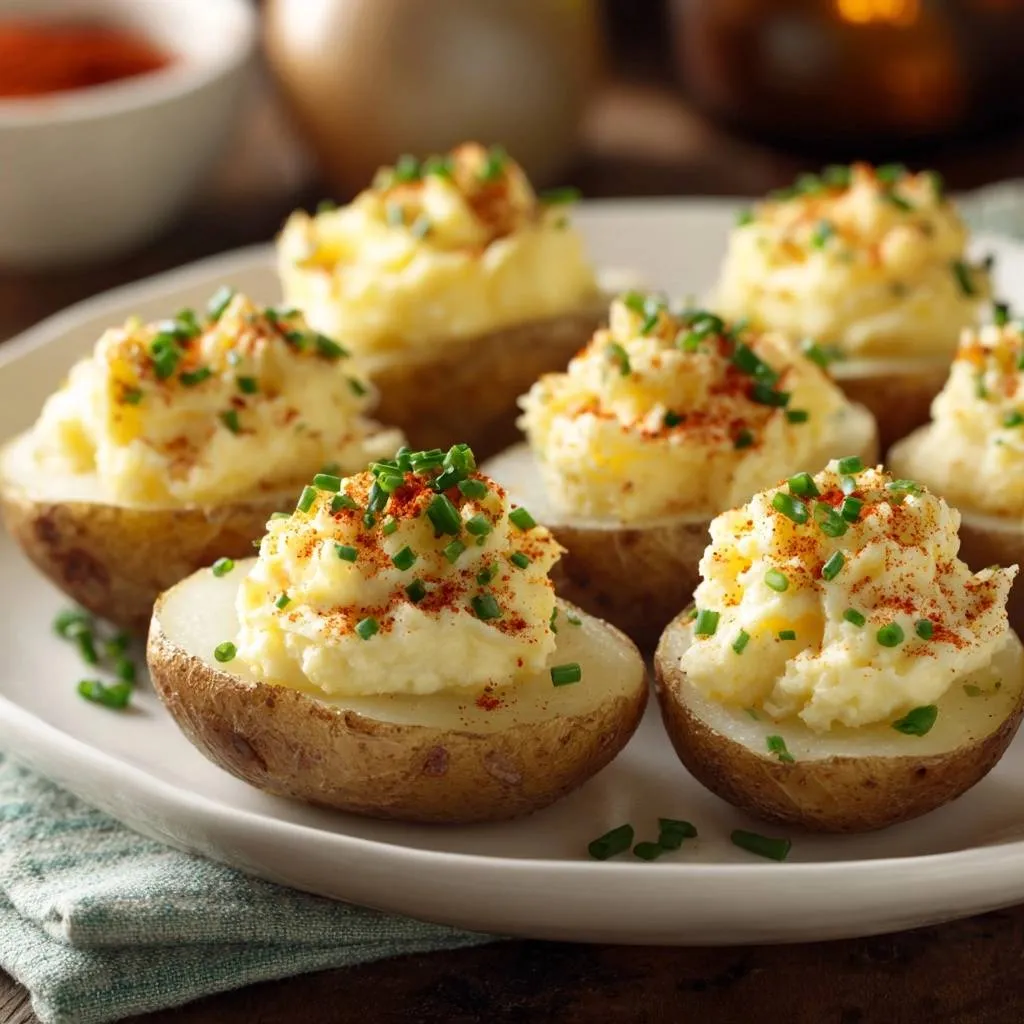
- While shells crisp, mash the potato flesh with butter, sour cream, heavy cream, and garlic powder. For the textured, peaked look shown in the image, use a fork to mash or a hand mixer on low speed to keep the potato fluffy rather than a gluey puree. Fold in shredded cheese if using.
- Season the filling with salt and pepper to taste. Use a spoon to mound the filling high into the shells, using the back of the spoon to create the textured “peaks” seen in the photo.
- Return the filled potatoes to the oven for 5 minutes to melt the flavors together and warm the filling through.
- Remove from the oven and top with a generous dusting of smoked paprika and fresh chives before serving immediately.
Notes
- To achieve the textured, peaked look on the filling, use a fork to mash the potatoes or a hand mixer on low speed. Avoid over-mixing to prevent a gluey texture. Ensure potatoes are completely dry before oiling to maximize skin crispiness.