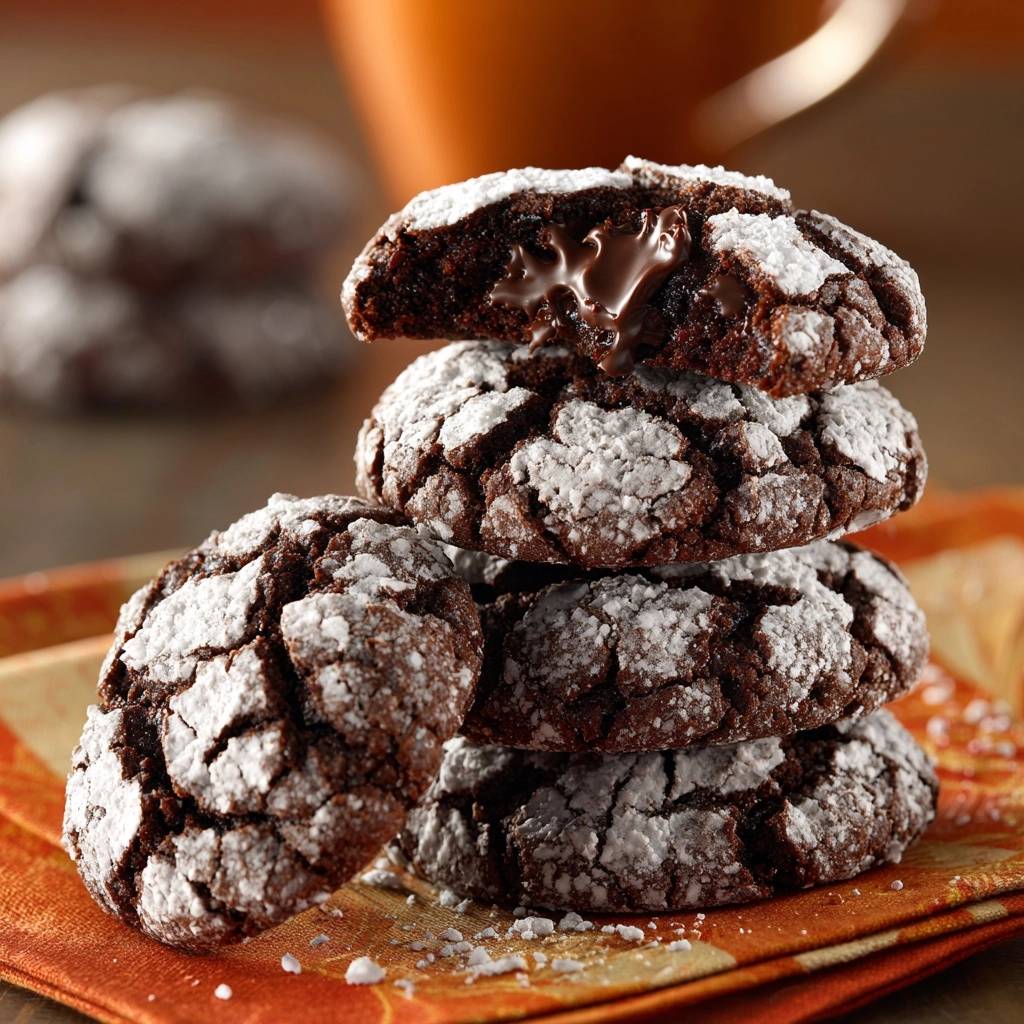
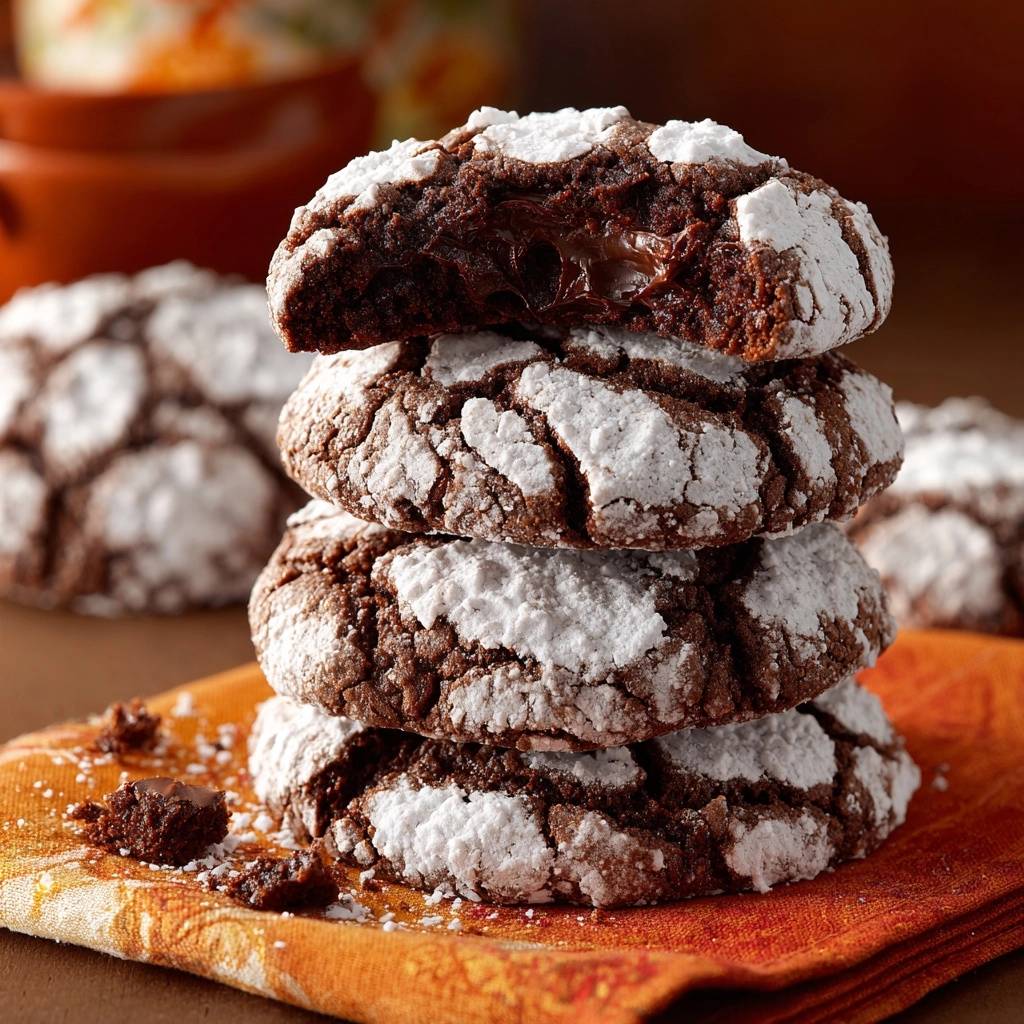
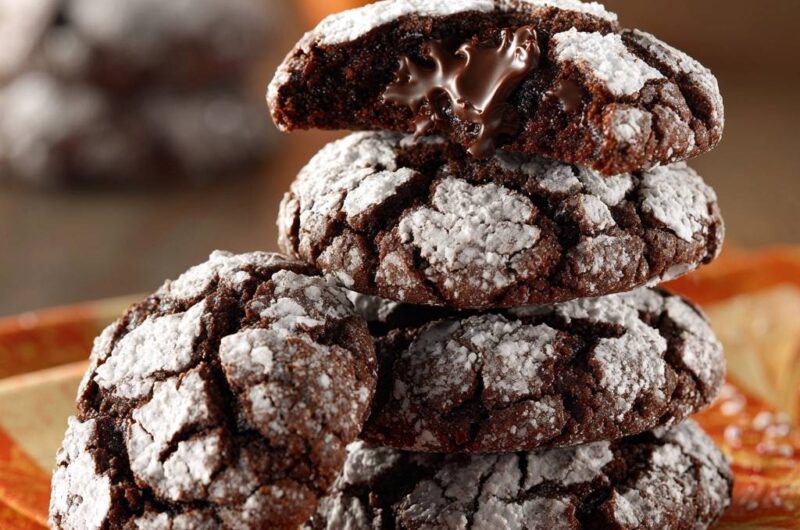
Imagine biting into a cookie that offers a crisp, snowy crunch before giving way to a deep, fudgy interior and a hidden river of warm chocolate. These Molten Lava Chocolate Crinkle Cookies are the ultimate sensory experience, contrasting a bright white, crackled exterior with a dark, decadent core. They look like a winter wonderland but taste like the richest brownie you have ever encountered.
For another chocolatey delight, explore these gooey chocolate hazelnut snowballs.
However, many bakers struggle with the classic crinkle cookie because the beautiful powdered sugar often dissolves into a sticky, translucent mess during baking. This recipe solves that heartbreak by using a professional double-coating technique that keeps the sugar coating thick and brilliant. You get that stunning high-contrast look every single time without the sugar “disappearing” into the dough.
The secret to that perfect, flowing center lies in the temperature of your dough and the quality of your chocolate. By stuffing the cookies with solid chocolate pieces and chilling the dough thoroughly, we ensure the outside sets into a beautiful crust while the inside stays liquid. It is a technical trick that makes a simple cookie feel like a high-end restaurant dessert.
The Science of the Anti-Soggy Sugar Barrier
Sugar is naturally hygroscopic, which means it loves to soak up moisture from its surroundings. When you roll chocolate dough in powdered sugar and put it in the oven, the heat draws moisture out of the dough. This moisture immediately dissolves the fine particles of powdered sugar, turning your beautiful white coating into a yellowed, tacky glaze.
To fight this, we use the “Shield Method.” By rolling the dough ball in granulated sugar first, we create a physical barrier of larger, drier crystals. These crystals do not dissolve as easily and act as a buffer between the moist dough and the delicate powdered sugar. This layer prevents the fat and water in the dough from migrating outward and ruining the aesthetic.
When the cookie expands in the oven, the granulated sugar moves with the dough, while the heavy layer of powdered sugar sits on top. As the surface cracks, the white sugar stays bright and opaque because it hasn’t been “melted” from beneath. This technique is the difference between a home-baked snack and a professional-grade pastry that holds its look for hours.
Essential Components for Molten Lava Chocolate Crinkle Cookies
Quality ingredients are the foundation of this recipe, especially since the chocolate flavor is so prominent. I recommend using a high-quality Dutch-processed cocoa powder if you can find it. It has a lower acidity and a darker, more intense color than natural cocoa, which provides a striking contrast against the white sugar coating.
You might notice this recipe calls for vegetable oil instead of butter. While butter adds flavor, oil is 100% fat and contains no water, which helps create that specific fudgy, chewy texture that stays soft even after the cookies cool. Oil also ensures the cookies have a glossy, brownie-like crumb that melts in your mouth.
The eggs should be at room temperature to ensure they emulsify perfectly with the oil and sugar. If the eggs are too cold, the dough might not come together smoothly, leading to an uneven bake. Finally, don’t skimp on the vanilla extract; it acts as a flavor enhancer that makes the chocolate taste even more intense.
Selecting the Right Chocolate for the Core
The “lava” effect depends entirely on what you tuck inside the dough. While standard semi-sweet chocolate chips work well because they are easy to handle, using a chopped chocolate bar with at least 60% cacao will give you a much smoother, more fluid center. Chocolate chips contain stabilizers meant to help them keep their shape, whereas bar chocolate melts into a true liquid pool.
Preparation Phase: Mixing the Fudgy Base
When you start mixing your dry ingredients into the wet base, the goal is to be gentle. Use a spatula to fold the flour and cocoa mixture into the egg and oil mixture until just combined. You want to avoid over-developing the gluten in the flour, which can happen if you stir too vigorously or for too long.
Over-mixing leads to a cakey, tough cookie rather than a dense, fudgy one. The dough will feel quite sticky and soft at this stage, almost like a thick frosting. Don’t be tempted to add more flour! The stickiness is exactly what we want for a rich texture, and the upcoming chilling phase will make it manageable.
Why Chilling the Dough is Non-Negotiable
Chilling this dough is the most important step for both texture and structure. When the dough sits in the fridge, the flour has time to fully hydrate, and the fats firm up. If you try to bake the dough while it is warm, the cookies will spread too thin on the pan, and your molten center will likely leak out and burn.
A minimum of two hours is required, but letting the dough rest for 24 hours is even better for flavor development. Cold dough also ensures that the “cracks” in the crinkle are deep and dramatic. The cold surface of the dough takes longer to set in the oven, allowing the leavening agents to push through and create those beautiful fault lines.
Step-by-Step: Engineering the Molten Center
To build the lava core, scoop about a tablespoon of the chilled dough and flatten it into a small disc in your palm. Place your chocolate chips or chopped chocolate right in the center. It is helpful to keep your hands slightly cool so the dough doesn’t melt as you work with it.
Carefully fold the edges of the dough over the chocolate, pinching the seams together firmly. You want to make sure there are no gaps or thin spots where the chocolate could escape. Roll it between your palms until it is a smooth, seamless ball. This “sealing” process is what keeps the surprise inside until the first bite.
The Double-Coating Process for Maximum Contrast
Set up your workstation with two separate bowls: one with granulated sugar and one with a generous amount of powdered sugar. Drop your dough ball into the granulated sugar first, rolling it until it is completely covered. This is your moisture shield that keeps the final product looking sharp.
Immediately move the ball into the powdered sugar. You want to coat it very heavily—think of it like making a snowball. Do not shake off the excess! A thick coating of powdered sugar ensures that as the cookie expands and cracks, the white parts remain dense and vibrant rather than fading into the dark dough.
Baking for the Perfect Crinkle Texture
Place your cookies on the middle rack of the oven to ensure even heat distribution. Watch them closely around the 10-minute mark. You are looking for the edges to be firm to the touch while the center still looks a bit soft and underbaked. This is the key to maintaining that liquid chocolate core.
The cookies will continue to cook on the hot baking sheet once you pull them out of the oven. This “carry-over cooking” finishes the edges while leaving the center perfectly gooey. If you overbake them, the chocolate inside will solidify, and you will lose the lava effect entirely. Let them rest for at least five minutes before moving them.
Troubleshooting Common Crinkle Cookie Failures
If your cookies spread too thin and look like pancakes, your dough was likely too warm when it hit the oven. Always keep the dough in the fridge between batches. If you find the cookies aren’t cracking, check the freshness of your baking powder or ensure your oven is truly preheated to 350°F.
For those who see their sugar turning yellow or disappearing, it usually means the granulated sugar layer was too thin or skipped entirely. Humidity can also play a role; on very rainy days, the air itself can melt the sugar coating. In those cases, an extra-heavy roll in the powdered sugar can help save the day.
If the center isn’t liquid, you either baked them too long or used chocolate with too many stabilizers. Try reducing the bake time by one minute for the next batch. Remember, these cookies are meant to be soft! A little bit of “wobble” in the center when they come out of the oven is a good sign.
Storage and Reheating for the Lava Effect
These cookies are best served warm, but they store well in an airtight container at room temperature for up to three days. Do not refrigerate them after baking, as the moisture in the fridge will ruin the crisp sugar coating. To bring back the lava effect for leftovers, simply pop a cookie in the microwave for 8 to 12 seconds.
Expert Baking Troubleshooting
Why did my powdered sugar melt?
Powdered sugar melts when it absorbs moisture from the dough or the air. This recipe uses a base layer of granulated sugar to act as a barrier, but if the dough is too warm or the kitchen is very humid, the sugar can still dissolve. Always ensure your dough is cold and use a very heavy hand when applying the final powdered sugar coating.
Can I freeze the dough balls before baking?
Yes, you can freeze the stuffed dough balls for up to three months. For the best results, freeze them on a tray before they are rolled in sugar. When you are ready to bake, let them thaw slightly in the fridge, then roll them in the granulated and powdered sugars just before they go into the oven.
How do I get larger cracks in the crust?
Larger cracks happen when the surface of the cookie dries out quickly while the inside is still expanding. Using fresh baking powder is essential for this. You can also try rolling the dough balls slightly larger; more volume inside means more pressure against the crust, which results in wider, more dramatic “fault lines” in the sugar.
What is the best cocoa powder to use?
Dutch-processed cocoa powder is the gold standard for this recipe. It has been treated with an alkalizing agent that neutralizes its natural acidity, resulting in a darker color and a smoother, more mellow chocolate flavor. This creates the best visual contrast against the white sugar and a flavor profile that mimics a rich dark chocolate bar.
Chocolate Crinkle Cookies
Course: DessertCuisine: AmericanDifficulty: medium18
cookies15
hours10
minutes195
kcal120
MinutesA deep, fudgy chocolate cookie featuring a molten lava center and a crisp powdered sugar crust. This recipe uses a granulated sugar barrier technique to prevent the powdered sugar from melting during baking.
Ingredients
1 cup all-purpose flour
1/2 cup unsweetened cocoa powder
1 teaspoon baking powder
1/4 teaspoon salt
3/4 cup granulated sugar (plus 1/4 cup for rolling)
1/4 cup vegetable oil
2 large eggs
1 teaspoon vanilla extract
1/2 cup high-quality semi-sweet chocolate chips or chopped chocolate (for the molten center)
1/2 cup powdered sugar (for rolling)
Directions
- In a medium bowl, whisk together the flour, cocoa powder, baking powder, and salt.
- In a separate large bowl, beat the 3/4 cup granulated sugar and vegetable oil until combined. Add the eggs and vanilla, beating until smooth and slightly lightened in color.
- Gradually fold the dry ingredients into the wet ingredients until a soft, sticky dough forms.
- Crucial Step: Chill the dough in the refrigerator for at least 2 hours. This firms the fats, ensuring the cookies don’t spread too thin and the “molten” center stays contained.
- Preheat your oven to 350°F (175°C) and line a large baking sheet with parchment paper.
- Scoop a rounded tablespoon of chilled dough. Flatten it into a disc in your palm. Place 4 to 5 chocolate chips in the center, then carefully fold the dough around them, pinching the seams to seal completely. Roll into a smooth ball.
- The Anti-Soggy Secret: Place the 1/4 cup granulated sugar and the 1/2 cup powdered sugar in two separate small bowls. Roll the dough ball first in the granulated sugar until fully coated. This creates a dry “shield.” Immediately roll the ball in the powdered sugar, coating it very heavily so no dough is visible.
- Place the balls 2 inches apart on the baking sheet. Do not flatten them; the oven heat will cause them to expand and create the signature “crinkle” cracks.
- Bake for 10 to 12 minutes. The cookies are done when the edges are set but the centers still look slightly soft. The powdered sugar should remain bright white and distinct.
- Let the cookies cool on the pan for at least 5-8 minutes. This allows the molten center to set slightly so it doesn’t leak out instantly, but remains liquid when bitten into. Serve warm for the maximum lava effect shown in the image.
Notes
- Rolling the dough in granulated sugar before the powdered sugar creates a moisture barrier that ensures a bright white finish. Serve warm for the best molten effect.