
There is nothing quite as disappointing as biting into a mini pot pie only to find a gummy, flavorless dough at the bottom. Most of us have been there, expecting a crunch but getting a soggy mess that sticks to the pan. It’s the ultimate kitchen letdown when the filling is delicious but the vessel fails to hold its weight.
The secret to a perfect Muffin Tin Chicken Pot Pies experience lies in the textural contrast. You want a shatteringly crisp, golden puff pastry shell that gives way to a rich, velvety chicken filling. It should be sturdy enough to pick up with your hands but delicate enough to melt in your mouth.
I’ve developed an “Anti-Soggy Secret” that changes the game for home cooks. By using a specific par-baking technique and a moisture barrier, you can ensure your pastry stays crisp even under a heavy, creamy sauce. This method turns a simple weeknight dinner into a professional-grade snack or meal that looks like it came from a high-end bakery.
The Science of the Anti-Soggy Bottom Secret
Puff pastry relies on hundreds of thin layers of fat trapped between layers of dough. When the heat hits the oven, the water in the dough and fat turns to steam, forcing those layers apart to create that signature lift. However, when you add a heavy, wet filling to raw dough, the weight and moisture trap the steam, leading to a dense, doughy bottom.
To fight physics, we use a two-step defense. First, we par-bake the shells with weights to set the structure of the base before the filling ever touches it. This gives the pastry a head start to crisp up and firm its “bones” so it won’t collapse under the weight of the chicken and vegetables.
The second part of the secret is the “egg wash seal.” By brushing a thin layer of beaten egg onto the par-baked dough and popping it back in the oven for two minutes, you create a hydrophobic protein barrier. This invisible shield prevents the sauce from migrating into the pastry layers, keeping the bottom dry and crunchy while the filling stays moist.
Essential Components for Muffin Tin Chicken Pot Pies
Quality ingredients make a massive difference when you’re working with such a small, concentrated dish. I always reach for a rotisserie chicken because the meat is already seasoned and tender. It saves you twenty minutes of prep and adds a depth of roasted flavor that poached chicken simply can’t match.
For the vegetables, stick with frozen peas, carrots, and corn. Unlike canned vegetables, which can be mushy and overly salty, frozen veggies retain their bright color and a slight “snap” even after baking. They provide a necessary pop of freshness against the rich, savory sauce.
The sauce itself uses condensed cream of chicken soup as a base, but we elevate it with a splash of heavy cream. This addition tempers the saltiness of the concentrate and creates a luxurious, glossy mouthfeel. It transforms a pantry staple into a sauce that tastes like a labor-intensive velouté.
Selecting and Handling Frozen Puff Pastry
Temperature is your best friend and your worst enemy when working with puff pastry. You want the dough to be thawed enough to handle without cracking, but it must remain cold to the touch. If the dough gets too warm, the fat layers will melt into the flour, and you’ll lose that beautiful flakiness.
If you notice the dough becoming sticky or limp while you’re cutting your squares, stop immediately. Pop the pastry back into the fridge for ten minutes to firm up. Most grocery store brands use oil-based fats, which are more forgiving, but butter-based pastries require even faster handling for the best rise.
The Flavor Profile: Herbs and Aromatics
Since these pies bake quickly at high heat, dried herbs are actually more effective than fresh ones. Dried thyme and garlic powder distribute evenly through the thick sauce and release their oils as the filling bubbles. They provide a consistent, savory backbone that doesn’t get lost in the cream.
Don’t be shy with the coarse ground black pepper. The large flakes provide little “bites” of heat that cut through the richness of the heavy cream and chicken. It balances the palate and ensures the dish doesn’t feel too heavy or one-note.
Step-by-Step: Engineering the Perfect Individual Pot Pie
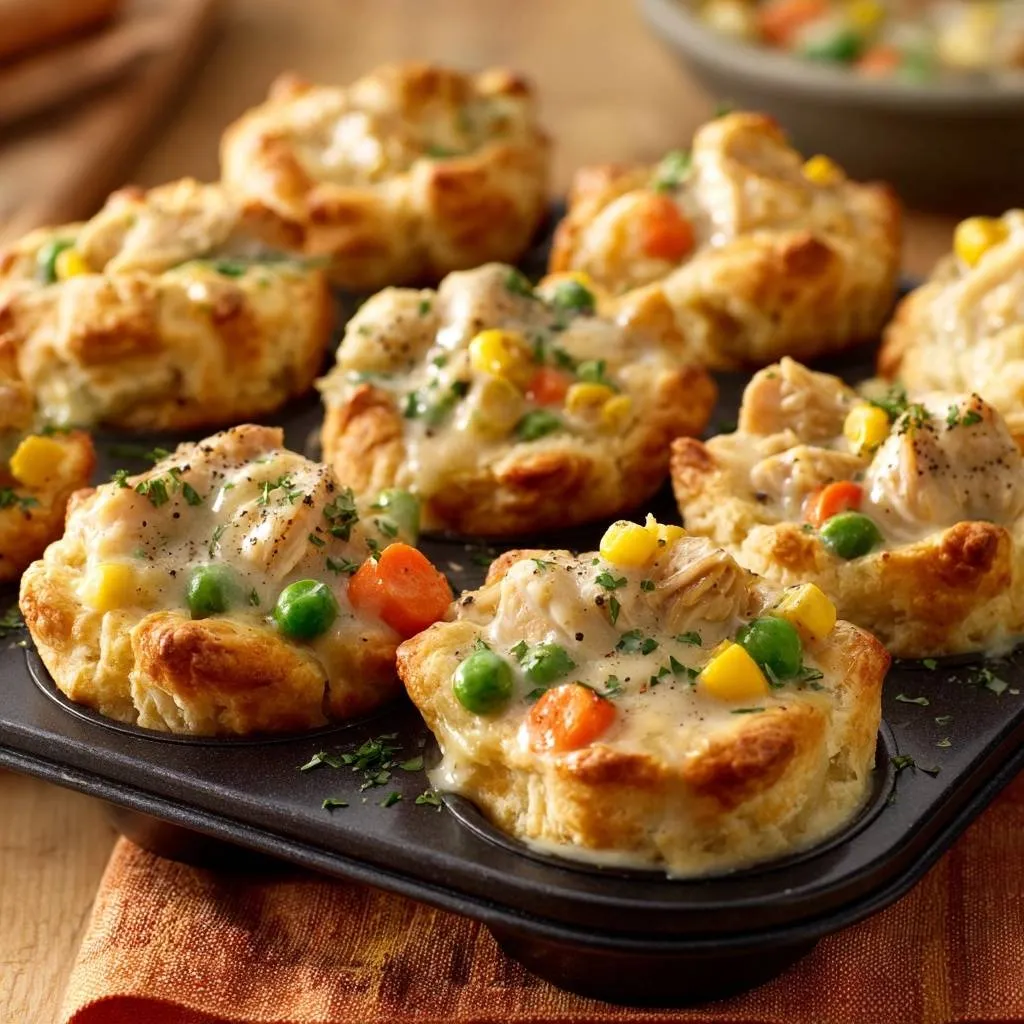
Start by preheating your oven to a hot 400°F. You need that initial blast of heat to make the pastry “pop.” Thoroughly grease your muffin tin with butter, making sure to hit the top surface of the tin as well. This prevents the ruffled edges of the pastry from sticking when you try to lift them out.
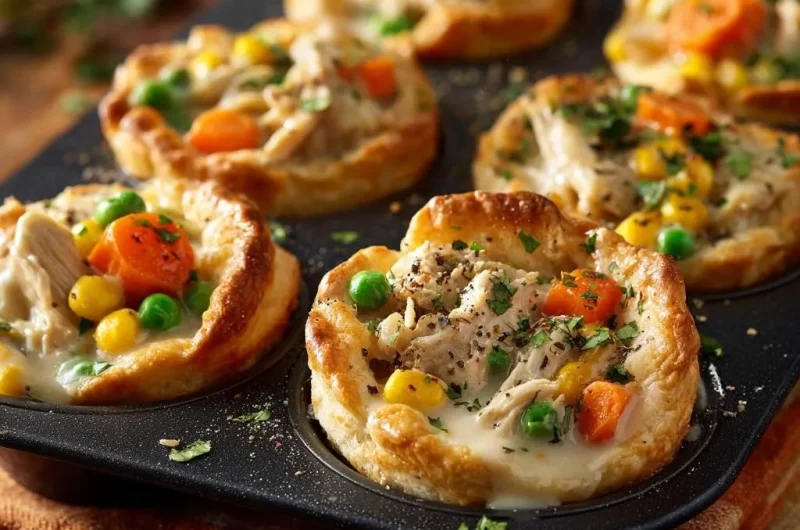
When cutting your pastry, I prefer squares over circles. The corners of the squares create beautiful, rustic ruffles that stand up over the edges of the muffin cups. These “peaks” get extra crispy and provide a wonderful visual appeal that looks much more artisanal than a flat, round top.
For a similar crispy topping, check out the secrets to a Classic Chicken Noodle Casserole.
Once the dough is in the tin, it’s time for the par-bake. Use small squares of parchment paper and dried beans or pie weights to keep the centers from puffing up too much. You’re looking for the edges to just start turning a pale gold before you remove the weights and apply your egg wash seal.
After the seal is set, fill the cups right to the brim. Because the filling is already thick, it won’t shrink much, and a full cup ensures every bite has the perfect ratio of crust to chicken. Brush the very top edges with more egg wash to get that deep, professional mahogany shine.
The Critical Par-Bake and Egg Wash Seal
Docking the dough is a step you can’t skip. Use a fork to prick the bottom of each pastry cup several times. This allows trapped air to escape, preventing the bottom from bubbling up into a dome that would displace your filling.
When you apply the egg wash after the first 8 minutes, use a light hand. You want a thin, even coat that covers every nook and cranny of the bottom. If you pool the egg, it might scramble; you just want a shiny, dry film that acts as your waterproof jacket for the pastry.
Assembly and the “To the Brim” Filling Rule
When mixing your filling, fold the chicken and vegetables gently into the soup mixture. You want to keep the chunks of chicken intact rather than shredding them into a paste. This creates a much better “chew” and makes the pies feel more substantial.
Filling them to the top isn’t just about looks; it’s about moisture control. A full pie has less room for air, which helps the filling stay creamy rather than drying out in the high heat of the oven. The bubbling sauce meeting the golden crust is the ultimate sign of a job well done.
Troubleshooting Common Mini Pot Pie Issues
If your pastry shrinks down the sides of the tin, it usually means the dough was too warm or was stretched too thin. Try to “drop” the dough into the cups rather than pulling it. If it happens anyway, don’t worry; just fill it as much as you can and enjoy the extra-thick crust at the bottom.
For a filling that seems too thin, you can whisk in an extra tablespoon of flour before baking. However, the condensed soup usually thickens significantly as it heats. If the tops are browning too fast, simply tent a piece of foil over the tin for the last five minutes of baking.
Make-Ahead Strategies and Freezing Instructions
These are fantastic for meal prep, but you have to be smart about it. I recommend making the filling up to two days in advance and storing it in the fridge. When you’re ready to eat, just prep the pastry and bake fresh for the best texture.
If you want to freeze them, bake them fully first. Let them cool completely, then wrap them individually in foil. To reheat, put them back in a 350°F oven for 15 minutes. Avoid the microwave, as it will turn that hard-earned crispy crust into a soft, chewy sponge.
Optimal Side Dishes for Individual Pot Pies
Since these pot pies are quite rich and savory, you want a side dish that offers a bright, acidic contrast. A simple arugula salad with a lemon vinaigrette is my go-to. The peppery greens and citrus juice cut right through the cream sauce and refresh your palate between bites.
Roasted balsamic Brussels sprouts are another excellent choice. The charred, slightly bitter edges of the sprouts and the sweet acidity of the balsamic glaze provide a sophisticated balance. Avoid serving these with mashed potatoes or heavy breads, as the pastry already provides plenty of starch.
Expert Tips for Professional Results
The hardest part of this recipe is waiting. You must let the pies rest in the tin for at least 10 minutes after they come out of the oven. This allows the internal steam to settle and the crust to firm up. If you try to pull them out immediately, the pastry will be too soft and might tear.
Use a thin offset spatula or a butter knife to gently circle the edges before lifting. If you greased the tin well, they should pop right out. A final garnish of fresh parsley and a crack of fresh pepper adds a burst of color and a hit of freshness that makes the whole dish sing.
Customizing the Protein and Vegetable Mix
Feel free to swap the chicken for leftover roasted turkey after the holidays. It works beautifully with the same flavor profile. If you want an earthier version, you can add sautéed mushrooms or even a little bit of chopped leek to the mix.
Just remember to keep the moisture levels consistent. If you add watery vegetables like zucchini, sauté them first to cook off the liquid. Too much extra moisture will overwhelm the “egg wash seal” and lead you right back to the soggy bottom we worked so hard to avoid.
Frequently Asked Questions
Can I use pie crust instead of puff pastry?
You can, but the result will be very different. Pie crust is “short” and crumbly, whereas puff pastry is light and airy. If you use pie crust, you won’t get those tall, ruffled edges, and the dish will feel much heavier. You will still need to par-bake the pie crust to avoid a soggy bottom.
Why did my pastry not rise?
The most common culprit is a cold oven or warm dough. If your oven isn’t fully preheated to 400°F, the steam won’t be powerful enough to lift the layers. Additionally, if the dough sat out too long and the fat melted into the flour before baking, the layers will stick together instead of puffing up.
Can I make these in a jumbo muffin tin?
Yes, but you will need to adjust your pastry size and bake time. Cut your pastry squares larger (about 6 inches) and increase the par-bake time by 3 minutes. The final bake with the filling will likely take 20 to 25 minutes. This makes for a very hearty, single-serving meal.
How do I prevent the filling from bubbling over and burning on the tin?
While a little bubbling is normal, you can prevent a mess by not over-filling the very center. Leave a tiny bit of headspace if your sauce seems thin. Also, ensuring your oven is level helps the filling stay inside the “cup” rather than tilting and spilling over one side.
Is there a substitute for the condensed cream of chicken soup?
If you prefer to make a sauce from scratch, you can create a thick roux-based velouté. Melt 2 tablespoons of butter, whisk in 2 tablespoons of flour, and slowly add 1 cup of chicken stock and 1/4 cup of heavy cream. Simmer until it is very thick—much thicker than a standard gravy—before adding your chicken and veggies.
Chicken Pot Pies
Course: Main CourseCuisine: AmericanDifficulty: easy6
servings15
minutes25
minutes340
kcal40
MinutesA clever twist on a classic comfort food, these individual pot pies feature a rich chicken and vegetable filling encased in a shatteringly crisp puff pastry crust that stays firm thanks to a unique pre-baking technique.
Ingredients
1 sheet frozen puff pastry, thawed but cold
2 cups shredded rotisserie chicken
1 cup frozen peas and carrots, thawed
1/2 cup corn kernels
1 can (10.5 oz) condensed cream of chicken soup
2 tablespoons heavy cream (for a richer, glossy sauce)
1/2 teaspoon garlic powder
1/2 teaspoon dried thyme
1/2 teaspoon coarse ground black pepper
1 egg, beaten (for egg wash)
Fresh parsley, finely chopped for garnish
Directions
- Preheat your oven to 400°F (200°C). Grease a standard muffin tin thoroughly with butter or non-stick spray.
- Roll out the puff pastry slightly on a floured surface. Cut into 6 large squares or circles (about 4-5 inches wide). Press the dough into the muffin cups, allowing the edges to ruffle slightly over the top.
- The Anti-Soggy Secret: Prick the bottoms of the dough with a fork. Place a small piece of parchment paper and a few pie weights (or dried beans) into each cup. Bake the empty crusts for 8 minutes. Remove the weights and parchment, brush the inside bottom of the crust with a thin layer of the beaten egg wash, and bake for 2 more minutes. This “egg wash seal” creates a waterproof barrier so the sauce cannot penetrate the pastry.
- While the crusts pre-bake, whisk together the condensed soup, heavy cream, garlic powder, thyme, and black pepper in a medium bowl. Fold in the shredded chicken, peas, carrots, and corn.
- Remove the tin from the oven. If the centers have puffed up, gently press them down with the back of a spoon to make room for the filling.
- Fill each par-baked crust to the brim with the chicken mixture. Brush the exposed top edges of the pastry with the remaining egg wash for a deep golden, professional shine.
- Return to the oven and bake for 12 to 15 minutes until the pastry is tall, flaky, and golden brown, and the filling is bubbling.
- Let the pies rest in the tin for 5-10 minutes. This is vital; it allows the steam to settle and the crust to firm up so they can be lifted out cleanly. Garnish with fresh parsley and an extra dusting of cracked black pepper before serving.
Notes
- The ‘egg wash seal’ is the key to a waterproof barrier. Ensure the pies rest for 5-10 minutes after baking so the crust firms up enough to be lifted out of the tin cleanly.