Stop dealing with dry, sandy energy balls that fall apart before they even hit your mouth. Most no-bake treats crumble because the dry ingredients aren’t properly hydrated, leaving you with a mouthful of dusty biscuit crumbs. It’s a common frustration that turns a quick snack into a messy disappointment.
This recipe changes the game by focusing on a specific binding technique and a higher moisture-to-crumb ratio. We’re moving away from the typical “dry ball” and toward a dense, fudgy truffle texture that stays perfectly intact. You’ll get that satisfying, moist interior that feels like a rich truffle rather than a dry granola bite.
For a similar chewy texture, you might enjoy these chewy chocolate hazelnut macaroons.
The secret to this success is the fat-based emulsion we create before adding any dry ingredients. By whisking the coconut oil and nut butter into a glossy base, we ensure every single crumb is coated in fat. This prevents the biscuits from soaking up all the moisture and turning the truffle into a desert-dry puck. Trust me, once you feel that fudgy “snap,” you’ll never go back to the old way.
The Science of Hydration in No-Bake Desserts
To understand why truffles crumble, you have to look at the physics of the “crumb.” Dry biscuit particles are incredibly thirsty; they act like tiny sponges that immediately soak up any liquid they touch. If you simply toss everything in a bowl and stir, the outer layers of the crumbs grab the moisture, leaving the centers dry and brittle.
However, our method uses a fat-based emulsion to manage this hydration. By combining melted coconut oil with creamy nut butter, we create a protective barrier. This mixture coats the starch particles in the chocolate biscuits, slowing down the absorption of the maple syrup. Therefore, the moisture is distributed evenly rather than being sucked up by the first few crumbs it touches.
In addition, this emulsion provides the structural integrity needed for a “melt-in-your-mouth” experience. When you bite into the truffle, the coconut oil begins to melt at body temperature, releasing the chocolate flavors instantly. Without this specific fat balance, the truffle would feel gritty on your tongue instead of smooth and velvety.
Essential Components for a Fudgy Truffle Base
Quality ingredients are the foundation of any good dessert, but in a no-bake recipe, their physical properties matter even more. Since we aren’t using heat to chemically change the structure, we rely on the natural viscosity and texture of our pantry staples. Choosing the right versions of these items will determine if your truffle is a success or a crumbly mess.
Selecting the Right Cocoa Biscuit Foundation
The consistency of your biscuit crumbs is non-negotiable; you need a “fine sand” texture. If you have large chunks, the truffles will crack when you try to roll them. I recommend using a food processor to pulse chocolate graham crackers or dark cocoa biscuits until they are uniform. Dark cocoa biscuits often have a deeper flavor and less sugar than standard graham crackers, which helps balance the sweetness of the maple syrup.
The Role of Runny Nut Butters
You must use a well-stirred, runny nut butter for this recipe to work. If you reach for the dry, chalky stuff at the bottom of the jar, the emulsion will break and the dough will be too stiff. Almond butter or cashew butter works best because they have a neutral, creamy profile. Ensure the oil is fully incorporated into the butter before measuring so the truffles stay moist and pliable.
Why Melted Coconut Oil is the Secret Binder
Melted coconut oil is the “glue” that makes this recipe professional-grade. Unlike other fats, coconut oil is solid at room temperature but has a very low melting point. This means it acts as a structural lock once the truffles are refrigerated, providing a clean “snap” when you bite in. It also adds a subtle richness that mimics the mouthfeel of expensive cocoa butter found in high-end chocolates.
Phase One: Creating the Glossy Emulsion
Firstly, you need to whisk the nut butter, maple syrup, melted coconut oil, vanilla, and salt in a large bowl. You are looking for a visual cue here: the mixture should be completely smooth, glossy, and dark. If it looks separated or curdled, keep whisking until it pulls together into a cohesive liquid ribbon.
Secondly, always sift your cocoa powder into this wet mixture. Cocoa powder is notorious for forming small, stubborn clumps that don’t break down during stirring. Sifting prevents the “bitter pocket” syndrome, where someone bites into a truffle and gets a dry puff of unsweetened cocoa. Once sifted, whisk it in until the base looks like a thick chocolate ganache.
Phase Two: The Mechanical Pressing Technique
This is the core “hack” that separates a mediocre snack from a true truffle. Instead of lightly folding the crumbs into the liquid, you need to use the back of a heavy spoon to vigorously mash the mixture. Press the dough firmly against the sides of the bowl for at least a full minute.
This mechanical pressure is vital because it forces the liquid binders into the cellular structure of the biscuit crumbs. You are essentially hydrating the “sand” by force. As you mash, you’ll notice the texture change from a loose rubble to a dense, clay-like dough. This creates that beautiful, cake-like cross-section that looks so impressive when served.
Phase Three: The Critical Hydration Rest
Once the dough is mixed, you must let it rest for 10 minutes at room temperature. This is the most skipped step in no-bake recipes, but it is the most important for texture. During this time, a process called capillary action occurs, where the crumbs slowly pull the syrup and oil into their very center.
If you skip this rest, the truffles might feel tacky on the outside but will remain gritty on the inside. After ten minutes, the dough will feel noticeably firmer and less sticky. This rest ensures the final product is fudgy rather than grainy, giving the ingredients time to fully marry before you start shaping them.
Shaping and Coating for a Professional Finish
To get uniform 155-calorie portions, use a small cookie scoop to portion out the dough. Scoop one generous tablespoon and roll it firmly between your palms. The heat from your hands will slightly melt the coconut oil on the surface, creating a tacky exterior that is perfect for grabbing the coconut.
Immediately roll the ball in the shredded coconut while it is still warm and “grabby.” I like to press the coconut lightly into the surface with my fingers to make sure it sticks well. If you wait too long to roll them in the coating, the surface will dry out and the coconut will just fall off, leaving you with a bald truffle.
Troubleshooting Common Texture Issues
If your mixture seems too oily, don’t panic. This can happen if your nut butter was exceptionally runny or if the room is very warm. Simply sift in an extra tablespoon of cocoa powder or a teaspoon of crushed biscuits to soak up the excess fat. The dough should feel like soft play-dough, not greasy.
On the other hand, if the mixture is still crumbling after the rest, it needs more moisture. Add a teaspoon of warm water or a tiny bit more maple syrup and mash it again. If the coconut won’t stick because the balls have cooled, try the “steam” trick: hold the ball over a pot of simmering water for three seconds to reactivate the surface tackiness.
Storage and Temperature Management
The “Cold-Set” rule is absolute for these truffles. You must chill them in the refrigerator for at least 45 minutes before serving. This time allows the coconut oil to solidify completely, which locks the moisture inside and creates that signature fudgy bite. If you eat them too soon, they will feel soft and greasy.
For long-term storage, keep them in an airtight container in the fridge for up to two weeks. Interestingly, these actually taste better after 24 hours because the flavors have more time to develop. The salt sharpens the chocolate, and the coconut oil stabilizes the texture, making them even more satisfying the next day.
Flavor Variations and Dietary Swaps
You can easily customize these truffles to suit your preferences. For a nut-free version, sunflower seed butter is an excellent substitute for almond butter, though it may add a slightly earthy green tint. If you love coffee, add half a teaspoon of espresso powder to the cocoa powder to create a sophisticated mocha profile.
In addition, consider the texture of your coconut. While raw shredded coconut is classic, toasted coconut adds a wonderful crunch and a nutty aroma that pairs beautifully with the dark chocolate. Just ensure the toasted coconut is completely cool before rolling, or it might melt the truffle surface too quickly and create a mess.
Expert Truffle Making FAQ
Can I use granulated sugar instead of maple syrup?
No, granulated sugar will not work in this specific recipe. The liquid volume of the maple syrup is essential for hydrating the biscuit crumbs. If you use dry sugar, the truffles will be extremely sandy and will not hold their shape. Stick to liquid sweeteners like honey or agave for the best results.
Why are my truffles sweating?
Truffles usually “sweat” due to rapid temperature shifts. If you move them from a very cold fridge to a hot, humid kitchen, moisture from the air condenses on the surface. To prevent this, keep them in a sealed container and only take out what you plan to eat immediately. The coconut oil is sensitive to heat.
Can I freeze these for long-term storage?
Yes, these truffles freeze beautifully for up to three months. Place them in a single layer in a freezer-safe bag. When you are ready to eat them, thaw them in the refrigerator rather than on the counter. This slow thaw prevents them from becoming mushy or losing their structural “snap.”
What is the best way to crush the biscuits without a food processor?
If you don’t have a food processor, use the rolling pin method. Place the biscuits in a heavy-duty zip-top bag and squeeze out the air. Use a rolling pin to crush them, then roll over the bag repeatedly until the pieces are reduced to a fine, uniform powder. Sift out any large chunks before using.

Chocolate Coconut Truffles
Course: DessertCuisine: AmericanDifficulty: easy12
truffles15
minutes155
kcal25
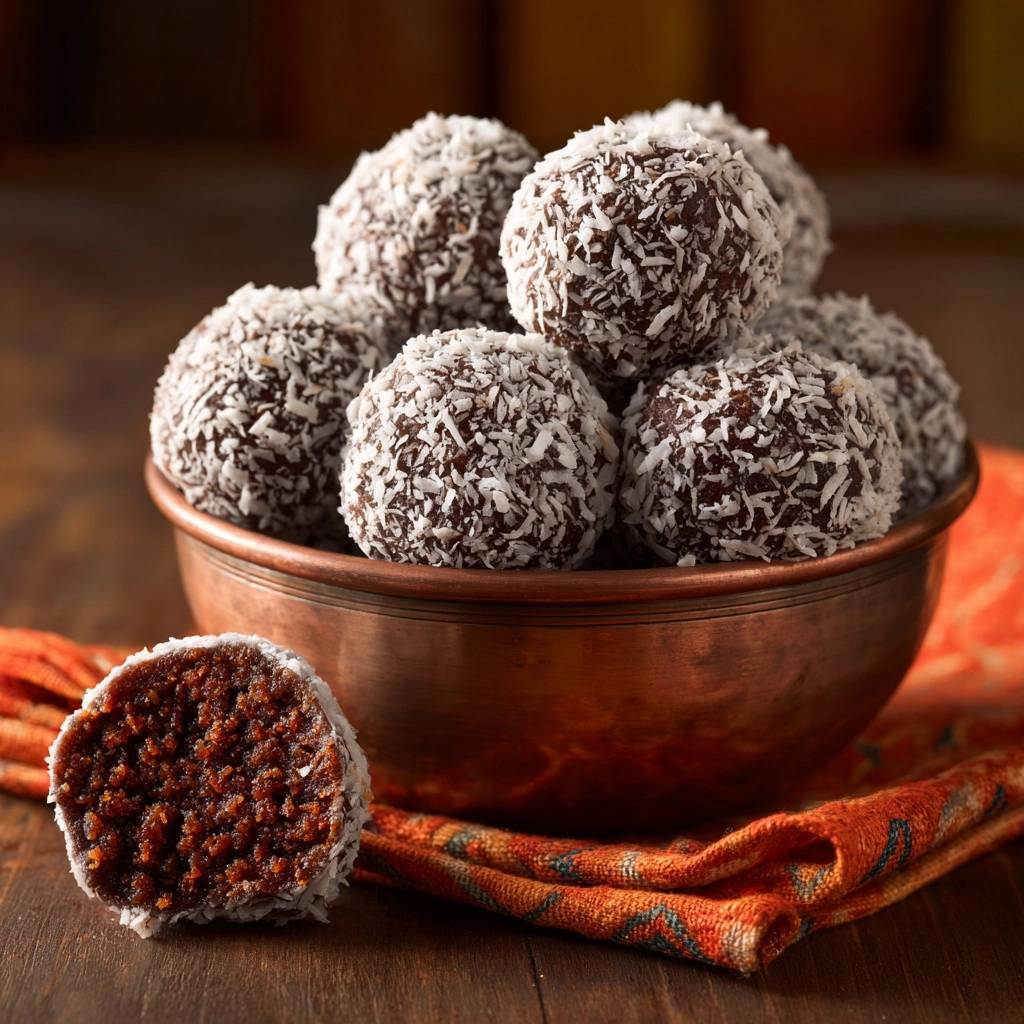
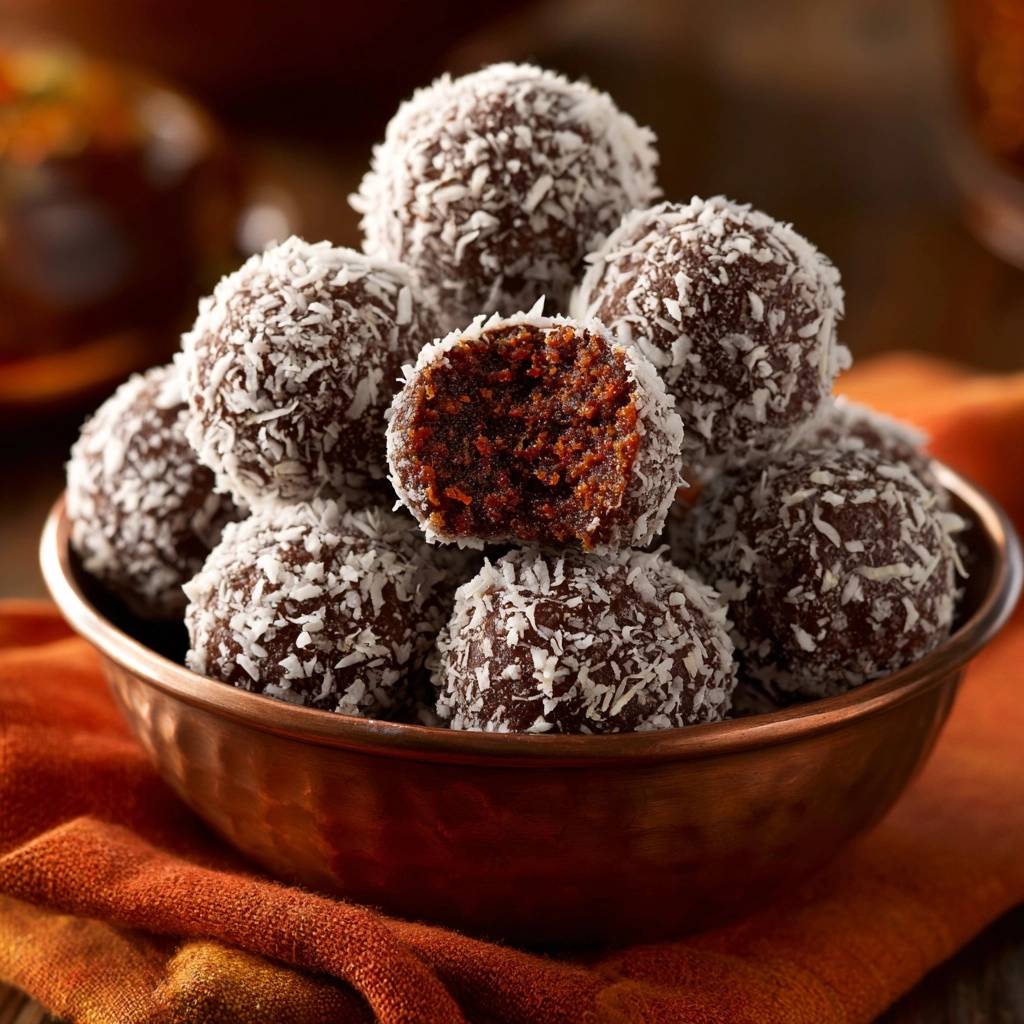
MinutesA rich and moist chocolate truffle made with crushed biscuits, nut butter, and coconut oil. These treats are designed to stay intact and provide a dense, cake-like interior without any dry or sandy texture.
Ingredients
1 1/4 cups finely crushed chocolate graham crackers or cocoa biscuits (pulsed to a fine sand)
1/2 cup creamy almond butter or cashew butter (ensure it is well-stirred and runny)
1/4 cup maple syrup or honey
2 tablespoons melted coconut oil (the secret to the “fudgy” set)
3 tablespoons unsweetened cocoa powder
1 teaspoon vanilla extract
Pinch of sea salt
3/4 cup unsweetened shredded coconut (for coating)
Directions
- To solve the crumbling problem, whisk the nut butter, maple syrup, melted coconut oil, vanilla, and salt in a large bowl until the mixture is completely smooth and glossy. The addition of coconut oil creates a fat-based emulsion that prevents the biscuits from drying out the bite.
- Sift the cocoa powder into the wet mixture to avoid clumps, then add the finely crushed biscuits.
- Use the back of a heavy spoon to vigorously mash and press the mixture against the sides of the bowl for 1-2 minutes. This mechanical pressure forces the liquid binders into the cellular structure of the crumbs, creating the dense, cake-like interior seen in the cross-section of the image.
- Let the “dough” rest for 10 minutes at room temperature. This allows the biscuit crumbs to fully hydrate, ensuring the final truffle is fudgy rather than gritty.
- Scoop one generous tablespoon of the mixture and roll it firmly between your palms to form a smooth, tight ball.
- Immediately roll the ball in the shredded coconut. Press the coconut lightly into the surface to ensure it adheres to the tacky exterior.
- Chill in the refrigerator for at least 45 minutes. The coconut oil will firm up, locking the moisture inside and providing a clean, solid snap when bitten.
Notes
- The secret to the fudgy set is the combination of melted coconut oil and mechanical pressure when mixing, which ensures the crumbs are fully hydrated and prevents crumbling.