There is something undeniably theatrical about a lava cake. You press your spoon into the side of a perfectly domed cake, and a river of vibrant, warm sweetness spills out across the plate. It is the ultimate “wow” dessert, but for many home cooks, it is also the most stressful. Traditional molten cakes rely on underbaking the center, which means a thirty-second difference in your oven can turn a liquid masterpiece into a dry, ordinary muffin.
This recipe changes the game by using a fail-safe ganache core. Instead of hoping the batter stays raw in the middle, we insert a frozen disc of red-tinted white chocolate ganache. This ensures that the cake walls can bake fully and gain structural integrity while the center is guaranteed to be molten every single time. You get that iconic red velvet tang and cocoa depth without the “will it or won’t it” anxiety of traditional methods.
The secret to the perfect flow lies in the temperature of your ingredients. Always use room-temperature eggs and yolks. Cold eggs can cause the melted butter to seize, creating a lumpy batter that won’t rise evenly. When the batter is smooth and emulsified, it creates a delicate, velvety crumb that acts as the perfect vessel for the hidden treasure inside.
The Architecture of a Perfect Red Velvet Molten Cake
A successful lava cake is a feat of edible engineering. Unlike a self-saucing pudding, where the sauce is created by pouring liquid over the top, this ganache-core method builds the dessert from the inside out. The cake walls must be sturdy enough to hold the weight of the filling but tender enough to melt in your mouth.
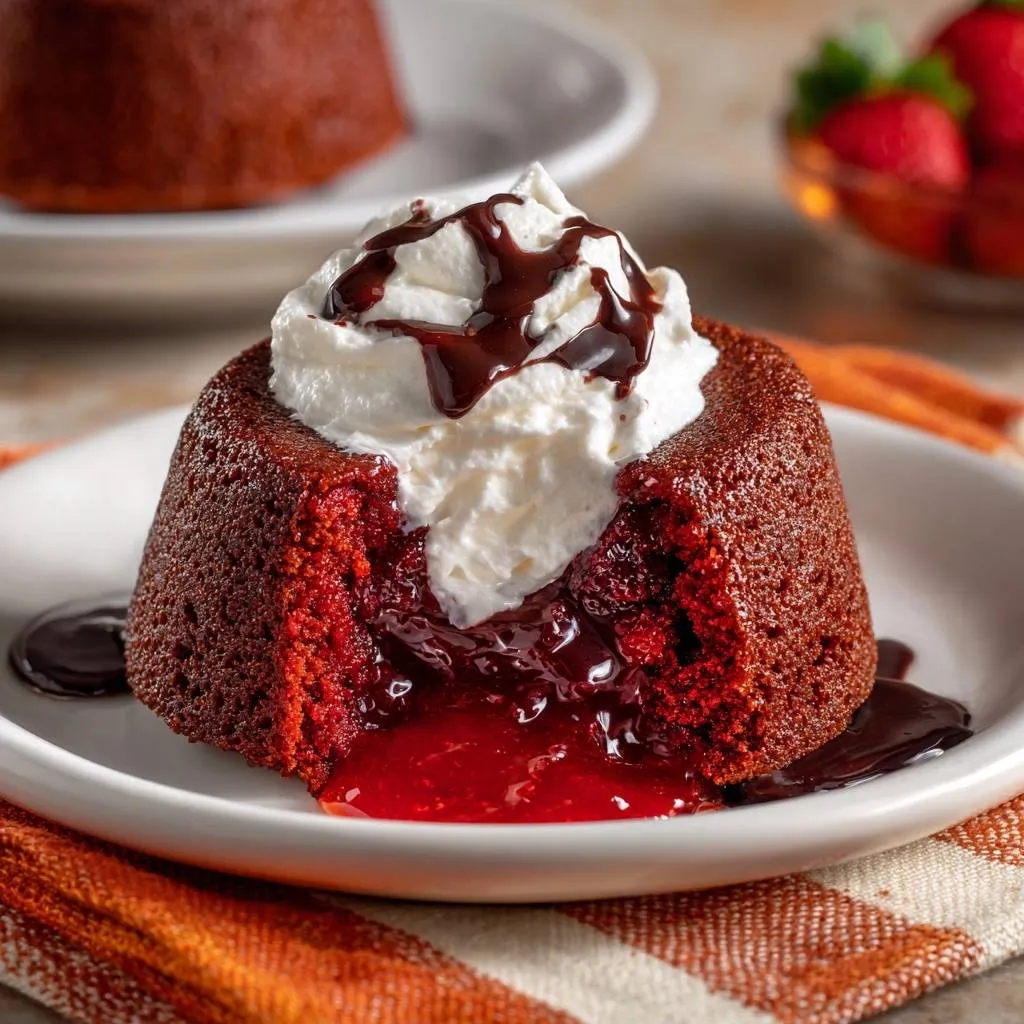
The red velvet aesthetic demands a specific textural contrast. You want a tight, fine crumb that looks like classic velvet but feels moist. Because we are using a white chocolate base for the lava, the interior is richer and more decadent than a standard chocolate version. This creates a beautiful visual when the deep crimson cake is cut open to reveal the bright, flowing red center.
For a similar red velvet experience without leaks, explore red velvet cheesecake stuffed cookies.
Essential Ingredients for the Red Ganache Core
The “lava” in this recipe is a simple but precise ganache. White chocolate serves as the perfect base because it carries the red gel coloring beautifully and provides a creamy, buttery flavor that complements the cocoa in the cake. Heavy cream is the essential thinning agent here; it ensures the chocolate stays in a liquid state even as it begins to cool on the plate.
Using gel food coloring is a non-negotiable step for the core. Liquid food coloring is water-based and can cause the white chocolate to “seize” or turn into a grainy paste. Gel is highly concentrated, meaning you only need a tiny amount to achieve a deep, dramatic crimson without thinning out the fats in the ganache.
Selecting High-Quality White Chocolate
Not all white chocolate is created equal. For a smooth, luxurious flow, look for chocolate that contains real cocoa butter rather than vegetable oil. High-quality chips or chopped baking bars melt more consistently and avoid the waxy mouthfeel often found in “candy melts.” If the ingredient list starts with sugar and oil instead of cocoa butter, your lava might be thick and sluggish rather than silky.
The Red Velvet Batter: Balancing Cocoa and Color
Red velvet is more than just a color; it is a specific flavor profile that sits right between vanilla and chocolate. We use a small amount of unsweetened cocoa powder to provide that hint of earthiness. However, adding too much cocoa will turn the batter brown, muddying the vibrant red hue we are looking for.
The addition of two extra egg yolks is the “pro move” for stability. These extra yolks provide the fat and protein needed to strengthen the cake walls. This ensures that when you flip the ramekin over, the cake doesn’t collapse under its own weight. The yolks also contribute to a richer, more custard-like texture in the cake itself.
Flour and Cocoa: The Sifting Requirement
Sifting your dry ingredients might feel like an extra chore, but it is vital for lava cakes. Cocoa powder is notorious for clumping in the pantry. If those lumps make it into your batter, they create air pockets or weak spots in the cake’s structure. A weak spot in a lava cake usually leads to a “blowout,” where the lava leaks out the side before it even hits the table.
Step-by-Step: Preparing the Frozen Lava Inserts
To make the ganache, combine your white chocolate and cream in a microwave-safe bowl. Use 20-second intervals and stir thoroughly between each one. White chocolate has a lower burning point than dark chocolate, so patience is key here. Once it is smooth, stir in your red gel until the color is uniform and intense.
Drop tablespoon-sized dollops of this mixture onto parchment paper and pop them in the freezer. They need at least 45 minutes to become rock solid. If they are even slightly soft when you put them in the batter, they will melt too quickly in the oven and mix with the cake, destroying the “molten” effect you worked so hard to create.
Engineering the Bake: Ramekin Preparation and Assembly
Properly preparing your ramekins is the difference between a beautiful plated dessert and a pile of crumbs. Use softened butter to coat every nook and cranny of the 6-ounce ramekins. When dusting with flour or cocoa powder, tap the ramekin upside down to remove every bit of excess. I prefer using cocoa powder for dusting because it disappears into the dark red cake, whereas white flour can leave a dusty residue on the outside.
When assembling, pour about one-third of your batter into the bottom first. Place the frozen ganache disc right in the center. If you just drop the disc into an empty ramekin, it will sink to the bottom and stick to the plate. By “sandwiching” the core between layers of batter, you ensure the lava stays perfectly suspended in the middle of the cake.
Precision Timing: The 400°F Baking Window
Oven calibration is everything for this recipe. At 400°F, the outside of the cake cooks rapidly to form a crust while the frozen center begins to liquefy. You are looking for the edges to be firm and the top to lose its shiny, wet appearance. The center should still have a very slight jiggle when you move the baking sheet.
Don’t rush the two-minute rest period after you pull them out of the oven. This short window allows the cake to “set” just enough to be handled. During these two minutes, carry-over cooking finishes the very center of the cake walls, ensuring they are strong enough to be inverted onto a plate without bursting.
If you’re enjoying these baking tips, definitely check out this old-fashioned gingerbread cake for a warming treat.
Troubleshooting Common Red Velvet Lava Cake Obstacles
If your cake sticks to the ramekin, it is almost always a greasing issue. Make sure you don’t miss the bottom “corner” where the wall meets the base. If the center isn’t flowing, you likely left them in the oven for just sixty seconds too long. Every oven runs differently, so it is worth checking them at the 11-minute mark.
If the cake collapses immediately upon unmolding, the walls were underbaked. This usually happens if the oven wasn’t fully preheated. If your cakes come out looking brown or brick-colored, you might be using a liquid beet-based dye or too much cocoa powder. Stick to gel colors for that “fire engine” red that makes red velvet so famous.
How to Test for Doneness Without a Thermometer
The “touch test” is your best friend here. Gently press the top of the cake with your finger. It should feel like a soft sponge cake on the outer inch, but the very center should feel soft and give way easily. You can also look for the “matte finish.” As the cake bakes, the top goes from a glossy, liquid look to a dull, matte finish. Once that matte look reaches the center, they are ready.
Plating and Presentation Techniques
To unmold, run a very thin paring knife around the edge of the cake. Place your serving plate upside down over the ramekin, then quickly flip both over together. Wait a few seconds for gravity to do the work. You should feel the weight of the cake drop onto the plate. Lift the ramekin slowly and straight up to avoid snagging the sides.
Make sure your serving plates are at room temperature. If you use a plate that has been sitting in a cold cupboard, the thermal shock can cause the bottom of the cake to crack prematurely. A warm plate keeps the lava flowing longer, giving your guests plenty of time to admire your handiwork before the first bite.
Garnishing for Contrast
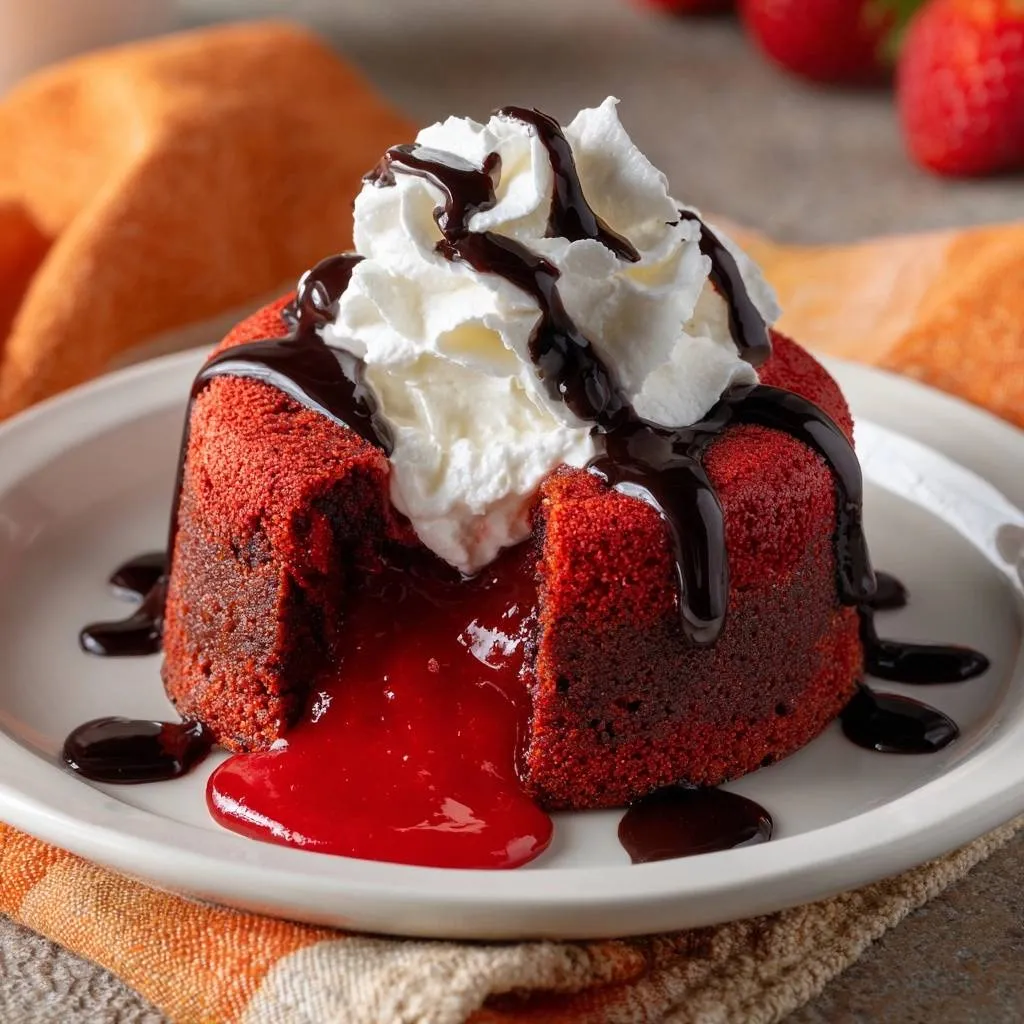
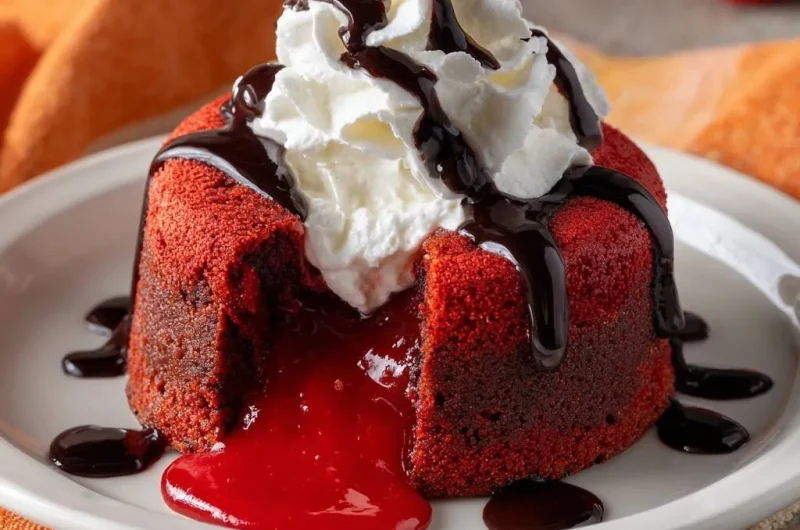
Red velvet is visually striking, but it needs contrast to really pop. A snowy white dollop of whipped cream provides a beautiful color break against the red cake. I love adding a drizzle of chocolate syrup around the base of the cake to add depth. If you want to go the extra mile, a few fresh raspberries or a sprig of mint adds a fresh, acidic element that cuts through the richness of the white chocolate center.
What to Try Next
Round out your dessert experience with these complementary baked goods.
- For a warm, spiced treat that complements the richness of red velvet, consider this Moist, Tender Honey Pumpkin Bread.
- If you’re seeking another comforting bake with a tender crumb, this Secret to Pillowy Perfection Fluffy Diner-Style Pancakes offers a delightful contrast.
Make-Ahead Strategies and Storage
You can absolutely prep these in advance, which makes them perfect for dinner parties. You can assemble the ramekins with the batter and frozen cores, then cover them with plastic wrap and keep them in the fridge for up to 24 hours. When you are ready to bake, just take them straight from the fridge to the oven.
Note that cold batter takes longer to heat up. You will likely need to add 2 to 3 minutes to the total baking time if you are starting with chilled ramekins. Keep a close eye on them and use the touch test to ensure they don’t overbake. I don’t recommend freezing the fully assembled, unbaked cakes, as the texture of the batter can change.
Expert Tips for Scaling the Recipe
If you are doubling this recipe for a crowd, do not overcrowd your baking sheet. Leave at least two inches of space between each ramekin. If they are too close together, the air cannot circulate properly, and the cakes in the middle will be undercooked while the ones on the edges are overdone.
Also, remember that the ganache cores must stay frozen until the very second they go into the batter. If you are making a large batch, keep the cores in the freezer and only take out four at a time as you fill the ramekins. This keeps the “lava” integrity high for every single guest.
Frequently Asked Questions
Can I use liquid food coloring instead of gel?
It is not recommended. Liquid food coloring is much less concentrated, so you have to use a lot more to get a bright red. This extra moisture can thin out the batter and cause the white chocolate ganache to seize or become grainy. Gel provides a much more intense color without changing the chemistry of the ingredients.
What is the best substitute for ramekins?
If you don’t have ramekins, you can use a standard muffin tin. However, because muffin cups are smaller, you will need to reduce the bake time to about 8-10 minutes. Unmolding is also trickier; you’ll need to place a large baking sheet over the whole tin and flip it all at once, which can be messy. Ramekins are definitely the preferred tool for this job.
Why did my lava core sink to the bottom?
This usually happens for two reasons. Either you didn’t put enough batter in the bottom of the ramekin before adding the core, or the ganache core wasn’t frozen solid. If the core is soft, it will melt instantly and sink through the batter. Make sure you have a solid “floor” of batter and a rock-hard frozen core to keep it centered.
Can I make these without a microwave?
Yes, you can use a double boiler (bain-marie) to melt the ganache. Place a heat-proof bowl over a pot of simmering water, making sure the bottom of the bowl doesn’t touch the water. Stir the white chocolate and cream until melted. This is actually a very safe way to melt white chocolate as it prevents the scorching that can sometimes happen in a microwave.
How do I reheat a leftover lava cake?
While these are best fresh, you can reheat them in the microwave for 15-20 seconds. This will soften the center again, though it may not be quite as “liquid” as the first time. Be careful not to go longer, or you will cook the center through and lose the molten effect entirely. Store any leftovers in an airtight container in the fridge for up to two days.
Red Velvet Cakes
Course: DessertCuisine: AmericanDifficulty: medium4
servings20
minutes12
minutes445
kcal32
MinutesThese Red Velvet Lava Cakes solve the common issue of unpredictable bake times by using a frozen red-tinted white chocolate ganache core. This technique guarantees a flowing, vibrant center and a perfectly baked cake exterior.
Ingredients
For the Red Lava Core:
3 ounces white chocolate chips
2 tablespoons heavy cream
1/2 teaspoon red gel food coloring
For the Red Velvet Cake:
1/2 cup unsalted butter, melted
1/3 cup granulated sugar
2 large eggs plus 2 egg yolks, room temperature
1 teaspoon vanilla extract
1/2 teaspoon red gel food coloring
1/2 cup all-purpose flour
1 tablespoon unsweetened cocoa powder
Pinch of salt
Toppings:
Whipped cream (from a canister or freshly whipped)
Chocolate dessert syrup
Directions
- Prepare the Lava Core: In a small microwave-safe bowl, combine white chocolate chips and heavy cream. Microwave in 20-second intervals, stirring until smooth. Stir in the red gel food coloring until the mixture is a deep, vibrant red. Drop four tablespoon-sized dollops onto a parchment-lined plate and freeze for at least 45 minutes until solid.
- Prep the Oven and Ramekins: Preheat your oven to 400°F (200°C). Generously grease four 6-ounce ramekins with butter and dust with a little flour or cocoa powder, tapping out the excess. This ensures the cakes release cleanly.
- Mix the Batter: In a medium bowl, whisk the melted butter and sugar until combined. Whisk in the eggs, yolks, vanilla, and red food coloring until the mixture is smooth and the color is uniform.
- Combine Dry Ingredients: Sift the flour, cocoa powder, and salt directly into the wet ingredients. Gently fold with a spatula until just combined. Do not overmix, as this will make the cake tough.
- Assemble: Fill each ramekin about one-third of the way with batter. Place one frozen red ganache core into the center of each. Top with the remaining batter until the ramekins are about three-quarters full, ensuring the core is completely covered.
- Bake: Place ramekins on a baking sheet and bake for 12 to 14 minutes. The sides should be firm and the tops should look set but slightly soft to the touch.
- Unmold and Serve: Let the cakes rest in the ramekins for 2 minutes. Run a thin knife around the edges and carefully invert each cake onto a small plate.
- Garnish: Top each cake with a generous swirl of whipped cream and drizzle with chocolate syrup, allowing the syrup to pool around the base as shown in the image. Serve immediately while the center is molten.
Notes
- The ganache cores must be frozen for at least 45 minutes to ensure they don’t melt too quickly during the baking process. Use gel food coloring for the most vibrant red color without affecting the batter consistency.