Imagine biting into a pastry that shatters with a distinct, musical crunch, revealing a center of molten, spiced apples. The contrast between the buttery, flaky layers and the gooey, salted caramel is enough to make anyone weak at the knees. It’s the ultimate comfort food, but achieving that professional bakery finish at home can be surprisingly elusive.
Most home bakers struggle with the dreaded “soggy bottom,” where the underside of the turnover becomes a limp, doughy mess. This happens because the fruit releases its juices during the bake, soaking into the delicate pastry before it has a chance to crisp up. We’re going to fix that today by focusing on moisture management and temperature control.
The secret to a perfect turnover isn’t just the dough; it’s the stability of the filling. By pre-cooking your apples with a thickener and chilling them completely, you create a barrier that protects the pastry. I’ve found that using a shallow bowl for chilling speeds up the process and ensures the butter in your dough stays cold, which is the only way to get those sky-high, flaky layers.
The Science of Preventing Soggy Pastry Bottoms
Puff pastry is a marvel of culinary engineering, relying on hundreds of thin layers of butter trapped between sheets of dough. When the heat of the oven hits that butter, it creates steam, which lifts the layers and creates that iconic flake. However, if moisture from the apple filling seeps into the dough before it sets, the layers stick together and turn into a heavy, greasy slab.
Raw apples are roughly 85% water, and as they bake, they dump all that liquid directly onto your bottom crust. By pre-cooking the filling, we force the apples to release their moisture in a saucepan rather than inside the pastry. This controlled evaporation is the first line of defense against a mushy dessert.
Furthermore, pre-cooking allows the starches to gelatinize and the sugars to caramelize before they ever touch the dough. This creates a stable, jam-like environment. When the turnover hits the oven, the pastry can focus on rising and crisping because it isn’t fighting a losing battle against a puddle of apple juice.
Why Cornstarch Slurries are Non-Negotiable
A cornstarch slurry acts as a powerful binding agent that “locks” the apple juices in place. When you stir that mixture of starch and cold water into the simmering fruit, it transforms the thin, watery liquid into a thick, translucent glaze. This glaze clings to the apples instead of running off.
Without this step, the heat of the oven would cause the sugar and fruit juice to become incredibly thin and runny. The cornstarch ensures that even at high temperatures, the filling maintains a viscous consistency. It’s the difference between a neat, filled pastry and one that leaks its soul out onto the baking sheet.
The Thermal Shock: Why Filling Temperature Matters
Temperature is everything when working with puff pastry. If you place a warm apple filling onto a sheet of raw dough, the butter in the pastry will begin to melt instantly. This ruins the lamination, which is the technical term for those beautiful, distinct layers of fat and flour.
Once that butter melts into the flour, you no longer have puff pastry; you have a standard pie crust that won’t rise. You must chill the filling until it is cold to the touch. This “thermal shock” ensures the pastry stays firm and the butter remains solid until it reaches the intense heat of the oven, where it can do its job properly.
Essential Components for Salted Caramel Apple Turnovers
Success starts with your shopping list. While the ingredient list is short, each item plays a specific role in the structural integrity and flavor profile of the dish. You want ingredients that can stand up to high heat without losing their identity.
For example, using unsalted butter in the filling allows you to control the seasoning perfectly. Since we are finishing these with a heavy sprinkle of flaky sea salt, you don’t want hidden salt in the filling to push the flavor over the edge. It’s all about balance.
Don’t forget the importance of the egg wash. A simple beaten egg with a splash of water acts as both a glue for the seams and a lacquer for the crust. It provides the protein necessary for the Maillard reaction, which gives the turnovers that deep, mahogany glow that looks like it came from a French patisserie.
Selecting the Right Apple Variety
Granny Smith apples are the gold standard for turnovers for two reasons: acidity and firmness. The tartness of the apple cuts through the intense sweetness of the caramel sauce, providing a much-needed flavor contrast. More importantly, they hold their shape under pressure.
If you use a softer apple like a McIntosh or Red Delicious, they will break down into applesauce during the pre-cook. You want distinct cubes of fruit that offer a slight “toothsome” bite. The Granny Smith stays firm through the saucepan stage and the 25-minute bake, ensuring a great texture.
Puff Pastry: Store-Bought vs. Homemade
While making puff pastry from scratch is a noble pursuit, high-quality store-bought versions are a fantastic time-saver. Look for brands that list “butter” as the primary fat rather than oil or shortening. All-butter pastry has a superior flavor and a much cleaner mouthfeel.
For another way to achieve perfectly crisp layers, check out this braided apple pastry.
Keep the dough in the fridge until the very second you are ready to roll it out. If the dough becomes too soft or sticky while you’re working, don’t fight it. Pop it back into the freezer for five minutes to firm up the butter. Cold dough is the secret to a high rise.
The Role of Flaky Sea Salt
Table salt is for seasoning; flaky sea salt is for experience. Using a finishing salt like Maldon provides a specific crunch and a sudden burst of salinity. These large, pyramid-shaped crystals don’t dissolve immediately into the caramel.
This creates a “salted caramel” effect where you get hit with a wave of sweet, followed by a sharp, clean saltiness. It wakes up the palate and prevents the sugar from feeling cloying. It’s a small detail that makes the entire dish feel sophisticated and chef-made.
Step-by-Step: Preparing the Spiced Apple Filling
Start by dicing your peeled apples into uniform half-inch cubes. Consistency is key here so they cook at the same rate. Toss them into a saucepan with the brown sugar, butter, and spices. As they cook, you’ll smell the cinnamon and nutmeg blooming in the heat.
Cook the mixture for about 5 to 7 minutes. You are looking for the apples to become slightly translucent on the edges while remaining firm in the center. Once you stir in the cornstarch slurry, the liquid will turn from a cloudy juice into a shiny, thick syrup in about sixty seconds.
Immediately move the filling to a shallow bowl or a plate. Spreading it out increases the surface area, allowing the steam to escape and the mixture to cool rapidly. Don’t rush this. If you have time, let it sit in the fridge for at least thirty minutes until it’s stone cold.
Assembly Techniques for a Professional Seal
Once your pastry is rolled and cut into squares, it’s time to assemble. Place a generous spoonful of the cold filling in the center, but resist the urge to overstuff. If the filling touches the edges of the square, the egg wash won’t be able to create a proper seal.
Think of the egg wash as your culinary glue. Brush it lightly along the perimeter before folding the dough over to create a triangle. This creates a protein bond that holds the turnover together as the air inside expands during the baking process.
Mastering the Fork Crimp
To ensure a professional seal, use the tines of a fork to press down firmly along the edges. You aren’t just making a pretty pattern; you are physically fusing the top and bottom layers of dough together. This prevents “blowouts” where the filling leaks out and burns on the pan.
If the dough feels like it’s sticking to the fork, dip the tines in a little bit of flour. Press straight down with confident pressure. A well-crimped edge creates a beautiful, ruffled border that crisps up beautifully in the oven’s heat.
Steam Management: Slitting the Pastry
Venting is a step you cannot skip. As the apples bake, they will still release a small amount of steam. If that steam has nowhere to go, it will build up pressure and either burst your seams or make the interior of the pastry gummy and wet.
Use a very sharp knife to cut two or three small slits in the top of each turnover. This allows the steam to escape cleanly. It also gives the person eating it a little “peek” at the golden apple filling inside, which adds to the visual appeal.
Baking for Maximum Rise and Color
Preheat your oven to a hot 400°F. This high temperature is vital for “oven spring,” which is the rapid rise the pastry gets in the first few minutes. If the oven is too cool, the butter will simply leak out of the pastry, leaving you with a flat, greasy mess.
Brush the tops of your turnovers generously with the egg wash right before they go in. This is what creates that lacquered, golden-brown finish. Bake them for 20 to 25 minutes. Don’t be afraid of a deep color; a pale turnover is often an undercooked, soggy turnover.
The Cooling Rack Requirement
As soon as the turnovers come out of the oven, move them to a wire cooling rack. If you leave them on the hot baking sheet, the bottom of the pastry will “sweat.” The trapped steam between the parchment paper and the hot crust will turn your crispy base soft in minutes.
Letting them sit on a rack for 10 minutes allows air to circulate entirely around the pastry. This sets the crust and ensures that the first bite is just as crunchy as the last. Once they are slightly cooled, you can go wild with the caramel drizzle and sea salt.
Troubleshooting Common Turnover Failures
If your turnovers didn’t rise as much as you hoped, the most likely culprit is the temperature of the dough. If the pastry gets too warm during assembly, the layers of butter merge with the flour. Next time, try chilling your baking sheet in the fridge before you start assembling the turnovers on it.
Another common issue is caramel leakage. If you see a pool of sugar burning on your parchment paper, you might be overfilling the squares or not crimping the edges hard enough. Remember, the filling expands as it heats up, so leave a little “breathing room” inside the pastry triangle.
Lastly, if the bottom is still soft despite your best efforts, check your oven rack position. Baking on the lower third of the oven can help the bottom crust get more direct heat, ensuring it crisps up at the same rate as the top. Every oven has its own personality, so don’t be afraid to adjust.
Make-Ahead Strategies and Storage Logistics
These turnovers are fantastic for make-ahead treats. You can assemble the turnovers completely, up to the point of the egg wash, and then freeze them on a tray. Once frozen solid, transfer them to a freezer bag. You can bake them straight from frozen; just add about 5 minutes to the baking time.
If you have leftovers, store them in an airtight container at room temperature for up to two days. To restore that “just-baked” crunch, avoid the microwave at all costs. Instead, pop them into a 350°F oven or a toaster oven for 5 minutes. This dries out the pastry and re-crisps the layers perfectly.
Expert Tips for Customizing Your Fillings
Once you’ve mastered the basic apple filling, you can start playing with flavors. A teaspoon of freshly grated ginger adds a sophisticated heat that pairs beautifully with caramel. Alternatively, try adding half a cup of toasted chopped pecans for an extra layer of crunch inside the turnover.
You can also swap out the spices. Cardamom provides a floral, citrusy note that feels very high-end, while a pinch of ground cloves adds a deep, earthy warmth. Just ensure any additions don’t add extra moisture; if you add juicy berries, for instance, you may need to slightly increase the cornstarch slurry.
Frequently Asked Questions
Can I use puff pastry that has been sitting out?
No, you should avoid using puff pastry that has reached room temperature. When the dough gets warm, the butter layers soften and blend into the flour. This destroys the lamination, meaning your turnovers will be flat and greasy rather than light and flaky. Always keep the dough chilled until the moment you need to work with it.
What is the best substitute for Granny Smith apples?
If you can’t find Granny Smiths, Honeycrisp or Braeburn apples are the best alternatives. They both have a firm texture that holds up well during the pre-cooking and baking process. Avoid soft apples like Gala or Fuji, as they tend to turn mushy and release too much water, which can lead to a soggy crust.
How do I prevent the caramel drizzle from becoming a sticky mess?
The key is to wait until the turnovers have cooled for at least 10 to 15 minutes. If the pastry is piping hot, the caramel will thin out and run right off the sides, pooling on the plate. Letting the turnover cool slightly allows the caramel to sit on top of the ridges, creating those beautiful, thick ribbons of sauce.
Can I use a different starch instead of cornstarch?
Yes, arrowroot powder or tapioca starch can work as substitutes for cornstarch. Use them in the same 1:1 ratio. However, avoid using flour as a thickener for the filling, as it can leave a cloudy appearance and a slightly pasty taste. Cornstarch is preferred because it creates a clear, shiny glaze that looks professional.
Why is my egg wash streaky?
Streaky egg wash usually happens if the egg isn’t beaten thoroughly enough or if the pastry is too cold and the egg “clumps.” To get a perfectly even finish, whisk the egg with a tablespoon of water and a tiny pinch of salt. The salt helps break down the proteins in the egg white, resulting in a smooth liquid that glides on easily.
Salted Caramel Apple Turnovers
Course: DessertCuisine: AmericanDifficulty: medium4
servings20
minutes25
minutes420
kcal45
MinutesA foolproof recipe for apple turnovers featuring a thick spiced apple glaze, chilled puff pastry for maximum flake, and a decadent salted caramel drizzle.
Ingredients
2 large Granny Smith apples, peeled and diced into 1/2-inch cubes
1/4 cup brown sugar
1 tablespoon unsalted butter
1 teaspoon ground cinnamon
1/4 teaspoon ground nutmeg
1 tablespoon cornstarch
1 package (17.3 oz) frozen puff pastry, thawed but kept very cold
1 egg, beaten with 1 tablespoon water (egg wash)
1/2 cup thick caramel sauce (for drizzling)
1 tablespoon flaky sea salt (such as Maldon)
Directions
- To prevent a soggy bottom, you must manage the moisture. Place the diced apples, brown sugar, butter, cinnamon, and nutmeg in a small saucepan over medium heat. Cook for 5-7 minutes until the apples are tender but still hold their shape.
- In a small bowl, whisk the cornstarch with 1 tablespoon of cold water to create a slurry. Stir this into the simmering apples. Boil for 1 minute while stirring constantly until the liquid transforms into a thick, translucent glaze. This binds the juices so they cannot migrate into the dough.
- Transfer the apple filling to a shallow bowl and refrigerate until completely cold. Never put warm filling on raw pastry; the heat will melt the butter layers in the dough, ruining the flake and causing a leaden crust.
- Preheat your oven to 400°F (200°C). Line a large baking sheet with parchment paper.
- On a lightly floured surface, gently roll out the puff pastry and cut into four 5-inch squares.
- Place a generous spoonful of the chilled apple mixture in the center of each square.
- Lightly brush the edges of the squares with the egg wash. Fold the pastry over the filling to form a triangle. Use a fork to crimp the edges firmly to seal.
- Using a sharp knife, cut two small slits in the top of each turnover to allow steam to escape.
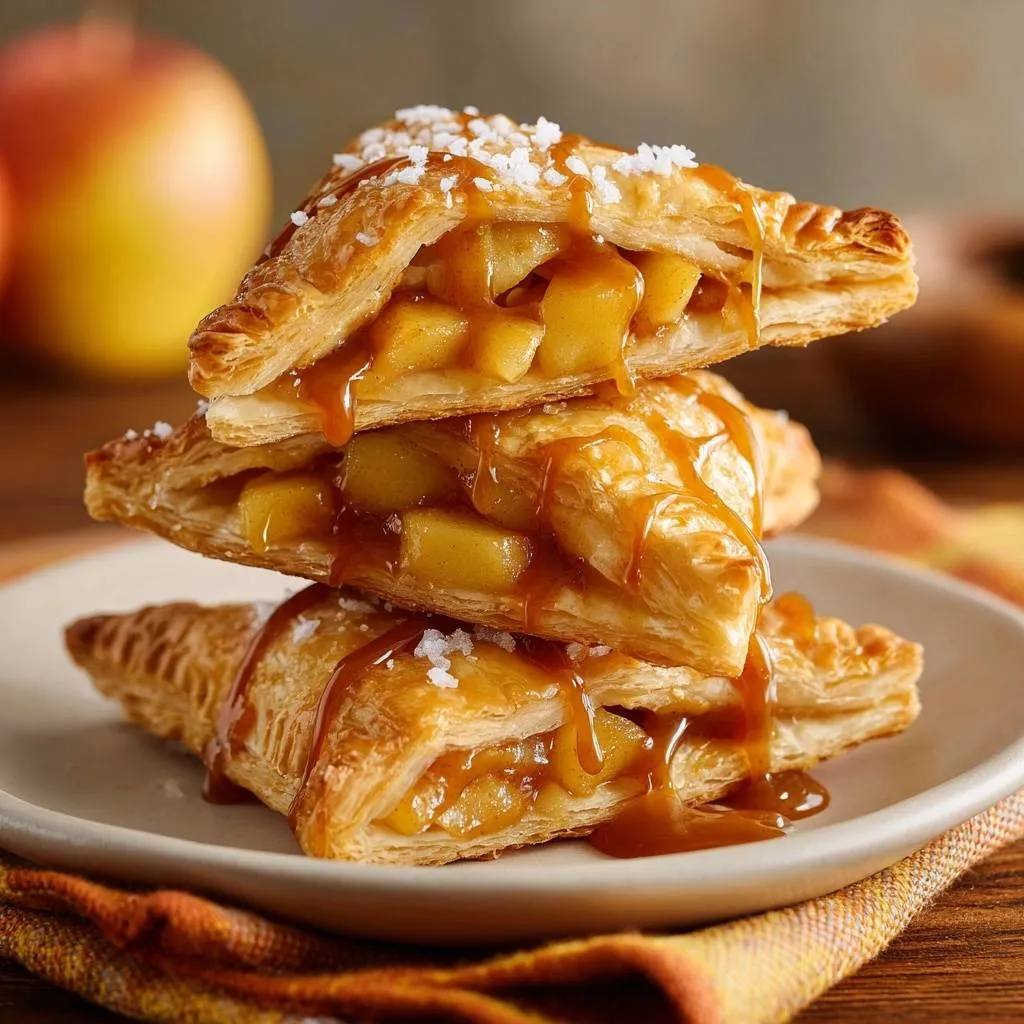
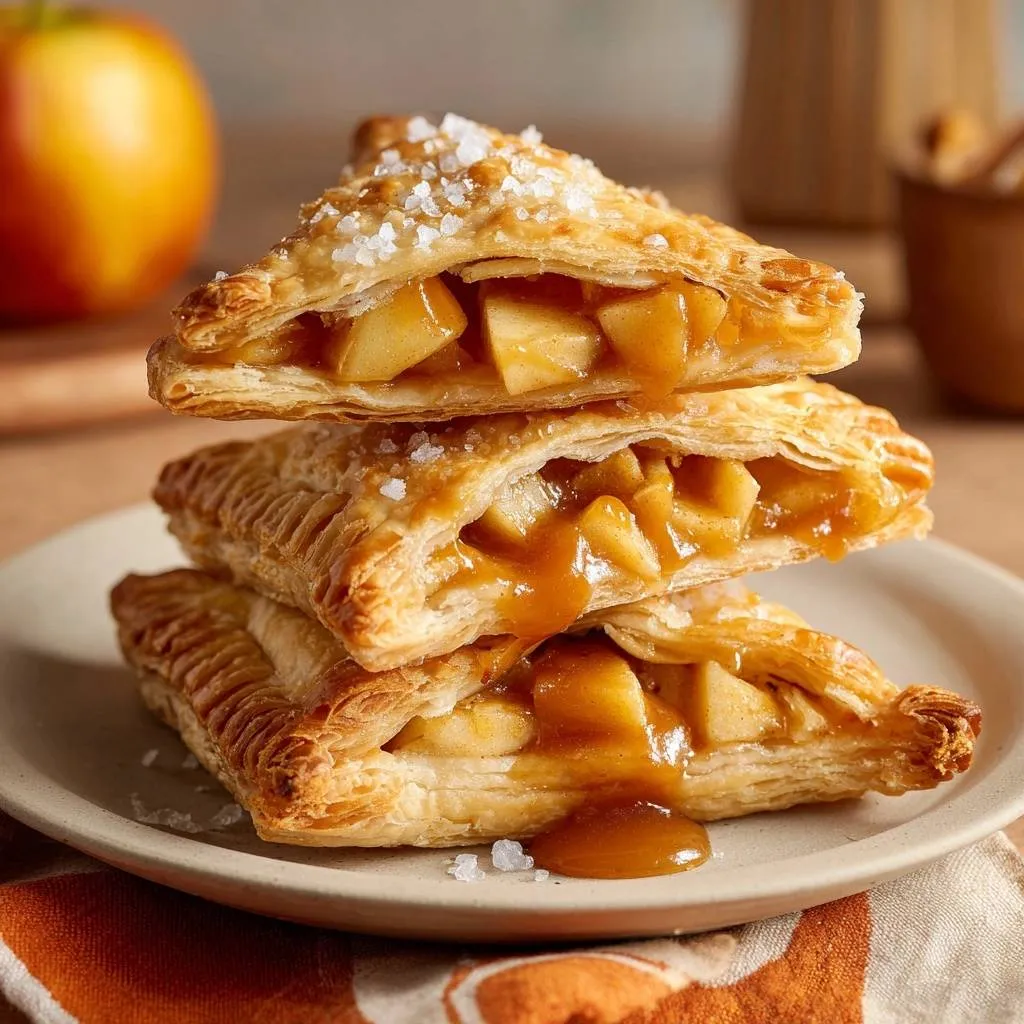
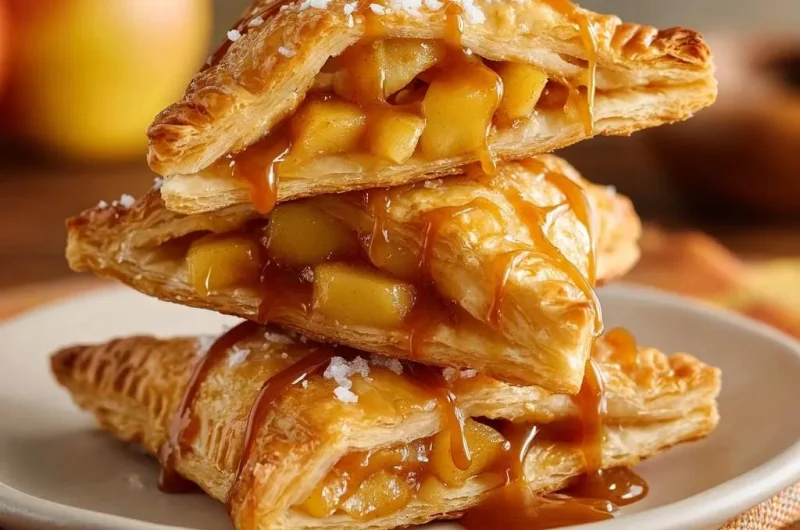
- Brush the tops of the turnovers thoroughly with the remaining egg wash. This creates the deep golden, lacquered finish seen in the image.
- Bake for 20 to 25 minutes, or until the pastry is puffed and a deep golden brown.
- Transfer the turnovers to a wire cooling rack immediately. Let them cool for at least 10 minutes; this allows air to circulate underneath, ensuring the bottom remains crisp.
- Once slightly cooled, drizzle generously with the caramel sauce and finish with a heavy sprinkle of flaky sea salt.
Notes
- The secret to the ‘Anti-Soggy Bottom’ is cooling the filling completely before assembly and using a cornstarch slurry to bind the juices. Always bake on parchment paper and cool on a wire rack to maintain crispness.