Imagine slicing your knife through a thick layer of bubbly, toasted mozzarella and hitting a crust so crisp it actually makes an audible sound. That golden-brown crunch is the hallmark of a perfect Skillet Chicken Parmesan, yet so many home versions end up as a sad, mushy disappointment. When breaded chicken sits submerged in liquid, the steam from the meat gets trapped, turning that beautiful coating into a soggy paste within minutes.
The secret to avoiding this culinary tragedy lies in a specific “nesting” technique rather than the traditional “drowning” method. By controlling how the sauce interacts with the breading, you maintain a sharp contrast between the velvet texture of the cheese and the jagged, salty ridges of the fried crust. It’s about structural integrity just as much as it is about flavor.
If you want to guarantee a restaurant-quality result, you must press your breading into the meat with real force. Most people just lightly toss the chicken in crumbs, but I’ve found that using the palm of your hand to firmly pack the panko creates a dense, moisture-resistant barrier. This shield keeps the juices inside the chicken while preventing the marinara from soaking through the exterior during the final broil.
The Science of a Non-Soggy Breaded Crust
Moisture is the enemy of any fried coating, and in a dish like Skillet Chicken Parmesan, you’re fighting a two-front war. You have steam escaping from the cooking meat on the inside and the water content of the marinara attacking from the outside. To win, you need to understand moisture migration and how to block it effectively.
Panko breadcrumbs are the superior choice here because they are flaky and porous, which provides more surface area for the oil to crisp up. However, standard panko can be a bit too large, leaving gaps where sauce can seep in. By pulsing your panko in a blender for just a few seconds, you create a “tighter” crumb. This finer texture creates a more solid wall of protection around the chicken breast.
Furthermore, the parmesan cheese in the breading mixture acts as a delicious, salty glue. As the chicken fries, the cheese melts slightly and then hardens, reinforcing the panko structure. This creates a crust that is physically tougher and more resistant to the softening effects of the tomato sauce, ensuring that the first bite is just as crunchy as the last.
Why the Wire Rack is Non-Negotiable
Once that chicken comes out of the hot oil, your instinct might be to put it straight onto a paper towel-lined plate. Don’t do it. Placing hot, fried food on a flat surface creates a “sweat” effect where the heat trapped underneath turns back into water, instantly softening the bottom crust.
Instead, use a wire cooling rack set over a baking sheet. This allows air to circulate around the entire cutlet, letting steam escape freely from all sides. This short resting phase is the essential bridge that allows the crust to fully set and harden before it ever touches a drop of sauce.
Essential Components for Skillet Chicken Parmesan
Quality ingredients are the foundation of this dish, starting with the chicken itself. I always recommend using boneless, skinless chicken breasts pounded to a uniform 1/2-inch thickness. This isn’t just for tenderness; it’s a mathematical necessity for even cooking. If one side is thicker than the other, the thin part will dry out before the center is safe to eat.
Pounding the meat also breaks down tough muscle fibers, ensuring every bite is butter-tender. If you don’t have a meat mallet, a heavy skillet or even a rolling pin works perfectly. Just be sure to wrap the chicken in plastic wrap first to keep things clean and prevent the meat from tearing.
The Three-Station Dredging System
Success in breading requires a disciplined three-step process: flour, egg, then crumbs. The flour’s job is to absorb surface moisture so the egg has something to cling to. Without that initial dusting, the entire breading “sleeve” will likely slide right off the chicken in the pan.
The egg wash acts as the protein glue, while the final panko-parmesan mixture provides the structural shield. I like to add dried oregano and garlic powder directly into the breading rather than the sauce. This ensures the seasoning is toasted by the hot oil, which unlocks a deeper, more savory aroma than if the spices were just simmered in liquid.
Selecting the Right Marinara and Mozzarella
Since the chicken only spends a few minutes in the sauce, you need a marinara with a thick, reduced consistency. A watery, thin sauce will migrate too quickly into the breading and ruin your hard work. Look for a high-quality brand where tomato paste or crushed tomatoes are the primary stars, not water.
When it comes to cheese, fresh mozzarella offers a beautiful, creamy melt, but it carries a lot of water. If you use fresh slices, pat them dry with paper towels before placing them on the chicken. Alternatively, a low-moisture, whole-milk mozzarella provides that classic “pizza-style” stretch and browns beautifully under the broiler without puddling.
Step-by-Step: Achieving the Perfect Golden Sear
The frying stage is where the flavor is built. You want about a half-inch of neutral oil in your skillet—enough to come halfway up the sides of the chicken. Wait until the oil is shimmering and reaches roughly 350°F before adding the meat. If the oil is too cold, the breading will act like a sponge and soak up grease; if it’s too hot, the outside will burn before the inside is cooked.
For a similar crispy texture alongside your chicken, explore these crispy thyme skillet potatoes.
When you lay the chicken into the pan, always lay it away from you. This simple motion ensures that if the oil splashes, it moves toward the back of the stove rather than toward your arms. You are looking for a “shallow fry” here, which gives you more control than deep frying while still delivering that signature golden-brown hue.
Don’t crowd the pan! If you put too many pieces in at once, the oil temperature will plummet, and you’ll lose that vital sear. Fry in batches if necessary. You’ll know it’s time to flip when the edges of the chicken look opaque and the bottom is a deep, rich gold. This usually takes about 4 to 5 minutes per side.
Managing Heat in Cast Iron vs. Stainless Steel
I almost always reach for my 12-inch cast-iron skillet for this recipe. Cast iron is a heat powerhouse; it retains energy much better than stainless steel. When you drop cold chicken into the pan, the cast iron stays hot, ensuring the frying process never stalls.
Stainless steel is great for heat conduction, but it can be finicky with breaded items. If the pan isn’t perfectly heated, the breading might stick to the bottom and tear away when you try to flip it. If you use stainless, be extra diligent about checking that your oil is shimmering before the chicken makes contact.
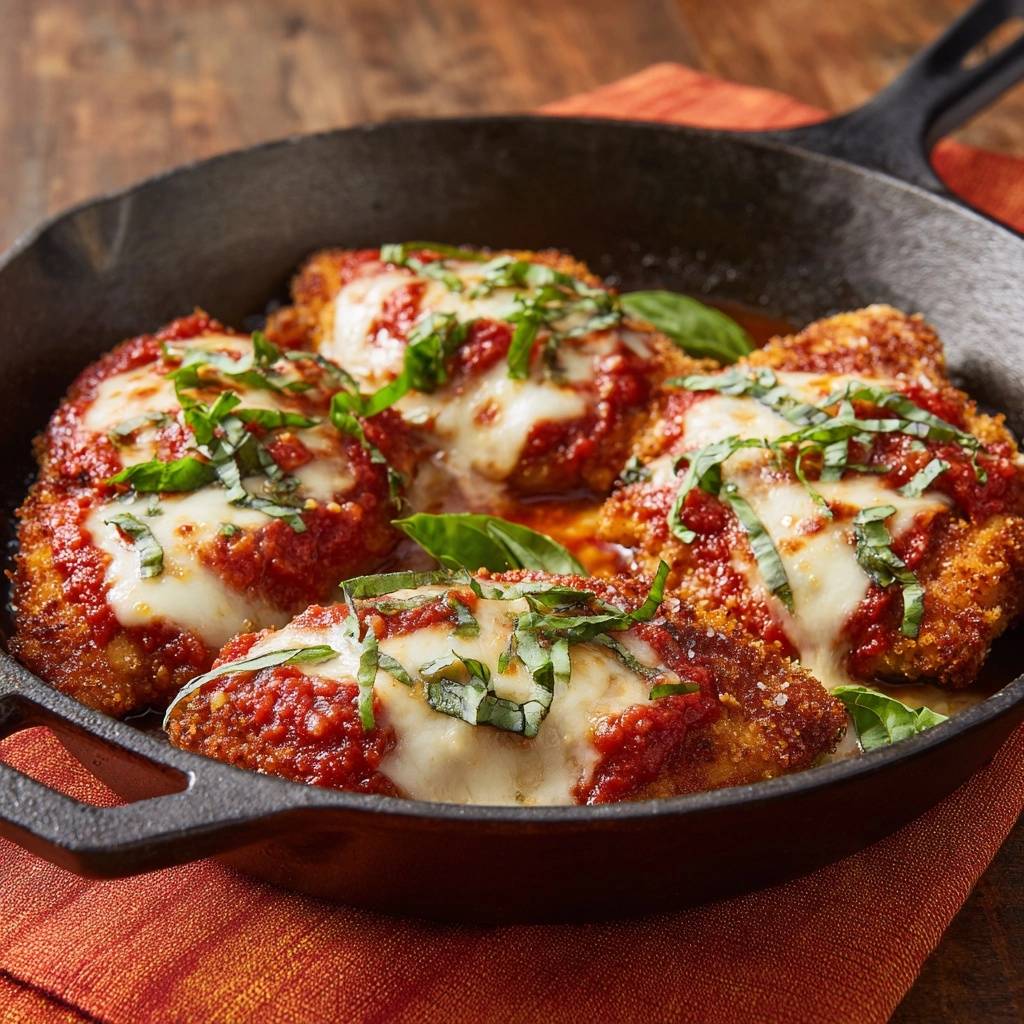
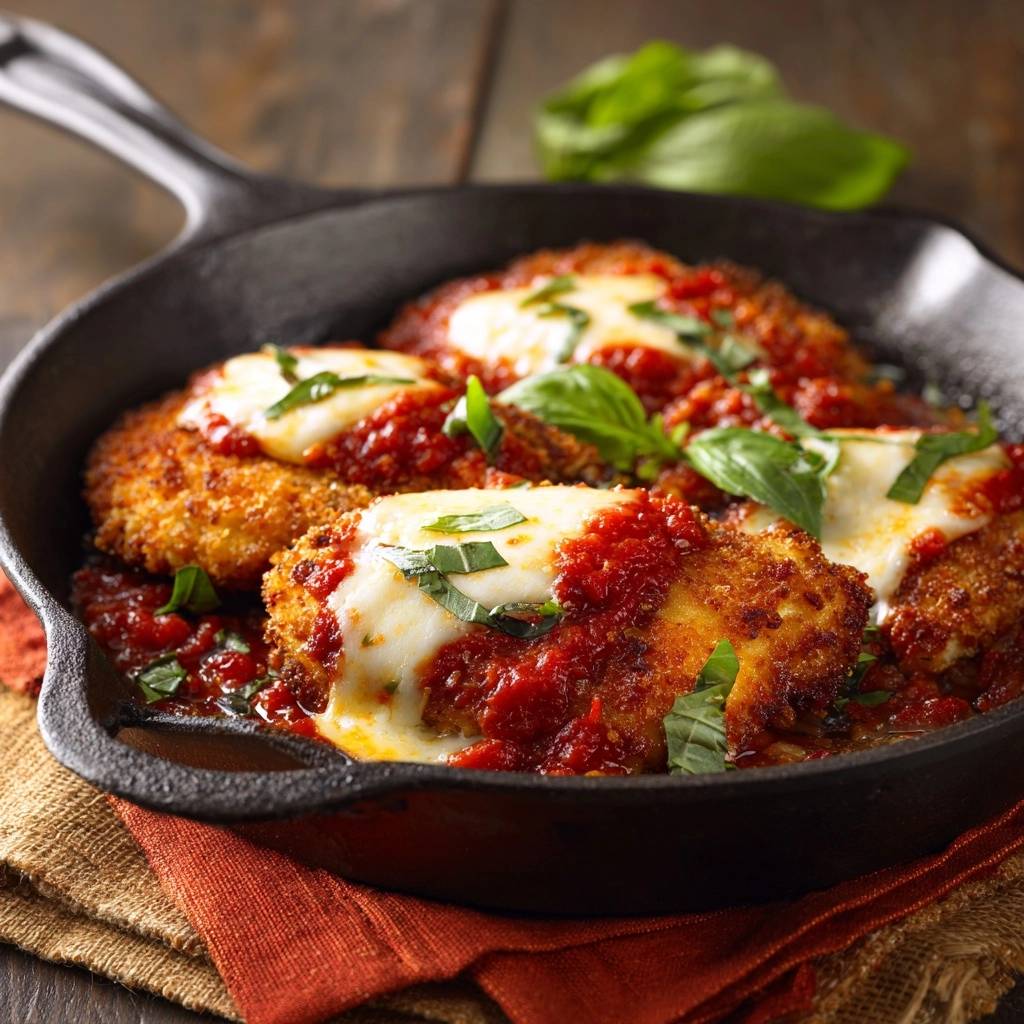
The Nesting Method: Assembly and Broiling
This is the critical transition that separates the pros from the amateurs. After frying, remove the chicken and wipe out the excess oil with a thick wad of paper towels. Leave behind those little browned bits at the bottom of the pan—that’s “fond,” and it’s packed with concentrated chicken and parmesan flavor.
Pour your marinara directly into the hot skillet. The residual heat will start the sauce simmering immediately. Now, instead of burying the chicken, you “nest” it. Place the crispy cutlets gently on top of the sauce. This keeps the bottom of the chicken in contact with the flavors of the marinara while the top and sides stay exposed to the air, preserving their crunch.
The “Center-Strip” Saucing Strategy
To further protect the texture, do not cover the entire piece of chicken with sauce. Spoon a modest strip of marinara only down the center of each breast. This leaves the perimeter of the breading completely dry and exposed.
When you top that center strip with mozzarella and pop it under the broiler, the dry edges of the chicken get one last blast of intense heat. This makes them even crispier while the cheese melts and fuses with the sauce in the middle. It creates a perfect bite that is simultaneously saucy, cheesy, and crunchy.
Troubleshooting Common Breaded Chicken Failures
One of the most common complaints is the breading falling off in the pan. This usually happens because the chicken was too wet before the flour stage. Always pat your chicken dry with paper towels before you start the dredging process. If the meat is damp, the flour turns into a slick film that won’t bond to the protein.
If you find your chicken is burnt on the outside but raw in the middle, your oil was likely too hot. Cast iron holds heat so well that you may need to turn the burner down to medium once the frying is underway. Use an instant-read thermometer to check the internal temperature; you’re aiming for 160°F before the chicken goes into the sauce, as it will finish at 165°F under the broiler.
Lastly, if the dish tastes “flat,” it’s almost always a salt issue. You must season every layer. Salt the flour, salt the egg wash, and ensure your breadcrumb mixture has enough parmesan. If you only season the very top, the interior of the meat will taste bland and uninspired.
Optimal Side Dishes for Skillet Chicken Parmesan
While spaghetti is the traditional partner, the richness of fried chicken and melted cheese often calls for something with a bit of a “bite.” Garlicky broccoli rabe is a fantastic choice. Its slight bitterness cuts right through the heavy fats, cleansing your palate between mouthfuls.
If you prefer something cold, a crisp Caesar salad with plenty of lemon juice works wonders. Alternatively, a simple arugula toss with a light lemon vinaigrette provides a peppery, bright contrast to the savory marinara. The goal is to balance the plate so the meal feels satisfying rather than overwhelming.
Make-Ahead Strategies and Storage Logistics
You can actually prep the breaded cutlets up to 4 hours in advance. Place them on a parchment-lined tray in the refrigerator, uncovered. This actually helps the breading “set” and adhere even better to the meat. Just don’t add the sauce or cheese until you are ready to cook and serve.
If you have leftovers, avoid the microwave at all costs. The microwave will turn the breading into a soggy, rubbery mess. Instead, place the chicken in an air fryer at 350°F for about 5 minutes, or in a toaster oven. This dry heat will reactivate the oils in the crust and bring back that essential crunch. Store leftovers in an airtight container in the fridge for up to three days.
Expert Tips for Professional Results
To truly master this dish, stop guessing and start measuring. An infrared thermometer is a game-changer for checking oil temperature. Knowing exactly when your oil hits 350°F prevents the greasy, oil-soaked crust that ruins so many home-cooked meals.
Another pro move is the “fridge rest.” If you have the time, let your breaded chicken sit in the fridge for 15 to 20 minutes before frying. This cold rest allows the flour and egg to hydrate and form a much stronger bond with the panko, making it nearly impossible for the breading to flake off during the flip.
When it comes to the garnish, treat your basil with respect. To chiffonade correctly, stack the leaves, roll them tightly like a cigar, and slice thin ribbons with a very sharp knife. Do this at the very last second. If you chop basil too early or use a dull knife, the edges will bruise and turn black, losing that vibrant, peppery aroma.
Finally, right before you serve the skillet, give the whole dish a tiny squeeze of fresh lemon juice. You won’t taste “lemon,” but the acidity will brighten the heavy flavors of the cheese and fried breading, making every ingredient pop. It’s the finishing touch that makes people ask for your secret recipe.
Frequently Asked Questions
How do I store leftovers so they don’t get soggy?
Store leftovers in an airtight container in the refrigerator for up to 3 days. To maintain the best texture, try to store the chicken and any extra sauce separately if possible. When reheating, use an oven or air fryer at 350°F until the cheese is bubbly and the crust is crisp again. Avoid freezing this dish, as the moisture in the sauce and chicken will cause the breading to become mushy upon thawing.
Why does my breading always fall off the chicken?
Breading usually falls off because the chicken was damp before dredging or the pan was crowded. Always pat the chicken completely dry with paper towels before the flour step. Additionally, make sure you press the panko mixture firmly into the meat with your palms. Finally, don’t flip the chicken too early; let the crust fully sear and release naturally from the pan before turning it over.
Can I use gluten-free flour and breadcrumbs?
Yes, you can easily swap the all-purpose flour for a 1:1 gluten-free flour blend and use gluten-free panko-style crumbs. Gluten-free breadcrumbs actually tend to stay very crispy, though they may brown slightly faster than wheat-based crumbs, so keep a close eye on the heat. Ensure your parmesan cheese is also high quality to help with the structural bonding of the crust.
What can I use instead of a cast-iron skillet?
If you don’t have cast iron, a heavy-bottomed stainless steel skillet or a high-quality non-stick pan will work. The key is using a pan that can go from the stovetop to the broiler. If your pan has a plastic handle, you will need to transfer the chicken and sauce to a baking dish before adding the cheese and broiling. However, a metal-handled skillet is preferred to keep everything in one pan for the best flavor retention.
Is it okay to use chicken thighs instead of breasts?
You can use boneless, skinless chicken thighs, but they require a slightly longer cooking time because they have a higher fat content. Pound them to an even thickness just like the breasts. Thighs are more forgiving and stay very juicy, but they may not get quite as “flat” as a breast, which can make the nesting process a little more lopsided in the skillet.
How do I know when the oil is ready without a thermometer?
If you don’t have a thermometer, dip the end of a wooden spoon or a single breadcrumb into the oil. If the oil starts bubbling steadily around the wood or the crumb, it’s ready. If it bubbles violently, it’s too hot; if it doesn’t bubble at all, it needs more time. The “shimmer” on the surface of the oil is also a good visual cue that it’s approaching the right temperature.

Skillet Chicken Parmesan
Course: Main CourseCuisine: Italian-AmericanDifficulty: easy4
servings15
minutes20
minutes510
kcal35
MinutesA restaurant-quality Chicken Parmesan that solves the problem of soggy breading. By nesting crispy, panko-crusted chicken breasts on top of simmering marinara sauce and finishing under the broiler, you achieve a perfect balance of juicy meat, melted mozzarella, and a crunch that lasts.
Ingredients
4 boneless skinless chicken breasts, pounded to 1/2-inch thickness
1 cup fine panko breadcrumbs (pulsed in a blender for a tighter crust)
1/2 cup grated parmesan cheese
2 large eggs, beaten with 1 tablespoon water
1/2 cup all-purpose flour
1 teaspoon garlic powder
1 teaspoon dried oregano
1/2 teaspoon salt
1/4 teaspoon black pepper
1/2 cup neutral oil (vegetable or grapeseed) for shallow frying
1.5 cups high-quality marinara sauce
1 cup fresh mozzarella cheese, sliced or torn
1/4 cup fresh basil leaves, chiffonade
Directions
- Set up three shallow bowls. Place flour mixed with salt and pepper in the first; the beaten egg wash in the second; and a mixture of panko, parmesan, garlic powder, and oregano in the third.
- Dredge each chicken breast in flour (shake off excess), dip in egg, and press firmly into the panko mixture. Press the breading in hard to create a dense, even barrier that resists moisture.
- Heat the oil in a large 12-inch cast-iron skillet over medium-high heat. Once the oil is shimmering (about 350°F), add the chicken. Fry for 4 to 5 minutes per side until the crust is deep golden brown and the internal temperature reaches 160°F.
- Remove the chicken from the skillet and set aside on a wire rack. Carefully wipe out the excess frying oil from the skillet with paper towels, leaving only a thin film.
- Pour the marinara sauce into the bottom of the hot skillet. Place the chicken breasts back into the skillet, nesting them on top of the sauce.
- Spoon a small amount of additional sauce only down the center of each breast, leaving the crispy edges exposed. Top the sauce with mozzarella cheese.
- Place the skillet under a preheated broiler for 2 to 3 minutes until the cheese is bubbly and shows toasted brown spots.
- Remove from the oven and garnish with fresh basil. Serve immediately directly from the skillet to maintain the contrast between the simmering sauce and the crunchy breading.
Notes
- To ensure the tightest crust possible, pulse your panko breadcrumbs in a blender before breading. Always rest the fried chicken on a wire rack rather than paper towels to prevent steam from softening the bottom crust.