Hear that crunch? That is the sound of a perfectly rendered chicken drumstick, and it is a sound most home cooks rarely achieve in their own kitchens. Usually, skillet chicken ends up with skin that is either rubbery and pale or burnt on the outside while remaining raw near the bone. It is frustrating to put in the effort only to end up with a texture that feels more like boiled poultry than a gourmet roast.
The secret to achieving that deep golden, shatter-crisp exterior while keeping the meat dripping with juice is all about the cold-pan start and moisture control. This method ensures the fat renders out completely before the meat overcooks, giving you restaurant-quality results every single time. You don’t need fancy equipment, just a bit of patience and a shift in how you think about heat.
I’ve found that the biggest mistake people make is dropping cold meat into a screaming hot pan. This “shocks” the skin, causing it to seize up and trap a layer of flabby fat underneath. By starting with a cold skillet, you allow the fat to liquefy and escape slowly. This creates a thinner, crispier skin that stays brittle even after you add the lemon and garlic aromatics.
The Science of Rendering Fat for Crispy Skin
Chicken skin is a complex layer of protein and subcutaneous fat. When you subject it to immediate, intense heat, the proteins on the surface tighten instantly. This creates a barrier that prevents the fat underneath from escaping. Consequently, you get a piece of chicken that looks cooked on the outside but has a greasy, soft layer of unrendered fat hiding just beneath the surface.
The “Cold-Pan Start” is a game-changer because it works with the physics of the bird. As the skillet gradually warms up, the collagen in the skin begins to break down gently. This allows the fat to liquefy and exit the skin, essentially frying the chicken in its own natural oils. Therefore, the skin becomes thinner and more delicate as the cooking process continues.
Furthermore, the addition of a small amount of honey in this recipe isn’t just for sweetness. It plays a vital role in the Maillard reaction. Because honey contains simple sugars, it accelerates the browning process at a lower temperature. This helps you achieve that stunning mahogany color without having to leave the chicken on the heat so long that the meat becomes dry and stringy.
Essential Components for Skillet Roasted Lemon Garlic Chicken
Quality ingredients are the foundation of this dish, and each one serves a specific functional purpose. Chicken drumsticks are the ideal candidate here because they are bone-in and skin-on. The bone acts as an insulator, keeping the meat moist during the high-heat oven finish, while the skin provides the necessary fat for the rendering process.
The garlic head is another critical element. You’ll notice this recipe calls for leaving the skins on the cloves during the roasting phase. This is a deliberate choice to protect the delicate garlic flesh from the intense heat of the skillet and oven. It prevents the garlic from turning bitter and instead creates a soft, jammy “roasted garlic” paste that you can squeeze out later.
When it comes to the glaze, the balance of honey and smoked paprika is essential. The paprika adds a subtle earthiness and a vibrant red hue, while the honey provides the “stickiness” that helps the lemon juice cling to the meat. Additionally, always use low-sodium chicken broth. As the sauce reduces in the oven, the salt concentrates, and using a full-sodium broth can result in a final dish that is unpleasantly salty.
For a different take on this flavor combination, check out these honey garlic chicken bites.
Selecting the Right Cast Iron or Heavy Skillet
The vessel you choose is just as important as the ingredients. A cast-iron skillet is the gold standard for this recipe because of its incredible heat retention. Once it gets hot, it stays hot, providing a consistent sear that doesn’t drop in temperature when you move the chicken around. This consistency is what leads to an even, golden crust across every drumstick.
If you don’t have cast iron, a heavy-bottomed stainless steel pan will work, but you must be more vigilant. Stainless steel is more responsive to heat changes, which means the honey-lemon glaze could scorch if your burner is too high. Avoid thin, non-stick pans for this method, as they cannot handle the 400-degree oven finish and won’t produce the same level of browning.
Phase One: Moisture Removal and Seasoning Strategy
Moisture is the absolute enemy of crispiness. If there is water on the surface of your chicken, the heat of the pan will turn that water into steam. Steam cooks the skin, but it will never make it crispy. Therefore, you must use paper towels to pat the drumsticks until they are completely dry to the touch. If you have time, let them sit uncovered in the fridge for an hour to air-dry even further.
Once the chicken is bone-dry, apply your seasoning. I recommend mixing the salt, pepper, paprika, and oregano in a small bowl first to ensure an even blend. Sprinkle the mixture from a height to get a uniform coating on all sides of the drumsticks. This prevents clumps of spices that can burn and turn bitter in the pan fat.
Wait to salt the chicken until right before you are ready to cook. Salt draws moisture out of the meat through osmosis. If you salt it too early and let it sit on the counter, you’ll end up with a wet surface again, defeating the purpose of your careful drying. Season it, then get it straight into that cold skillet.
Phase Two: The Cold-Pan Sear Technique
Place your seasoned drumsticks in the cold skillet and drizzle with olive oil. Turn the heat to medium-high and then simply wait. For the first few minutes, you won’t hear much. However, as the pan warms, you’ll hear a gentle hiss that eventually grows into a vigorous sizzle. This is the sound of the fat rendering and the skin beginning to crisp.
Resist the urge to move the chicken for at least the first 6 to 8 minutes. The skin needs time to form a crust; if you try to flip it too early, it will stick to the pan and tear. Once the skin has properly crisped, it will naturally release from the metal. You’ll see the fat pooling in the bottom of the pan, which is exactly what you want.
Use tongs to turn the drumsticks every few minutes after that initial sear. You are looking for a deep, uniform golden brown on all sides. This stovetop phase should take about 12 to 15 minutes. By the end, the chicken should already look delicious, but we still need the oven to finish the interior and set the glaze.
Phase Three: Deglazing and Aromatics Integration
Once the skin is brittle and golden, it’s time to build the flavor base. Toss the unpeeled garlic cloves into the spaces between the chicken. Let them dance in the hot chicken fat for about two minutes. You’ll smell the aroma immediately—it should be sweet and nutty, not acrid or burnt.
Whisk your broth, lemon juice, and honey together in a small measuring cup. Now, here is the most important part of the entire process: the “Pour-Around” method. Carefully pour the liquid into the bottom of the pan, avoiding the tops of the chicken drumsticks. If you pour the liquid directly over the skin, you will instantly undo all the hard work you did to make it crispy.
Tuck your lemon wedges into the liquid. These will soften and caramelize in the oven, adding a concentrated citrus punch to the pan sauce. The liquid should come up about halfway the side of the chicken, leaving the top half of the skin exposed to the dry heat of the oven.
Phase Four: The High-Heat Oven Finish
Slide the entire skillet into your preheated 400-degree oven. This high temperature creates a convection effect that circulates dry, hot air around the top of the chicken. While the bottom of the drumsticks braises in the lemon-garlic broth, the top continues to dehydrate and harden into a crackling crust.
During these 15 to 20 minutes, the honey and lemon juice will emulsify with the rendered chicken fat. This creates a glossy, thick pan sauce that coats the bottom of the meat. You’ll notice the liquid reducing and bubbling vigorously. This concentration of flavors is what makes the sauce so addictive.
Check the internal temperature with a meat thermometer. You are looking for 165 degrees Fahrenheit at the thickest part of the drumstick. Once you hit that mark, pull the skillet out immediately. The chicken will continue to cook slightly from the residual heat of the cast iron, a process known as carry-over cooking.
Troubleshooting Common Chicken Roasting Obstacles
If your chicken skin is still soft after the oven phase, you likely had too much liquid in the pan or crowded the drumsticks too closely together. Crowding creates steam pockets. Next time, use a larger skillet or cook in two batches to ensure there is plenty of space for air to circulate around each piece of meat.
Burnt garlic is another common issue. If your garlic turned black and bitter, it’s usually because the skins were removed or it was added too early in the searing process. Keeping the papery skins on acts as a heat shield. If the garlic still burns, try tucking the cloves partially under the chicken pieces to protect them from the direct heat of the oven.
If your pan sauce looks “broken” or greasy, don’t panic. This happens when the fat and the broth haven’t fully emulsified. Simply remove the chicken to a plate and give the sauce a vigorous whisk while it’s still hot. The honey acts as a natural stabilizer and should help pull the sauce back together into a smooth, velvety glaze.
Flavor Variations: Adapting the Lemon Garlic Profile
While the lemon and garlic combination is a classic, you can easily adapt this method to suit different flavor profiles. For a Mediterranean twist, add a handful of pitted Kalamata olives and a tablespoon of capers to the pan when you add the broth. The saltiness of the olives beautifully balances the sweetness of the honey.
For a different flavor profile, explore creamy lemon herb chicken thighs.
If you prefer a bit of heat, incorporate a teaspoon of red pepper flakes into your dry rub. You can also whisk a teaspoon of harissa paste into the broth mixture. This gives the chicken a smoky, spicy depth that pairs perfectly with the cooling acidity of the lemon.
For an herb-heavy version, swap the dried oregano for fresh woody herbs. Tucking sprigs of rosemary and thyme into the skillet before it goes into the oven will infuse the fat with incredible aromatics. Just remember to stick to “hard” herbs for the roasting phase, as “soft” herbs like parsley or cilantro will simply wilt and turn bitter in the high heat.
Optimal Side Dishes for Roasted Drumsticks
You want sides that can stand up to the bold flavors of lemon and roasted garlic. A fluffy bed of couscous or quinoa is perfect for soaking up those precious pan juices. Alternatively, roasted turmeric potatoes are a great choice; you can even roast them on a separate sheet pan at the same time the chicken is in the oven.
Round Out Your Meal
Here are a couple of dishes that go well with your lemon garlic chicken.
- For a fresh counterpoint, consider a Garlic Herb Grilled Chicken Salad, bringing bright herbs and a cool finish.
- If you’re in the mood for something with a bit of sweetness and crunch, the Harvest Apple and Walnut Salad offers a satisfying contrast.
To balance the richness of the rendered fat, I love serving this with something bright and crisp. A shaved fennel salad with a light vinaigrette or some charred broccolini provides a necessary textural contrast. The bitterness of the greens cuts through the savory glaze, making every bite feel fresh.
When it comes to serving, I always recommend the “Sauce Service” approach. Instead of pouring the pan drippings over the top of the chicken on the plate, serve the sauce in a small ramekin on the side. This allows your guests to dip the meat into the sauce while keeping the skin perfectly crunchy until the very last bite.
Storage, Reheating, and Maintaining Texture
If you have leftovers, store them in an airtight container in the refrigerator for up to three days. However, be aware that the skin will naturally soften as it sits in the fridge. To revive that “shatter-crisp” texture, avoid the microwave at all costs. The microwave will turn the skin rubbery and dry out the meat.
The best way to reheat this chicken is in an air fryer or a toaster oven. Set the temperature to 375 degrees Fahrenheit and heat for about 5 to 8 minutes. This high, dry heat will re-crisp the exterior while keeping the interior succulent. If you’re using a standard oven, place the chicken on a wire rack over a baking sheet to allow air to circulate underneath.
I do not recommend freezing this specific dish. While the meat will freeze fine, the skin will lose its structural integrity once thawed and reheated. It will become soggy and lose that signature crunch that makes this recipe so special. This dish is truly at its best when eaten fresh from the skillet.
Expert Tips for Professional Results
To truly master this dish, use a meat thermometer every single time. Pulling the chicken at exactly 165 degrees ensures the meat stays juicy. Drumsticks are forgiving because of their higher fat content, but overcooking will still lead to a stringy texture. Precision is the difference between a good meal and a great one.
Always let the chicken rest for at least 5 minutes before serving. When meat cooks, the muscle fibers tighten and push the juices toward the center. Resting allows those fibers to relax and the juices to redistribute throughout the drumstick. If you cut into it too soon, all that delicious moisture will end up on the cutting board instead of in your mouth.
Don’t throw away those roasted garlic cloves! Once the chicken is done, the garlic inside the skins will be as soft as butter. Squeeze the cloves out of their skins and spread the roasted garlic directly onto the chicken or a piece of crusty bread. It is a concentrated, sweet, and savory treat that is often the best part of the meal.
Frequently Asked Questions
Can I use chicken breasts instead of drumsticks?
You can use chicken breasts, but you must adjust the timing. Breasts are leaner and cook much faster than drumsticks. I recommend using bone-in, skin-on breasts to prevent them from drying out. You will likely need to reduce the oven time to 10-12 minutes. Always use a thermometer to ensure they don’t go past 165 degrees, as white meat becomes dry very quickly.
Do I really have to start with a cold pan?
Yes, the cold-pan start is the most important part of the technique. If you start with a hot pan, the skin sears and traps the fat underneath. Starting cold allows the fat to render out slowly, which is the only way to get that paper-thin, ultra-crispy skin. It takes a few extra minutes, but the difference in texture is undeniable.
Can I skip the honey in the glaze?
You can skip the honey if you are watching your sugar intake, but your chicken won’t have the same deep mahogany color. The honey aids in the Maillard reaction, which is the chemical process that creates browned, flavorful crusts. If you omit it, you might want to increase the smoked paprika slightly to help with the visual color, though the flavor profile will be more tart from the lemon.
What if I don’t have a cast-iron skillet?
A heavy stainless steel skillet or a Dutch oven are the best alternatives. The key is using a pan with a thick bottom that can distribute heat evenly and safely transition from the stovetop to a 400-degree oven. Avoid using glass baking dishes for the searing phase, as they cannot be used on the stovetop and won’t provide the necessary heat for rendering the fat.
Why is my pan sauce too thin?
If the sauce hasn’t thickened enough, it’s usually because it didn’t reduce sufficiently in the oven. You can fix this by removing the chicken to a plate and simmering the sauce on the stovetop for 2-3 minutes after roasting. The liquid will evaporate, and the sugars from the honey will help it thicken into a syrupy glaze that coats the back of a spoon.
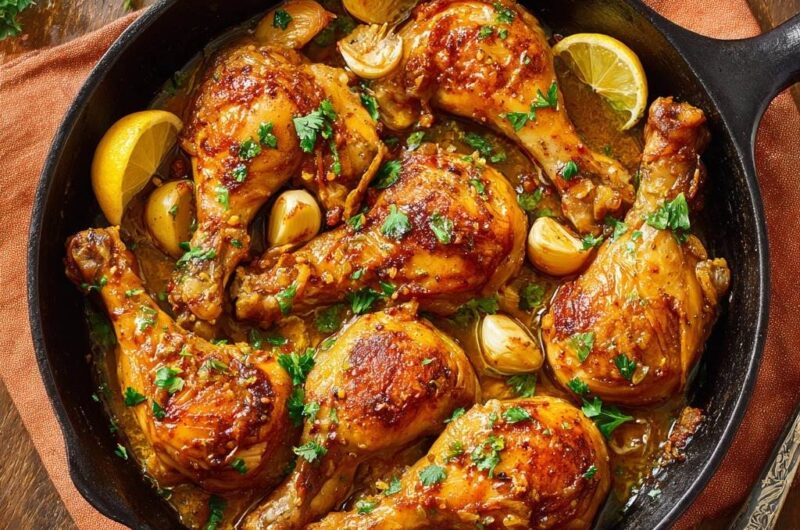
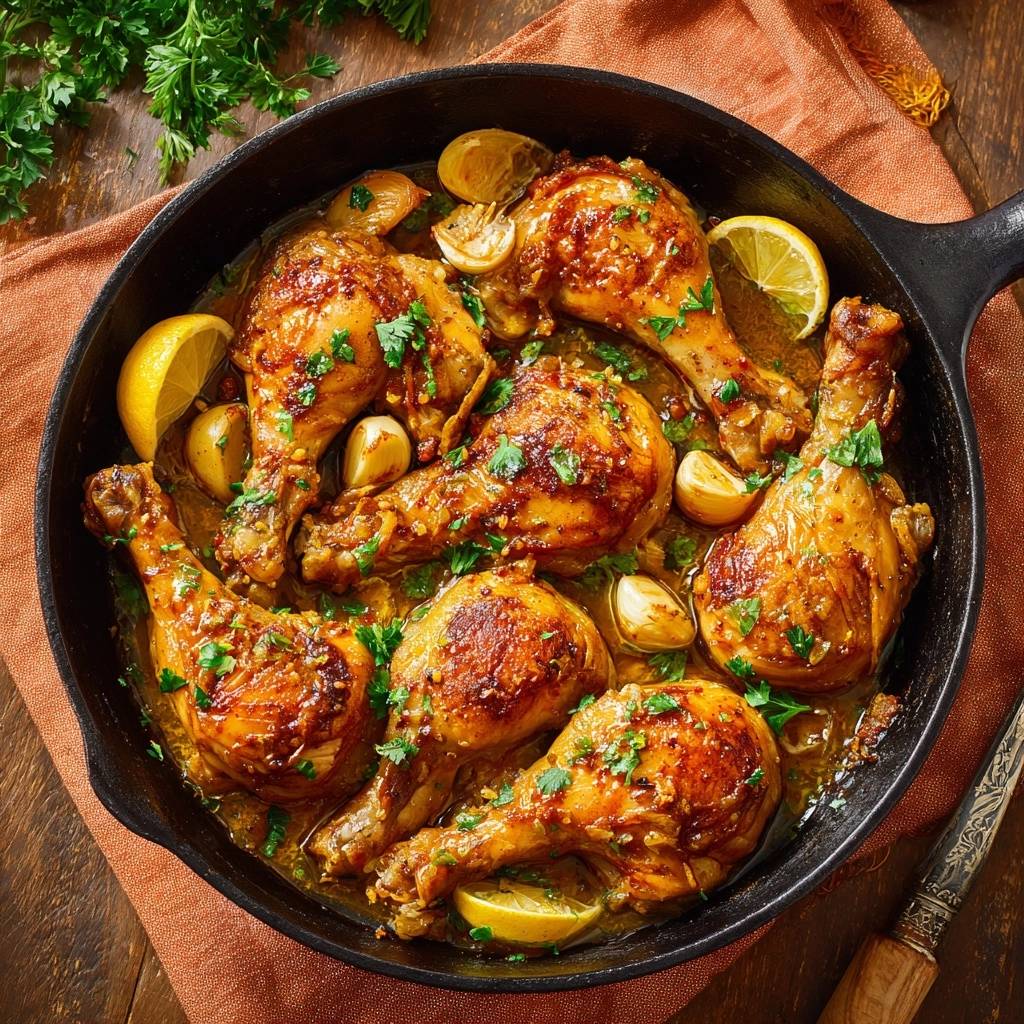
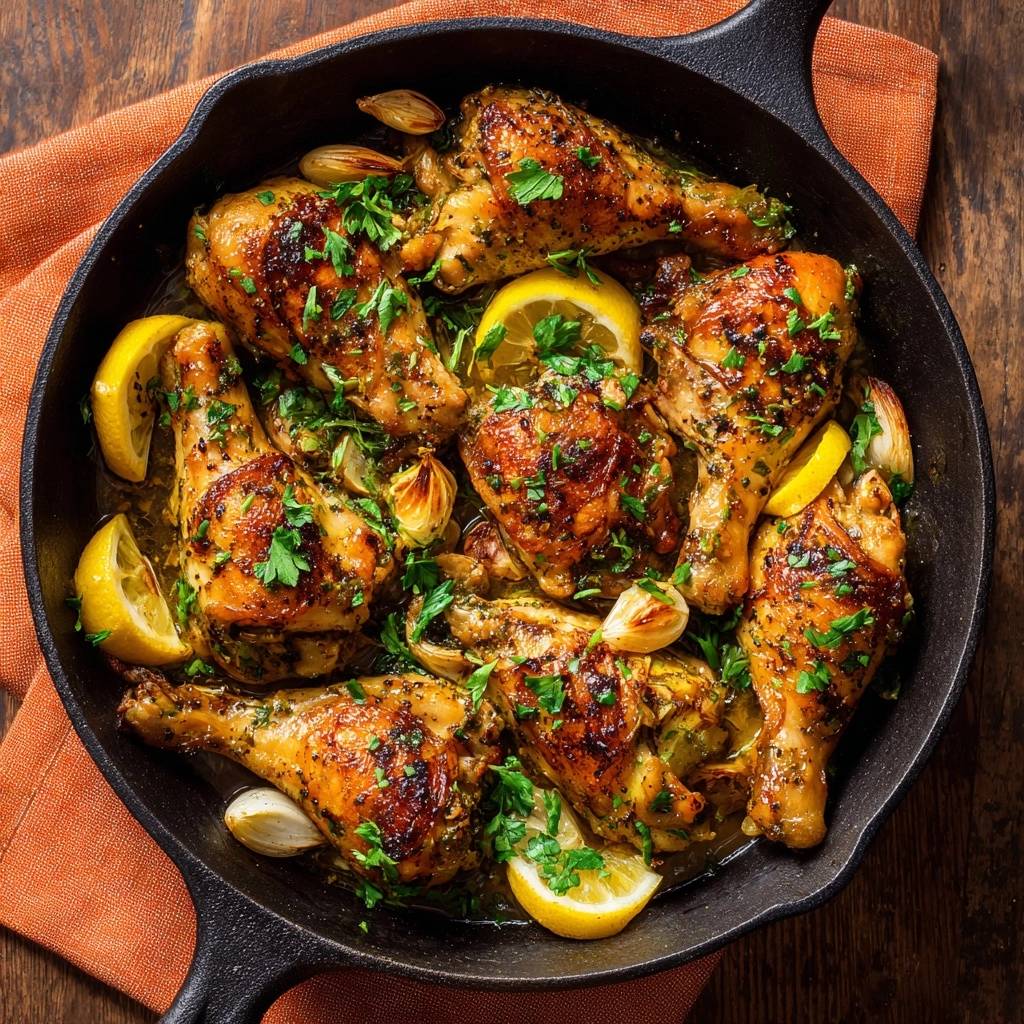
Lemon Garlic Chicken
Course: Main CourseCuisine: AmericanDifficulty: easy4
servings10
minutes35
minutes410
kcal45
MinutesA restaurant-quality chicken drumstick recipe that uses a cold-pan rendering technique and a high-heat oven finish to achieve shatter-crisp skin and a deep mahogany glaze with garlic and lemon.
Ingredients
6 to 8 chicken drumsticks, patted bone-dry
2 tablespoons olive oil
1 head of garlic, cloves separated (leave skins on for roasting)
2 lemons, one sliced into wedges and one juiced
1/2 cup low-sodium chicken broth
1 tablespoon honey (to achieve the deep mahogany glaze shown)
1 teaspoon smoked paprika
1 teaspoon dried oregano
Salt and black pepper to taste
Fresh parsley, chopped for garnish
Directions
- The most critical step for crispy skin is removing moisture. Use paper towels to pat the chicken drumsticks until they are completely dry to the touch. Season generously with salt, pepper, paprika, and oregano.
- Place the chicken drumsticks in a cold cast-iron skillet. Drizzle with olive oil. Only then, turn the heat to medium-high. Starting with a cold pan allows the fat to render slowly, which is the only way to achieve a truly crispy texture without burning the surface.
- Sear the chicken for 12 to 15 minutes, turning occasionally with tongs, until the skin is deep golden brown and crispy on all sides.
- Once the skin is crisp, add the garlic cloves (with skins on to prevent burning) to the spaces between the chicken. Let them toast in the rendered chicken fat for 2 minutes until fragrant.
- Whisk the chicken broth, lemon juice, and honey together. Pour the mixture into the pan, being careful to pour around the chicken rather than over it. Pouring liquid directly on the skin will make it soggy.
- Tuck the lemon wedges into the skillet. Transfer the skillet to a preheated 400-degree oven for 15 to 20 minutes. This high-heat finish glazes the chicken in the reducing juices while keeping the skin brittle.
- Remove from the oven when the internal temperature reaches 165 degrees. Let rest for 5 minutes. Garnish with fresh parsley and serve the pan juices on the side to keep that skin perfectly crunchy until the first bite.
Notes
- The cold-pan start is essential for rendering fat. Always pour liquids around the chicken rather than over it to maintain the skin’s crispness. Leave garlic skins on during roasting to prevent them from burning.