Imagine pulling a heavy Dutch oven from the heat and lifting the lid to reveal beef so tender it practically falls apart at the mere suggestion of a fork. The aroma of rich red wine, earthy thyme, and caramelized onions fills your kitchen, promising a meal that feels like a warm hug. This isn’t just dinner; it’s a culinary victory that turns a humble, tough cut of meat into a silky, melt-in-your-mouth masterpiece.
Most home cooks struggle with short ribs because they either rush the process or fail to lock in the moisture correctly. However, achieving that restaurant-quality “fall-off-the-bone” texture is entirely possible when you master the balance of a hard sear and a gentle simmer. Therefore, we focus on a specific moisture-lock technique that ensures the meat stays succulent while the connective tissues transform into liquid gold.
The secret to this recipe’s success lies in the “half-submerged” braise. By only covering the ribs halfway with liquid, you allow the bottom to tenderize in the broth while the exposed top maintains its savory, seared crust. This dual-texture approach creates a depth of flavor that fully submerged ribs simply cannot match. Trust the process, keep the heat low, and let time do the heavy lifting for you.
The Science of Collagen and Low-Heat Braising
Beef short ribs are packed with tough connective tissue called collagen. If you cook this meat quickly over high heat, it becomes rubbery and impossible to chew. However, when you maintain a steady temperature of 325°F, that collagen slowly melts and transforms into gelatin. This biological shift is what gives the sauce its body and the meat its buttery, luxurious mouthfeel.
Patience is your best tool in the kitchen for this specific dish. A 3.5-hour window is the thermal “sweet spot” where the fibers finally give up their resistance. If you pull them out too early, they’ll be “done” but chewy; if you wait for that magic window, the meat will slide right off the bone with zero effort. In addition, the low heat prevents the muscle fibers from tightening up and squeezing out their natural juices.
Essential Components for a Rich Braising Base
Quality ingredients are the foundation of a great braise. I always recommend bone-in short ribs because the marrow inside the bone seeps into the sauce, adding an incredible richness you won’t get from boneless cuts. Furthermore, using a high-smoke point oil like vegetable or grapeseed oil is crucial. It allows you to get the pan screaming hot for the initial sear without the oil burning or turning bitter.
Aromatics play a supporting role but are no less important. We use whole pearl onions and cremini mushrooms instead of standard chopped yellow onions to provide texture and visual appeal. These vegetables hold their shape during the long cook time, becoming little flavor bombs that soak up the beef drippings. Fresh thyme is also non-negotiable, as its woody fragrance cuts through the richness of the beef perfectly.
Selecting the Right Cut of Beef
When you’re at the butcher counter, look for “English cut” short ribs, which are cut into thick individual rectangles with a single bone. These are superior for braising compared to the thin “flanken” style used for grilling. You want to see heavy marbling—those white flecks of fat—running through the meat. A decent fat cap on top is also a good sign, as it will baste the meat as it renders down in the oven.
The Role of Acidity and Tannins in Red Wine
Red wine does more than just add flavor; its natural acidity helps break down the tough muscle fibers during the long simmer. A dry Cabernet or Merlot works best because the tannins provide a structural backbone to the sauce. If you prefer not to use wine, pomegranate juice is a fantastic substitute. Its deep color and tartness mimic the wine’s profile beautifully, especially when paired with a small splash of balsamic vinegar for extra punch.
Step-by-Step: Achieving the Perfect Maillard Sear
The Maillard reaction is a chemical process that happens when meat hits a hot pan, creating that dark, flavorful crust. Do not rush this step! You want a very deep, dark brown color on all sides of the ribs. If the meat looks grey or light tan, you haven’t developed enough flavor yet. This crust eventually dissolves into the braising liquid, creating the “fond” that makes the final sauce so savory.
Be careful not to overcrowd your Dutch oven. If you put too many ribs in at once, the temperature of the oil will drop, and the meat will steam in its own juices rather than sear. Work in batches if you have to. You’ll know you’ve done it right when the bottom of the pot is covered in dark, sticky bits that smell like roasted heaven. That is the “liquid gold” that will flavor your entire dish.
Deglazing and Building the Aromatic Foundation
Once the meat is out, it’s time to deglaze. Pouring your liquid into the hot pot creates a burst of steam that lifts those caramelized bits (the fond) off the bottom. Use a wooden spoon to scrape every last morsel into the wine. This step ensures that all the hard work you put into the sear actually ends up in your sauce. It’s the difference between a flat gravy and a complex, multi-layered reduction.
Adding the tomato paste now is a pro move. You want to cook the paste for about two minutes until it turns from bright red to a rusty brick color. This caramelization removes the raw metallic taste and acts as a natural thickener. When you stir in the minced garlic, wait until you can smell it—usually about 30 seconds—before adding the stock. This prevents the garlic from burning and turning bitter in the hot fat.
The Half-Submerged Braising Technique
The “Liquid Level Rule” is the most important part of the moisture-lock method. You want the beef stock and wine to come exactly halfway up the sides of the short ribs. If you drown the meat completely, you’re essentially boiling it, which can lead to a stringy texture. By leaving the tops exposed, the dry heat of the oven continues to intensify the flavor of the crust while the bottom half gently poaches in the aromatics.
Managing the Dutch Oven Environment
A tight-fitting lid is your best friend here. It creates a pressurized environment that forces moisture back into the meat. If your lid feels a bit loose, you can place a piece of parchment paper or aluminum foil over the pot before putting the lid on. This creates an extra seal to prevent the liquid from evaporating too quickly during the first two and a half hours of cooking. You want that steam trapped inside to do the work.
Glazing the Carrots and Reducing the Sauce
For the final 30 to 45 minutes, we remove the lid and add the carrots. This is where the transformation happens. With the lid off, the liquid begins to evaporate and thicken into a glossy glaze. The carrots, nestled in the liquid, cook through while absorbing the rendered beef fat and wine reduction. They come out looking shiny and tasting incredibly sweet and savory.
For vibrant veggie sides, try these glazed carrots and green beans.
You are looking for the sauce to reach the “nappe” stage. This is a fancy chef term that simply means the sauce is thick enough to coat the back of a spoon without immediately running off. If you find the sauce is still too thin, you can simmer it on the stovetop for a few minutes after removing the meat. The result should be a concentrated, dark reduction that looks like liquid velvet.
Preparing the Silky Sweet Potato Mash
While the beef is finishing its slow dance in the oven, whip up the sweet potato mash. Sweet potatoes provide a brilliant pop of color and a natural sweetness that balances the heavy, salty notes of the beef. Boil the cubed potatoes until they are soft enough to be crushed with a fork. For the smoothest results, use a potato ricer or a hand mixer to get rid of every single lump.
Fold in the butter and heavy cream while the potatoes are still steaming hot. This allows the fats to emulsify perfectly into the starch, creating a texture that is light and airy rather than gummy. Season generously with salt to make the flavors pop. This vibrant orange base makes for a stunning presentation when the dark, glazed short ribs are placed on top.
Troubleshooting Common Braising Obstacles
If you check your ribs after 2.5 hours and they still feel tough, don’t panic! Every piece of meat is different, and some just need a little more time to break down. Simply put the lid back on and give them another 30 minutes. You cannot overcook short ribs at this temperature easily, but you can certainly undercook them. If the meat isn’t yielding to a fork, it simply hasn’t reached the gelatin stage yet.
If your sauce tastes too salty, it’s likely because the stock reduced more than expected. You can fix this by adding a splash of water or a little more unsalted beef stock. If the sauce feels too greasy, you can use a large spoon to skim the clear fat off the surface. Alternatively, dipping a rolled-up paper towel lightly onto the surface will soak up the excess oil without losing the flavorful sauce underneath.
Plating for a Restaurant-Quality Presentation
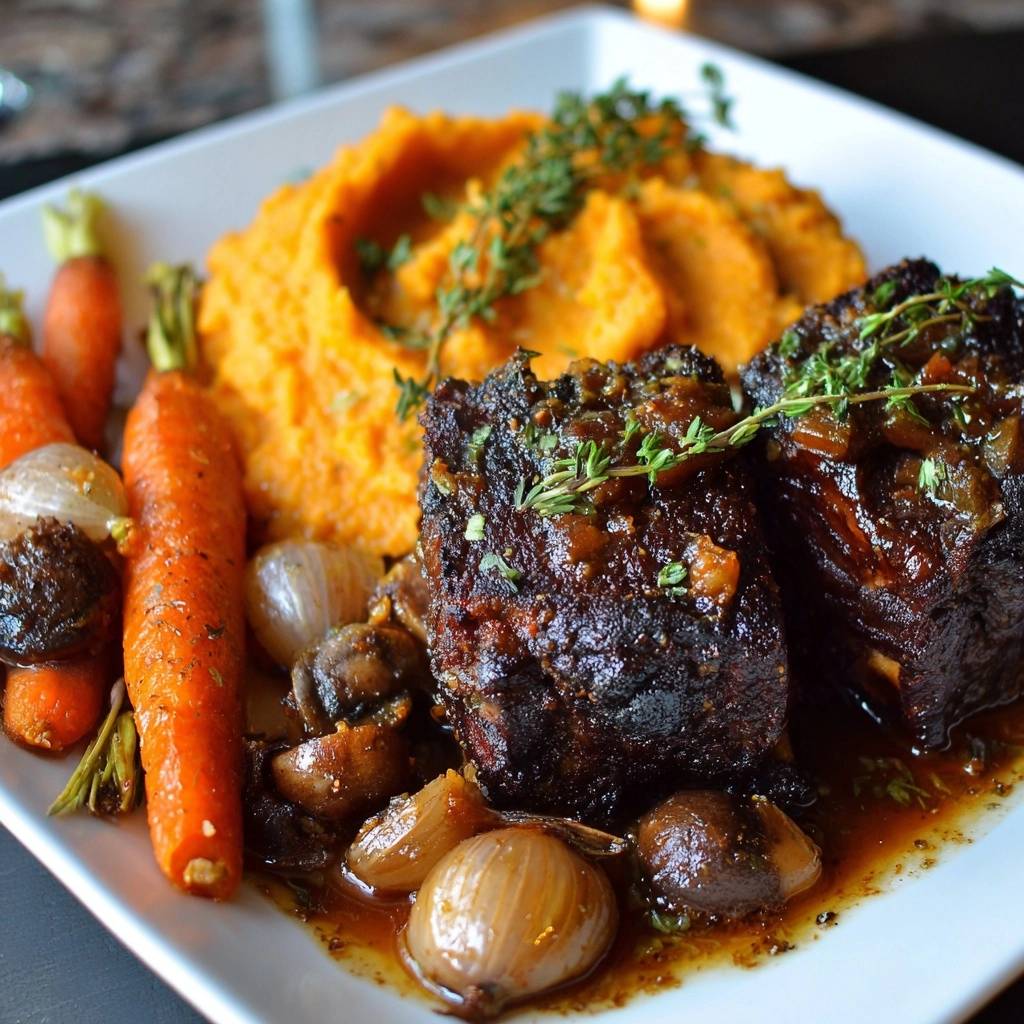
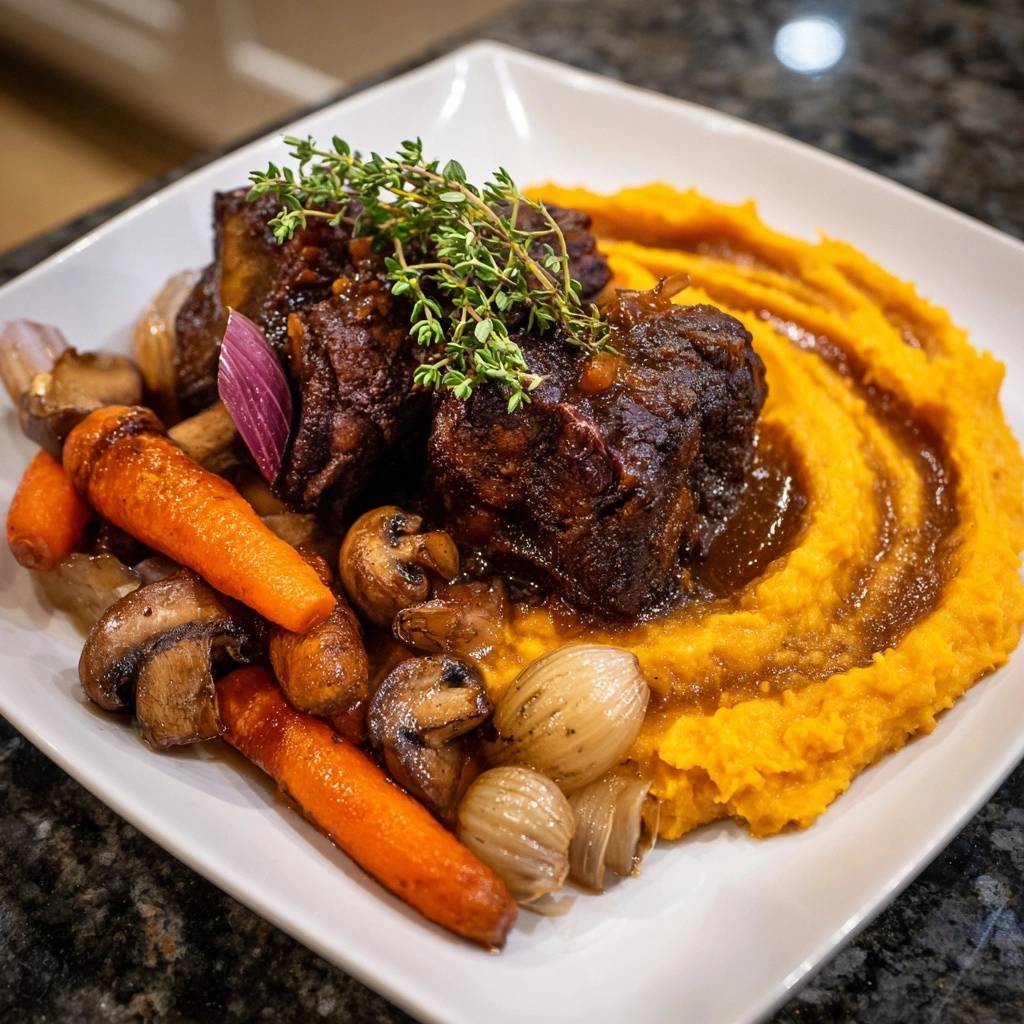
To plate this like a pro, use the “Mound and Lean” technique. Start with a generous scoop of the sweet potato mash in the center of a wide bowl or plate. Lean the short rib against the side of the mound so it stands tall. Arrange the glazed carrots, pearl onions, and mushrooms around the base. This creates height and makes the dish look much more expensive than it actually is.
What Else to Make
Round out your meal with these complementary dishes.
- For some satisfying crunch alongside your slow braised beef short ribs, consider these crispy fried onion strings, prepared using an anti-soggy method.
- Add a fresh element to your beef short ribs with this crunchy rainbow veggie slaw, featuring crisp zoodles that maintain their texture.
Finally, spoon that gorgeous red wine reduction directly over the meat so it glistens under the light. Garnish with a few fresh sprigs of thyme. The fresh herbs aren’t just for looks; the scent of raw thyme provides a bright, floral contrast to the deep, roasted aromas of the beef. It wakes up the palate before you even take your first bite.
Make-Ahead Strategies and Storage Instructions
Braised short ribs are famous for tasting even better the next day. As the dish cools, the flavors continue to meld and the meat absorbs even more of the braising liquid. If you’re making this for a dinner party, feel free to cook it a day in advance. Store the ribs and sauce together in an airtight container in the refrigerator. This also makes it incredibly easy to remove the solidified fat from the top before reheating.
When you’re ready to serve, reheat the ribs slowly on the stovetop over low heat. Add a splash of beef stock to loosen the sauce if it has become too thick. Avoid using the microwave, as it can toughen the meat fibers. A slow, gentle warm-up ensures the beef stays just as tender as the moment it first came out of the oven.
Expert Tips for Scaling and Variations
If you’re cooking for a larger crowd, you can easily double this recipe. Just make sure you use a large enough roasting pan so the ribs aren’t stacked on top of each other. They need that surface area to brown and braise correctly. You can also experiment with the aromatics. Adding a couple of star anise pods to the liquid adds a subtle, mysterious depth that pairs beautifully with beef, though it’s entirely optional.
For a different flavor profile, you can swap the thyme for rosemary or add a few strips of orange zest to the braising liquid. The citrus oils cut through the fat and provide a bright finish. Regardless of the herbs you choose, always stick to the half-submerged liquid rule to maintain that perfect texture. Consistency in technique is what separates a good cook from a great one.
Freezing and Long-Term Preservation
This dish freezes exceptionally well, making it a perfect “future meal” for busy nights. Place the cooled ribs and plenty of sauce into a freezer-safe bag or container. Removing as much air as possible will prevent freezer burn. The meat will stay at peak quality for up to three months. To serve, thaw it overnight in the fridge before following the stovetop reheating instructions mentioned earlier.
Frequently Asked Questions
Can I use a slow cooker instead of an oven?
You can use a slow cooker, but you will lose the reduction quality of the sauce. In an oven, the dry heat helps evaporate the liquid and intensify the flavors. If you use a slow cooker, you’ll likely need to pour the sauce into a pan at the end and boil it down on the stove to get that thick, glossy glaze.
If you enjoy the slow-cooked beef in this recipe, you’ll want to try the slow-braised beef stew next.
Why are my short ribs still tough?
If the meat is tough, it almost always means it hasn’t cooked long enough. Beef short ribs go through a “stall” where they seem done but are still chewy. Keep braising! Give it another 30 to 45 minutes and you will likely find that they suddenly soften up as the collagen finally melts into gelatin.
For even more tender slow-braised beef short ribs, check out fork-tender results.
Do I have to use bone-in ribs?
While boneless ribs are easier to eat, bone-in ribs provide significantly more flavor and a better sauce consistency. The bone acts as a conductor of heat and releases minerals and marrow into the braising liquid. If you must use boneless, reduce the cooking time by about 30 minutes and keep a close eye on the tenderness.
What can I substitute for heavy cream in the mash?
If you want to avoid heavy cream, you can use full-fat coconut milk for a subtle tropical twist that pairs surprisingly well with sweet potatoes. Alternatively, you can simply use more butter and a little bit of the starchy potato cooking water to achieve a creamy consistency without the dairy cream.
How do I remove excess grease from the final sauce?
The easiest way is to chill the dish overnight; the fat will harden into a solid white layer on top that you can simply lift off. If you’re serving immediately, you can use a “fat separator” pitcher or carefully lay a piece of fresh white bread on the surface of the sauce for a few seconds to soak up the oil.
Beef Short Ribs
Course: Main CourseCuisine: AmericanDifficulty: medium4
servings20
minutes3
hours740
kcal180
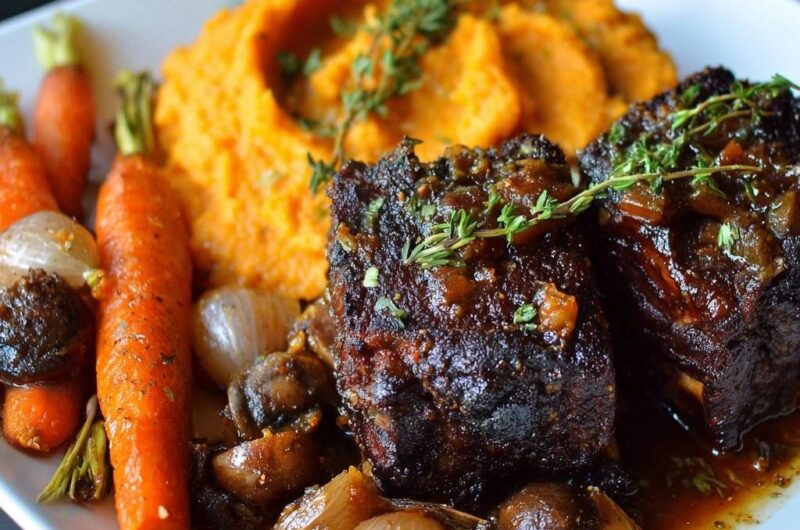
MinutesThese bone-in beef short ribs are seared for a caramelized crust and then slow-braised in a savory liquid of red wine, beef stock, and aromatics. Served alongside a creamy sweet potato mash and glazed carrots, this dish delivers a perfect fork-tender result every time.
Ingredients
4 large bone-in beef short ribs (approx. 10-12 oz each)
2 tablespoons vegetable oil (high smoke point for searing)
1 pound small carrots, peeled (tops left on for presentation)
1 cup whole pearl onions, peeled
1 cup small cremini mushrooms, whole or halved
1 cup dry red wine (Cabernet or Merlot)
2 cups beef stock
2 tablespoons tomato paste
4 cloves garlic, minced
1 bunch fresh thyme
2 large sweet potatoes, peeled and cubed
4 tablespoons butter
1/4 cup heavy cream (for the mash)
Salt and coarse black pepper to taste
Directions
- Preheat your oven to 325 degrees F. Generously season the short ribs with salt and pepper on all sides, pressing the seasoning into the meat.
- Heat oil in a large oven-safe Dutch oven over medium-high heat. Sear the ribs for 4 to 5 minutes per side until a very deep, dark brown crust forms. This is vital for the color and flavor depth seen in the final dish. Remove ribs and set aside.
- In the same pot, add the pearl onions and mushrooms. Saute for 5 minutes until the onions are translucent and mushrooms are browned. Stir in the tomato paste and garlic, cooking for 2 minutes until the paste darkens slightly.
- Pour in the red wine to deglaze, scraping the bottom of the pot to release the flavorful browned bits (fond). Let the wine reduce by half.
- Add the beef stock and return the ribs to the pot. The liquid should come about halfway up the sides of the meat, leaving the top crust exposed. Nestled the thyme sprigs into the liquid.
- Cover with a tight-fitting lid. Transfer to the oven and braise for 2.5 hours.
- While the beef cooks, boil the sweet potatoes in salted water until tender (about 15-20 minutes). Drain and mash with butter, heavy cream, and salt until completely smooth and vibrant.
- After 2.5 hours of braising, remove the lid. Tuck the whole carrots into the braising liquid around the beef. Return to the oven, uncovered, for the final 30-45 minutes. This allows the sauce to reduce into a thick glaze and the carrots to glaze in the rendered fat.
- Remove the pot from the oven. Let the meat rest in the juices for 10 minutes.
- To serve, place a generous mound of sweet potato mash on the plate. Arrange the short ribs and glazed carrots alongside. Spoon the onions, mushrooms, and the concentrated red wine reduction over the meat. Garnish with fresh thyme sprigs.
Notes
- The secret to success is searing the meat at a high temperature first to create a dark crust and ensuring the braising liquid only covers the ribs halfway to maintain texture while breaking down connective tissue.