Nothing ruins a beautiful fruit bar faster than a mushy, wet crust that falls apart the moment you pick it up. Most recipes fail because the fruit juice seeps directly into the base during baking, leaving you with a soggy mess. These Strawberry Cheesecake Crumble Bars solve that problem with a specific “Anti-Soggy Bottom” strategy that ensures every bite is structurally sound.
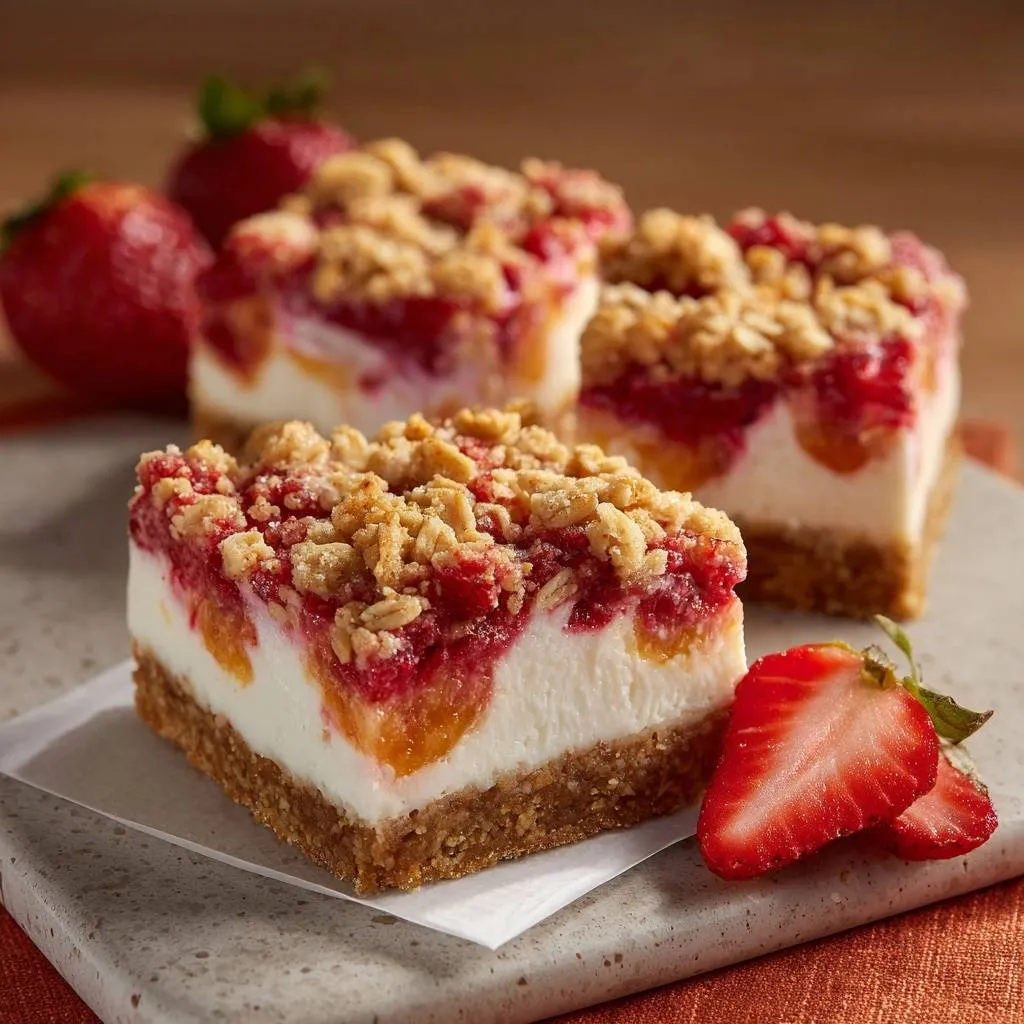
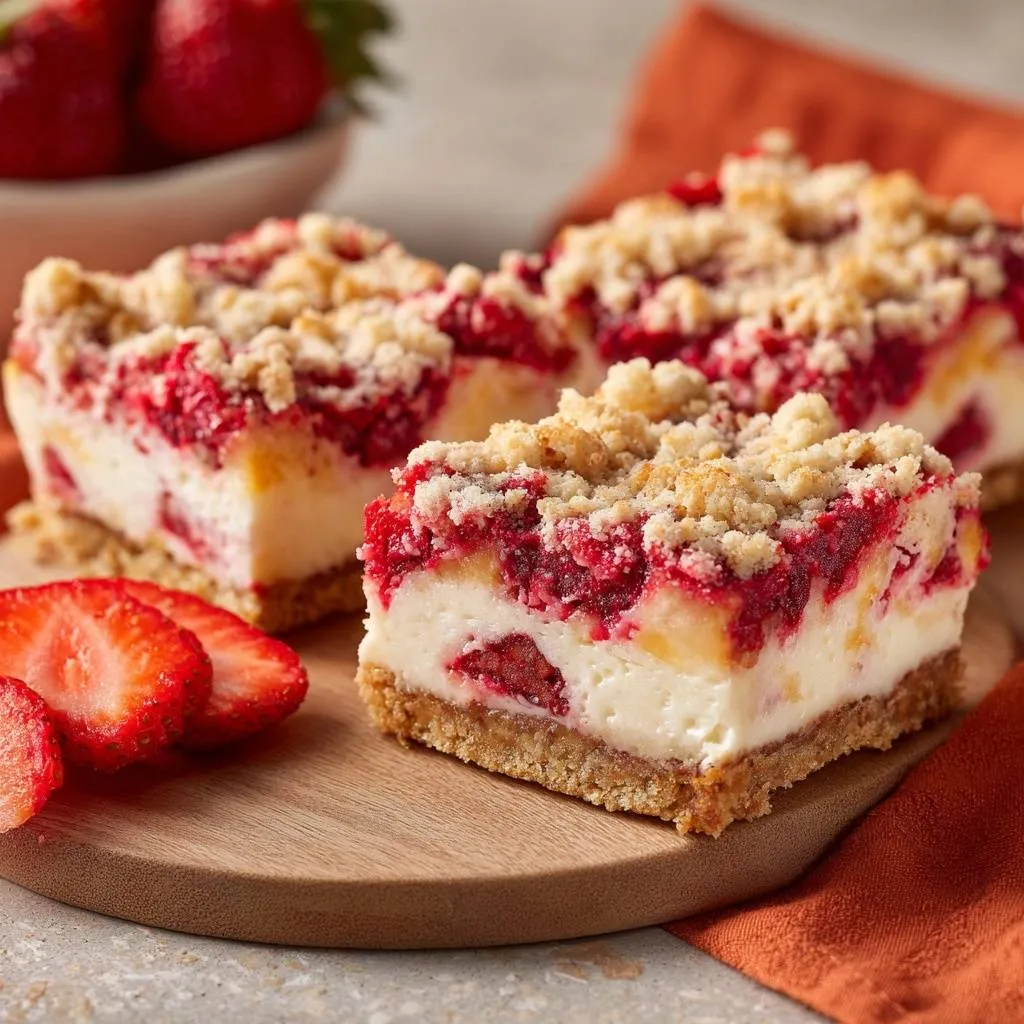
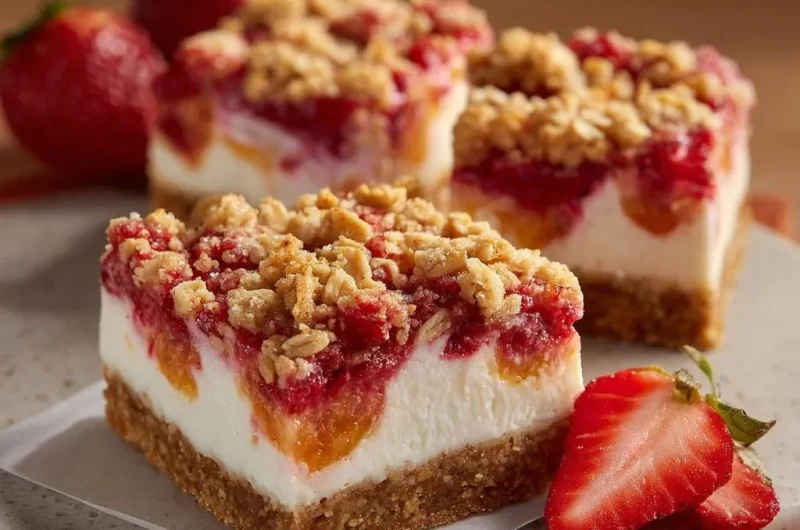
The magic lies in the contrast of textures. You get a sturdy, buttery graham cracker base, a silky-smooth cheesecake center, and a jammy strawberry layer topped with a pebbly oat crumble. It’s a sophisticated upgrade to a standard fruit bar that feels like a bakery-style treat made right in your own kitchen.
The secret to this success is a quick par-bake and a cornstarch-maceration technique. By pre-baking the crust, you create a heat-sealed barrier that repels moisture. Meanwhile, the cornstarch binds the strawberry juices into a thick glaze as they bake, preventing them from weeping into the cheesecake layer. This guarantees a crisp, satisfying crunch every single time.
The Science of Preventing a Soggy Crust
Moisture migration is the enemy of any layered dessert. When you place fresh fruit directly onto a raw or semi-baked crust, the heat of the oven breaks down the fruit’s cell walls. This releases water that gravity pulls straight down into your base. Without a barrier, that moisture turns your crisp graham crackers back into a soft paste.
Par-baking the graham cracker base for ten minutes is a non-negotiable step. This process melts the sugar and butter together, creating a hydrophobic barrier that acts like a shield. It essentially “waterproofs” the crust before the wet cheesecake batter and juicy strawberries ever touch it. You’ll notice the surface looks matte and feels firm when it comes out of the oven.
In addition to the par-bake, cornstarch plays a vital role as a thickening agent. When strawberries heat up, they release a significant amount of liquid. The cornstarch catches this moisture immediately, turning it into a thick, jam-like consistency. This keeps the fruit layer suspended on top of the cheesecake rather than letting it sink or bleed through the entire bar.
Essential Components for Strawberry Cheesecake Crumble Bars
Success starts with the temperature of your ingredients. You must use room temperature cream cheese and sour cream to achieve a perfect emulsion. If the cheese is cold, it will remain in tiny lumps no matter how long you beat it. Room temperature fats blend smoothly, creating that signature velvety mouthfeel we all crave in a cheesecake.
I prefer using sour cream over heavy cream for the filling because it adds a subtle tang that cuts through the richness. It also provides better structural stability, ensuring the bars hold their shape when sliced. For the crumble, always reach for rolled oats rather than quick oats. Rolled oats maintain their integrity and provide a much better “chew” and rustic look to the topping.
For a different kind of creamy filling, try these red velvet cheesecake cookies.
Don’t forget the flour in the cheesecake batter. Just one tablespoon acts as a stabilizer. It binds the moisture from the egg and sour cream, preventing the cheesecake from becoming too soft or weeping liquid after it cools. It’s a small addition that makes a massive difference in the final density of the bar.
For a different take on creamy fillings, explore creamy pumpkin swirl cheesecake.
Selecting and Preparing Fresh Strawberries
When choosing your berries, look for deep red fruit that is firm to the touch. Overripe berries contain too much water and can overwhelm the cornstarch. I recommend dicing them into uniform, small pieces about a quarter-inch thick. This ensures they macerate evenly and distribute across the cheesecake without creating large “wet spots.”
If you find yourself using frozen berries, do not thaw them completely before use. Instead, toss them with an extra half-teaspoon of cornstarch while they are still slightly icy. Frozen fruit releases more water than fresh because the ice crystals break the fruit’s structure, so that extra starch is your insurance policy against a runny filling.
The Role of Cold Butter in the Oat Topping
While the cheesecake needs room temperature ingredients, the crumble topping demands the exact opposite. You need cold, cubed butter straight from the fridge. When you rub cold butter into the flour and oats, you create tiny pockets of fat. In the oven, these pockets melt and create steam, which lifts the crumble and makes it light and crisp.
Avoid overworking the topping until it becomes a paste. You are looking for a pebbly, sandy texture with some larger clumps. If the butter gets too warm from your hands, the topping will melt into a greasy film rather than staying as distinct, crunchy nuggets. If it feels soft, pop the crumble bowl in the freezer for five minutes before sprinkling it on.
Step-by-Step: Building the Structural Layers
Building these bars is all about the order of operations. You want to work efficiently so the crust stays warm while the cheesecake is prepared, but the fruit shouldn’t sit in the sugar for too long before baking. Follow these phases to ensure the best structural integrity for your dessert.
Phase 1: Compacting and Par-Baking the Base
Start by mixing your graham crumbs, sugar, and melted butter until it looks like wet sand. Pour this into your lined pan and use the flat bottom of a measuring cup to press it down. You need to apply firm pressure, especially in the corners. A tightly packed base is less likely to crumble when you eventually lift the bars out of the pan.
Bake the crust at 350°F for exactly ten minutes. You aren’t looking for a deep brown color yet. Instead, look for the edges to just barely start darkening and the surface to look dry. This short stint in the oven sets the foundation for everything else. Let it sit on the counter while you move to the next step.
Phase 2: Achieving a Silky Cheesecake Emulsion
When mixing the cheesecake layer, keep your mixer on low speed. It is tempting to crank it up to get rid of lumps, but high speeds incorporate air bubbles. Air causes the cheesecake to rise like a soufflé in the oven and then collapse, leading to cracks. Mix just until the egg is fully incorporated and the batter looks like thick, glossy ribbons.
If you still see tiny lumps, use a silicone spatula to smash them against the side of the bowl rather than continuing to beat the mixture. Once the batter is smooth, pour it over your par-baked crust. Use the back of a spoon to level it out so the strawberries have a flat surface to rest on.
Phase 3: Macerating Fruit and Assembling
Toss your diced strawberries with the sugar and cornstarch about ten minutes before you are ready to assemble. This short window allows the sugar to draw out just enough juice to create a syrup with the cornstarch. If they sit too long, they will become too liquid. Spread them evenly over the cream cheese, then finish with a heavy hand of the oat crumble.
Baking Temperatures and Visual Cues for Doneness
The 350°F oven temperature is the sweet spot for these bars. It is hot enough to crisp the oat topping and brown the crust, but gentle enough to cook the cheesecake without curdling the proteins. You’ll know they are done when the edges of the crumble are golden brown and the center has a slight, firm jiggle.
Perform the “jiggle test” by gently shaking the pan. The center shouldn’t move like liquid, but it should sway slightly like set gelatin. If the whole thing moves as one solid block, you’ve likely overbaked it. Remember, the cheesecake will continue to firm up significantly as it cools on the counter and in the fridge.
The Mandatory Cooling and Setting Period
I know it is hard to wait, but you cannot cut these bars while they are warm. Cheesecake is a custard, and custards need time for the protein bonds to fully solidify. If you cut into them early, the filling will ooze out and the crust will shatter. This cooling period is where the “Anti-Soggy” magic really finishes its work.
Let the pan sit on a wire rack for at least an hour until it reaches room temperature. Then, move it to the refrigerator for a minimum of four hours, though overnight is even better. This cold environment allows the butter in the crust to re-solidify, giving you that perfect, snappy crunch that contrasts so well with the creamy filling.
Troubleshooting Common Texture Issues
If your crumble topping feels too sandy or dry after baking, you likely didn’t incorporate the butter well enough or the butter was too cold to bind with the flour. Next time, ensure the butter pieces are worked in until they are the size of small peas. If the cheesecake layer cracks, it’s usually a sign of overbeating or overbaking. Don’t worry, though—the strawberry and crumble layers are great at hiding any surface imperfections!
A crust that falls apart usually stems from insufficient compression. You really have to muscle that measuring cup down when pressing the crumbs into the pan. Also, ensure you aren’t skipping the salt in the crust; it doesn’t just add flavor, it helps balance the sweetness of the graham crackers and brings out the nuttiness of the butter.
Flavor Variations and Ingredient Swaps
Once you master the base recipe, you can get creative. Try adding a teaspoon of fresh lemon zest to the cheesecake batter for a bright, acidic kick. You can also swap the strawberries for raspberries or blackberries. If you use blueberries, keep them whole so they “pop” in the oven rather than bleeding into the batter.
Serving Suggestions
Round out your dessert spread with these delightful recipes.
- Start your morning with Gingerbread Chia Overnight Oats for a spiced, creamy breakfast option.
- Make your meal hearty with Cheesy Corn Casserole, a flavorful dish that complements sweet desserts.
For the crumble, adding a handful of finely chopped pecans or walnuts adds a wonderful earthy flavor and extra protein. If you want a deeper flavor in the base, you can substitute the graham crackers with crushed ginger snaps or shortbread cookies. Just keep the ratios of crumbs to butter the same to maintain the structural integrity.
Make-Ahead Strategies and Storage Logistics
These bars are the ultimate make-ahead dessert because they actually taste better on day two. You can store them in an airtight container in the refrigerator for up to five days. To keep the crumble topping from getting soft, I recommend placing a piece of paper towel under the lid of the container to absorb any condensation.
You can also freeze these bars for up to three months. Wrap individual slices tightly in plastic wrap and then place them in a freezer-safe bag. When you’re ready for a treat, thaw a bar in the fridge for a few hours. The crust stays remarkably crisp even after freezing, thanks to that initial par-baking step.
Expert Tips for Clean Slicing
To get those perfect, professional-looking squares, use the parchment paper overhang to lift the entire block out of the pan once it is fully chilled. Place it on a large cutting board. Run a long, sharp knife under hot water, wipe it completely dry, and make your first cut. The heat helps the blade glide through the cold cream cheese without sticking.
The most important rule for clean layers is to wipe the blade clean after every single cut. If you don’t, the cheesecake residue from the previous slice will smudge the strawberry layer on the next one. It takes an extra minute, but the result is a set of bars with distinct, beautiful layers that look like they came from a high-end patisserie.
Frequently Asked Questions
Can I use frozen strawberries instead of fresh?
Yes, you can use frozen strawberries, but you must take extra care with the moisture. Do not thaw them completely, as they will become mushy. Instead, use them while they are still partially frozen and add an extra half-teaspoon of cornstarch to the fruit mixture. This helps absorb the excess liquid that frozen fruit naturally releases during the baking process.
Why did my cheesecake layer turn rubbery?
A rubbery texture is almost always the result of overbaking. When cheesecake stays in the oven too long, the proteins in the eggs and cream cheese tighten up and squeeze out moisture. To prevent this, use the “jiggle test” and remove the bars when the center still has a slight sway. The residual heat will finish the cooking process as the bars cool on the counter.
Is there a substitute for graham cracker crumbs?
If you don’t have graham crackers, you can use digestive biscuits, vanilla wafers, or even shortbread cookies. Simply pulse them in a food processor until they reach a fine crumb consistency. Since some cookies have a higher fat content than graham crackers, you may need to reduce the melted butter by a tablespoon to ensure the crust isn’t too greasy.
How do I prevent the parchment paper from slipping?
The easiest way to keep your parchment paper in place is to use a tiny bit of “glue.” Lightly grease the baking pan with a small dab of butter or a quick spray of non-stick oil before laying the paper down. Press the parchment into the corners, and the grease will hold it firmly against the walls of the pan so it doesn’t slide around while you’re pressing in the crust.
Can I make this recipe gluten-free?
Absolutely. To make these bars gluten-free, substitute the graham crackers with a gluten-free brand of crackers or cookies. Use a 1-to-1 gluten-free flour blend for the cheesecake and the crumble topping. Most importantly, ensure your oats are certified gluten-free, as standard oats are often processed in facilities that handle wheat.
Strawberry Cheesecake Crumble Bars
Course: DessertCuisine: AmericanDifficulty: medium12
bars20
minutes50
minutes340
kcal70
MinutesThese bars feature a sturdy graham cracker crust, a creamy cheesecake filling, and a jam-like strawberry layer topped with a buttery oat crumble. The recipe focuses on preventing sogginess through specific preparation methods.
Ingredients
For the Crust:
2 cups graham cracker crumbs
1/2 cup unsalted butter, melted
1/4 cup granulated sugar
1/4 teaspoon salt
For the Cheesecake Filling:
16 ounces cream cheese, softened
1/2 cup sour cream, room temperature
1/2 cup granulated sugar
1 large egg, room temperature
1 teaspoon vanilla extract
1 tablespoon all-purpose flour
For the Strawberry Layer:
1.5 cups fresh strawberries, hulled and diced
1 tablespoon granulated sugar
1 teaspoon cornstarch (essential for preventing sogginess)
For the Oat Crumble:
1/2 cup rolled oats
1/2 cup all-purpose flour
1/4 cup light brown sugar, packed
4 tablespoons cold unsalted butter, cubed
1/4 teaspoon cinnamon
Directions
- Preheat your oven to 350°F (175°C). Line an 8×8 inch square baking pan with parchment paper, ensuring there is an overhang on two sides for easy removal.
- In a medium bowl, combine graham cracker crumbs, melted butter, 1/4 cup sugar, and salt. Press the mixture firmly and evenly into the bottom of the prepared pan using the bottom of a measuring cup.
- Bake the crust alone for 10 minutes. This “sets” the butter and sugar to create a crisp barrier. Remove from the oven and let it cool slightly while you prepare the fillings.
- In a small bowl, toss the diced strawberries with 1 tablespoon of sugar and 1 teaspoon of cornstarch. Set aside; the cornstarch will bind the juices as they bake.
- In a large bowl, beat the softened cream cheese and 1/2 cup sugar until completely smooth and fluffy. Add the egg, sour cream, vanilla, and 1 tablespoon of flour. Mix on low speed just until combined-do not overbeat, or the cheesecake will puff and crack.
- Pour the cheesecake batter over the par-baked crust, smoothing the top with a spatula.
- Evenly distribute the macerated strawberries over the cheesecake layer.
- Prepare the crumble: In a small bowl, mix the oats, flour, brown sugar, and cinnamon. Work the cold cubed butter into the mixture using a pastry cutter or your fingers until it forms large, pea-sized clumps. Sprinkle the crumble generously over the strawberry layer.
- Bake for 35 to 40 minutes. The edges should be golden brown and the center should have a slight, firm jiggle when shaken.
- Allow the bars to cool at room temperature for 1 hour, then refrigerate for at least 4 hours (preferably overnight). This cooling period is mandatory for the cheesecake to set and the crust to reach its maximum crispness. Slice into bars using a warm, sharp knife.
Notes
- The cooling period of at least 4 hours is mandatory for the cheesecake to set and the crust to reach maximum crispness. Use a warm, sharp knife for clean slices.