
Nothing ruins a family dinner faster than a lasagna that turns into a watery soup the moment you cut into it. We have all been there, staring at a plate where the noodles are swimming in a puddle of red liquid. It is frustrating because you put so much work into the prep, only to have the structural integrity fail at the finish line.
This Classic Beef and Herb Lasagna is designed specifically to solve that “soggy bottom” syndrome. By focusing on moisture control and a specific herb profile, you get a dish that stands tall on the plate. The combination of lean beef and fresh thyme creates a sophisticated, savory depth that feels like a Sunday afternoon at a traditional Italian-American home.
For even better results with your next lasagna, check out this classic meaty lasagna.
The secret to those perfect, defined layers isn’t just the cheese; it is all about the science of reduction. If you don’t cook the water out of your sauce before it hits the oven, that water has nowhere to go but down into your bottom crust. I’ll show you exactly how to manage your sauce and cheese layers to ensure every slice comes out as a clean, beautiful square.
The Architecture of a Non-Watery Meat Sauce
The foundation of a sturdy lasagna starts in the skillet, not the baking dish. When you use ground beef, even the lean variety, it releases a significant amount of moisture and fat as it browns. Therefore, you must be diligent about draining every single drop of liquid from the pan once the meat is no longer pink.
Once you add your marinara, the real work begins through the process of evaporation. Most commercial sauces are thinner than they appear, packed with water that will separate during the long bake time. You need to simmer the meat and sauce uncovered for at least 15 minutes to encourage that water to turn into steam and leave the pan.
You are looking for a specific visual cue here. The sauce should look “heavy” and thick, clinging tightly to the beef crumbles rather than pooling around them. If you drag a wooden spoon through the center of the pan and the sauce slowly fills the gap rather than rushing back in, you have achieved the perfect consistency. This reduction ensures that the only moisture in your oven is there to soften the pasta, not to flood the pan.
Essential Components for Classic Beef and Herb Lasagna
Quality ingredients are the building blocks of a great lasagna, and their fat-to-water ratio matters immensely. For the cheese layer, I always recommend whole milk ricotta. While part-skim might seem like a lighter choice, it often contains more stabilizers and water, which can lead to a grainy, “weeping” texture when heated. Whole milk ricotta provides a creamy, stable fat content that holds its shape.
The mozzarella choice is equally critical. You must look for “low-moisture” mozzarella on the label. Fresh mozzarella balls, the kind stored in water or oil, are delicious on pizza but disastrous in a multi-layered lasagna. They release a massive amount of whey as they melt, which is a primary culprit for a soggy bottom. Low-moisture cheese melts into a gooey, stretchy blanket without the extra liquid.
For the aromatics, fresh thyme is the star of this show. While dried herbs work in a pinch, fresh thyme leaves offer a bright, lemony, and earthy punch that cuts through the richness of the beef. I also prefer using garlic powder in the cheese mixture rather than raw minced garlic. This ensures the flavor is distributed evenly throughout the ricotta without any sharp, crunchy bits of undercooked garlic interrupting the creamy texture.
The Role of the Egg Binder in Ricotta
Adding a lightly beaten egg to your ricotta mixture is a non-negotiable step for structural success. Think of the egg as the “glue” of your lasagna. As the lasagna bakes, the proteins in the egg denature and create a delicate web that holds the cheese together. This prevents the ricotta from becoming runny and ensures it stays as a distinct, fluffy layer between the pasta sheets.
Selecting the Right Pasta: Oven-Ready vs. Par-boiled
You have two main paths for your noodles, and both work if you understand their behavior. Oven-ready (no-boil) noodles are fantastic for moisture control because they actually act like a sponge, soaking up any residual liquid from your sauce. However, if your sauce is too thick, they can stay crunchy. Par-boiled noodles offer that classic, chewy “al dente” bite, but you must dry them thoroughly with paper towels before layering to avoid adding extra water to the dish.
Step-by-Step: Building Structural Integrity
Building a lasagna is an exercise in engineering. You aren’t just stacking ingredients; you are creating a reinforced structure that needs to withstand the heat of the oven and the pressure of its own weight. If the layers aren’t balanced, the whole thing will slide apart the moment you try to serve it.
Phase 1: Preparing the Beef and Herb Base
Start by browning your beef over medium-high heat until it is deeply colored. This browning adds flavor through the Maillard reaction, which is essential since we aren’t using pork or sausage. After draining the fat, stir in your sauce and let it simmer. Remember, we want a concentrated flavor and a thick texture. This is the time to taste and adjust your salt and pepper, ensuring the beef is well-seasoned before it gets buried in cheese.
Phase 2: The Strategic Layering Sequence
To protect the bottom layer of pasta from getting mushy, start with a very thin smear of sauce on the bottom of the pan—just enough to keep the noodles from sticking. Place your first layer of noodles down, then spread the ricotta mixture. The key is to sandwich the meat sauce between the cheese and the pasta. This “seals” the noodle and prevents the sauce from soaking in too deeply, which keeps the pasta from becoming bloated and soft.
Phase 3: The Foil Tent and Heat Management
Baking at 375°F provides enough heat to bubble the sauce and melt the cheese without scorching the edges too quickly. When you cover the dish with foil, make sure to “tent” it by arching the center upward. This prevents the melting mozzarella from sticking to the foil and pulling off when you uncover it. The first 25 minutes of covered baking creates a steam chamber that cooks the noodles, while the final 20 minutes uncovered is all about that golden-brown crust.
The Science of the 20-Minute Rest
I know it is tempting to dive in the second the timer goes off, but you must wait. Resting the lasagna for at least 20 minutes is just as important as the cooking itself. During this time, carry-over cooking finishes the center of the dish, and the melted fats and proteins begin to “set.”
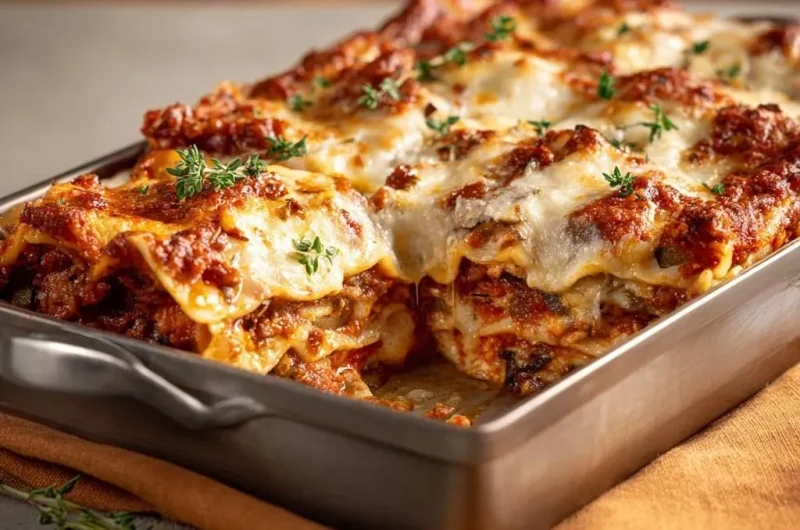
Think of it like resting a steak. If you cut it too soon, all the juices run out. In a lasagna, those juices will flood the bottom of the pan, making the bottom layer soggy and leaving the top layers dry. A proper rest allows the ricotta and mozzarella to firm up, giving you those beautiful, clean-edged squares that look like they came from a professional kitchen.
Make-Ahead Strategies and Freezing Protocols
Lasagna is the ultimate make-ahead meal. You can assemble the entire dish 24 hours in advance and keep it in the refrigerator. In fact, this often improves the texture as the noodles have time to settle into the sauce. If you do this, just add about 10 minutes to the covered baking time to account for the cold dish.
For freezing, I recommend freezing the lasagna unbaked. Wrap it tightly in plastic wrap and then foil to prevent freezer burn. It will stay fresh for up to three months. When you are ready to eat, thaw it in the fridge for a full 24 hours before baking. If you must freeze a pre-baked lasagna, cut it into individual portions first so you can reheat only what you need without drying out the entire tray.
Troubleshooting Common Lasagna Failures
If your cheese ends up rubbery, you likely used pre-shredded cheese from a bag. Those products are coated in potato starch or cellulose to prevent clumping, which interferes with a smooth melt. Always grate your own mozzarella from a block for the best stretch. If the edges of your noodles are crunchy, it means they weren’t fully covered by sauce or cheese; make sure to spread your ingredients all the way to the very corners of the pan.
If your layers are sliding around, it usually points to one of two things: too much fat left in the meat or not enough resting time. Next time, be even more aggressive with draining the beef and give the dish an extra five minutes on the counter before slicing. Precision in these small steps makes the difference between a mess and a masterpiece.
Optimal Side Dishes for Rich Pasta
Since this lasagna is incredibly rich and savory, you want side dishes that provide a sharp contrast. A simple arugula salad with a lemon vinaigrette is perfect because the bitterness of the greens and the acidity of the lemon cut right through the heavy cheese. Charred broccolini with red pepper flakes also works well, offering a crisp-tender texture that balances the soft layers of the pasta.
Avoid serving heavy garlic bread or thick starches. The lasagna already provides plenty of carbohydrates, so adding more bread can make the meal feel overwhelming. Instead, focus on bright, fresh vegetables that cleanse the palate between bites of beef and ricotta.
Expert Tips for Enhanced Flavor
For a truly professional finish, try the “parmesan crust” technique. During the last 10 minutes of baking, sprinkle an extra handful of freshly grated parmesan over the top. This creates a salty, umami-rich crust that shatters slightly when you bite into it. Also, try to grate your mozzarella using the large holes of a box grater for a more rustic, uneven melt that browns beautifully.
Adjusting Herbs for Seasonal Variations
While thyme is our primary herb, you can easily tweak the profile. In the summer, adding a handful of chopped fresh basil to the ricotta mixture adds a sweet, peppery note. In the winter, a tiny bit of dried oregano in the meat sauce can provide a more robust, earthy flavor. Just be careful not to overdo it; you want the herbs to complement the beef, not mask it.
Storage and Reheating for Best Texture
Leftover lasagna is often better the next day, but the microwave is its enemy. Microwaving often turns the pasta rubbery and makes the cheese oily. Instead, place a slice in a small baking dish, add a teaspoon of water to the corner, cover with foil, and heat in a 350°F oven until bubbly. This preserves the “anti-soggy” integrity you worked so hard to achieve.
How do I store leftovers and can I freeze this lasagna?
Store leftovers in an airtight container in the refrigerator for up to 4 days. For longer storage, lasagna freezes beautifully. You can freeze the entire assembled dish unbaked for up to 3 months. If freezing individual cooked slices, wrap them tightly in plastic wrap and then foil. To reheat, thaw in the refrigerator overnight and bake at 350°F until the internal temperature reaches 165°F. Do not freeze the lasagna while it is still warm, as this creates large ice crystals that ruin the texture.
Why is my lasagna watery even though I followed the recipe?
The most common culprit for a watery lasagna is not simmering the sauce long enough. Even if the sauce looks thick in the jar, it needs to be reduced with the meat to cook off excess water. Another possibility is using “fresh” mozzarella instead of “low-moisture” mozzarella. Fresh mozzarella has a very high water content that releases during baking. Finally, ensure you are using a large enough egg in your ricotta; if the cheese mixture doesn’t “set,” it can appear watery.
Can I use gluten-free noodles or substitute the beef?
Yes, you can use gluten-free lasagna noodles. If using no-boil gluten-free noodles, you may need to add an extra 1/4 cup of water to your sauce to ensure they soften properly. For a beef substitute, ground turkey or ground chicken works well. However, because these meats are leaner and have less flavor than beef, you should increase the garlic powder and herbs by half to maintain the savory profile of the dish.
What is the best way to prevent the cheese from sticking to the foil?
The “tenting” method is the most effective way to protect your cheese layer. When you cover the pan, don’t pull the foil tight across the top. Instead, create a dome shape so there is a gap of air between the cheese and the foil. You can also lightly spray the underside of the foil with non-stick cooking spray. This ensures that when you pull the foil off halfway through baking, all that delicious mozzarella stays on the lasagna where it belongs.
Do I really need to let it rest for 20 minutes?
Yes, the resting period is mandatory for a structurally sound lasagna. When the dish comes out of the oven, the cheese is in a liquid state and the sauce is bubbling. If you cut it immediately, the layers will slide apart and the sauce will run to the bottom of the pan. During the 20-minute rest, the proteins and fats begin to solidify, “locking” the layers together. This results in a much better mouthfeel and a professional presentation.
Beef Lasagna
Course: Main CourseCuisine: Italian-AmericanDifficulty: medium8
servings25
minutes50
minutes485
kcal75
MinutesA hearty and structured lasagna featuring lean ground beef, a thick herb-infused marinara, and a blend of ricotta, mozzarella, and parmesan cheeses designed to stay firm when sliced.
Ingredients
1 pound lean ground beef
12 to 15 lasagna noodles (oven-ready or par-boiled)
3 cups thick marinara sauce
15 ounces whole milk ricotta cheese
1 egg, lightly beaten
4 cups shredded mozzarella cheese (low-moisture)
1/2 cup grated parmesan cheese
2 tablespoons fresh thyme leaves
1 teaspoon garlic powder
1/2 teaspoon salt
1/2 teaspoon black pepper
Directions
- Preheat your oven to 375 degrees F.
- In a large skillet, brown the ground beef over medium-high heat. Drain every drop of excess fat and liquid. This is the first step to preventing a soggy result.
- Stir in the marinara sauce and simmer uncovered for 15 minutes. You must simmer until the sauce is thick and heavy, not runny. If it looks like soup, keep simmering.
- In a small bowl, combine the ricotta, beaten egg, garlic powder, salt, pepper, and half of the fresh thyme. The egg acts as a binder to keep the cheese layer firm and prevent it from weeping moisture.
- To prevent the bottom from getting soggy, spread a very thin layer of sauce on the bottom of the pan, then place your first layer of noodles.
- Spread a layer of the ricotta mixture over the noodles, followed by a layer of meat sauce and a generous handful of mozzarella.
- Repeat the layers (aiming for 3 to 4 layers of pasta), finishing with a final layer of noodles topped with the remaining meat sauce, then a heavy coating of mozzarella and parmesan.
- Cover with foil, tenting it so the foil does not touch the cheese. Bake for 25 minutes.
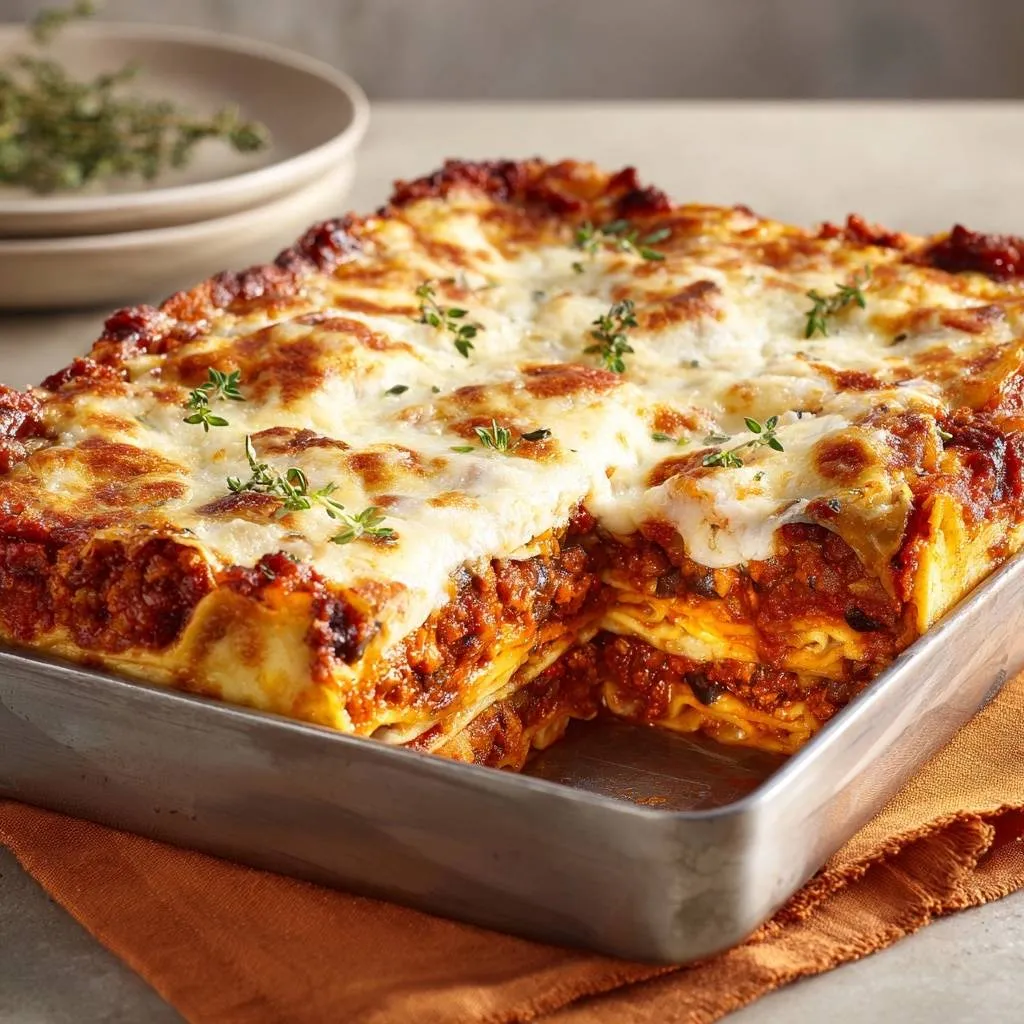
- Remove the foil and bake for another 20 to 25 minutes until the cheese is deeply golden brown and bubbling, matching the toasted crust in the photo.
- The most important step: Let the lasagna rest for at least 20 minutes before slicing. This allows the structure to set and ensures the juices stay within the layers rather than flooding the pan. Garnish with remaining fresh thyme sprigs before serving.
Notes
- The secret to preventing a soggy bottom is draining all fat from the beef, simmering the sauce until thick, and letting the dish rest for 20 minutes after baking.