The arrival of spring brings a specific kind of excitement to the kitchen as the first stalks of tart rhubarb appear alongside the season’s earliest strawberries. This Classic Strawberry Rhubarb Lattice Pie captures that fleeting moment when the sharp, assertive tang of rhubarb meets the floral sweetness of sun-ripened berries. It is a flavor profile defined by tension, offering a refreshing brightness that heavy winter desserts simply cannot match.
However, many home bakers shy away from this duo because rhubarb is notorious for releasing a flood of liquid during baking. This often results in the dreaded “soggy bottom,” where the lower crust turns into a pale, doughy mess under a pool of fruit soup. This recipe serves as your technical solution, utilizing a specific maceration and reduction method to ensure your pie is structurally sound and your crust stays shatteringly crisp.
The secret to success lies in managing the water content of the fruit before it ever touches the dough. By pre-treating the filling and using a high-heat baking strategy, you can achieve a slice that holds its shape perfectly on the plate. You’ll get that iconic jammy interior without sacrificing the integrity of the golden, flaky pastry underneath.
The Chemistry of a Crisp Bottom Crust
Achieving a crisp bottom crust in a fruit pie is a battle against steam and moisture. When fruit heats up, its cell walls break down and release juices that immediately begin to soak into the raw dough. To prevent this, we use a preheated heavy baking sheet as a heat sink. By placing the pie directly onto a hot surface, you jump-start the cooking of the bottom crust, searing the fat and flour together before the fruit juices have a chance to penetrate the layers.
The fat in your pie dough, ideally high-quality butter, creates lamination by forming tiny pockets of steam as it melts. If the fruit moisture enters these pockets first, the dough becomes saturated and heavy rather than light and flaky. Therefore, providing immediate, intense bottom heat is the most effective way to protect the lamination of your pastry.
Furthermore, the sugar in the filling acts as a hygroscopic agent, meaning it pulls water out of the fruit. If this happens entirely inside the oven, the bottom crust is essentially boiled in fruit juice. By controlling this process on the counter first, we ensure the dough stays dry enough to brown and crisp properly.
Why Maceration Prevents a Watery Filling
Maceration is the simple but vital process of tossing fruit with sugar and letting it sit. Through osmosis, the sugar draws out the excess water from the rhubarb and strawberries before they go into the crust. After about 30 minutes, you will see a surprising amount of thin, pink liquid pooling at the bottom of your bowl.
If you skip this step, all that liquid is released during the baking process, which is the primary cause of a “soupy” pie. By extracting this moisture early, you can see exactly how much liquid you are dealing with. The fruit will look slightly softened and glossy, indicating it is ready for the next stage of flavor concentration.
Reducing Fruit Juices into a Concentrated Syrup
Instead of discarding the liquid you just extracted, you should simmer it in a small saucepan until it reduces by half. This technique concentrates the natural pectins and sugars, turning a thin juice into a thick, potent syrup. This process intensifies the strawberry flavor and ensures the final filling has a jammy, rich consistency.
As the syrup bubbles, it undergoes a mild Maillard reaction, adding depth to the sweetness. Once you pour this concentrated syrup back over the fruit, you are adding flavor without the excess water. This is the professional secret to a filling that is moist and luscious but never runny.
Essential Components for the Perfect Fruit Pie
The quality of your ingredients directly impacts the structural success of a lattice pie. While frozen fruit is convenient, fresh rhubarb and strawberries are superior for this recipe because they hold their shape better during the long bake. Frozen fruit often collapses into a puree, which can cause the lattice top to sink or sag as the pie cooks.
We use cornstarch as our primary thickener because it provides a clear, glossy finish that lets the vibrant red of the berries shine. Unlike flour, which can make a filling look cloudy or “pasty,” cornstarch creates a clean gel that sets firmly once cooled. This ensures every slice looks as good as it tastes.
Selecting and Preparing Fresh Rhubarb and Strawberries
When shopping, look for the reddest rhubarb stalks you can find, as these provide the most beautiful color, though green stalks taste just as tart. Choose firm, medium-sized strawberries that aren’t overripe, as they need to withstand the heat without turning to mush. Cutting the rhubarb into 1/2 inch pieces is the “Goldilocks” size—large enough to maintain some texture but small enough to cook through at the same rate as the berries.
The Role of Acid and Aromatics
A tablespoon of lemon juice is essential because it balances the pH of the filling, which helps the cornstarch set and brightens the heavy sweetness of the sugar. Vanilla extract and a pinch of salt act as flavor enhancers, deepening the fruit’s natural profile. These small additions transform the pie from a simple sweet treat into a complex, well-rounded dessert.
Step-by-Step: Building the Classic Strawberry Rhubarb Lattice Pie
Building a professional-grade pie requires a methodical approach to ensure the crust and filling work in harmony. Follow these phases to guarantee a beautiful result.
Phase 1: Preparing the Fruit and Syrup
Start by tossing your sliced fruit with the sugar and letting it macerate for at least 30 minutes. Strain the mixture through a colander, catching the liquid in a saucepan. Simmer that liquid until it is syrupy and thick, then let it cool slightly before pouring it back over the fruit. When you add the cornstarch, toss it thoroughly until no white clumps remain; these clumps won’t dissolve in the oven and will leave chalky spots in your pie.
If you enjoy macerated fruit, you might also appreciate the tips in our peach cherry pie.
Phase 2: Rolling and Filling the Bottom Crust
Roll your chilled bottom crust to about 1/8 inch thickness, ensuring it is wide enough to overhang the pie plate by an inch. After pouring in your fruit mixture, dot the top with small cubes of unsalted butter. As the pie bakes, this butter emulsifies with the fruit juices, creating a silky, luxurious mouthfeel that balances the tartness of the rhubarb.
Phase 3: Engineering the Perfect Lattice Top
Cut your second crust into 1-inch strips and weave them in a classic over-under pattern. A lattice isn’t just for looks; the gaps between the strips allow steam to escape freely, which prevents the filling from becoming trapped and soggy. Once woven, trim the excess and crimp the edges tightly to seal the two crusts together, preventing any juice from leaking out the sides.
Phase 4: The Two-Stage Baking Temperature Strategy
Start the pie at 400°F for the first 20 minutes to set the crust and begin the browning process. Then, drop the temperature to 375°F for the remainder of the time. This lower heat allows the fruit to soften and the cornstarch to fully gelatinize without burning the pastry. Look for “thick and slow” bubbles in the center; if the bubbles are thin and popping rapidly, the starch hasn’t finished its job yet.
Troubleshooting Common Pie Failures
Even experienced bakers can run into trouble with fruit pies, but most issues are easily fixed with a few simple adjustments. Monitoring the pie closely during the final 20 minutes of baking is the best way to ensure success.
Preventing Over-Browning of the Crust Edges
Because this pie stays in the oven for nearly an hour, the crimped edges often brown faster than the center lattice. Check your pie at the 20-minute mark; if the edges are already golden, shield them with a pie shield or a ring of aluminum foil. This protects the delicate edges while allowing the rest of the crust to reach a deep, mahogany brown.
How to Tell if the Filling is Set
The most common mistake is taking the pie out too early. You must see the filling bubbling vigorously in the center of the lattice, not just the edges. These bubbles should look “lazy” and thick. Most importantly, you must let the pie cool on a wire rack for at least 4 hours. This cooling period is when the cornstarch fully sets; slicing into a hot pie will result in a runny mess every time.
Make-Ahead Strategies and Storage Tips
You can prepare the pie dough up to two days in advance and keep it wrapped tightly in the fridge. However, I don’t recommend freezing the assembled, unbaked pie, as the rhubarb will release too much water upon thawing. Once baked, the pie can sit at room temperature for up to two days, covered loosely with foil.
If you have leftovers, store them in the refrigerator for up to four days. To regain that signature crispness, reheat individual slices in a 350°F oven for about 10 minutes. Avoid the microwave, as it will make the pastry soft and rubbery.
Expert Tips for Professional Results
For the best visual results, use a glass pie plate so you can actually see the color of the bottom crust. If it looks pale, it needs more time. Before baking, brush the lattice with an egg wash and sprinkle generously with coarse sparkling sugar. This adds a professional bakery-style crunch and a beautiful shimmer to the finished product.
Optimal Serving Temperatures and Pairings
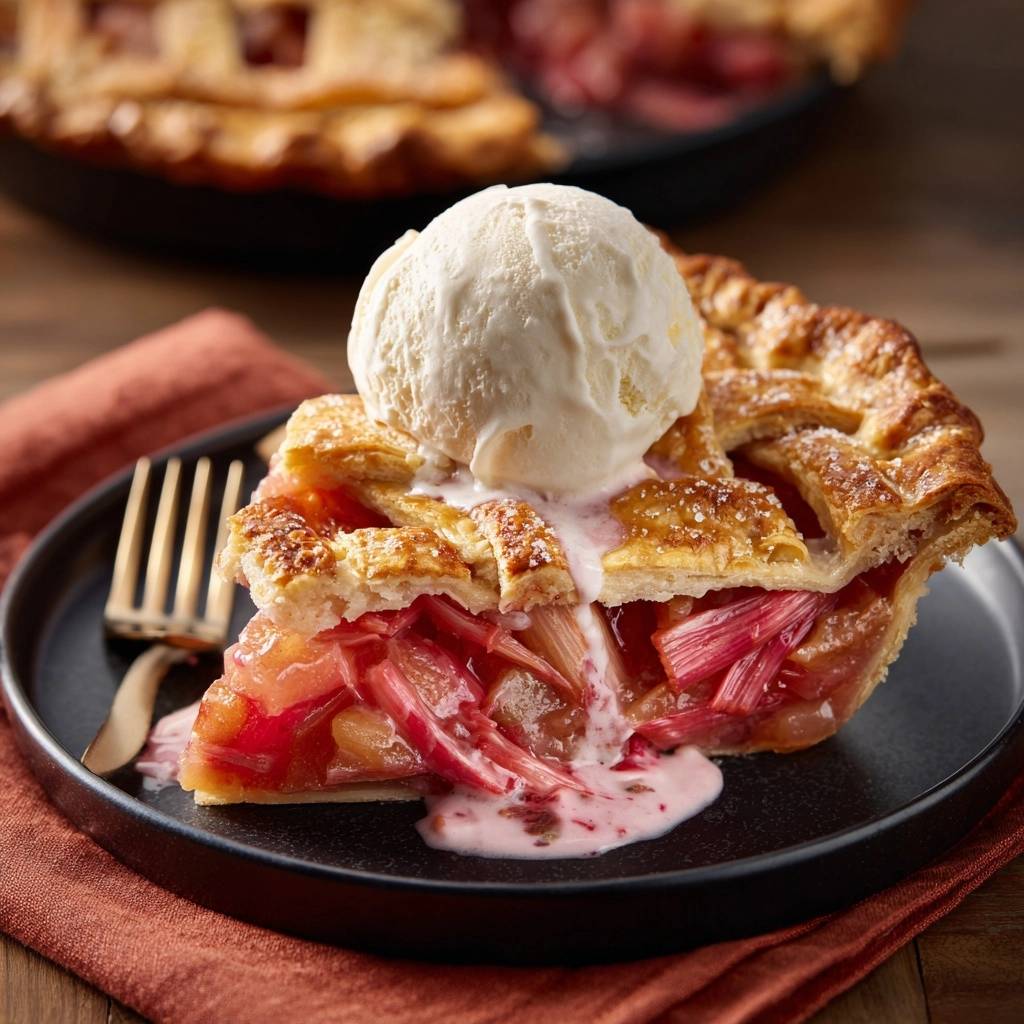
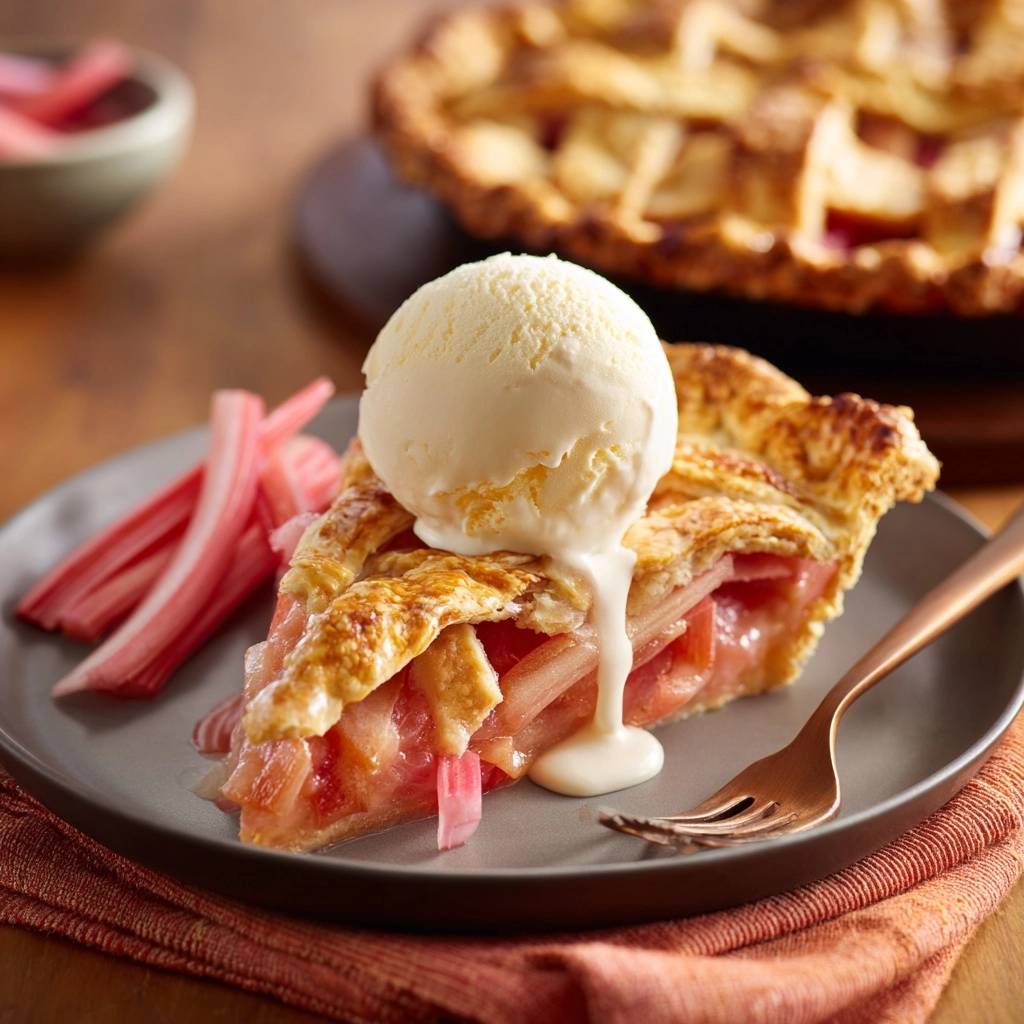
While it’s tempting to eat pie warm, this specific recipe is best served at room temperature to maintain the structure of the filling. The tartness of the rhubarb cries out for a creamy companion. A large scoop of high-quality vanilla bean ice cream or a dollop of unsweetened whipped cream provides the perfect mellow contrast to the vibrant fruit.
Frequently Asked Questions
Can I use frozen rhubarb for this pie?
Yes, you can use frozen rhubarb, but you must thaw it completely and drain it very well before starting the maceration process. Frozen fruit tends to be much wetter than fresh, so you might need to simmer the juices for a few extra minutes to achieve the correct syrupy consistency. Do not use frozen strawberries, as they lose too much structure.
Why did my lattice top shrink during baking?
Lattice shrinkage usually happens because the dough wasn’t allowed to relax. After rolling out your strips and weaving them, let the assembled pie sit in the refrigerator for 15 to 20 minutes before putting it in the oven. This allows the gluten to relax and the fat to firm up, which prevents the strips from pulling back as they hit the heat.
Can I substitute the cornstarch with flour?
You can substitute flour, but you will need to use about 1/2 cup to achieve the same thickening power as 1/3 cup of cornstarch. Keep in mind that flour will make the filling look cloudy and slightly more opaque. If you want that professional, translucent fruit look, stick with cornstarch or use arrowroot powder as a 1:1 substitute.
How do I avoid a large gap between the fruit and the top crust?
A “gap” happens when the fruit cooks down and shrinks, leaving the baked lattice hovering above it. To avoid this, make sure you pack the fruit into the pie plate tightly, mounding it slightly in the center. The maceration and reduction steps also help because they pre-shrink the fruit, meaning the volume you put into the crust is much closer to the volume you’ll have after baking.
Is it okay to use a store-bought crust?
Absolutely. While homemade crust offers the best flavor, a high-quality refrigerated store-bought crust works perfectly well for this recipe. Just make sure the crust is chilled when you roll it out, and follow the same preheated baking sheet instructions to ensure the bottom gets as crisp as possible.

Strawberry Rhubarb Pie
Course: DessertCuisine: AmericanDifficulty: medium8
servings45
minutes55
minutes410
kcal60
MinutesThis classic pie balances tart rhubarb and sweet strawberries with a crisp, flaky lattice crust. By reducing the fruit juices into a syrup before baking, the filling stays stable and the bottom crust remains golden and crunchy.
Ingredients
2 refrigerated or homemade pie crusts (chilled)
3 1/2 cups fresh rhubarb, cut into 1/2 inch pieces
2 cups fresh strawberries, quartered
1 cup granulated sugar
1/3 cup cornstarch (increased for stability)
1 tablespoon lemon juice
1 teaspoon vanilla extract
1/4 teaspoon salt
2 tablespoons unsalted butter, cut into small cubes
1 egg, beaten with 1 tablespoon water (egg wash)
1 tablespoon coarse sparkling sugar
Vanilla ice cream for serving
Directions
- Preheat your oven to 400°F (200°C). Place a heavy baking sheet on the middle rack to preheat; this provides immediate bottom heat to sear the lower crust.
- In a large bowl, toss the rhubarb, strawberries, and sugar. Let this sit for 30 minutes. This is the secret step. You will see a significant amount of liquid pooling at the bottom.
- Strain the fruit through a colander, catching all the liquid in a small saucepan. Set the fruit aside.
- Bring the collected juice to a simmer over medium heat and reduce it by half until it is syrupy. This concentrates the flavor and removes excess water. Pour the syrup back over the fruit.
- Add the cornstarch, salt, lemon juice, and vanilla to the fruit mixture. Toss thoroughly until no white clumps of starch remain.
- Roll out the bottom crust and fit it into a 9-inch pie plate. Pour the fruit mixture in and dot the top of the filling with the small cubes of butter for a silky mouthfeel.
- Roll out the second crust and cut into 1-inch strips. Weave the strips over the filling to create a lattice pattern. Trim and crimp the edges to seal.
- Brush the lattice with the egg wash and sprinkle generously with coarse sparkling sugar.
- Place the pie directly onto the preheated baking sheet. Bake at 400°F for 20 minutes. Reduce the heat to 375°F and bake for another 35-40 minutes. If the edges brown too quickly, shield them with foil. The pie is done when the crust is deep golden and the filling bubbles thick and slow in the center.
- Crucial Step: Let the pie cool completely on a wire rack for at least 4 hours. As seen in the image, a properly set pie maintains its structure when sliced, even with the weight of a large scoop of vanilla ice cream on top. Serve at room temperature.
Notes
- For the best results, let the pie cool for at least 4 hours to allow the filling to set completely. Serve with vanilla ice cream.