
Imagine a forkful of velvety, garlic-scented cream sauce paired with a piece of chicken so crisp the skin actually crackles when you bite into it. Most one-pan meals promise convenience but deliver disappointment in the form of rubbery, pale chicken skin that has been steamed into submission by the surrounding liquid. This recipe flips the script by treating the skillet like a two-zone cooking environment.
The secret lies in the “Anti-Soggy” philosophy, where we prioritize the structural integrity of the crust just as much as the tenderness of the meat. By using a specific searing technique and a clever “high-tuck” placement, you get the best of both worlds: a rich, braised interior and a shatteringly crisp exterior. It is the ultimate comfort food that doesn’t sacrifice texture for flavor.
For a similar creamy chicken experience, check out this creamy peppercorn pan chicken.
To ensure success, you must start with bone-in, skin-on dark meat. The bone acts as a natural insulator, keeping the chicken juicy during the oven finish, while the skin provides the rendered fat needed to flavor the entire base of the dish. One pro tip to remember: always pat your chicken dry with paper towels until the skin feels like parchment paper before it hits the oil. Moisture is the enemy of the crunch you crave.
The Science of the Perfect Sear
Achieving that deep mahogany color on your chicken isn’t just about aesthetics; it is about the Maillard reaction. This chemical process occurs when proteins and sugars are exposed to high heat, creating hundreds of different flavor compounds. If your chicken is damp when it hits the pan, it will steam rather than sear, leaving you with a grey, unappealing texture.
Once the chicken is in the skillet, leave it alone. It is tempting to poke and prod, but the skin needs uninterrupted contact with the hot oil to release its fat and develop a crust. You will know it is ready to flip when the chicken releases naturally from the pan. If it sticks, it is telling you it needs another minute to finish building that golden barrier.
The rendered fat left behind in the skillet is liquid gold. Instead of wiping the pan clean, we use that flavorful oil to sauté the vegetables. This ensures that every bite of potato and mushroom is infused with the essence of roasted chicken, creating a cohesive flavor profile that builds from the bottom up.
Why Bone-In Skin-On Poultry Wins
While boneless breasts are convenient, they often dry out long before the potatoes in a skillet meal reach the perfect creamy consistency. Bone-in thighs and drumsticks are much more forgiving. The connective tissue breaks down during the simmering process, resulting in meat that pulls away from the bone with zero effort.
Furthermore, the skin acts as a protective lid for the meat. As the chicken sits in the oven, the skin renders its fat downward, basting the meat and keeping it moist while the top side becomes incredibly crispy. It is a self-basting system that yields a much more sophisticated result than lean cuts ever could.
Essential Components for the Skillet Sauce
The foundation of this Creamy Mushroom and Potato Chicken Skillet relies on high-quality staples. Baby yellow potatoes are the MVP here because their waxy texture allows them to hold their shape even after simmering in cream. Unlike russets, which might dissolve and turn your sauce into mashed potatoes, yellow potatoes stay firm yet buttery.
For the mushrooms, skip the basic white buttons and reach for cremini (often sold as baby bellas). They have a lower water content and a much deeper, earthier flavor. When they hit that hot chicken fat, they caramelize beautifully, adding a savory “umami” punch that balances the richness of the heavy cream.
The Role of Dijon Mustard in Emulsification
You might wonder why a creamy sauce needs mustard, but it is actually a functional powerhouse. Dijon acts as a natural emulsifier, helping the heavy cream and chicken broth bind together into a smooth, glossy sauce. Without it, the sauce is more likely to “break” or separate into an oily mess under the high heat of the oven.
Beyond the chemistry, the mustard provides a necessary acidic backbone. The sharp, vinegary tang of the Dijon cuts through the heavy fats of the cream and chicken skin. It brightens the entire dish, ensuring that the sauce feels luxurious rather than heavy or cloying on the palate.
Selecting the Right Mushrooms for Texture
Mushrooms are nearly 90% water, which means they shrink significantly during cooking. To prevent them from disappearing into the sauce, slice them into thick, hearty pieces. You want to be able to identify a mushroom on your fork, not just a sliver of brown skin.
When you add them to the skillet, let them brown thoroughly before adding the garlic. Garlic burns quickly, but mushrooms need time to release their moisture and take on color. Waiting until the mushrooms look toasted ensures you get the best flavor without any bitter, burnt garlic notes.
Step-by-Step: Achieving the Golden Crunch
Start by heating your oil until it shimmers. When you place the chicken in the pan, you should hear a loud, aggressive sizzle. This is the sound of moisture evaporating and the sear beginning. If the pan is too quiet, your oil isn’t hot enough, and the skin will likely stick and tear.
Watch for the visual cues: the edges of the chicken skin will start to turn opaque and then brown. After about 8 minutes, the skin should be a deep, uniform gold. When you flip the pieces, you only need a quick two-minute sear on the bottom. The goal here isn’t to cook the chicken through yet, but to lock in the juices and build that initial flavor base.
The High-Tuck Method: Protecting the Skin
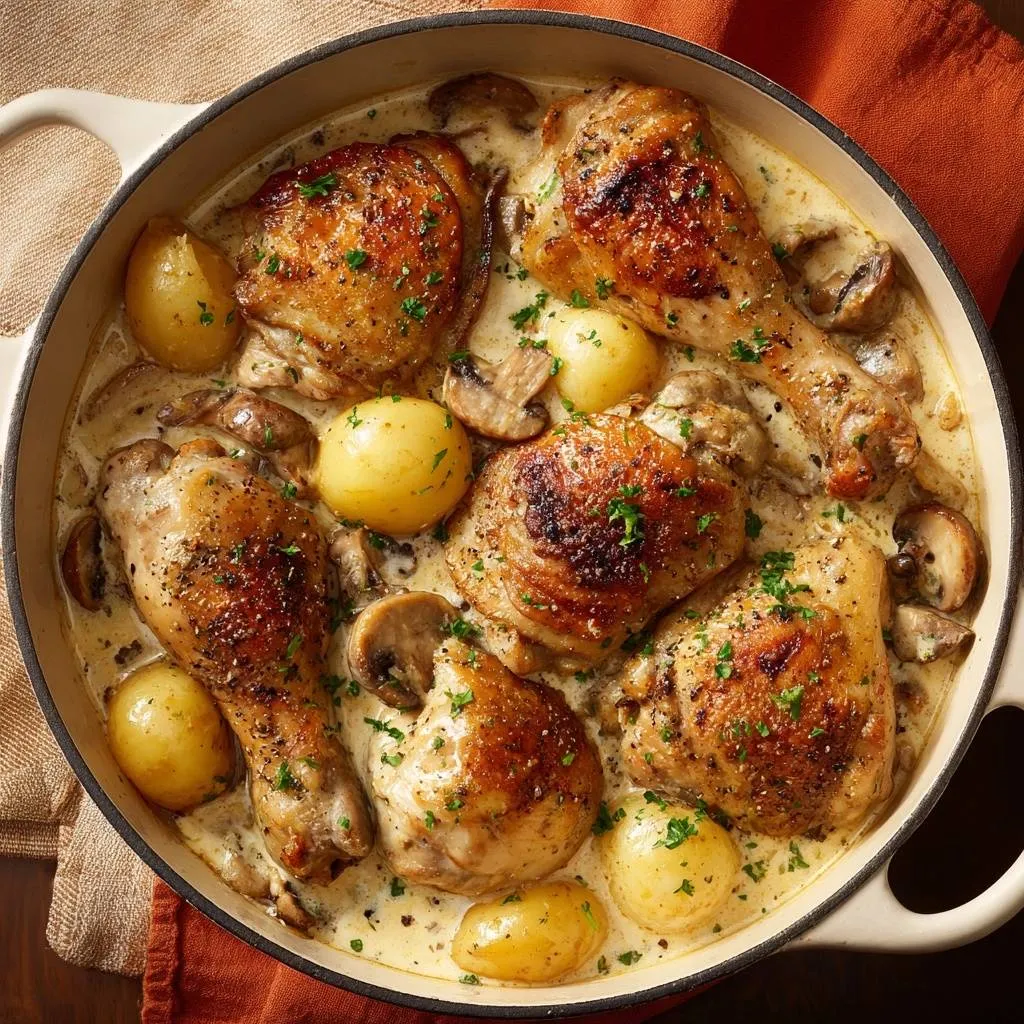
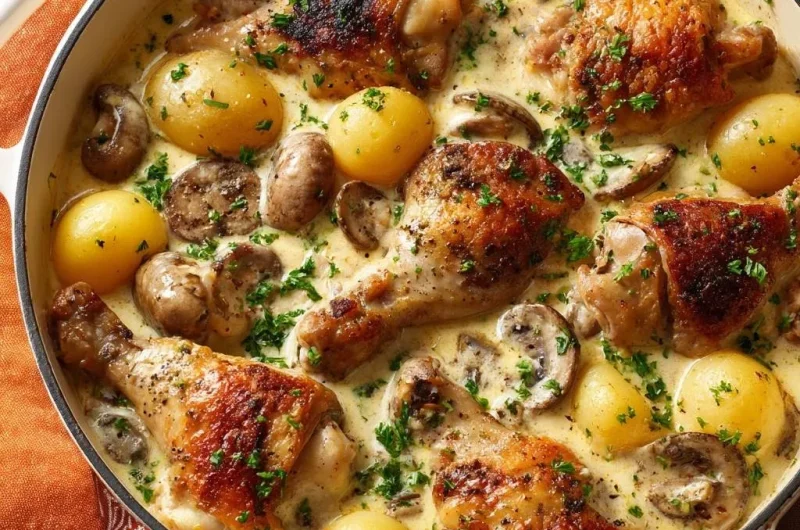
This is the most critical part of the recipe. Once your sauce is simmering, do not just toss the chicken back into the liquid. If the skin is submerged, all that hard work you put into the sear will be wasted as it turns back into a soggy mess. Instead, use your potatoes and mushrooms to build little “islands.”
Nestle the chicken pieces so they sit on top of the vegetables. The liquid should only reach about halfway up the sides of the chicken. This allows the bottom half of the meat to braise in the flavorful cream while the skin stays high and dry, exposed to the circulating heat of the oven. It is like a spa treatment for your dinner.
Oven Finishing for Maximum Flavor Extraction
Moving the skillet to a 375°F oven does two things. First, it provides a steady, surrounding heat that cooks the potatoes to the center without burning the bottom of the sauce. Second, the dry heat of the oven acts like a finishing broiler for the chicken skin, drying out any remaining moisture and turning it into a crackling crust.
As the dish bakes, the sauce will reduce and thicken. The starch from the potatoes will naturally leach into the cream, creating a thick, gravy-like consistency that coats the back of a spoon. You will know it is done when the sauce is bubbly and the chicken registers 165°F on a meat thermometer.
Troubleshooting Common Skillet Challenges
If you find your sauce is still too thin after the baking time, simply remove the chicken and potatoes to a plate and simmer the sauce on the stovetop for 3-4 minutes. This quick reduction will intensify the flavors and thicken the texture instantly. Just be sure not to let it boil too hard, or the cream might scorch.
If your potatoes are still a bit firm but the chicken is done, you can cover the pan loosely with foil, making sure the foil doesn’t touch the chicken skin. This traps steam to soften the potatoes while protecting the crust. However, if you use the “high-tuck” method correctly, the potatoes usually cook perfectly in tandem with the meat.
Flavor Variations and Herb Substitutions
Thyme and parsley are the classic choices for this dish, but you can easily pivot based on what is in your garden. Rosemary adds a woody, pine-like aroma that pairs beautifully with the mushrooms. If you want something a bit more sophisticated, fresh tarragon offers a subtle anise flavor that feels very French and elegant.
For an extra layer of aromatics, try adding sliced leeks or shallots along with the mushrooms. They melt into the sauce and provide a sweetness that complements the garlic. If you like a bit of heat, a pinch of red pepper flakes added to the oil before the garlic can provide a nice back-of-the-throat warmth.
Optimal Side Dishes for Creamy Poultry
Since this skillet is already loaded with hearty potatoes and rich cream, you want to pair it with something that offers a sharp contrast. A simple arugula salad tossed in a lemon vinaigrette is perfect. The peppery greens and acidic dressing cut right through the richness of the chicken and sauce.
Steamed green beans or roasted asparagus also work well. Keep the seasoning simple with just sea salt and a squeeze of lemon. You want the side dish to act as a palate cleanser between bites of the decadent, creamy chicken. Avoid serving this with bread or pasta, as the potatoes already provide plenty of starch.
Storage and Reheating Without Losing Texture
Leftovers will stay fresh in an airtight container for up to three days. However, the refrigerator is the enemy of crispy skin. When you are ready to eat, avoid the microwave if possible. The microwave will turn the chicken rubbery and the sauce might separate.
The best way to reheat is in the oven or an air fryer. Place the chicken skin-side up at 350°F for about 10 minutes until the skin crisps back up. You can warm the sauce and potatoes in a small saucepan on the stove with a splash of broth or water to loosen the consistency. This extra step makes the meal taste just as good as the night you made it.
Expert Tips for Skillet Success
Can I use heavy cream alternatives like coconut milk?
You can use full-fat coconut milk, but it will significantly change the flavor profile to something more tropical. If you need a dairy-free option, cashew cream is a better substitute as it has a neutral flavor and high fat content that mimics heavy cream without the coconut aftertaste.
How do I know the potatoes are fully cooked without a fork-mash?
The easiest way is to use a thin skewer or a paring knife. It should slide into the center of the largest potato with absolutely no resistance. If you feel a “pop” or any firmness, they need another five minutes. Since they are peeled, they absorb the sauce quickly once they reach the softening point.
What is the best skillet material for this dish?
A heavy cast iron skillet or a stainless steel braiser is ideal. Cast iron holds heat exceptionally well, which helps in getting that initial hard sear on the chicken. Stainless steel is also great because it allows you to see the “fond” (the brown bits) on the bottom, making it easier to know when to deglaze.
Can I use chicken breasts instead of thighs?
You can, but you must be very careful. Breasts cook much faster and have less fat, so they are prone to drying out. If using breasts, I recommend checking the internal temperature at the 15-minute mark in the oven. You may need to pull them out while the potatoes finish cooking.
How to prevent the garlic from burning during the sauté phase.
Garlic only needs about 30 to 60 seconds of heat to become fragrant. Always add it last, after the mushrooms and potatoes have already browned. If the pan looks too dry or hot, move the vegetables to the edges and drop the garlic in the center with a tiny splash of broth to cool the surface slightly.
Chicken Mushroom Potato Skillet
Course: Main CourseCuisine: AmericanDifficulty: medium4
servings15
minutes45
minutes580
kcal60
MinutesThis recipe solves the problem of soggy chicken skin in creamy dishes by using a high-tuck method. Bone-in chicken is seared to a golden crunch and then propped up on potatoes and mushrooms so the skin stays above the sauce line while baking in the oven.
Ingredients
4 chicken thighs and 4 drumsticks, bone-in and skin-on
1 pound baby yellow potatoes, whole (peeled)
8 ounces cremini mushrooms, sliced thick
1.5 cups heavy cream
1/2 cup chicken broth
1 tablespoon Dijon mustard (for sauce stability and tang)
3 cloves garlic, minced
2 tablespoons olive oil
1 teaspoon dried thyme
Salt and black pepper to taste
Fresh parsley, finely chopped for garnish
Directions
- Preheat your oven to 375°F (190°C). Pat the chicken skin completely dry with paper towels. Season generously with salt and pepper on all sides.
- Heat olive oil in a large, oven-safe wide skillet or braiser over medium-high heat. Place chicken skin-side down and sear for 8 to 10 minutes without moving them until the skin is deep golden brown and the fat has rendered. Flip and sear for 2 minutes on the other side. Remove chicken from the pan and set aside on a plate.
- In the same skillet, add the whole peeled potatoes and sliced mushrooms. Sauté for 6-8 minutes in the chicken fat until the mushrooms are browned and the potatoes are golden on the outside. Add the minced garlic and thyme, cooking for 1 minute until fragrant.
- Whisk the chicken broth, heavy cream, and Dijon mustard together. Pour the mixture into the skillet. Stir to combine, scraping up the flavorful brown bits (fond) from the bottom of the pan. Bring to a gentle simmer.
- The Anti-Soggy Secret: Carefully nestle the chicken pieces back into the pan. Use the potatoes and mushrooms as “pedestals” to prop the chicken up. The liquid should only reach halfway up the sides of the chicken. The crispy skin must remain entirely above the liquid line.
- Transfer the skillet, uncovered, to the preheated oven. Bake for 20-25 minutes. This ensures the potatoes cook through to the center while the dry oven heat maintains and enhances the “crackling” texture of the exposed chicken skin.
- Remove from the oven once the chicken reaches an internal temperature of 165°F and the sauce has thickened. Garnish heavily with fresh parsley and serve immediately directly from the skillet.
Notes
- The Anti-Soggy Secret: Use the potatoes and mushrooms as pedestals to prop the chicken up. Ensure the liquid only reaches halfway up the sides of the chicken so the skin remains exposed to dry heat.