
There is something undeniably sophisticated about the earthy, toasted aroma of a fresh pistachio. When you pair that deep, nutty profile with the velvet-like texture of a premium cheesecake, you create a dessert that feels both rustic and incredibly high-end. Most people view the pistachio as a humble snack, but in this recipe, it becomes the star of a rich, buttery show that coats the palate in a way few other flavors can match.
However, the journey to a perfect cheesecake is often paved with the fear of the “Grand Canyon” crack. You spend hours on a dessert only to have the center split or sink into a sad crater as it cools. It’s frustrating, but it’s also entirely preventable. By focusing on moisture control and a gentle temperature decline, you can achieve a flat, professional surface that looks like it came straight from a high-end bakery case.
Preventing those cracks is easier than you think, and you can apply similar techniques to red velvet cheesecake stuffed cookies.
The secret to this specific Creamy Pistachio Dream Cheesecake lies in the “Slow-Cool” method. Most bakers pull their cake out the second the timer dings, which shocks the delicate proteins and causes them to contract too quickly. By propping the oven door open and letting the cake rest in its warm water bath, you allow the internal structure to firm up gradually. This patience is what separates a cracked, dry cake from a silky masterpiece.
The Anatomy of a Crack-Free Cheesecake
Understanding the science of your ingredients is the first step toward mastery. A cheesecake is essentially a baked custard, which means it relies on the coagulation of proteins found in the eggs and cream cheese. When these proteins are heated too quickly or too high, they tighten up and squeeze out moisture. This is why a cheesecake baked at high heat often ends up with a grainy, rubbery texture instead of a creamy one.
High heat also causes the edges of the cake to expand and rise rapidly while the center remains liquid. As the cake cools, the edges stay stuck to the sides of the pan while the middle drops, creating that dreaded structural failure in the form of a deep crack. Moisture control is your primary defense here. By keeping the oven environment humid and the temperature low, you ensure the entire cake cooks at a uniform rate from the outside in.
Why Room Temperature Ingredients are Non-Negotiable
You might be tempted to start mixing while your cream cheese is still slightly chilled, but that is a recipe for disaster. Cold fats do not play well with air. When you try to beat cold cream cheese, it breaks into tiny, stubborn lumps that refuse to smooth out. You then end up over-mixing the batter to get rid of those lumps, which incorporates far too much air into the mixture.
This excess air is the enemy of a flat cheesecake. In the heat of the oven, those air bubbles expand, causing the cake to puff up like a souffle. Once you take it out, the air escapes and the cake collapses. Using room temperature eggs, cream, and cheese allows the ingredients to emulsify effortlessly into a silky liquid without the need for aggressive whipping.
Essential Components for the Pistachio Base and Filling
Quality ingredients are the backbone of this dish. For the filling, you must use full-fat cream cheese, specifically the blocks rather than the whipped tubs. You want a minimum of 33% fat content to ensure the cake has enough body to hold its shape. Heavy cream is also superior to sour cream in this specific recipe because its higher fat content complements the natural oils in the pistachio paste, leading to a richer mouthfeel.
The graham cracker crust provides the necessary salty-sweet crunch to offset the dense filling. Using unsalted butter allows you to control the salt levels, especially since the topping features salted pistachios. When you mix the crumbs, they should feel like wet sand. If the mixture is too dry, the crust will crumble when sliced; if it’s too oily, it will become soggy once the batter is added.
Selecting High-Quality Pistachio Paste vs. Nut Butters
Not all pistachio products are created equal. For this cheesecake, you want a pure pistachio paste that contains 100% nuts with no added sugars or oils. Many commercial “pistachio spreads” are loaded with palm oil and sugar, which will throw off the chemistry of your batter and result in an artificial, cloying taste. A pure paste offers a deep, olive-green color and a concentrated nut flavor that is truly unmatched.
If you can only find sweetened pistachio butter, you will need to reduce the granulated sugar in the recipe by at least a quarter cup. However, the pure paste is worth the hunt. It provides a savory undertone that balances the sweetness of the cream cheese, making the dessert feel complex rather than just sugary. It also ensures the texture remains dense and fudgy rather than oily.
The Role of Almond Extract in Flavor Reinforcement
It might seem strange to add almond extract to a pistachio cake, but there is a botanical reason for it. Pistachios and almonds are closely related, and a tiny amount of almond extract acts as a “flavor bridge.” It highlights the floral, nutty notes of the pistachio, making it taste more like itself. Without it, the pistachio flavor can sometimes get lost behind the tang of the cream cheese.
Be careful not to overdo it, though. You only need a quarter teaspoon to reinforce the flavor. If you add too much, the cake will start to taste like a cherry pit or a marzipan candy. The goal is to have people take a bite and wonder why the pistachio tastes so vibrant, not to have them identify the almond specifically. It is a subtle chef’s trick that makes a world of difference.
Constructing the Perfect Graham Cracker Foundation
The foundation of your cheesecake needs to be sturdy enough to support nearly three pounds of filling. After pressing your buttery crumbs into the springform pan, you must pre-bake the crust for exactly 10 minutes. This short stint in the oven sets the sugars and fats, creating a moisture barrier. If you skip this step, the crust will absorb the moisture from the batter and the water bath, resulting in a “soggy bottom.”
Use the bottom of a flat measuring cup to press the crumbs firmly into the corners of the pan. You want a tight, even layer that goes about half an inch up the sides. This “lip” of crust helps hold the filling in place and provides a beautiful visual border once the cake is sliced. Let the crust cool completely before pouring in the batter to ensure it stays crisp.
Step-by-Step: Mixing the Silky Pistachio Batter
When you begin mixing the filling, keep your mixer on medium-low speed. You are looking for a smooth, creamy consistency, not a fluffy one. Scrape the sides and the bottom of the bowl frequently with a silicone spatula. Often, a thick plug of unmixed cream cheese hides at the very bottom of the bowl, which can cause white streaks in your green pistachio batter later on.
If you appreciate this cheesecake’s creamy texture, you’ll want to try the creamy pumpkin swirl cheesecake.
Add your eggs one at a time, mixing just until the yellow yolk disappears. This is the most critical stage for emulsion stability. If you dump all the eggs in at once, the fat in the cream cheese will struggle to bond with the liquid in the eggs, leading to a broken or “curdy” batter. Once the heavy cream and pistachio paste go in, the mixture should look like thick, pale green satin.
Achieving the Signature Vibrant Green Hue
Pure pistachio paste will give the batter a lovely, natural sage color. However, if you want that striking, “dreamy” green look, a drop or two of green gel food coloring is the way to go. Gel is preferred over liquid coloring because it is highly concentrated and won’t add unnecessary moisture to the batter. Liquid dyes can sometimes thin out the mixture, affecting the final set.
For those who prefer to avoid synthetic dyes, a half-teaspoon of high-quality matcha powder can provide a similar boost in color. Matcha has an earthy profile that complements pistachio perfectly. Whichever you choose, add it at the very end of the mixing process so you can judge the final color accurately before the cake goes into the oven.
The Water Bath: Engineering a Gentle Bake
A water bath, or Bain-Marie, is the secret weapon of professional pastry chefs. The physics are simple: water cannot exceed 212°F at sea level. By surrounding your cheesecake pan with boiling water, you create a thermal buffer. This ensures the outside of the cake never gets hotter than the boiling point, allowing the center to catch up without the edges overcooking or curdling.
To prevent leaks, wrap the bottom of your springform pan in two or even three layers of heavy-duty aluminum foil. Make sure the foil comes all the way up the sides. Place the wrapped pan into a larger roasting pan and then pour the boiling water in once the pans are already on the oven rack. This prevents you from splashing water into the batter while moving the tray.
The Slow-Cool Method: Preventing Structural Shock
Once the timer goes off, your work isn’t done. The transition from a 325°F oven to a 70°F kitchen is too much for a cheesecake to handle. This is when most cracks happen. Instead of removing the cake, turn the oven off and prop the door open just a few inches using a wooden spoon. This allows the heat to escape slowly, lowering the temperature of the cake by just a few degrees every minute.
During this hour of resting, the internal structure of the cheesecake is still finishing its “carry-over” cooking. The proteins are settling into their final positions. If you rush this, the steam trapped inside the cake will condense too quickly, causing the surface to wrinkle or pull away from the edges. This gradual decline is the most important step for achieving that perfectly flat, professional finish.
After the hour in the oven, move the cake to the counter to reach room temperature. Only then should it go into the refrigerator. A cheesecake needs at least 8 hours, but preferably 24, to fully set. During this time, the fats stabilize and the pistachio oils permeate the cream cheese, deepening the flavor significantly. Patience truly is the final ingredient in a perfect cheesecake.
Troubleshooting Common Pistachio Cheesecake Hurdles
Even with the best intentions, things can go wrong. If you notice your water bath has leaked and the crust feels damp, don’t panic. You can often save it by removing the foil and letting the cake sit on a wire rack in the fridge uncovered; the cold air will help dry out the base. If the surface starts browning too quickly in the oven, simply tent a piece of foil loosely over the top of the roasting pan.
Another common issue is the “jiggle” factor. It can be terrifying to pull a cake out that still looks wobbly. However, if the edges are set and slightly puffed, but the center 2-3 inches move like Jell-O (not like liquid sloshing), it is done. The residual heat will finish the job. If you wait until the center is firm, the cake will be overbaked and dry once it cools.
Identifying the Perfect “Jiggle”
To test the jiggle, give the side of the roasting pan a very gentle nudge. You are looking for a specific movement. The center should ripple slightly, similar to a bowl of firm pudding. If the surface breaks or looks like milk moving under a skin, it needs another five minutes. Remember, a cheesecake that is perfectly firm in the oven will be a cheesecake that is overdone on the plate.
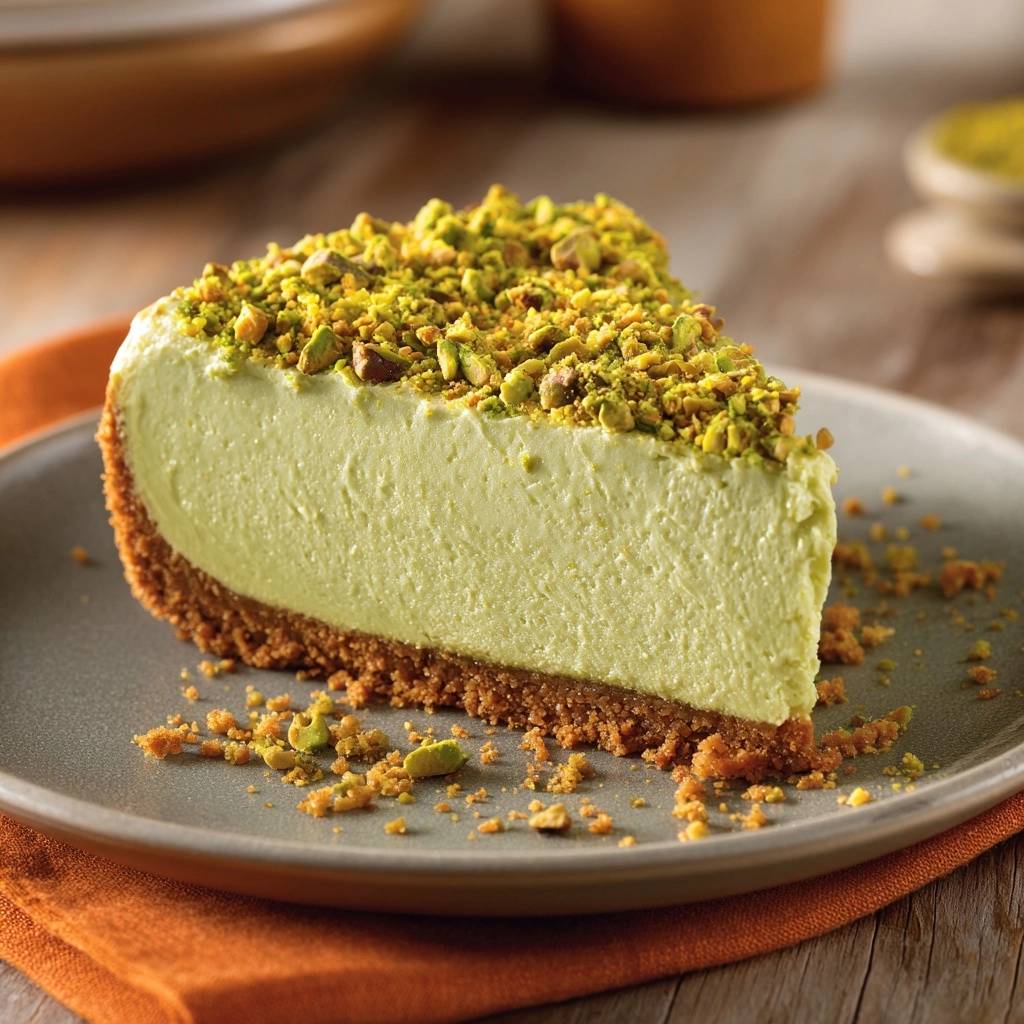
Finishing Touches: The Dense Pistachio Topping
The thick layer of chopped pistachios isn’t just for looks; it provides a vital textural contrast. Use roasted, salted pistachios for the best results. The salt cuts through the richness of the cream cheese, while the roasting process releases the natural oils in the nuts. Roughly chop them so you have a mix of fine dust and larger, crunchy chunks.
Press the nuts lightly into the surface of the chilled cheesecake. Because the cake is dense and slightly tacky, they will adhere easily. This layer also acts as a “camouflage” for any minor imperfections on the surface. If you did end up with a tiny hairline crack, this generous topping will hide it completely while adding a massive boost of flavor.
The Hot Knife Technique for Clean Slices
To get those sharp, professional edges you see in food photography, you need a hot knife. Fill a tall glass with boiling water and dip a thin, sharp blade into it. Wipe the blade completely dry with a clean towel before making your first cut. The heat from the metal will slice through the cold fats of the cheesecake like butter.
Crucially, you must clean and re-dip the knife between every single slice. If you don’t, the bits of cheesecake from the previous cut will smear across the next one, ruining the clean lines. It takes a little extra time, but the visual payoff is worth the effort. Your guests will be amazed at how perfect each wedge looks on the plate.
Storage and Make-Ahead Logistics
Cheesecake is the ultimate make-ahead dessert. In fact, it tastes better on day two or three. The flavors have more time to meld, and the texture becomes even creamier as it sits. You can store the cake in an airtight container in the refrigerator for up to five days. Just be sure to add the nut topping right before serving if you want them to stay maximum-crunchy.
What’s Next?
Try these delicious pairings:
If you want to freeze the cake, do it without the topping. Wrap the fully chilled cake (or individual slices) tightly in plastic wrap, then a layer of aluminum foil. It will stay fresh in the freezer for up to three months. To thaw, place it in the refrigerator overnight. Never thaw a cheesecake on the counter, as the temperature change is too drastic and will cause the texture to break down.
Expert Tips for Cheesecake Success
How do I store leftovers and does this freeze well?
Store any leftover cheesecake in an airtight container in the refrigerator for up to 5 days. For the best texture, keep it away from strong-smelling foods like onions or garlic, as the high fat content in the cheese will absorb those odors. You can freeze this cake for up to 3 months. Wrap it tightly in plastic wrap and then foil. Thaw it slowly in the fridge for 24 hours before serving to maintain the creamy consistency.
Why did my cheesecake crack despite using a water bath?
The most common reason for cracking, even with a water bath, is over-mixing the eggs. When you beat eggs into the batter at high speed, you incorporate air. That air expands in the oven and then collapses as it cools, pulling the surface apart. Always mix on low speed once the eggs are added. Additionally, ensure you don’t skip the “Slow-Cool” step in the oven, as sudden temperature drops are a leading cause of surface tension breaks.
Can I substitute the pistachio paste with something else?
If you cannot find pistachio paste, you can make a DIY version by blending roasted, unsalted pistachios in a high-speed food processor until they turn into a smooth, liquid butter. Do not substitute with pistachio pudding mix or flavored syrups, as these contain starches and chemicals that will change the bake time and texture of the cake. If you want a different nut flavor altogether, cashew butter works as a great 1:1 substitute due to its similar fat content.
How do I get the foil off without breaking the crust?
Wait until the cheesecake has cooled to room temperature before attempting to remove the foil. If you try to peel it off while the butter in the crust is still warm and soft, you risk pulling chunks of the base away with the foil. Once the cake is cool, the butter will have firmed up, making the crust much more durable. Carefully unwrap the layers and pat the outside of the pan dry with a towel before releasing the springform latch.
Why is my crust soggy even though I pre-baked it?
A soggy crust usually happens because of a leak in the water bath. Even a tiny pinhole in your aluminum foil can allow water to seep in. To prevent this, use “heavy-duty” extra-wide foil so you can wrap the bottom in one solid piece without seams. Another tip is to place the foil-wrapped springform pan inside a slightly larger silicone cake pan or a slow cooker liner before putting it in the water bath for an extra layer of waterproof protection.

Pistachio Cheesecake
Course: DessertCuisine: AmericanDifficulty: medium12
servings25
minutes1
hour10
minutes510
kcal95
MinutesA vibrant and creamy pistachio cheesecake featuring a graham cracker crust, high-quality pistachio paste, and a dense topping of roasted pistachios. This recipe focuses on moisture control to prevent sinking and cracking.
Ingredients
1.5 cups graham cracker crumbs
1/4 cup granulated sugar
6 tablespoons unsalted butter, melted
32 ounces (4 blocks) cream cheese, softened to room temperature
1 cup granulated sugar
4 large eggs, room temperature
1 cup heavy cream, room temperature
3/4 cup high-quality pistachio paste (pure, no added sugar)
1 teaspoon vanilla extract
1/4 teaspoon almond extract (to enhance the pistachio flavor)
1-2 drops green gel food coloring (optional, for the vibrant visual match)
1 cup roasted, salted pistachios, roughly chopped (for the thick topping)
Directions
- Preheat your oven to 325°F (160°C). Mix graham cracker crumbs, 1/4 cup sugar, and melted butter. Press firmly into the bottom and slightly up the sides of a 9-inch springform pan. Bake for 10 minutes, then let cool completely.
- Wrap the outside of the cooled springform pan in two layers of heavy-duty aluminum foil, ensuring it is watertight.
- In a large bowl, beat the softened cream cheese and 1 cup sugar on medium-low speed until completely smooth and creamy. Scrape the sides frequently.
- Add eggs one at a time, mixing on low speed just until combined. Do not over-mix, as air bubbles cause the cake to rise and then sink/crack.
- Stir in the pistachio paste, heavy cream, vanilla extract, almond extract, and food coloring (if using) until the color is uniform and the batter is silky.
- Pour the batter over the cooled crust. Place the foil-wrapped pan into a large roasting pan. Pour boiling water into the roasting pan until it reaches halfway up the sides of the cheesecake pan.
- Bake for 65 to 75 minutes. The edges should be set and slightly puffed, but the center 2-3 inches should still have a distinct jiggle.
- To solve the cracking problem, turn the oven off and prop the door open just a crack with a wooden spoon. Let the cheesecake sit in the water bath inside the cooling oven for 1 hour.
- Remove from the oven, take the pan out of the water bath, and remove the foil. Let it cool to room temperature on the counter. Chill in the refrigerator for at least 8 hours or overnight.
- Once fully chilled and set, cover the entire top surface with a dense, thick layer of chopped pistachios, pressing them lightly into the surface so they adhere as shown in the image. Slice with a hot, clean knife for perfect edges.
Notes
- To prevent cracking, use the Slow-Cool method by propping the oven door open for one hour after baking. Ensure all dairy ingredients are at room temperature to avoid lumps and over-mixing.