Nothing ruins a morning faster than a smoothie bowl that looks like soup before you’ve even found a spoon. You spend time carefully arranging your toppings only to watch them sink into a watery, green abyss. Most people struggle with this because they use too much liquid or room-temperature fruit, resulting in a thin consistency that can’t support the weight of a single blueberry.
The secret to a professional-grade bowl lies in the frozen-base technique, which creates a texture closer to soft-serve ice cream than a drinkable shake. By prioritizing frozen solids and using a specific blending method, you create a structural foundation that keeps your granola crunchy and your fruit perched perfectly on top. It’s about controlling the temperature and the moisture from the very first second.
For an equally satisfying breakfast, explore how to achieve a perfect fruit yogurt bowl without the crunch issues.
I’ve found that the real trick to that vibrant color and thick body is the order of operations in your blender. If you toss everything in and hit “high,” you’ll likely end up with air pockets and a stalled motor. Instead, you need to use a tamper to manually guide the frozen chunks into the blades, which allows you to use about 70% less liquid than a standard smoothie recipe requires.
For a similarly satisfying texture, consider the blackberry peanut butter oat bowl.
The Physics of a Thick Smoothie Base
Creating a thick smoothie bowl is actually a lesson in food science and emulsification. When you blend frozen mango and banana, you aren’t just chopping fruit; you’re creating a network of tiny ice crystals held together by fruit fibers and natural sugars. This frozen matrix provides the structural integrity needed to hold up heavy toppings like pumpkin seeds and fresh berries.
The pectin found in bananas acts as a natural thickening agent, giving the base a creamy, “gel-like” mouthfeel that prevents it from feeling icy or gritty. Additionally, the insoluble fiber in the baby spinach adds bulk to the mixture without thinning it out. When these elements are blended at high speeds with minimal liquid, they form a dense emulsion that resists melting much longer than a traditional smoothie.
Because the fruit is 100 percent frozen, the blender blades create friction that slightly softens the edges of the ice crystals rather than melting them completely. This results in a “micro-crystalline” structure. This is why the base looks matte and thick rather than shiny and runny. If you see a glossy reflection on your smoothie base, it usually means too much ice has melted into water.
Why Temperature Control Prevents Melting
Ambient heat is the enemy of the perfect bowl, so I always recommend chilling your serving bowl in the freezer for ten minutes before you start. A room-temperature ceramic bowl will immediately begin transferring heat to the base, melting the bottom layer and causing the whole structure to slide. Using a chilled coconut shell or a heavy-walled ceramic bowl provides the best insulation against the warm air in your kitchen.
Essential Components for the Spirulina Base
The ingredients in this bowl are chosen for their functional properties as much as their flavor. Frozen mango is the MVP here because it blends into a much smoother, creamier consistency than ice cubes ever could. While ice makes a drink watery as it melts, frozen mango maintains its creamy viscosity, ensuring the last bite is just as thick as the first.
Spirulina provides that deep, emerald hue, but it can have a distinct earthy or “oceanic” scent if used in excess. The natural sweetness of the frozen banana and mango is essential because it masks those savory notes, turning the spirulina into a background flavor rather than the main event. Always use unsweetened almond milk to keep the sugar levels balanced, as the fruit provides more than enough natural sweetness.
If you find your almond milk is too thin, you can actually use a splash of coconut milk for extra fat. The healthy fats in coconut or nut milks help the fat-soluble nutrients in the greens and spirulina absorb better. However, the golden rule remains: use the liquid sparingly to maintain that “spoonable” rather than “sippable” texture.
Selecting High-Quality Spirulina Powder
Not all spirulina is created equal, and the quality will directly affect the taste of your bowl. Look for a powder that is dark, vibrant green and has a mild, seaweed-like aroma rather than a fishy smell. If the powder looks dull or brownish, it has likely oxidized and lost its nutritional potency and fresh flavor. Green spirulina is traditional, but blue spirulina is an option if you want a more neutral flavor and a bright cyan color.
The Role of Low-Moisture Greens
Baby spinach is the best choice for this recipe because it has a very high water content but a very mild flavor profile. Unlike kale or chard, which can be fibrous and bitter, baby spinach pulverizes completely into the base. This gives you all the benefits of leafy greens without any “chewy” bits in your smoothie. It also reinforces the green color of the spirulina, making the bowl look incredibly vibrant.
Step-by-Step: Achieving the Soft-Serve Texture
To start, load your frozen mango, sliced frozen banana, spirulina, and spinach into the blender. It’s vital to put the frozen fruit at the bottom near the blades. Add only two tablespoons of almond milk to begin. This will look like it isn’t enough, but trust the process. Turn the blender on its lowest setting and immediately start using the tamper to push the fruit down.
As you increase the speed to medium, you’ll hear the motor change pitch. You are looking for the “four-blade vortex,” where the mixture starts to fold in on itself, creating four distinct ridges on the surface. If the blades are spinning but nothing is moving, don’t just add a cup of milk. Add one single tablespoon, pulse, and use the tamper again. This manual labor is what guarantees the thick, soft-serve finish.
The transformation happens quickly once the fruit starts to break down. The mixture will go from chunky and loud to smooth, quiet, and glossy. Stop the blender the moment the last chunk of mango disappears. Over-blending generates heat from the motor, which will start to melt your hard-earned texture. You want the mixture to be so thick that it barely falls off a spoon when turned upside down.
Managing the Liquid-to-Solid Ratio
The most common mistake is impatience. People add more milk because they want the blender to do all the work. However, every extra drop of liquid moves you further away from a bowl and closer to a juice. Stick to the tablespoon-by-tablespoon rule. If you accidentally add too much, you can try to save it by tossing in a few more frozen mango chunks or a teaspoon of chia seeds to soak up the excess moisture.
The Structural Spoon Technique
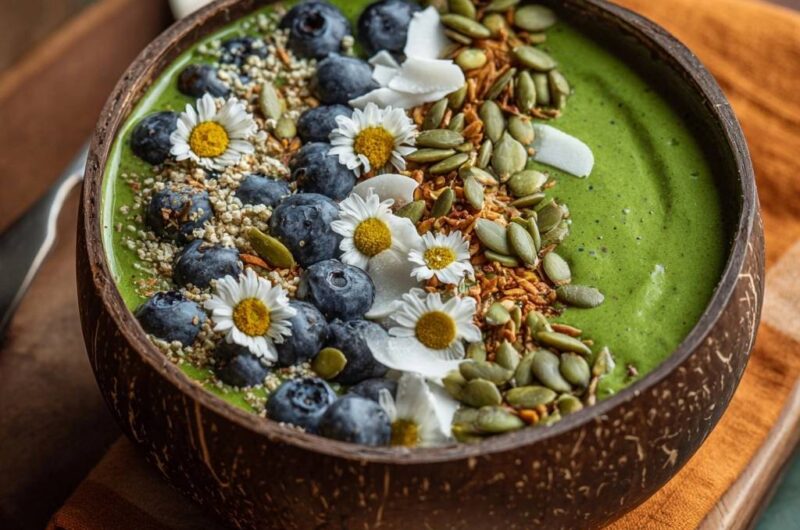
Once the base is blended, scoop it into your chilled bowl immediately. Don’t just pour it; use a silicone spatula to “pack” it down, removing any air pockets. Use the back of a large spoon to smooth the surface into a flat or slightly domed shape. This creates a solid “floor” for your toppings. If the surface is uneven, your seeds and nuts will naturally roll into the low spots, ruining the aesthetic and the texture.
The Anti-Soggy Topping Architecture
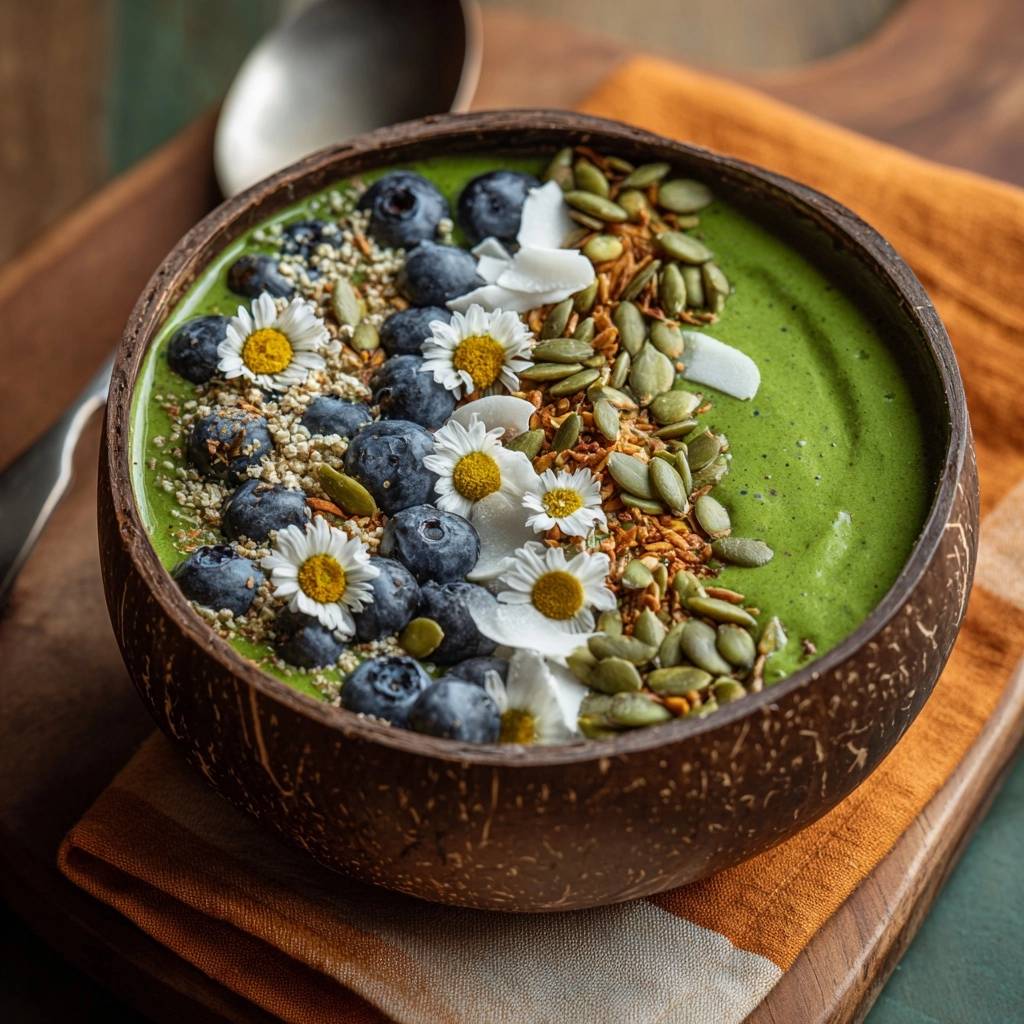
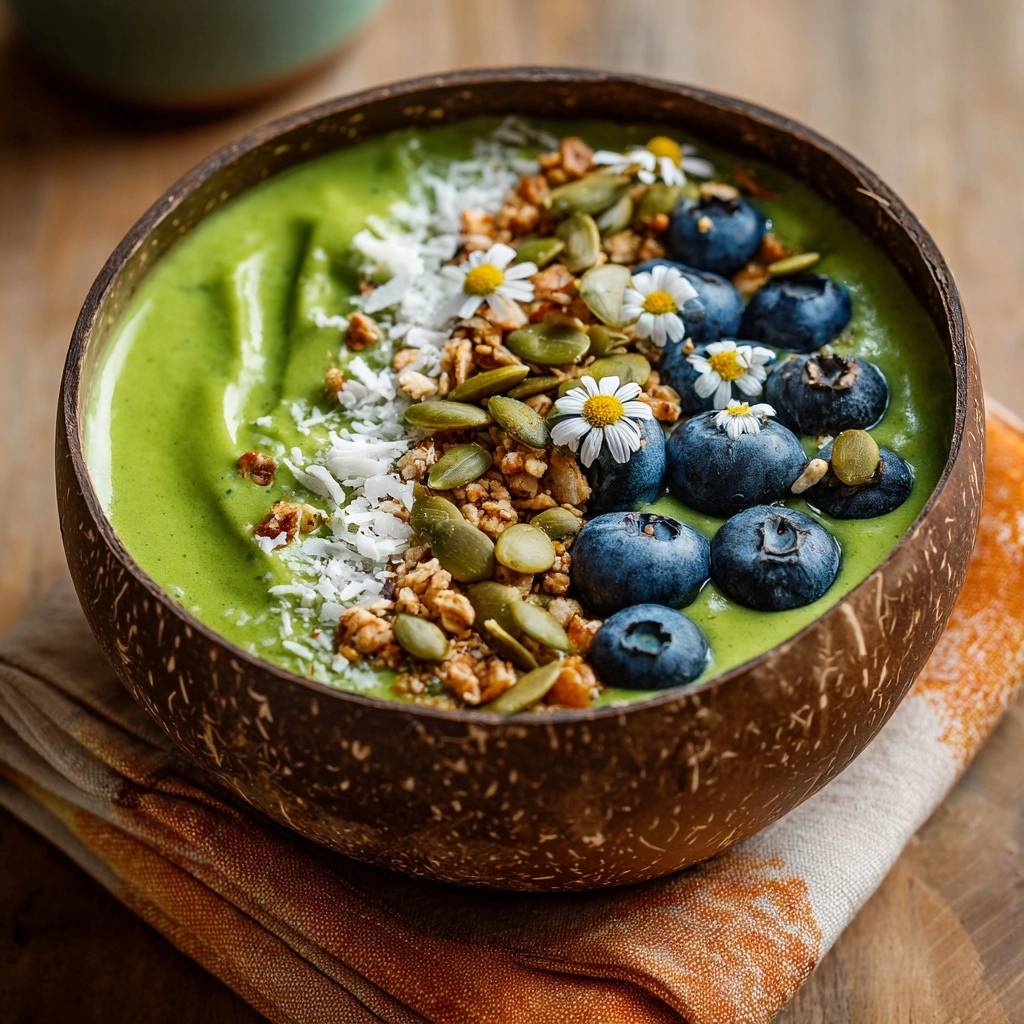
Topping a smoothie bowl is an art form that requires a “density gradient” approach. You want to place your heaviest items first. Fresh blueberries should be nestled into the base so they stay put. By creating a “wall” of fruit, you provide a physical barrier that helps keep the lighter, crunchier toppings from sliding around or touching the moist base too much.
Next, layer your hemp hearts and toasted coconut flakes. These smaller, flatter items act as a moisture barrier. If you put granola directly onto a melting base, it absorbs water instantly and turns soft. By layering seeds and coconut first, you create a dry “buffer zone” that keeps your granola and toasted almonds crispy until the very last bite. It’s all about protecting the crunch.
Finally, add your pumpkin seeds and granola in distinct rows. This isn’t just for the “Instagram look”; it allows you to control the ratio of crunch to cream in every spoonful. When you mix everything together at the start, the textures get lost. By keeping them in sections, you can scoop a bit of everything while maintaining the integrity of the individual ingredients.
Adding Crunch with Seeds and Grains
Toasting your coconut flakes and slivered almonds is a non-negotiable step for the best flavor. Raw seeds and nuts can taste a bit “dusty” when paired with a cold base. A quick two-minute toast in a dry pan brings out the natural oils and creates a much firmer crunch. This extra hardness makes them more resistant to the moisture of the smoothie, ensuring they stay loud and crispy while you eat.
For a similarly satisfying baked treat, consider our caramelized banana bread.
Looking for More Baking Inspiration?
Enjoy more baked goods that complement your vibrant breakfast.
- For a sweet and nutty treat, consider this Glazed Pecan Banana Bread, featuring similar fruit notes.
- If you love banana flavors, try this Banana Walnut Bread for a tender and satisfying bake.
Functional Garnishes: Edible Flowers and Herbs
Edible chamomile flowers add a delicate, apple-like aroma that complements the mango beautifully. When you eat a smoothie bowl, your sense of smell plays a huge role in the perceived flavor. Adding a fresh aromatic garnish elevates the experience from a simple breakfast to a sensory event. Just ensure your flowers are specifically labeled as food-grade and haven’t been treated with floral pesticides.
Customizing Your Green Smoothie Bowl
While almond milk is a classic choice, you can easily swap it for oat milk if you want a nut-free version with a bit more natural sweetness. For a tropical twist, coconut water works well, though it is thinner than milk, so you’ll need to be even more careful with the quantity. If you don’t have mango, frozen pineapple is a great substitute, though it is more fibrous and may require an extra thirty seconds of blending.
You can also play with the greens. If you’re a “green smoothie pro,” try swapping half the spinach for frozen kale. Just be aware that kale has a much stronger flavor and a tougher texture, so you’ll need a high-speed blender to get it completely smooth. For a different flavor profile, a pinch of fresh ginger or a squeeze of lime juice can brighten the earthy notes of the spirulina significantly.
Troubleshooting Common Texture Issues
If your blender stalls and smells like it’s working too hard, stop immediately. This usually happens when there’s an air pocket around the blades. Use your spatula to stir the mixture manually and press it down into the blades before trying again. Never keep running a stalled motor, as the heat will quickly melt your frozen fruit and potentially damage your appliance.
If your spirulina leaves dark green clumps, it’s likely because the powder was exposed to moisture in the jar. To fix this, you can sift the spirulina through a fine-mesh strainer before adding it to the blender. If the base is already blended and you see clumps, give it a few high-speed pulses. The sheer force of a high-speed blender should eventually break them down, provided the mixture isn’t too dry.
Blender Maintenance for Frozen Recipes
Working with 100 percent frozen ingredients is the ultimate test for a blender. To keep your machine in top shape, always start on the lowest speed to break up the large chunks before ramping up to high. This prevents the blades from “shocking” the motor. After making a thick bowl, I always recommend cleaning the blender immediately with warm soapy water to prevent the sticky fruit sugars from hardening around the blade seal.
Expert Tips for Preparation and Storage
Smoothie bowls are a “live” dish, meaning they are best served the second they are finished. However, you can save time in the morning by pre-portioning your frozen mango, sliced banana, and spinach into individual freezer bags. This way, you just dump the bag into the blender, add your spirulina and a splash of milk, and you’re done in under three minutes.
Never try to freeze a fully assembled bowl for later. The freezing process will turn the creamy base into a solid block of ice, and the toppings will lose their texture entirely. If you have leftover base, the best way to save it is to pour it into an ice cube tray. You can then pop those “smoothie cubes” into your next blender session for an extra boost of flavor and nutrition.
The Best Bowls for Insulation
If you find your bowls are melting too fast, look into double-walled ceramic or vacuum-insulated stainless steel bowls. These are designed to prevent heat transfer, keeping the contents frozen for up to thirty minutes. Coconut shells are also surprisingly good insulators because the wood is porous and doesn’t conduct heat as quickly as thin glass or plastic bowls do.
Frequently Asked Questions
Can I use fresh fruit instead of frozen?
No, using fresh fruit will result in a thin, liquid smoothie rather than a thick bowl base. The frozen fruit provides the “ice” structure that allows the bowl to hold its shape. If you only have fresh fruit, you must peel and freeze it for at least 4 hours (preferably overnight) before attempting this recipe. Adding ice cubes to fresh fruit is a poor substitute, as it dilutes the flavor and creates a grainy, slushy texture.
How do I get the spirulina taste to be less “ocean-like”?
The key to masking the earthy taste of spirulina is acidity and sweetness. Ensure your banana is very ripe (spotted) before freezing, as this provides maximum sweetness. You can also add a teaspoon of lemon or lime juice to the blender. The citric acid cuts through the “seaweed” notes of the spirulina, making the overall flavor profile much brighter and more fruit-forward.
Is it possible to make this without a high-speed blender?
It is possible, but it requires more patience. In a standard blender, you will likely need to stop the machine every 15 seconds to manually stir the fruit. You may also need to add slightly more liquid to get the blades to catch. If you are using a food processor, you can actually achieve a very thick texture more easily than in a cheap blender, as the wider blades are better at handling large frozen chunks with minimal liquid.
How do I keep my hemp hearts from getting soggy?
Hemp hearts are very absorbent. To keep them from getting soggy, always place them on top of a “dry” ingredient like toasted coconut flakes or granola rather than directly on the green base. This creates a physical barrier. Additionally, wait to add the hemp hearts until the very last second before you sit down to eat, as they will begin to soften as soon as they touch any moisture.
Can I prep the entire bowl the night before?
You cannot prep the assembled bowl the night before because the texture will be completely ruined. The base will either melt into a liquid in the fridge or freeze into a solid, un-spoonable brick in the freezer. The toppings will also lose their crunch. For the best experience, only pre-portion the dry ingredients and the frozen fruit bags. The actual blending and assembly should always happen right before consumption.
Spirulina Smoothie Bowl
Course: BreakfastCuisine: AmericanDifficulty: easy1
serving5
minutes2
minutes360
kcal5
MinutesA nutrient-dense green smoothie bowl featuring frozen mango, banana, and spirulina, designed with a thick consistency to support heavy toppings like seeds and granola without melting.
Ingredients
1.5 cups frozen mango chunks
1 large frozen banana, sliced
1 cup fresh baby spinach
1 teaspoon spirulina powder
1/4 cup unsweetened almond milk (add sparingly)
1/2 cup fresh blueberries
2 tablespoons pumpkin seeds (pepitas)
1 tablespoon toasted coconut flakes
1 tablespoon hemp hearts
2 tablespoons toasted granola or slivered almonds (for texture)
Edible chamomile flowers for garnish
Directions
- The secret to the perfect thick base is using 100 percent frozen fruit. Place your frozen mango, frozen banana, spirulina, and spinach into a high-speed blender.
- Add only half of the almond milk to start. To solve the runny base problem, you must use the blender tamper to push the frozen fruit down into the blades rather than adding more liquid.
- Blend on low speed, gradually increasing to medium, until the mixture is the texture of thick frozen yogurt. If the blades spin freely without moving the fruit, add one extra tablespoon of milk at a time until it just catches.
- Scoop the thick green base into a chilled coconut bowl or ceramic bowl. Use the back of a spoon to create a smooth, slightly curved surface; this creates a structural foundation for your toppings.
- Arrange the toppings in distinct, overlapping sections to match the visual density of the image: start with a cluster of blueberries on one side, followed by a line of hemp hearts, a row of toasted coconut flakes, and a generous portion of pumpkin seeds and granola.
- Because the base is ultra-thick and frozen solid, your toppings will stay crisp and dry on the surface instead of getting soggy.
- Garnish with fresh edible chamomile flowers and serve immediately while the texture is at its peak.
Notes
- The key to the thick texture is using 100 percent frozen fruit and a blender tamper to minimize the need for extra liquid.