You’ve likely experienced the heartbreak of a promising fish dinner turning into a limp, greasy disappointment. There is nothing quite like the sound of a fork scraping against a truly shatteringly crisp crust, only to reveal a steaming, flaky center that melts away. That contrast between the golden, toasted exterior and the delicate white fish is the hallmark of a professional fry.
However, most home cooks struggle with the dreaded “soggy bottom,” where the underside of the fillet turns into a mushy mess before it even hits the plate. This happens because fish is naturally high in water, and without the right technique, that water turns into steam that traps itself between the meat and the breading. We’re going to fix that today by focusing on moisture control and heat management.
The secret to this recipe’s success is the double-dry technique combined with a specific resting period. By ensuring the fish is bone-dry before it ever touches the flour, and then letting the breaded fillets sit for five minutes, you create a structural bond that won’t fail in the pan. This isn’t just cooking; it’s engineering the perfect bite.
The Science of Moisture and Heat in Frying
Frying is essentially a race between dehydration and heat transfer. When you drop a breaded fillet into hot oil, the moisture on the surface of the fish immediately begins to evaporate. If the fish is too wet, that steam pushes the breading away from the flesh, creating a gap that eventually fills with oil and becomes soggy.
Therefore, you must understand the Leidenfrost effect. When your oil reaches that shimmering 350°F mark, it creates a protective barrier of steam that actually prevents the oil from soaking into the breading. If your oil is too cold, the breading acts like a sponge, absorbing grease instead of crisping up. If it’s too hot, the outside burns before the middle is safe to eat.
By maintaining a consistent temperature and using a shallow-fry method, you ensure the steam can escape out the sides of the crust. This keeps the structural integrity of the Panko intact. You want the heat to move quickly through the breading to cook the fish while the exterior toasts to a deep, nutty brown.
Selecting the Best Fillets for Crispy Breaded White Fish
Not all white fish are created equal when it comes to the frying pan. You want a fillet that is sturdy enough to handle being flipped but flaky enough to provide that classic texture. Cod and halibut are the gold standards here because they have a clean flavor and a robust structure that doesn’t fall apart easily.
If you’re using frozen fish, the “thaw and dry” process is your most important step. Frozen fillets often contain extra moisture from the freezing process. You must thaw them completely in the refrigerator, then use the pressing technique to remove every drop of excess liquid. Tilapia or haddock can work in a pinch, but they are thinner and cook much faster, so you’ll need to watch your timer closely.
Why Cod and Halibut Excel in This Recipe
Cod is famous for its large, thick flakes that stay incredibly juicy even under high heat. Halibut is slightly firmer and leaner, offering a more “steak-like” experience that holds onto breading exceptionally well. Both of these fish have a mild profile, which means they won’t compete with the garlic and paprika in your crust.
For more flaky seafood options, check out these crispy baked fish sticks.
Because these fillets are usually thicker, they allow the breading enough time to get dark and crispy without overcooking the interior. This thickness acts as a buffer, giving you a wider window of perfection. When you use these premium cuts, the result is a restaurant-quality dish that feels substantial and satisfying.
Essential Components for a Superior Breading Station
A great crust is built in layers, and each layer has a specific job to do. Panko breadcrumbs are the star of the show because they are jagged and airy, providing more surface area for the oil to crisp up compared to traditional sandy breadcrumbs. However, for the best results, you should pulse them in a blender for just two seconds.
This creates a finer, more uniform crumb that covers every single millimeter of the fish. If the crumbs are too large, you get “bald spots” where steam can escape and oil can enter. By using a finer Panko, you create a tight seal that locks in the juices while providing a consistent, crunchier mouthfeel in every bite.
The Role of Flour and Egg as Adhesives
Think of the flour and egg as the “glue” that holds your masterpiece together. The flour sticks to the protein in the fish, creating a dry surface for the egg to cling to. If you skip the flour, the egg will simply slide off the slick surface of the fish, taking your breading with it.
In addition, you must shake off every bit of excess flour until only a thin, dusty coating remains. Too much flour creates a gummy, pasty layer between the fish and the crust. The egg wash, lightened with a teaspoon of water, then creates a protein-rich bond that hardens instantly when it hits the hot oil.
Seasoning Profiles: Beyond Salt and Pepper
While salt and pepper are non-negotiable, garlic powder and paprika add a savory depth that makes the fish stand out. The paprika doesn’t just add a hint of earthiness; it also helps the crust achieve a beautiful, vibrant golden color more quickly. This prevents you from overcooking the fish while waiting for the breading to look “done.”
You can also experiment with dried parsley or even a tiny pinch of cayenne if you like a bit of back-end heat. Just remember to keep your seasonings dry. Adding wet ingredients like mustard or hot sauce directly to the breading mix will compromise the crunch you’ve worked so hard to achieve.
Step-by-Step: Achieving the Anti-Soggy Crust
Achieving the perfect fry is a three-phase operation. You cannot rush the preparation if you want the best results. Most people fail because they move too quickly from the fridge to the pan, but patience is the most important ingredient in your kitchen today.
Phase 1: The Bone-Dry Preparation Method
Start by laying your fillets on a thick stack of paper towels. Place another stack on top and press down firmly with your palms. You aren’t just dabbing the surface; you are trying to draw out the deep-seated moisture from the fibers of the meat.
Let the fish sit like this for at least five minutes. If the paper towels become soaked, swap them out for fresh ones. This step is the single most important factor in preventing a soggy bottom. A bone-dry fish ensures the flour adheres perfectly, creating the foundation for a crust that stays attached during the flip.
Phase 2: The Dredge and the Critical Rest Period
Use the “wet hand/dry hand” method to keep your station organized. Use one hand for the flour and Panko, and the other for the egg wash. Once the fish is fully breaded, place it on a wire rack for five minutes before frying. Do not skip this rest!
This “set time” allows the moisture in the egg to hydrate the flour and the Panko, creating a permanent bond. If you drop the fish into the oil immediately, the breading is more likely to flake off or puff up. This short rest ensures the crust stays tight and crisp throughout the cooking process.
Phase 3: Precision Shallow-Frying Techniques
Pour your oil into a heavy skillet until it is about 1/8-inch deep. You want enough oil to come up the sides of the fish, but not so much that the fish is submerged. Wait until the oil shimmers and a stray breadcrumb sizzles instantly upon contact.
Lay the fish in the pan away from you to avoid splashes. Cook for 3 to 4 minutes without touching it. If you move the fish too early, you’ll tear the crust. Flip it only once using a wide spatula, and ensure there is plenty of space between the fillets so the steam can escape freely.
Equipment: Why a Wire Rack Beats Paper Towels
Most people instinctively reach for paper towels to drain fried food, but this is a mistake for breaded fish. When you place hot, fried fish on a flat paper towel, the residual steam from the fish gets trapped underneath. This steam has nowhere to go, so it re-hydrates the bottom crust, making it soft in seconds.
Instead, use a wire cooling rack set over a baking sheet. This allows air to circulate 360 degrees around the fillet. The steam can escape from the bottom, and the excess oil can drip away without pooling. Letting the fish rest on a rack for just 60 seconds will preserve that “shatter” effect you’re looking for.
Troubleshooting Your Crispy Breaded White Fish
If your breading falls off in the pan, it’s usually because the fish was too wet or you didn’t let it rest after breading. Next time, press harder with the paper towels. If the outside is dark but the inside is cold, your heat is too high. Lower the flame and use a bit more oil to distribute the heat evenly.
If the fish tastes oily, your oil temperature likely dropped too low. This often happens when you crowd the pan with too many fillets at once. Fry in batches if necessary to keep that oil shimmering. Remember, the oil should be active and bubbling around the edges of the fish at all times.
Flavor Variations and Regional Swaps
Once you master the base technique, you can play with the flavors. For a zesty citrus version, rub a little lemon zest into the Panko before breading. The oils from the zest will bloom in the frying oil, giving the entire crust a bright, fresh aroma that cuts through the richness.
You could also try an herbed crust by adding dried thyme and oregano to the flour. However, always stick to dried herbs for the breading station. Fresh herbs contain moisture and can burn quickly in the hot oil, leading to a bitter taste. Save the fresh parsley for a garnish at the very end.
What to Serve with Crispy Breaded White Fish
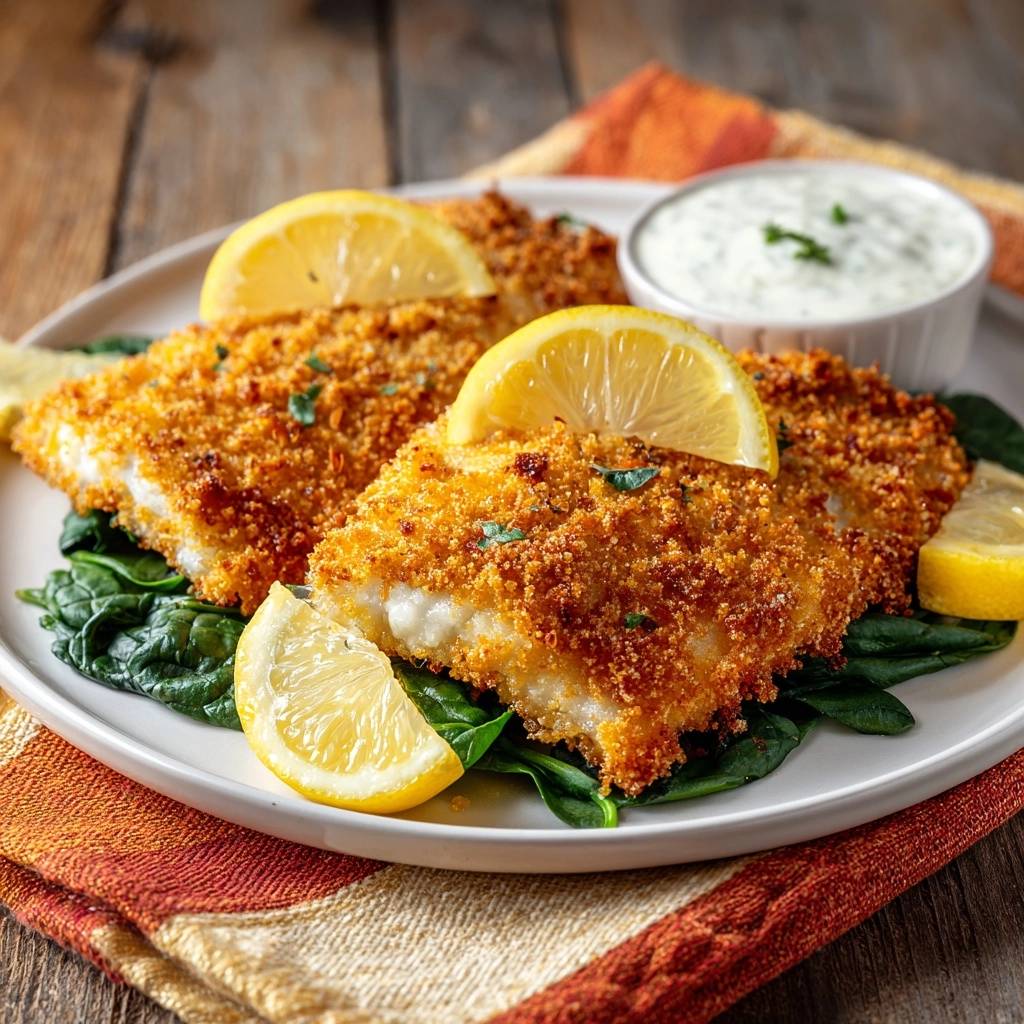
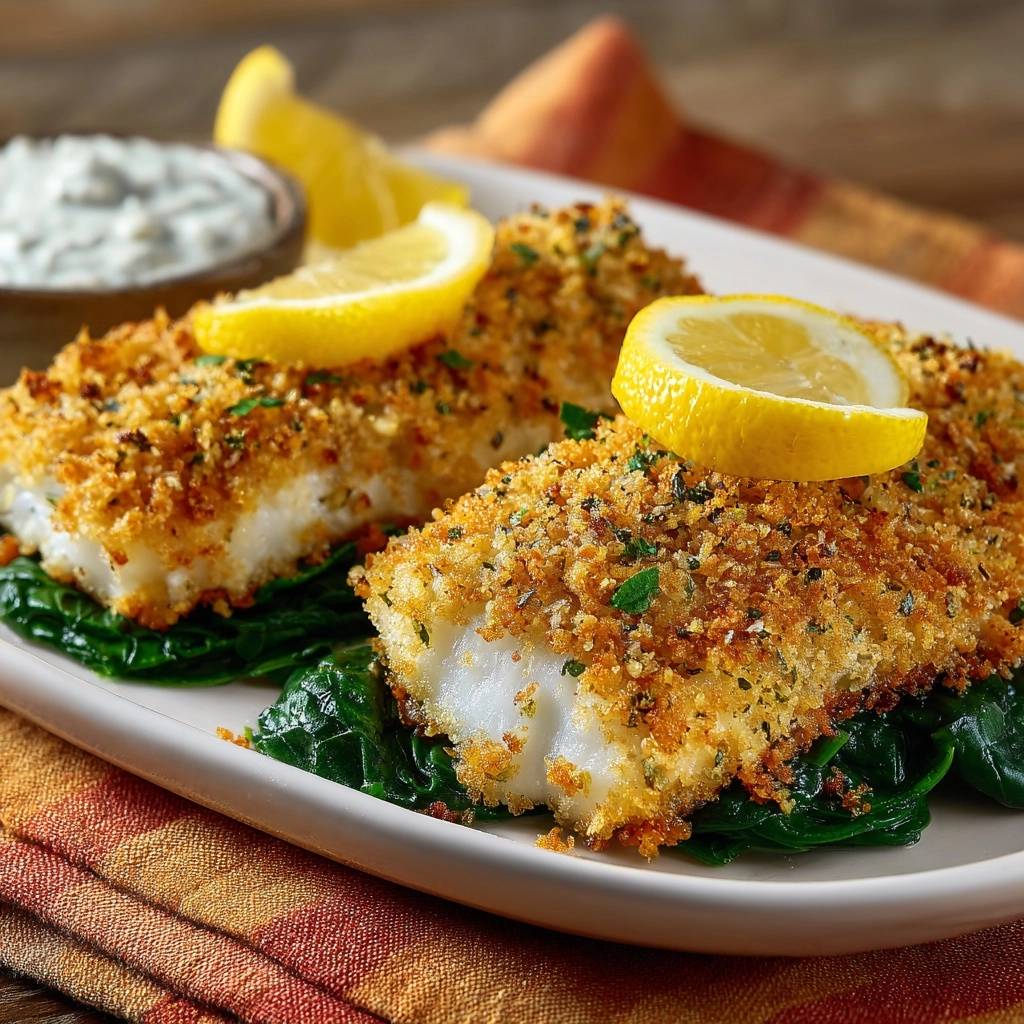
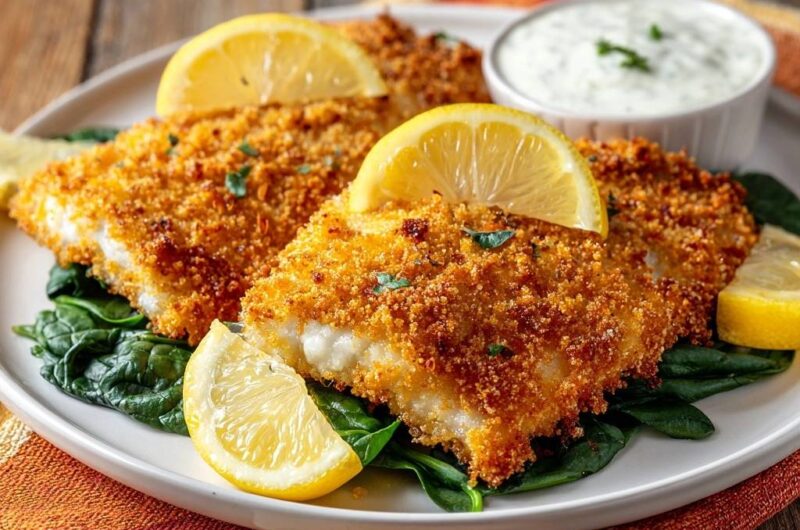
This recipe calls for a bed of fresh baby spinach, and for good reason. The slight bitterness and earthy notes of the greens provide a perfect counterpoint to the salty, savory fish. Sauté the spinach for just 30 seconds so it stays vibrant and slightly crisp rather than turning into a watery pile.
Other great pairings include roasted root vegetables or a bright, vinegar-based slaw. Avoid heavy, creamy sides that might compete with the fried texture. You want something acidic or fresh to cleanse the palate between bites of that rich, golden crust. A simple lemon-garlic quinoa also works beautifully for a more filling meal.
The Perfect Tartar Sauce and Acid Balance
Acidity is the secret weapon of fried seafood. A heavy squeeze of fresh lemon juice over the hot fish reacts with the fats in the crust to brighten the entire dish. It wakes up the flavors of the garlic and paprika and makes the fish feel lighter on the tongue.
A high-quality tartar sauce is the traditional companion for a reason. The pickles and capers in the sauce provide a sharp, briny contrast to the mild fish. If you’re making your own, ensure the base is thick and creamy so it clings to the crispy Panko without making it soggy.
Expert Tips for Maintaining Texture During Service
If you are cooking for a group, you can keep the first batch of fish warm in a 200°F oven. Place the wire rack directly into the oven; the airflow will keep the crust crisp while the low heat keeps the center moist. Never stack the fish on top of each other, as the heat from the bottom fillet will steam the one on top.
If you find the fish has sat out a bit too long and lost its edge, a “flash reheat” in a dry pan or an air fryer for 60 seconds can bring that crunch back to life. Avoid the microwave at all costs, as it will turn your beautiful crust into a rubbery mess in seconds. Treat your hard work with respect and keep that air moving!
Frequently Asked Questions
Can I bake this instead of frying?
You can bake this at 425°F for about 12 to 15 minutes, but the texture will be different. To get a similar crunch, you should toast the Panko in a dry pan until golden before breading the fish. Without the direct heat of the oil, the breading won’t brown as deeply or stay as crisp on the bottom.
What is the best oil for high-heat fish frying?
Grapeseed oil or vegetable oil are excellent choices because they have high smoke points and neutral flavors. Avoid extra virgin olive oil or butter for this specific recipe, as they will smoke and burn at the temperatures required to get the Panko truly crispy. You want an oil that can handle 350°F without breaking down.
How do I know the fish is cooked perfectly inside?
The fish is done when it reaches an internal temperature of 145°F. Visually, the meat should be opaque and should flake easily when pressed with a fork. If the fish feels “springy” or looks translucent, it needs another minute. Because we use a shallow fry, the heat penetrates quickly, so keep a close eye on it.
Can I use gluten-free flour and crumbs?
Yes, you can substitute the all-purpose flour with a 1:1 gluten-free flour blend and use gluten-free Panko-style crumbs. The technique remains exactly the same. Just ensure the gluten-free crumbs are finely crushed, as they can sometimes be harder and larger than standard Panko, which might affect how well they stick.
How do I store and reheat leftovers?
Store leftovers in an airtight container in the refrigerator for up to two days. To reheat, use an air fryer at 350°F for 3 to 4 minutes or a toaster oven. This will draw out the moisture and recrisp the breading. Avoid the microwave, as it will make the fish tough and the breading soggy.
Crispy Breaded White Fish
Course: Main CourseCuisine: AmericanDifficulty: easy2
servings15
minutes10
minutes410
kcal25
MinutesA specialized method for frying white fish fillets using Panko breadcrumbs and a shallow-fry technique to achieve a golden, crunchy exterior and flaky interior.
Ingredients
2 large white fish fillets (such as cod or halibut)
1 cup Panko breadcrumbs, finely crushed
1/2 cup all-purpose flour
1 large egg, beaten with 1 teaspoon water
1 teaspoon garlic powder
1/2 teaspoon paprika
1/2 teaspoon dried parsley (plus fresh for garnish)
Salt and black pepper to taste
1/3 cup neutral frying oil (such as grapeseed or vegetable oil)
Fresh lemon wedges for serving
2 cups fresh baby spinach for the base
1/2 cup tartar sauce for dipping
Directions
- The secret to avoiding a soggy bottom starts with moisture control. Use paper towels to press firmly on both sides of the fish fillets until they are bone dry. Let them sit on a fresh paper towel for 5 minutes before starting.
- Set up three shallow bowls. Place flour seasoned with salt and pepper in the first. Place the beaten egg and water in the second. Mix the Panko, garlic powder, paprika, and dried parsley in the third. For the best visual match to the image, pulse the Panko in a blender for 2 seconds to achieve a finer, more uniform crumb.
- Dredge the dry fish in flour, shaking off every bit of excess. Dip into the egg, then press firmly into the Panko mixture, ensuring total coverage. Let the breaded fillets rest on a wire rack for 5 minutes. This “set time” allows the breading to adhere so it does not fall off or trap steam in the pan.
- Heat the oil in a heavy skillet over medium-high heat. The oil should be about 1/8-inch deep to ensure the sides of the breading crisp up. Do not add the fish until the oil shimmers (approx. 350°F).
- Lay the fish in the pan. Cook for 3 to 4 minutes per side until the crust is deep golden brown. To maintain the crunch, do not crowd the pan and do not flip the fish more than once.
- Remove the fish and place it immediately onto a wire rack (not a flat plate) for 60 seconds. This allows air to circulate underneath, preventing the bottom from becoming soggy from residual steam.
- Lightly steam or sauté the spinach for 30 seconds just until wilted, then arrange it as a bed on the plate. Place the fish over the spinach, garnish with fresh parsley and lemon wedges, and serve with a side of tartar sauce.
Notes
- To maintain the crunch, always rest the cooked fish on a wire rack rather than a flat plate to allow air circulation and prevent steam buildup.