
Imagine biting into a golden, salt-flecked potato nugget that actually crunches when you chew, even while it is draped in a velvet blanket of peppery sausage gravy. Most breakfast bowls fail because they turn into a sad, beige mush within minutes of hitting the table. This recipe changes that by focusing on the structural integrity of the potato, ensuring every forkful maintains that satisfying contrast between the crispy exterior and the creamy sauce.
The secret to this Loaded Sausage Gravy Tater Tot Bowl lies in moisture management and heat application. We aren’t just heating up frozen potatoes; we are re-engineering them to withstand a heavy, savory topping. By treating the tater tot as a structural base rather than a side dish, you create a restaurant-quality meal that stays firm until the very last bite.
To achieve this, you must embrace the “overcook” method. While the package might suggest twenty minutes, we are pushing these tots until they reach a deep, mahogany gold. This extra time in the heat creates a thick, dehydrated crust that acts as a barrier against the gravy. It is the difference between a soggy mess and a breakfast masterpiece.
The Physics of the Anti-Soggy Tater Tot
When you pour a hot, liquid gravy over a porous potato, the starch immediately begins to soak up the moisture. This process, known as moisture migration, is the enemy of the crunch. To fight this, we use high-heat roasting to maximize starch retrogradation, which toughens the cell walls of the potato and makes them less permeable to the sauce.
The “Double-Heat” philosophy mentioned in our method ensures that the internal steam escapes the potato before the gravy is applied. If steam is trapped inside, it softens the crust from the inside out. By using an air fryer or a high-heat oven, we blast that moisture away, leaving behind a rigid, crispy shell that can support the weight of the sausage and cheese.
Why Wire Racks Beat Baking Sheets
If you bake tater tots directly on a flat baking sheet, the side touching the metal will brown, but the bottom will also trap steam. This creates a soft spot that collapses the moment it touches gravy. A wire rack is your best friend here because it allows for 360-degree convection, letting hot air circulate under the tots.

This constant airflow ensures the entire surface area of the potato is “sealed” by the heat. When you use a rack, you don’t even need to flip the tots halfway through. They emerge perfectly even, extra firm, and ready to handle the heavy lifting of a thick, traditional roux-based gravy.
Essential Components for the Loaded Sausage Gravy Tater Tot Bowl
Quality ingredients are the foundation of this dish, but their function is just as important as their flavor. You want a breakfast sausage that provides enough rendered fat to build your sauce without needing extra oil. Look for a high-quality ground sausage that feels firm to the touch, as this usually indicates a better meat-to-fat ratio for a stable roux.
The flour and milk work together to create the viscosity needed to “coat” rather than “soak.” If your gravy is too thin, it will act like a soup and drown the potatoes. If it is too thick, it won’t flow over the edges. We are aiming for a specific thickness that clings to the sausage crumbles and sits proudly on top of the tots.
Selecting the Right Frozen Potato Base
Not all frozen tater tots are created equal. For this specific application, look for brands that advertise “extra crispy” or “shredded” textures. These varieties often have more surface area and a higher starch content on the exterior, which translates to a better crunch after roasting.
Avoid the “mini” versions or rounds, as they lack the internal fluffiness needed to balance the rich gravy. A standard-sized tot provides the perfect ratio of crispy shell to soft, pillowy interior. This balance is what makes the eating experience so addictive.
For a sweet finish, consider these mini peanut butter brownie cheesecakes.
The Fat-to-Flour Ratio in Sausage Gravy
The magic of a great gravy starts with the fat. You need approximately three tablespoons of rendered sausage fat to properly hydrate your quarter-cup of flour. If you are using a very lean turkey sausage, the flour will look dry and clumpy; in this case, you must add a tablespoon of butter to bridge the gap.
A proper roux should look like a wet sand paste. If it is too dry, your gravy will taste like raw flour. If it is too oily, the gravy will break and look greasy on top of your bowl. Taking the time to balance this ratio ensures a glossy, emulsified sauce that stays creamy as it cools.
Dairy and Seasoning: Beyond the Basics
Whole milk is non-negotiable for this recipe. The fat content in whole milk provides the necessary body and mouthfeel that skim or 2% simply cannot replicate. It creates a rich, opaque white gravy that looks beautiful against the golden potatoes and melted orange cheddar.
For seasoning, we use a heavy hand with cracked black pepper. This isn’t just for a hint of spice; the pepper is a primary flavor profile that cuts through the richness of the dairy and sausage. A touch of garlic powder adds a savory depth that makes the gravy taste “all-day” slow-cooked in just a few minutes.
Step-by-Step: Achieving Maximum Potato Crunch
Start by preheating your oven to 425°F. This high temperature is vital for rapid moisture evaporation. Spread your tots in a single layer on the wire rack, making sure they aren’t touching. If they are crowded, they will steam each other, which is exactly what we want to avoid.
Bake them for 25 to 30 minutes. You are looking for a color that is darker than the “golden brown” suggested on the bag. They should feel hard to the touch when tapped with a spatula. This extra five minutes of cooking is the “insurance policy” that keeps your breakfast from getting soggy.
The Technique: Building a Stable Sausage Gravy
While the tots are crisping, brown your sausage in a large skillet. Use your spatula to break the meat into very small crumbles. Smaller crumbles mean more surface area for the flour to cling to, which results in a more uniform gravy. Once the meat is browned, sprinkle the flour evenly over the top.
Stir the flour and sausage constantly for at least two minutes. This “cooks” the flour, removing the metallic, raw taste and turning it into a savory base. You will notice the aroma change from raw dough to something slightly nutty. This is your cue that the roux is ready for the milk.
Testing for Coating Consistency
When adding the milk, go slowly. Pour in a half-cup, whisk until smooth, and then repeat. This prevents lumps from forming. Once all the milk is in, simmer the mixture until it reaches “nappe” consistency. This is a fancy chef term that simply means the gravy is thick enough to coat the back of a spoon.
To test it, dip a spoon into the gravy and run your finger through the coating on the back. If the line stays clean and the gravy doesn’t run into the empty space, it is perfect. This thickness ensures the gravy sits on top of the tots rather than disappearing into the bottom of the bowl.
Assembly Strategy for Textural Contrast
Plating is where the “Anti-Soggy” promise really comes to life. Instead of tossing the tots in the gravy, stack them high in a deep bowl. Use the “Center-Pour” method, drizzling the thick gravy only over the middle of the pile. This leaves the outer ring of tots exposed and perfectly crunchy.
By leaving some potatoes “naked,” you give the person eating the bowl a choice of textures in every bite. They can dip a crispy tot into the gravy or go for a fully loaded forkful from the center. This visual contrast also makes the dish look much more appetizing and professional.
The 30-Second Broil Finish
Once the gravy is poured, add a generous mound of shredded sharp cheddar to the center. To get that perfect, bubbly melt, pop the bowls under the broiler for just 30 seconds. Watch them closely, as the cheese can go from melted to burnt very quickly.
This quick blast of heat also helps “set” the gravy on the potatoes, creating a semi-solid layer that further prevents soaking. After the broil, sprinkle on your fresh thyme. The heat from the cheese will wake up the oils in the herbs, releasing a fresh, earthy scent just as you serve.
Troubleshooting Common Gravy and Tot Issues
If your gravy becomes too thick while waiting for the tots, don’t panic. Simply whisk in a tablespoon of milk at a time over low heat until it loosens up. Gravy continues to thicken as it sits, so it is always better to have a little extra milk on hand for adjustments.
If your tots come out of the oven and feel soft, it usually means the oven temperature wasn’t high enough or the rack was too low. You can fix this by tossing them into a hot air fryer for three minutes or putting them back in the oven on the highest rack for a quick blast of heat.
Flavor Variations and Protein Swaps
While traditional breakfast sausage is the standard, you can easily customize this bowl. For a spicy kick, use “hot” breakfast sausage or add a teaspoon of red pepper flakes to the roux. If you prefer a lighter version, turkey sausage works well, provided you add that extra tablespoon of butter for the roux.
Cheese is another great way to change the profile. While sharp cheddar provides a classic bite, smoked gouda adds a wonderful wood-fired flavor that complements the sausage. Pepper jack is excellent if you want a creamy melt with a bit of lingering heat.
Make-Ahead Components and Storage Limits
You can absolutely make the sausage gravy up to two days in advance. Store it in an airtight container in the fridge. When you are ready to serve, reheat it slowly in a saucepan, adding a splash of milk to restore the creamy texture. However, never cook the tater tots in advance.
Tater tots must be cooked fresh to maintain their crunch. Reheated tots are almost always chewy or greasy. For the best experience, time your potato roasting so they finish exactly when the gravy is hot and ready to pour. This dish does not freeze well once assembled, as the potatoes will lose all structural integrity.
Expert Tips for High-Volume Serving
If you are serving this for a brunch crowd, keep your cooked tots on their wire racks in a low-temperature oven (about 200°F). This keeps them warm and dry. For the gravy, a slow cooker on the “warm” setting is perfect. Just be sure to stir it occasionally to prevent a skin from forming on the surface.
When serving a group, consider a “build-your-own” station. Keep the tots in a large warming pan and the gravy in a separate pot. This allows guests to control the amount of gravy they want, ensuring that those who value the crunch above all else can keep their potatoes as dry as they like.
The Role of Fresh Herbs
Fresh thyme is the secret weapon of this dish. While many people reach for parsley or chives, thyme has an earthy, slightly floral note that pairs beautifully with the heavy fats in the sausage and dairy. It cuts through the richness and adds a sophisticated layer of flavor.
Always use fresh leaves rather than dried. Dried thyme can be woody and distracting in a creamy sauce. Strip the tiny leaves off the woody stems and sprinkle them on at the very last second. The residual heat from the gravy is all you need to soften them and release their full aroma.
How do I store leftovers without them getting mushy?
The best way to handle leftovers is to store the gravy and the tater tots in separate airtight containers in the refrigerator for up to three days. When you are ready to eat, reheat the tots in an air fryer or oven at 400°F until they are crispy again. Warm the gravy separately on the stove with a splash of milk. Never store them together, or the potatoes will turn into a paste that cannot be saved.
Why is my sausage gravy lumpy?
Lumps usually happen when the milk is added too quickly to the flour and fat mixture. To fix this, add the milk in very small increments at the beginning, whisking vigorously until a smooth paste forms before adding more. If you already have lumps, you can sometimes save the gravy by whisking it very hard over medium heat or, in extreme cases, running it through a fine-mesh strainer before adding the sausage back in.
Can I use a different type of flour for the gravy?
All-purpose flour is the standard for a reason, as it has the right protein content to create a stable roux. You can use a 1-to-1 gluten-free flour blend if needed, but avoid using almond or coconut flour, as they do not contain the starches necessary to thicken the milk into a traditional gravy. If using gluten-free flour, you may need to simmer the gravy a few minutes longer to reach the desired thickness.
What if my sausage doesn’t produce enough fat?
Modern grocery store sausage can sometimes be very lean. If you find that after browning the meat there is no liquid fat in the bottom of the pan, the flour will not have anything to bind to. Simply add 1 to 2 tablespoons of unsalted butter to the pan and let it melt before you sprinkle the flour over the meat. This ensures you have a proper fat-to-flour ratio for a creamy, smooth sauce.
Can I make this dish vegetarian?
Yes, you can easily adapt this for a vegetarian diet. Use a plant-based breakfast sausage crumble and brown it in the pan with 3 tablespoons of butter. Since vegetarian crumbles don’t release natural fats like pork does, the butter is essential to create the roux. Follow the rest of the steps exactly as written, using whole milk and the same seasonings for a rich, savory result.
Sausage Gravy Tater Tot Bowl
Course: BreakfastCuisine: AmericanDifficulty: easy4
servings10
minutes25
minutes620
kcal35
MinutesThis recipe solves the common frustration of soggy tots by using a specific double-heat method. By air-frying or high-heat roasting the tots separately and thickening the gravy to a precise coating consistency, you get that perfect crunch in every single bite even under a blanket of creamy sausage gravy and melted cheese.
Ingredients
1 package (32 oz) frozen tater tots
1 lb ground breakfast sausage (pork or turkey)
1/4 cup all-purpose flour
2.5 cups whole milk
1 teaspoon cracked black pepper
1/2 teaspoon salt
1/4 teaspoon garlic powder
1.5 cups shredded sharp cheddar cheese
Fresh thyme sprigs for garnish
Directions
- Preheat your oven to 425°F (220°C) or your air fryer to 400°F. To ensure the tots stay crispy under the gravy, spread them in a single layer on a wire rack set over a baking sheet. This allows air to circulate around the entire tot. Bake for 25-30 minutes (or 5-7 minutes longer than the package suggests) until they are deep golden brown and extra firm.
- While the tots cook, brown the breakfast sausage in a large skillet over medium-high heat, breaking it into small crumbles until fully cooked. Do not drain the fat; you need approximately 3 tablespoons of rendered fat to form the roux. If the sausage is very lean, add a tablespoon of butter.
- Sprinkle the flour over the cooked sausage and stir constantly for 2 minutes. This cooks out the raw flour taste and creates a thick paste that prevents the gravy from being watery.
- Slowly whisk in the milk, a half-cup at a time, ensuring no lumps form. Add the black pepper, salt, and garlic powder. Continue to simmer and stir for 5-7 minutes until the gravy is thick enough to heavily coat the back of a spoon.
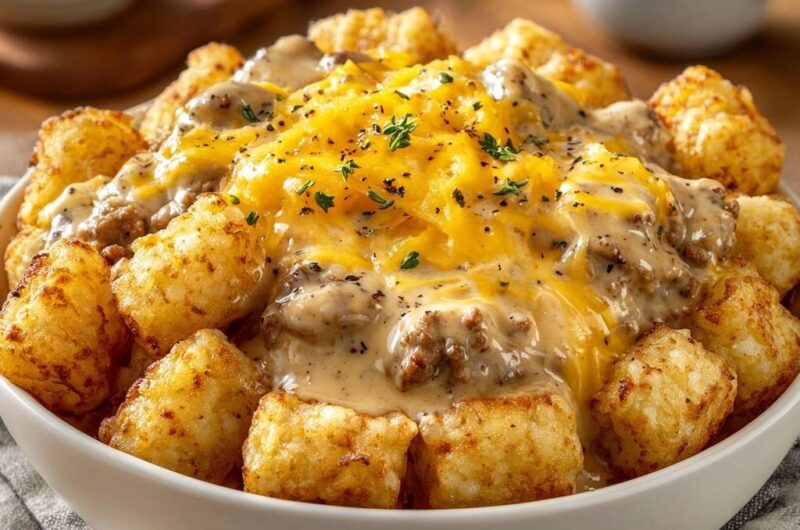
- Place the extra-crispy tots into serving bowls, stacking them high. Immediately pour the thick sausage gravy over the center, leaving the outer edges of the tots exposed to maintain the visual and textural contrast shown in the image.
- Top the center of the bowl with a generous mound of shredded cheddar cheese while the gravy is piping hot. For the perfect melt seen in the photo, you can place the bowls under a broiler for 30 seconds. Garnish with fresh thyme and serve immediately.
Notes
- To ensure the tots stay crispy, bake them 5 to 7 minutes longer than the package suggests. If the sausage is very lean, add a tablespoon of butter to help form the roux.