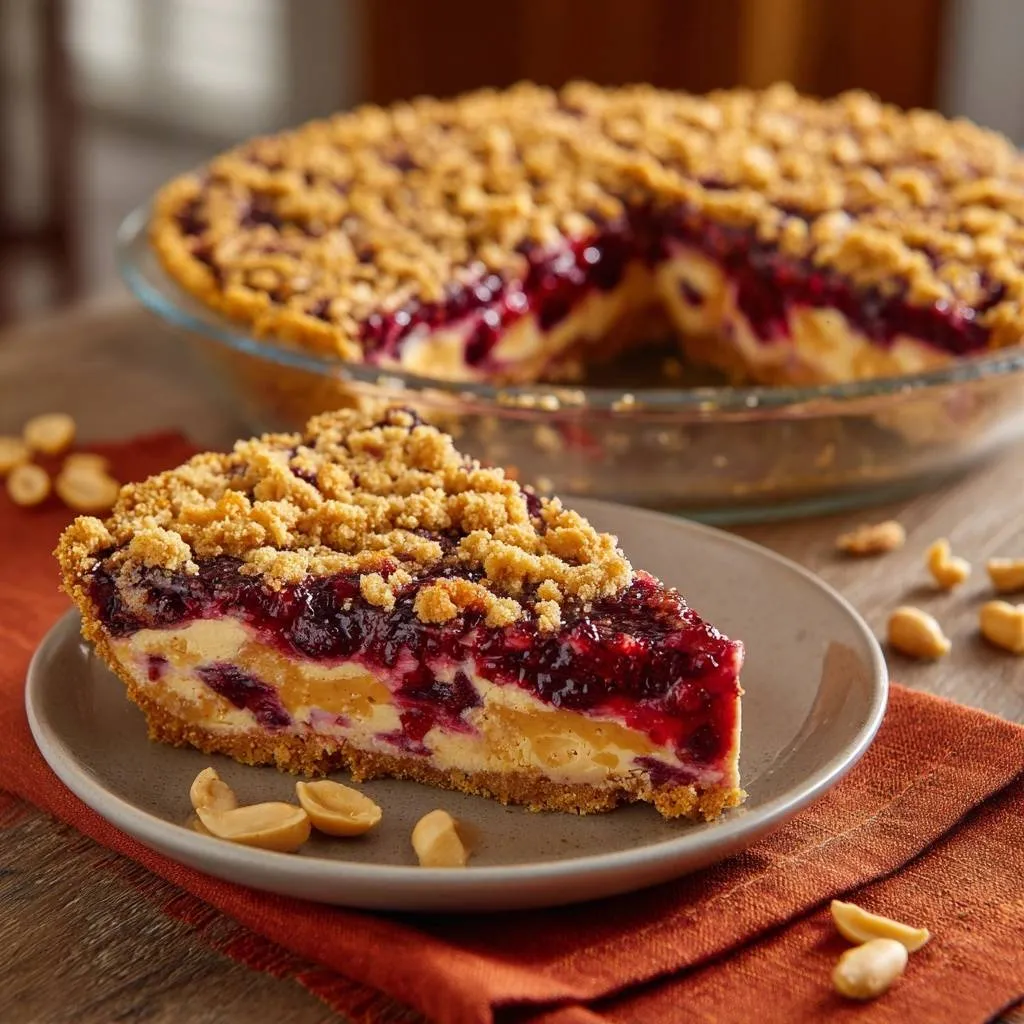
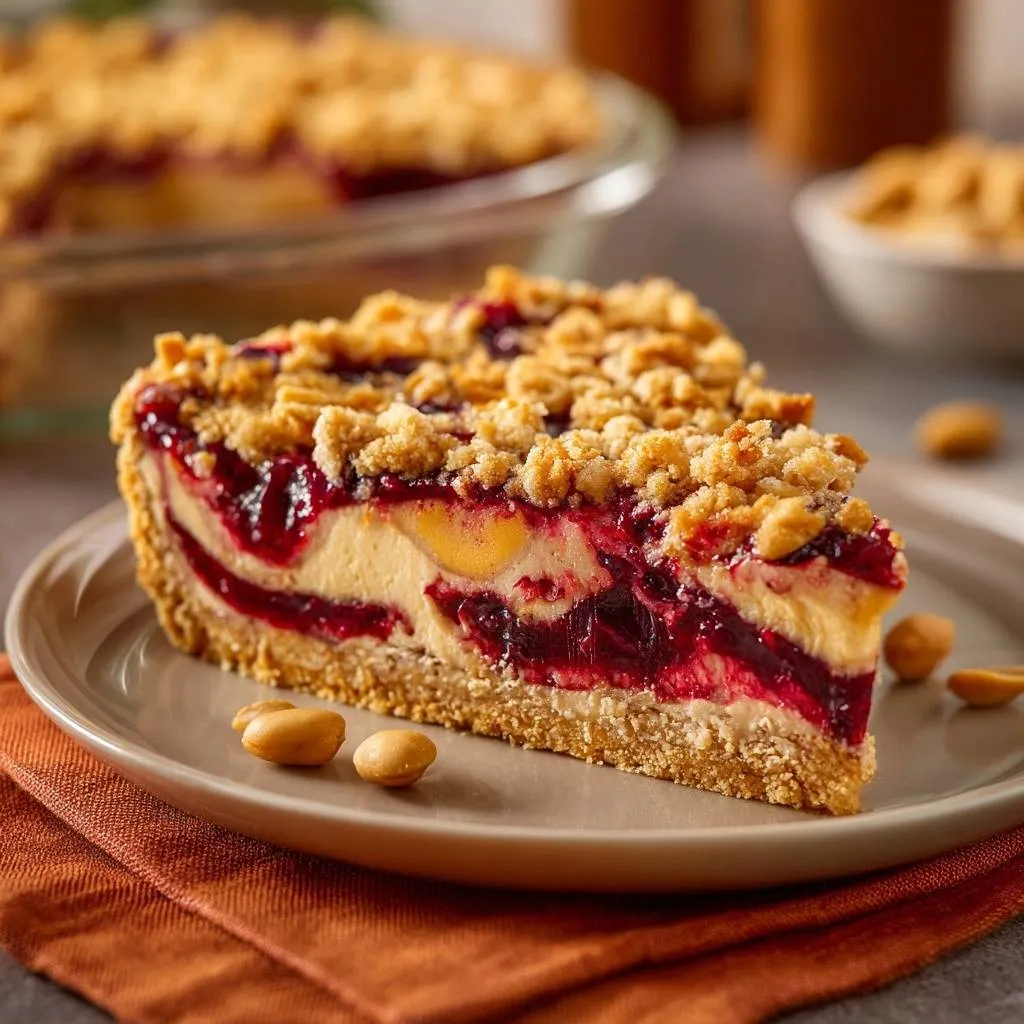
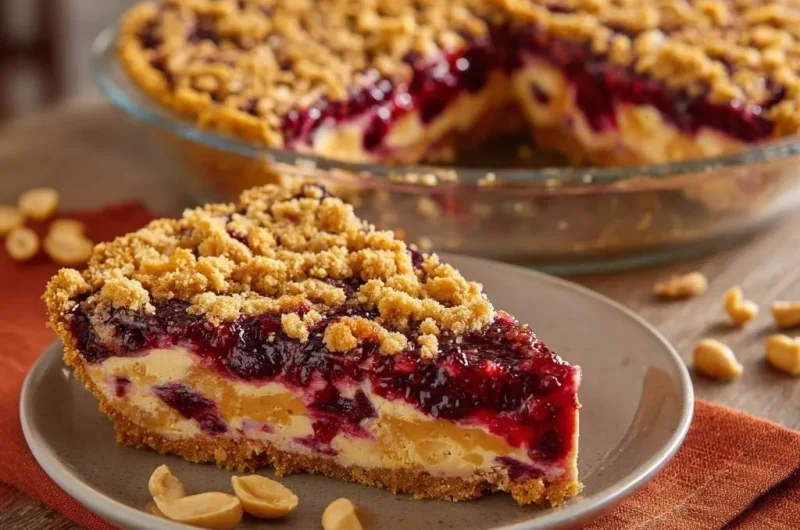
Imagine biting into a slice of pie where the bottom crust actually snaps back. You get that immediate crunch of toasted peanuts followed by a velvety, salty peanut butter cream that stands its ground against a mountain of jammy, tart berries. It is a texture lover’s dream come true.
Most fruit pies suffer from the dreaded “soggy bottom” because fruit juices act like a wrecking ball to delicate pastry. This recipe flips the script by treating the pie like a piece of architecture. We are building layers that protect one another, ensuring the crust stays as crisp on day two as it was the hour it left the oven.
The secret to this structural success is the double-barrier method. By par-baking the crust and then sealing it with a dense peanut butter protein layer, we create a waterproof shield. You don’t need a culinary degree to pull this off, but you do need to trust the cooling process to let those fats and pectins lock into place.
The Architecture of a Crisp Bottom Crust
When fruit hits the heat of the oven, the cell walls break down and release a flood of juice. In a standard pie, that liquid pools at the bottom, turning your crust into a mushy mess. This recipe uses physics to fight back by creating a moisture-proof foundation.
What to Pair with Your Peanut Butter Berry Crumble Pie
If you enjoyed the peanut butter flavors in this crumble pie, you might like these noodle dishes.
- For a different take on peanut noodles, explore Creamy Peanut Udon Noodles, focusing on avoiding clumps.
- If you’re keen on peanut noodles with a bit of heat, try Creamy Spicy Peanut Noodles, designed to prevent a gummy texture.
Firstly, we use a graham cracker and peanut base which is naturally more resistant to moisture than flour-based pastry. Secondly, the peanut butter layer acts as a lipid barrier. Since oil and water don’t mix, the heavy fats in the peanut butter and cream cheese prevent the berry juice from ever touching the crust.
This “Double-Barrier Method” ensures that even the juiciest blackberries won’t compromise the integrity of your slice. You end up with a pie that is perfectly stackable and firm, rather than a dessert you have to eat with a spoon from a bowl.
Why Graham Crackers and Peanuts Work Together
Graham crackers provide a honey-sweet, sturdy base, but adding finely chopped roasted peanuts changes the game. The peanuts add essential oils that help bind the crumbs together while providing a savory, salty punch.
This combination creates a much more complex flavor profile than a standard crust. The roasted notes of the nuts perfectly complement the bright acidity of the berries, making every bite feel balanced rather than cloyingly sweet.
Essential Components for the Berry Filling
For the best results, I highly recommend a mix of blueberries, raspberries, and blackberries. Blueberries provide a thick, jammy base because they are high in natural pectin, while raspberries add a sharp, floral acidity that cuts through the rich peanut butter.
Fresh berries are the gold standard here because they hold their shape better during the bake. If you must use frozen berries, do not thaw them first. Thawing releases too much liquid upfront, which can overwhelm the cornstarch before it has a chance to thicken the filling.
Keep in mind that different berries have different water contents. If your berries are particularly large and juicy, you might see more bubbling at the edges, but our barrier layer is designed to handle that extra moisture with ease.
The Role of Cornstarch and Lemon Juice
Cornstarch is your insurance policy. When it reaches a simmer, the starch granules swell and create a thick gel. This process, called gelatinization, turns thin fruit juice into a glossy, stable filling that won’t run all over your plate.
The lemon juice isn’t just for flavor; the acid actually helps brighten the fruit’s natural color. More importantly, it balances the sugar, ensuring the berry layer tastes like fresh fruit rather than a sugary preserve.
The Peanut Butter Barrier Layer Ingredients
The middle layer is a hybrid between a cheesecake and a thick nut butter spread. For this specific recipe, you want to use a standard “no-stir” creamy peanut butter. These brands are stabilized, meaning the oil won’t separate and leak into your crust during the bake.
For a similar smooth texture, learn how to achieve a perfect creamy pumpkin swirl cheesecake.
Natural peanut butters that require stirring are often too runny and oily for this application. We need the structural stability of a processed peanut butter to create that “waterproof” seal we talked about earlier.
The addition of a single egg is the “glue” of the barrier. As the pie bakes, the egg proteins set, transforming the peanut butter mixture into a firm, fudge-like cushion that supports the weight of the fruit and the crumble topping.
Crafting the Perfect Textured Crumble Topping
A great crumble should be chunky and crisp, not sandy or powdery. The trick is using cold, cubed butter. When those cold bits of fat hit the hot oven, the water inside them evaporates instantly, creating tiny steam pockets that puff up the flour and sugar.
By working the butter in until you have pea-sized lumps, you ensure a variety of textures. Some parts will be melt-in-your-mouth tender, while others will be crunchy and caramelized. It’s the ultimate contrast to the soft fruit underneath.
Adding crushed peanuts to the crumble provides what I call “skyscraper height.” The nuts don’t melt or compress, so they keep the topping airy and jagged. This extra surface area allows the topping to brown beautifully and stay crunchy for hours.
Step-by-Step: Building the Foundation
When you are mixing your graham cracker crumbs and peanuts with the melted butter, make sure every crumb looks like wet sand. If there are dry spots, the crust will fall apart the moment you try to lift a slice out of the pan.
Use the bottom of a flat measuring cup to press the mixture into the pie dish. You want to apply firm, even pressure. Start with the sides first, then move to the bottom. This creates a tight, compacted wall that can withstand the moisture of the filling.
Don’t be afraid to push hard. A loosely packed crust is the number one reason for “crumbly pie syndrome.” You want this base to feel like a solid cookie once it has been par-baked and cooled.
The Critical Par-Bake Phase
Baking the crust for exactly 8 minutes at 350°F is a non-negotiable step. This short stint in the oven toasts the peanuts and melts the sugar in the graham crackers, effectively “gluing” the crust together.
However, keep a close eye on it. Peanuts have a high oil content and can go from toasted to burnt in a matter of seconds. You are looking for a fragrant, golden-brown hue and a slightly firm surface before you pull it out to cool.
Step-by-Step: Applying the Moisture Seal
Before you start mixing the barrier layer, make sure your cream cheese is truly softened. If it’s even slightly cold, you’ll end up with tiny white lumps in your peanut butter mixture that won’t bake out.
Beat the mixture until it looks like thick frosting. When you spread it over the cooled crust, use an offset spatula if you have one. You must spread the mixture all the way to the very edges of the crust.
When you spread it over the cooled crust, use a Red Velvet cheesecake stuffed cookies method if you want a similar smooth finish.
Think of this like caulking a bathtub. If there is even a tiny gap between the peanut butter layer and the side of the crust, the berry juice will find it. Total coverage is the key to maintaining that crunch.
Step-by-Step: Fruit Layering and Final Assembly
When you toss your berries with the sugar and cornstarch, be gentle. You don’t want to crush the fruit and release all the juices before the pie even hits the oven. A light folding motion with a spatula is all you need.
Once the berries are layered over the peanut butter, sprinkle the crumble topping generously. I like to start at the edges and work my way toward the center. Make sure no large patches of fruit are peeking through.
Tucking the berries under a thick blanket of crumble protects them from the direct heat. This allows the fruit to steam and soften into a thick sauce rather than drying out or scorching on top.
Baking Times and Visual Indicators of Success
Your oven is ready when the topping is a deep, golden brown and you see thick, slow-moving bubbles of fruit juice peeking through the crumble at the edges. These bubbles are the sign that the cornstarch has reached the proper temperature to thicken.
If the juice looks thin and watery, it needs another five minutes. The bubbles should look almost like molten lava. Don’t worry if the center of the pie seems a little jiggly; that is just the peanut butter layer, which will firm up as it cools.
If you notice the peanuts in the crumble are browning too quickly, you can loosely tent the pie with a piece of aluminum foil for the last 10 minutes of baking. This protects the nuts while letting the fruit finish cooking.
The Necessity of the Three-Hour Chill
I know it is tempting to slice into a warm pie, but if you do, the peanut butter layer will be runny and the berry filling will spill everywhere. This pie requires patience to achieve its final, perfect form.
As the pie cools, the fats in the cream cheese and peanut butter solidify, creating that dense, fudge-like texture. Simultaneously, the natural pectins in the berries set into a soft gel. This is what gives you those clean, professional-looking slices.
Let it sit on the counter until the dish is no longer hot to the touch, then move it to the fridge. After three hours, the transformation is complete. The crust will be crisp, the barrier will be firm, and the berries will be perfectly set.
Troubleshooting Common Pie Failures
If your crumble topping comes out soft or greasy, your butter was likely too warm when you mixed it. Next time, try popping the cubed butter in the freezer for 10 minutes before working it into the flour. Cold fat is the secret to a crunchy topping.
If the berry layer is still runny after cooling, it usually means the cornstarch didn’t get hot enough to activate. Ensure your oven is properly calibrated and that you see those thick bubbles at the edges before removing the pie from the heat.
For those dealing with a crust that sticks to the pan, make sure you didn’t skimp on the melted butter in the base. The butter acts as a release agent, helping the graham cracker crumbs slide away from the glass or ceramic dish.
Adjusting for High-Moisture Fruits
If you decide to use strawberries or very ripe, late-summer blackberries, you are dealing with a lot of extra water. In these cases, I recommend adding an extra teaspoon of cornstarch to the filling mix.
Strawberries should also be quartered rather than halved to ensure they cook through at the same rate as the smaller berries. This prevents large pockets of water from forming in the middle of your pie.
Storage and Make-Ahead Strategies
This pie is a champion of longevity. Because of the peanut butter barrier, the crust doesn’t get soggy in the fridge. You can store leftovers in an airtight container for up to four days, and the base will stay remarkably firm.
If you want to get ahead of the game, you can prep the crumble topping weeks in advance. Just mix the flour, sugar, nuts, and butter, then store the raw crumble in a freezer bag. You can sprinkle it directly onto the fruit while still frozen.
I do not recommend freezing the fully assembled, unbaked pie, as the berries will release too much moisture upon thawing. However, a fully baked and cooled pie can be frozen for up to a month if wrapped tightly in plastic wrap and foil.
Expert Tips for Professional Presentation
To get those “picture-perfect” slices, use a sharp chef’s knife rather than a serrated one. Dip the knife in hot water and wipe it dry between every single cut. This prevents the peanut butter layer from smearing into the berries.
A light dusting of powdered sugar right before serving adds a beautiful contrast to the dark berries. If you want to go all out, serve each slice with a dollop of cold whipped cream. The airy cream balances the dense, rich texture of the peanut butter perfectly.
Avoid adding garnishes like fresh mint or extra berries until the very last second. Anything with moisture can soften that hard-earned crunchy crumble if left sitting for too long. Serve it proud and enjoy that crunch!
How do I prevent the graham cracker crust from crumbling when I slice it?
The key is a combination of firm pressure and the par-bake. When pressing the crumbs into the dish, use the flat bottom of a glass or measuring cup to pack them as tightly as possible. The 8-minute par-bake melts the sugar in the crumbs, which acts as a glue. Finally, the 3-hour chill is essential; it allows the butter in the crust to re-solidify, holding everything together for a clean cut.
Can I use natural peanut butter instead of the creamy commercial brands?
It is best to stick with “no-stir” creamy peanut butter for this recipe. Natural peanut butters often have a separated oil layer that can leak during the baking process, which might make your crust greasy or cause the barrier layer to break. If you only have natural peanut butter, make sure it is extremely well-stirred and consider adding an extra tablespoon of powdered sugar to help stabilize the oils.
Why is my berry filling still runny even after the pie has cooled?
This usually happens if the cornstarch didn’t reach a high enough temperature to “bloom” and thicken the juices. You must see the fruit juices bubbling thickly at the edges of the pie before taking it out of the oven. If you used frozen berries, they release more water than fresh ones, so you may need to increase the bake time by 5-10 minutes to ensure all that extra liquid is thickened by the starch.
How should I store leftovers to keep the crust from getting soft?
Store the pie in the refrigerator in an airtight container or covered tightly with plastic wrap. Unlike traditional flour-crust pies, this peanut butter berry pie holds up incredibly well because the peanut butter layer prevents the fruit juices from migrating into the crust. It will stay crisp for up to 4 days. For the best texture, let a slice sit at room temperature for 15 minutes before eating to soften the peanut butter layer slightly.
Can I substitute the mixed berries with other fruits like peaches or apples?
Yes, but you will need to adjust the prep. Peaches and apples have less natural pectin than berries and different moisture levels. For peaches, peel and slice them thinly and add an extra tablespoon of cornstarch. For apples, you should pre-saute them for 5 minutes to soften them before adding them to the pie, as they won’t soften at the same rate as berries during the 40-minute bake time.
What is the best way to reheat a slice without melting the peanut butter layer?
This pie is actually designed to be eaten cold or at room temperature to maintain the structural integrity of the “barrier.” If you prefer it warm, heat a single slice in the microwave for only 15-20 seconds. Do not put it back in the oven, as the high heat will melt the cream cheese and peanut butter layer, causing the pie to lose its shape and potentially making the crust soggy.
Peanut Butter Berry Crumble Pie
Course: DessertCuisine: AmericanDifficulty: medium8
servings25
minutes45
minutes480
kcal70
MinutesThis innovative pie solves the soggy bottom problem using a double-barrier method: a par-baked graham cracker crust and a thick peanut butter cheesecake seal. Layered with fresh berries and a peanut crumble, it ensures a firm, crisp base in every slice.
Ingredients
Crust:
1.5 cups graham cracker crumbs
1/2 cup finely chopped roasted peanuts
6 tablespoons melted butter
Peanut Butter Barrier Layer:
8 ounces softened cream cheese
1/2 cup creamy peanut butter
1/2 cup powdered sugar
1 large egg (to set the barrier during baking)
1 teaspoon vanilla extract
Berry Filling:
3 cups fresh mixed berries (blueberries, raspberries, or blackberries)
1/3 cup granulated sugar
2 tablespoons cornstarch
1 tablespoon lemon juice
Crumble Topping:
3/4 cup all-purpose flour
1/2 cup brown sugar
1/2 cup crushed roasted peanuts
6 tablespoons cold butter, cubed
Directions
- Preheat your oven to 350°F (175°C). In a bowl, combine graham cracker crumbs, chopped peanuts, and melted butter. Press this mixture firmly into the bottom and up the sides of a 9-inch pie dish.
- Bake the crust for 8 minutes. This is the first step to preventing sogginess. Let it cool for 10 minutes.
- In a medium bowl, beat the cream cheese, peanut butter, powdered sugar, egg, and vanilla until smooth. Spread this thick mixture evenly over the par-baked crust. This acts as a waterproof barrier that prevents fruit juices from soaking into the base.
- In a separate bowl, gently toss the berries with granulated sugar, cornstarch, and lemon juice. The cornstarch is vital as it thickens the juices immediately upon heating. Layer the fruit evenly over the peanut butter cream layer.
- Make the crumble topping by mixing the flour, brown sugar, and crushed peanuts. Work in the cold cubed butter with a fork or pastry cutter until large, pea-sized crumbs form. Sprinkle generously over the berries, ensuring full coverage.
- Bake for 35 to 40 minutes until the topping is golden brown and the fruit juices are bubbling thick at the edges.
- Allow the pie to cool completely at room temperature, then refrigerate for at least 3 hours before slicing. This cooling period allows the cheesecake barrier and the fruit pectin to fully set, guaranteeing that perfect, crisp bottom crust and clean, stackable slices shown in the image.
Notes
- The cooling and refrigeration period is essential for the cheesecake barrier and fruit pectin to set, ensuring clean slices and a crisp bottom.