There’s a specific kind of joy in the contrast between a tart, ruby-red raspberry and the floral, creamy sweetness of a vanilla sponge. It’s a classic pairing that feels both sophisticated and deeply nostalgic. However, many home bakers struggle with the dreaded “soggy cake syndrome,” where the fruit filling slowly seeps into the delicate crumb, turning a masterpiece into a mushy mess within hours.
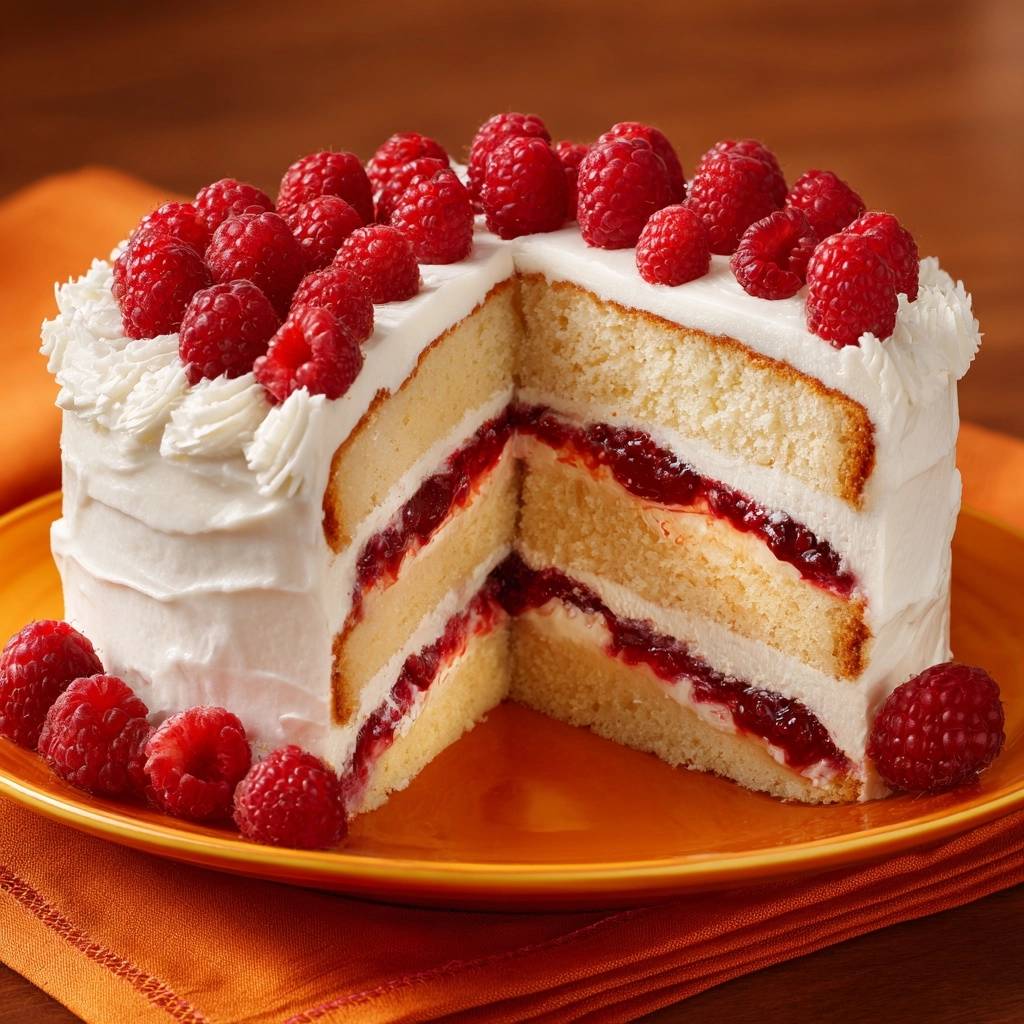
This Raspberry Vanilla Layer Cake solves that problem entirely by using a professional bakery secret: the stabilized cream barrier. By creating a structural shield between the moisture-heavy preserves and the airy cake, you ensure every bite remains light and distinct. It’s the difference between a grocery store sheet cake and a high-end patisserie showstopper that holds its shape for days.
For another comforting bake, try this old-fashioned gingerbread cake.
The secret to this recipe’s success lies in the temperature of your ingredients. I’ve found that using room-temperature eggs and milk is non-negotiable because it allows the fats and liquids to emulsify into a smooth, stable batter. If your ingredients are cold, the butter will seize, and you’ll end up with a dense, oily texture instead of the fluffy, cloud-like sponge we’re after.
The Science of the Moisture Barrier
Baking is essentially a delicious chemistry experiment, and the biggest challenge with fruit-filled cakes is osmosis. Naturally, the sugar in the raspberry preserves wants to pull moisture from the cake, while the liquid in the preserves wants to migrate into the dry pores of the sponge. Without a protector, your beautiful layers will eventually collapse or become unpleasantly damp.
That’s where the fat-based barrier comes in. By spreading a thin, even layer of stabilized whipped cream over the cake before adding the fruit, you’re creating a waterproof seal. Since fat and water don’t mix, the moisture from the preserves can’t penetrate the cream to reach the cake. This simple step preserves the integrity of the crumb for up to 72 hours in the fridge.
Structural integrity is also a major factor when you’re stacking three heavy layers. A standard whipped cream is too soft to support the weight and will squish out the sides. By stabilizing the cream with cornstarch, we create a frosting that acts more like a soft ganache. It provides the “grip” needed to keep the layers from sliding while maintaining that melt-in-your-mouth quality.
Essential Components for Raspberry Vanilla Layer Cake
Quality ingredients are the foundation of this cake. While some recipes call for cake flour, I prefer all-purpose flour here because it provides a slightly sturdier structure. This extra strength is vital for supporting the weight of the raspberry preserves and the thick layers of stabilized cream without the cake becoming tough.
You’ll also notice we use both vanilla extract in the cake and vanilla bean paste in the frosting. The extract provides a deep, baked-in flavor, while the paste adds those gorgeous little black specks to the white cream. It signals to anyone eating it that you didn’t skimp on the good stuff. Always use high-quality butter, as its flavor really shines through in the simple vanilla sponge.
Selecting the Best Raspberry Preserves
The preserves are the heart of the filling, so look for a brand with a high fruit-to-sugar ratio. I personally recommend a seedless preserve if you want a perfectly smooth, elegant mouthfeel. However, if you love a bit of texture and a more “rustic” homemade vibe, a seeded jam works beautifully too. Just ensure it has a thick, jammy consistency rather than a runny one.
Why Cornstarch Stabilizes Heavy Cream
Adding a bit of cornstarch to your heavy cream is a total game-changer. During the whipping process, the starch granules absorb a small amount of the water in the cream. This prevents “weeping,” which is when the water separates from the fat and pools at the bottom of your cake plate. It keeps your frosting looking freshly piped for days.
Critical Equipment for Professional Results
If you want that towering, bakery-style look, use 8-inch round pans instead of the standard 9-inch. The smaller diameter forces the batter upward, giving you taller, more dramatic layers. It’s a small change that makes a massive difference in the final presentation. Also, make sure your pans have straight sides rather than slanted ones for a perfectly cylindrical cake.
For more impressive layer cakes, explore the chocolate glazed pistachio layer cake.
A rotating cake turntable is another tool that will make your life infinitely easier. It allows you to keep your offset spatula steady while you spin the cake, resulting in smooth, professional sides. Finally, always use a metal bowl for whipping your cream. If you pop the bowl and the whisk attachment in the freezer for ten minutes before using them, your cream will whip up faster and hold more volume.
Preparing the Vanilla Sponge Base
The creaming method is the most important part of the sponge preparation. You aren’t just mixing butter and sugar; you’re beating air into the fat to create a light structure. You’ll know you’re done when the mixture turns from a yellow, grainy paste to a pale, almost white, fluffy cloud. This usually takes about 3 to 5 minutes on medium-high speed.
When it’s time to add the dry and wet ingredients, use the “alternating” technique. Start with a third of the flour, then half the milk, then more flour, and so on. This prevents the batter from saturating with liquid too quickly, which can cause it to “break” or curdle. Stop mixing the moment the last streak of flour disappears to keep the gluten from over-developing.
Temperature Control for Batter Emulsion
If you forget to take your eggs out of the fridge, don’t panic. You can quickly warm them by placing them in a bowl of warm (not hot!) water for about 5 to 10 minutes. This ensures they incorporate smoothly into the creamed butter. Cold eggs will cause the butter to clump up, leading to an uneven bake and a greasy finish.
Building the Stabilized Cream Frosting
Whipping the cream requires your full attention. You want to reach “stiff peaks,” which means when you lift the whisk, the cream stands straight up without drooping. However, there’s a fine line between stiff peaks and over-whipped cream that looks grainy and tastes like butter. Watch it closely toward the end and slow down the mixer speed.
Add your powdered sugar and cornstarch right at the beginning of the whipping process. This allows the starch to fully integrate with the cream as it thickens. The vanilla bean paste should go in last, just as the cream starts to hold its shape. This ensures the flavor is evenly distributed without deflating the air you’ve worked so hard to incorporate.
Assembly: The Anti-Soggy Filling Technique
This is where the magic happens. Once your cakes are completely cool, place the first layer on your turntable. Spread a very thin layer of the stabilized cream over the top, right to the edges. This is your moisture barrier. It doesn’t need to be thick; it just needs to be a continuous seal that covers every inch of the sponge’s surface.
Next, fill a piping bag with the cream and cut a medium-sized hole. Pipe a thick ring, or “dam,” about half an inch high around the very outer edge of the cake. This dam acts as a wall to hold the preserves in place. Without it, the weight of the upper cake layers would squeeze the jam out the sides, ruining your frosting job.
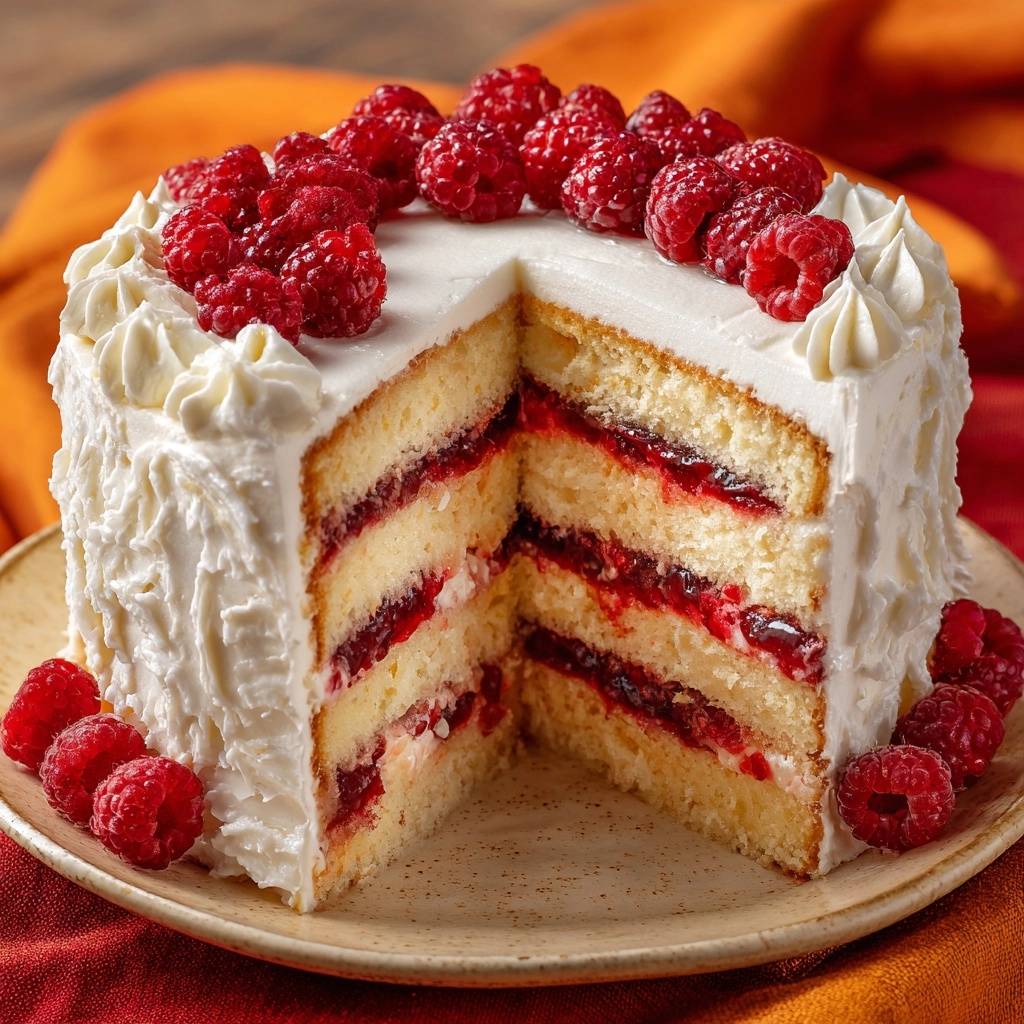
Carefully spoon the raspberry preserves into the center of the dam. Use a small offset spatula to level it out so it’s flush with the top of your cream ring. Repeat this process for the second layer. By the time you place the third layer on top, your preserves are safely “locked” inside a cage of cream, ensuring a clean, stable stack.
Managing the Raspberry Preserve Center
Be careful not to overfill the center. If the preserves sit higher than your cream dam, the next cake layer will “float” on the jam rather than resting on the stable cream. This causes the layers to slide around like a stack of wet plates. Keep the fruit layer flat and even for the best structural results.
Decorating with Fresh Raspberries
Fresh berries add a pop of color and a burst of acidity that cuts through the rich cream. Before decorating, make sure your raspberries are completely dry. If you wash them right before putting them on the cake, the water will cause the red juice to bleed into the white frosting, creating messy pink streaks.
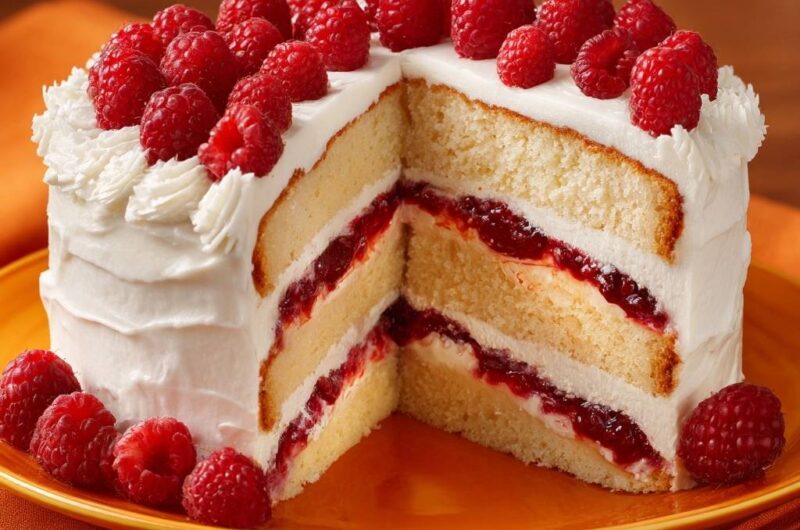
I love creating a “crown” of berries around the top edge, nestled into piped swirls of cream. You can also add a few berries around the base of the cake to give it a finished, professional look. If you’re feeling fancy, a light dusting of powdered sugar over the berries right before serving adds a beautiful, snowy touch.
Troubleshooting Common Layer Cake Issues
If your cake layers come out of the oven with a large dome, don’t try to stack them that way. Use a long serrated knife to gently saw off the rounded top once the cake is cool. A flat surface is essential for a stable cake. If your whipped cream looks grainy, you’ve likely over-whipped it. You can often fix this by gently folding in a tablespoon or two of fresh, liquid heavy cream by hand.
If you notice preserves leaking out the side, it usually means your dam wasn’t thick enough or the preserves were too runny. You can “patch” the leak by chilling the cake for 30 minutes, then scraping away the messy area and piping a fresh patch of cream over it. Finally, if the cake feels dry, check your oven temperature with a thermometer; many home ovens run hot, leading to over-baking.
Make-Ahead Strategies and Storage
You can easily break this process into two days. Bake the cake layers a day in advance, let them cool completely, and wrap them tightly in plastic wrap. Storing them at room temperature overnight actually makes them easier to trim and handle. The stabilized cream can also be made a few hours ahead, but it’s best whipped fresh for the fluffiest texture.
Once assembled, this cake must live in the fridge because of the fresh cream and fruit. However, for the best flavor, let the slices sit at room temperature for about 20 to 30 minutes before eating. This allows the butter in the sponge to soften slightly, giving you a much better mouthfeel than a cold, firm cake. It will stay fresh and delicious for up to three days.
What to Try Next
For more sweet treats to enjoy alongside your cake, consider these options.
- If you appreciate a sweet breakfast treat, try these Cinnamon Sugar Churro Waffles for a delightful start to your day.
- For another baked good with a fruit focus, try these Bakery Style Blueberry Muffins, perfect for a casual gathering.
Expert Baking FAQ
Can I use frozen raspberries for the topping?
I don’t recommend using frozen raspberries for the garnish. As they thaw, they release a lot of liquid and become very soft and mushy, which will ruin the look of your white frosting. However, you can use frozen berries to make a homemade raspberry reduction if you can’t find high-quality preserves at the store. Just simmer them with a bit of sugar and lemon juice until thick, then strain the seeds.
How do I get perfectly clean slices?
The secret to those professional, sharp-edged slices is the “hot knife” technique. Fill a tall glass with very hot water. Dip your sharp chef’s knife into the water, wipe it completely dry with a clean towel, and make one decisive cut. Wipe the blade clean of any cream or jam, dip it back in the hot water, and repeat for every single slice. It takes a little longer, but the results are stunning.
Is there a substitute for the cornstarch stabilizer?
If you don’t want to use cornstarch, you can use a tablespoon of instant vanilla pudding mix or a teaspoon of unflavored gelatin (dissolved in a little water). Another great option is folding in 4 ounces of softened mascarpone cheese or cream cheese into the whipped cream. This adds a slight tang and incredible stability, though it will make the frosting a bit richer and denser than the cornstarch version.
Why did my cake layers shrink away from the sides?
Cake layers usually shrink for two reasons: over-baking or over-greasing. If the cake stays in the oven too long, it loses too much moisture and physically contracts. Alternatively, if you grease the sides of the pan too heavily, the batter can’t “grip” the walls to climb up as it rises. For the best height, grease the bottom of the pan and line it with parchment paper, but leave the sides lightly greased or even ungreased.
Raspberry Vanilla Layer Cake
Course: DessertCuisine: AmericanDifficulty: medium12
servings45
minutes35
minutes510
kcal80
MinutesThis elegant layer cake features a moist vanilla sponge, high quality raspberry preserves, and a stabilized whipped cream frosting. The recipe utilizes a moisture barrier technique to keep the cake fresh and structured for days.
Ingredients
3 cups all-purpose flour
2 cups granulated sugar
1 tablespoon baking powder
1 teaspoon salt
1 cup unsalted butter, softened
4 large eggs, room temperature
1 cup whole milk, room temperature
2 teaspoons vanilla extract
2 cups fresh raspberries (for topping and garnish)
1 cup high-quality raspberry preserves
4 cups heavy whipping cream, chilled
1 cup powdered sugar
1 tablespoon cornstarch (to stabilize the cream)
1 teaspoon vanilla bean paste
Directions
- Preheat your oven to 350°F (175°C). Grease and flour three 8-inch round cake pans.
- In a large bowl, cream the softened butter and granulated sugar until pale and fluffy (about 3-5 minutes). Add eggs one at a time, beating well after each addition.
- In a separate bowl, whisk together flour, baking powder, and salt.
- Gradually add the dry ingredients to the butter mixture, alternating with the milk and vanilla extract, beginning and ending with the flour. Do not overmix.
- Divide the batter evenly between the three pans. Bake for 30 to 35 minutes, or until a toothpick inserted into the center comes out clean.
- Cool the cakes in the pans for 10 minutes, then invert onto a wire rack to cool completely.
- Prepare the stabilized frosting: In a chilled bowl, combine heavy whipping cream, powdered sugar, vanilla bean paste, and cornstarch. Whip on high speed until very stiff peaks form.
- To assemble: Place the first cake layer on a serving plate. Spread a thin, even layer of the stiff whipped cream over the entire surface of the cake. This acts as the “moisture barrier.”
- Use a piping bag to create a thick, 1/2-inch high ring (a “dam”) of whipped cream around the outer edge of the cake layer.
- Fill the center of the dam with half of the raspberry preserves, spreading it evenly up to the cream border.
- Carefully place the second cake layer on top and repeat the barrier, dam, and preserve filling steps.
- Top with the final cake layer. Frost the top and sides of the cake with the remaining whipped cream. Use a piping bag to create decorative swirls around the top edge.
- Arrange fresh raspberries generously across the top and around the base of the cake as shown in the image.
- Refrigerate for at least 2 hours before slicing. This allows the stabilized cream to set and ensures clean, professional slices.
Notes
- The cornstarch in the whipped cream acts as a stabilizer. Ensure the cake is refrigerated for at least 2 hours before slicing to achieve clean, professional edges.