Most people approach chicken pot pie with a mix of excitement and inevitable disappointment. You crave that buttery, flaky lid, but you usually end up with a damp, doughy mess where the crust meets the gravy. It’s a classic culinary letdown that happens because the steam from the filling has nowhere to go but up into your pastry.
This skillet method changes the game by adopting an “Anti-Soggy Bottom” philosophy. Instead of trapping raw dough over a simmering stew, we treat the components with the respect they deserve. By using a heavy skillet for superior heat distribution and a deconstructed baking technique, we ensure every single bite maintains its structural integrity.
The secret to this professional-grade result is the separation of powers. We bake the puff pastry as independent “tiles” on a flat sheet. This allows the dry heat of the oven to hit every surface of the dough, creating a shatteringly crisp texture that stays crunchy even when perched atop the creamy filling. It’s a simple mechanical fix that yields a massive upgrade in mouthfeel.
The Science of the Deconstructed Puff Pastry
When you place raw dough directly onto a hot liquid, you create a moisture trap. The bottom of the pastry boils in the steam while the top tries to bake. This results in a gummy layer of undercooked flour that ruins the experience. By baking the pastry separately, you allow for 360-degree airflow, which is essential for the Maillard reaction to occur evenly across the surface.
This deconstructed approach also allows the pastry to achieve its maximum vertical lift. Without the weight of the filling pulling it down, the layers of butter and flour can expand freely. You get a “skyscraper” effect with dozens of visible, flaky layers that provide a sophisticated contrast to the velvety chicken and vegetables below.
Why High Heat Matters for Laminated Dough
Puff pastry is a laminated dough, meaning it consists of hundreds of thin layers of cold butter folded into flour. When that cold butter hits a 400°F oven, the water in the butter turns to steam instantly. This rapid expansion is what “puffs” the pastry. If the oven is too cool, the butter simply melts and leaks out, leaving you with a flat, greasy cracker instead of a light, airy topper.
Essential Components for a Rich Skillet Filling
A great pot pie lives or dies by the quality of its sauce. You want a filling that feels luxurious but not heavy. Using a high-quality chicken broth provides the savory backbone, while a splash of heavy cream adds a silky, reflective sheen to the gravy. This combination creates a velouté that coats the vegetables without masking their natural flavors.
Fresh herbs are the unsung heroes of this dish. While dried thyme works well during the simmer, finishing with fresh parsley and thyme sprigs adds a bright, grassy note. This acidity and freshness are vital for cutting through the richness of the butter and cream, keeping your palate refreshed between bites.
Selecting and Preparing the Chicken
You can use a store-bought rotisserie chicken to save time, but be mindful of the salt content. If you’re poaching chicken breast at home, keep the cubes large, about one inch. This ensures the meat stays succulent and doesn’t shred into the sauce. You want distinct chunks of chicken that provide a meaty chew against the soft vegetables.
The Mirepoix and Root Vegetable Base
The foundation of the flavor is a classic mirepoix: onions, carrots, and celery. However, the potatoes require a bit of extra attention. Because the skillet sauce thickens quickly, raw potato cubes won’t have enough time to soften. Par-boiling your potatoes for about five minutes before adding them to the skillet ensures they are buttery-soft the moment the sauce reaches its ideal thickness.
Step-by-Step: Engineering the Perfect Skillet Chicken Pot Pie
Building this dish is an exercise in timing and temperature control. You’ll start by prepping your pastry, as it needs the most time in the oven. While those golden squares are rising, you’ll build the filling in the same skillet you’ll use for serving. This one-pan approach for the filling keeps all the browned bits of flavor (the fond) right where they belong.
For another easy one-pan meal, check out this juicy sausage potato bake.
Phase 1: Achieving the Golden Pastry Topper
Work with your puff pastry while it’s still cold to the touch. If it gets too warm, the butter will soften and the layers won’t separate properly. Cut the sheet into four equal squares and brush them with a simple egg wash. This isn’t just for looks; the protein in the egg creates a beautiful, lacquered sheen that looks like it came straight from a French bakery.
Bake them until they are a deep, mahogany gold. Don’t be afraid of a little color! That deep browning represents toasted flour and caramelized butter, which translates to flavor. Once they are out of the oven, let them rest on a wire rack so the bottoms don’t steam against the baking sheet.
Phase 2: Building the Roux and Flavor Base
Melt your butter in the cast iron skillet and watch for the foam to subside. Add your aromatics and sauté until the onions are translucent and the carrots have softened slightly. When you stir in the flour, you’re creating a roux. It’s crucial to cook this mixture for at least two minutes. You’re looking for a smell that’s slightly nutty, which indicates the raw flour taste has been cooked out.
Phase 3: Emulsifying the Creamy Velouté Sauce
Slowly whisk in your chicken broth. Start with a small splash and whisk until a thick paste forms, then gradually add the rest. This prevents lumps from forming. Once the cream goes in, let the sauce simmer gently. You are looking for the “nappe” stage, where the sauce is thick enough to coat the back of a spoon. If you run your finger through the sauce on the spoon, the line should stay clean and sharp.
Phase 4: The Final Assembly and Garnish
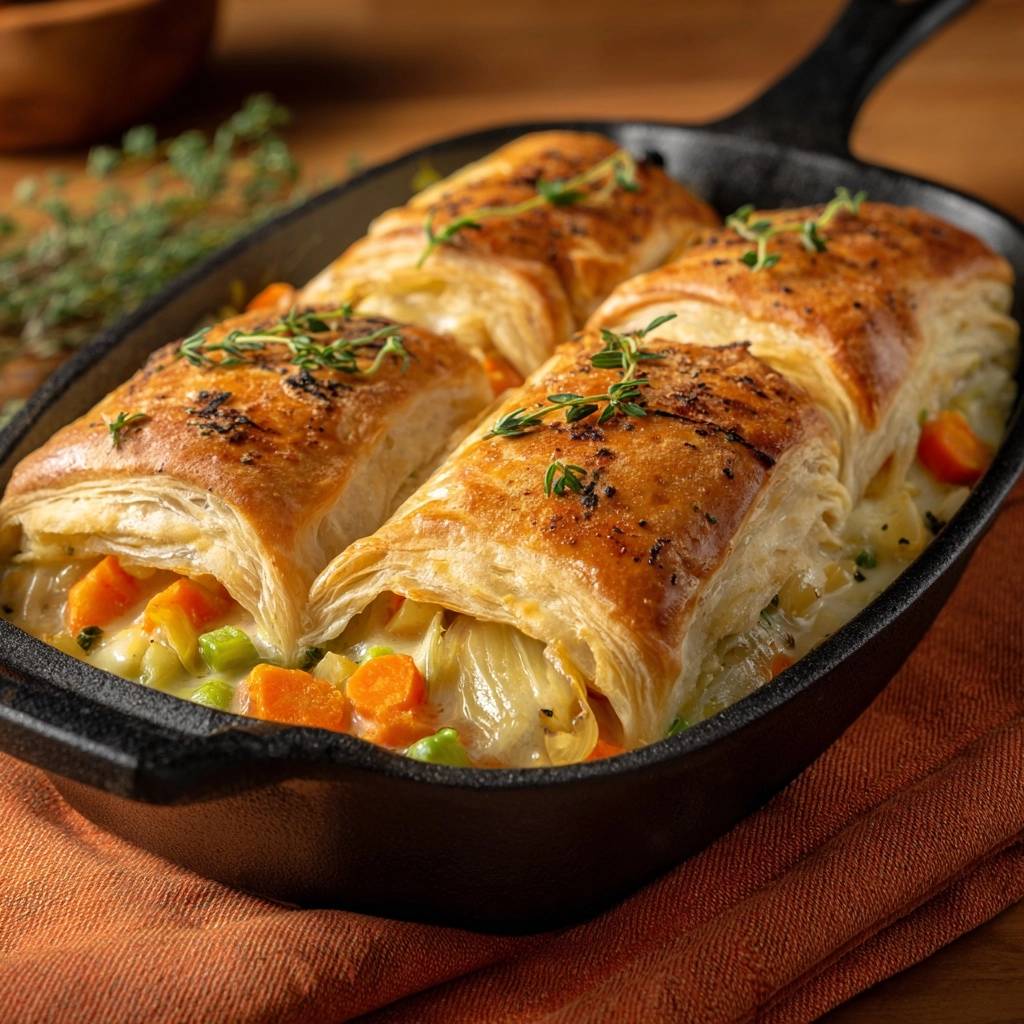
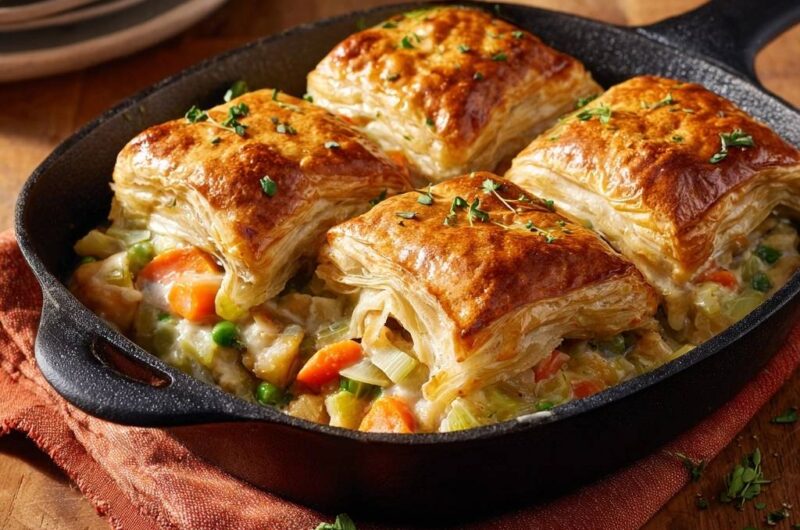
Fold in your cooked chicken and frozen peas at the very end. The peas only need a minute or two to turn bright green; overcooking them will make them gray and mushy. Once the filling is bubbling and hot, turn off the heat. Place your pre-baked pastry squares right on top. The heat from the filling will warm the bottom of the pastry slightly without compromising the crunch of the top layers.
Troubleshooting Common Pot Pie Pitfalls
If your sauce looks too thin, don’t panic. Let it simmer for another three minutes to reduce. Conversely, if it looks like a thick paste, whisk in an extra quarter-cup of broth to loosen it up. If your pastry deflates after you take it out of the oven, it likely needed another two minutes of baking to set the internal structure. Always aim for a firm, dry feel when you tap the top of the pastry.
Strategic Swaps and Flavor Variations
You can easily adapt this skillet technique to the seasons. For a “Forestier” style, swap the peas for sautéed wild mushrooms and add a teaspoon of Dijon mustard to the sauce. In the spring, try using leeks instead of onions and adding blanched asparagus tips. As long as you maintain the ratio of fat to flour for the roux, the flavor possibilities are endless.
Make-Ahead Strategies and Storage Logistics
You can prepare the chicken and vegetable filling up to 24 hours in advance. Store it in the refrigerator and reheat it gently in the skillet when you’re ready to serve. However, do not bake the puff pastry until you are ready to eat. Freshly baked pastry is the only way to guarantee that signature “shatter” when your fork hits the crust.
If you have leftovers, store the pastry and the filling in separate containers. Reheat the filling on the stove and pop the pastry into a toaster oven for three minutes. This prevents the pastry from absorbing the moisture of the gravy while it sits in the fridge.
Ideal Pairings for a Skillet Meal
Since this pot pie is rich and creamy, you want a side dish that offers a sharp contrast. A simple arugula salad with a lemon vinaigrette is perfect for cutting through the butter. Alternatively, roasted Brussels sprouts with a drizzle of balsamic glaze provide a bitter, earthy balance to the sweet carrots and peas in the filling.
Frequently Asked Questions
Can I use pie crust instead of puff pastry?
You can certainly use standard pie dough, but the result will be very different. Pie crust is “short,” meaning it’s crumbly rather than airy. If you use pie crust, you should still bake it separately on a sheet pan to avoid the soggy bottom, but it won’t have the dramatic height and light texture that puff pastry provides.
How do I prevent the sauce from becoming too thick?
The thickness of the sauce is controlled by the roux and the simmer time. If the sauce over-reduces and becomes too heavy, simply whisk in a splash of chicken broth or even a tablespoon of water right before serving. The sauce should be thick enough to feel substantial but thin enough to pool slightly on the plate.
Is a cast iron skillet mandatory?
While cast iron is preferred for its incredible heat retention, any heavy-bottomed, oven-safe skillet will work. Stainless steel or ceramic-coated pans are great alternatives. The key is using a pan that distributes heat evenly so the roux doesn’t burn in the corners of the skillet.
Can I use frozen vegetables instead of fresh?
Frozen peas are actually superior to fresh in this recipe because they are flash-frozen at peak ripeness. However, for carrots and celery, fresh is better. Frozen carrots often have a rubbery texture once thawed and simmered. If you must use a frozen vegetable mix, add it at the very end of the simmering process to prevent it from turning into mush.
How do I store leftovers without the pastry getting soft?
The best way to handle leftovers is to remove the pastry squares from the top of the filling before refrigerating. Store the pastry in a dry, airtight container at room temperature. Refrigerate the filling separately. When you’re ready for round two, reheat the filling in a pan and crisp the pastry in the oven at 350°F for a few minutes before reuniting them.
Chicken Pot Pie
Course: Main CourseCuisine: AmericanDifficulty: medium4
servings15
minutes35
minutes580
kcal50
MinutesThis deconstructed pot pie features a rich, creamy chicken and vegetable filling topped with separately baked golden puff pastry squares for maximum crunch.
Ingredients
1 sheet frozen puff pastry, thawed but cold
2 cups cooked chicken breast, cubed
1 cup carrots, sliced into thick rounds
1 cup frozen peas
2 stalks celery, chopped
1 small onion, diced
1 cup potatoes, peeled and cubed (par-boiled)
4 tablespoons butter
1/4 cup all-purpose flour
2 cups chicken broth
1/2 cup heavy cream
1 teaspoon dried thyme
Salt and black pepper to taste
1 egg, beaten with 1 tablespoon water (egg wash)
Fresh parsley and thyme for garnish
Directions
- Preheat your oven to 400°F (200°C). Line a baking sheet with parchment paper.
- To ensure a perfectly crisp crust, cut the puff pastry sheet into four equal squares. Place them on the prepared baking sheet. Brush the tops generously with the egg wash.
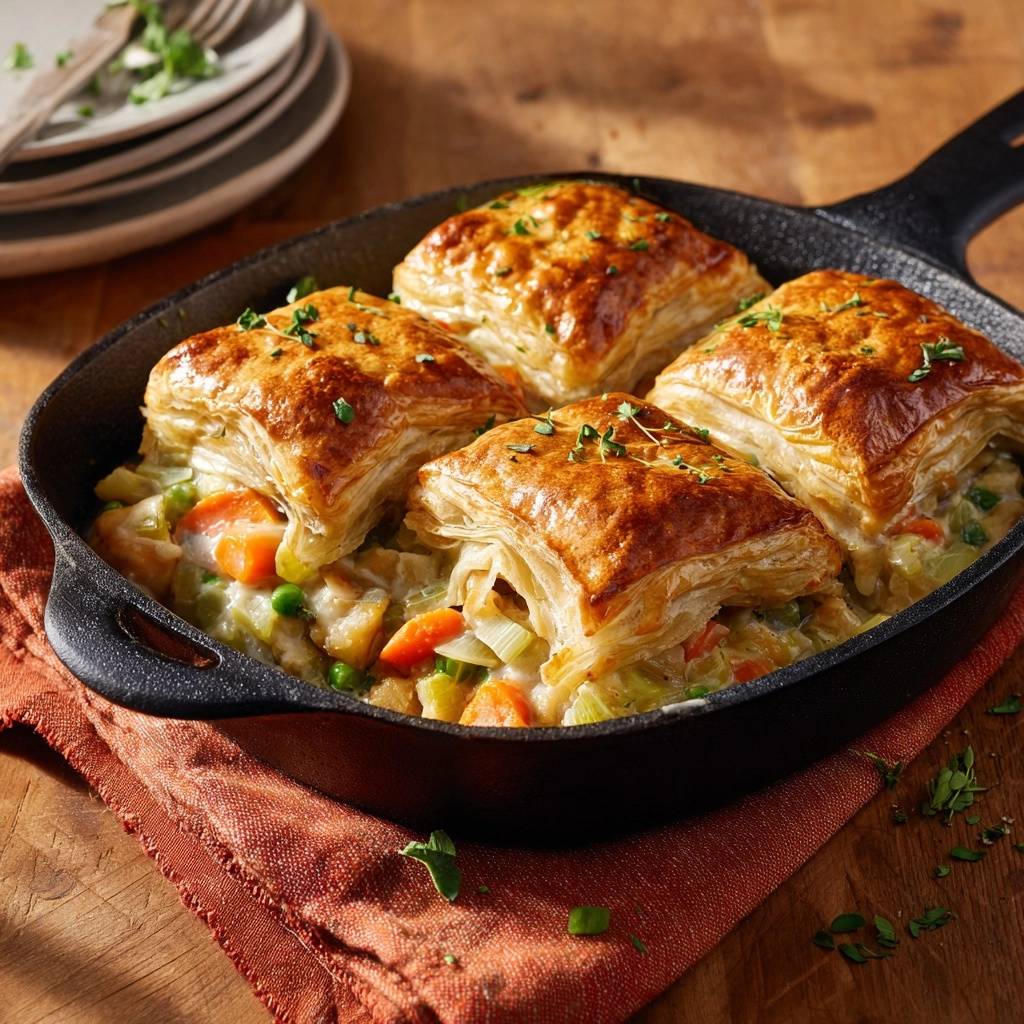
- Bake the pastry squares for 15-18 minutes until they are fully puffed and deep golden brown. Set aside. This “deconstructed” assembly is the only way to achieve the visual height and crunch shown in the image.
- While the pastry bakes, melt butter in a large 10-inch oven-safe cast iron skillet over medium heat. Add onions, carrots, and celery. Sauté for 8 minutes until the vegetables are tender.
- Stir in the flour and cook for 2 minutes, stirring constantly to create a light roux.
- Slowly whisk in the chicken broth and heavy cream. Add the par-boiled potatoes. Simmer for 5-7 minutes until the sauce is thick, creamy, and coats the back of a spoon.
- Fold in the cooked chicken, frozen peas, thyme, salt, and pepper. Let the filling simmer for another 2 minutes until the peas are bright green and the chicken is heated through.
- Turn off the heat. Place the fully baked, golden puff pastry squares directly on top of the bubbling filling in the skillet.
- Garnish with fresh parsley and thyme sprigs. Serve immediately while the pastry is at its maximum crispness.
Notes
- Baking the pastry squares separately and placing them on the filling at the end is the key to avoiding a soggy crust. Ensure potatoes are par-boiled before adding to the skillet to guarantee they are fully cooked.