The Southern Caramel Layer Cake is the undisputed crown jewel of church socials and holiday sideboards. It’s a dessert that commands respect, but for many home bakers, it’s also a source of immense frustration. You’ve likely seen it: a towering, golden masterpiece that looks incredible but leaves a gritty, sandy texture on your tongue. That crunch isn’t a feature; it’s a failure of sugar chemistry that has plagued family recipes for generations.
This isn’t just another recipe to add to your collection. It’s a technical roadmap designed to eliminate the guesswork and the “sandiness” forever. We’re focusing on the two pillars of a professional finish: precise temperature control and a specific sifting technique. By mastering these, you’ll produce a cake that’s as smooth as velvet and as rich as a piece of high-end fudge.
For a different take on rich layering, check out Chocolate Glazed Pistachio Layer Cake.
The secret to this success lies in the cooling phase of your caramel base. Most people rush to add their powdered sugar while the cooked mixture is still steaming. This heat causes the powdered sugar to melt and then recrystallize into tiny, jagged shards. I’ve found that waiting until the base hits exactly 85°F ensures the sugar stays suspended in the fat, creating that legendary silky mouthfeel you’re after.
For a bright citrus twist, try this glazed lemon zest bundt cake recipe.
The Anatomy of a Perfect Southern Sponge
A caramel cake needs a sturdy foundation because the frosting is significantly heavier than a standard buttercream. While many modern recipes call for cake flour, I stick with all-purpose flour here. It provides the necessary protein structure to support those thick, luscious layers of caramel without the cake collapsing or becoming compressed under the weight.
Unsalted butter is the heart of the flavor profile, so use the best quality you can find. Since we’re adding salt separately, using unsalted butter allows you to control the exact balance of the “salty-sweet” dynamic. This balance is crucial because the sugar content in a Southern Caramel Layer Cake is quite high, and you need that salt to cut through the richness.
Whole milk and large eggs provide the moisture and fat needed for a tender crumb. If you use skim milk or egg substitutes, the cake will lack the traditional “yellow cake” richness that defines this dessert. The goal is a sponge that is moist enough to eat on its own but resilient enough to handle a generous coating of frosting.
Why Room Temperature Ingredients are Non-Negotiable
Baking is a series of chemical reactions, and temperature is the catalyst. When you cream butter and sugar, you’re actually beating tiny air bubbles into the fat. If you add cold eggs or cold milk to that aerated butter, the fat will immediately seize and curdle. This breaks the emulsion you worked so hard to build.
A curdled batter leads to a dense, uneven cake with a greasy texture. By ensuring your milk and eggs are at room temperature, they’ll incorporate seamlessly into the butter. This creates a smooth, homogenous batter that rises evenly in the oven, resulting in a light, airy crumb that melts in your mouth.
Essential Tools for Caramel Success
You don’t need a professional kitchen, but a few specific tools will make your life much easier. A heavy-bottomed saucepan is your best friend when making the frosting. Thin pans have “hot spots” that can scorch the brown sugar and cream, leaving bitter black flecks in your beautiful golden caramel.
An offset spatula is another game-changer for this specific cake. Unlike a regular butter knife, the angled blade allows you to spread frosting smoothly without your knuckles dragging through the cake. It’s the only way to get those deep, decorative swirls that make a Southern cake look so rustic and inviting.
Finally, if you have a digital thermometer, use it. While you can eyeball the cooling process, knowing exactly when your caramel hits 85°F takes the anxiety out of the process. If you don’t have one, the mixture should feel lukewarm to the touch—not hot, but not cold enough to have set into a solid block.
The Science of Smooth Caramel Frosting
Brown sugar is the soul of this frosting, but it’s also the primary cause of grittiness. Brown sugar is simply granulated sugar coated in molasses, and those crystals need to be fully dissolved into the butter and cream. If you don’t boil the mixture long enough, the crystals remain intact, leading to that dreaded sandy texture.
The “2-minute boil” is the magic window where the sugar transitions into a stable syrup. During these 120 seconds, the water in the cream evaporates, and the sugar molecules break down and bond with the fats. This creates a cooked caramel base that is chemically stable, meaning it won’t “weep” or separate once it’s on the cake.
However, you must stop stirring once the boil begins. Stirring a boiling sugar syrup can trigger a chain reaction of crystallization, turning your smooth frosting into a grainy mess. Let the heat do the work, then move the mixture to a bowl to cool undisturbed until it reaches the perfect temperature for the powdered sugar.
The Double-Sifting Requirement Explained
You might think sifting powdered sugar once is enough, but for this recipe, you need to do it twice. Powdered sugar is notorious for clumping in the box or bag. Even a tiny, pea-sized clump can act as a “seed” for recrystallization once it hits the caramel base.
By sifting twice, you ensure the sugar is as fine as dust. This allows it to dissolve instantly into the lukewarm caramel without the need for aggressive over-mixing. It’s an extra five minutes of work that pays off in a frosting that looks like polished marble and feels like silk.
Step-by-Step: Baking the Golden Layers
Start by creaming your butter and sugar for at least three to five minutes. You’re looking for a dramatic transformation here. The mixture should change from a dense, yellow paste to a pale ivory color with a fluffy, cloud-like texture. This trapped air is what makes the cake rise.
When adding your dry ingredients and milk, always follow the “dry-wet-dry” rule. Start with a third of the flour, then half the milk, and repeat, ending with the flour. This technique prevents the batter from saturating with liquid too quickly, which can lead to a tough, rubbery cake.
Stop the mixer the very second you see the last streak of flour disappear. Over-mixing at this stage develops the gluten in the flour. While gluten is great for chewy bread, it’s the enemy of a tender Southern sponge. Treat the batter gently, and your cake will be incredibly soft.
Step-by-Step: Crafting the Silky Caramel Base
When you melt the butter and brown sugar, keep the heat at a steady medium. You want a gentle boil, where bubbles break the surface consistently but the mixture isn’t foaming over the sides of the pan. If the heat is too high, the sugar will cook too fast and turn into hard candy.
Once the two minutes are up, immediately transfer the hot liquid to a heat-proof glass or metal bowl. This stops the cooking process instantly. Now comes the hardest part: waiting. Let it sit for 45 to 60 minutes. If you try to beat in the sugar while it’s hot, the frosting will be runny and translucent.
As you beat in the sifted powdered sugar, the frosting will transform from a dark, oily liquid into a thick, opaque tan cream. It should be stiff enough to hold its shape when you lift the beaters. If it feels too soft, don’t panic—just add a little more sugar until it reaches a spreadable consistency.
Assembling and Decorating for Maximum Height
Before you even touch the frosting, make sure your cake layers are level. If they have a “dome” on top, use a long serrated knife to gently saw off the hump. Level cakes are much more stable and prevent the top layer from sliding off the bottom one.
The “crumb coat” is your secret weapon for a professional look. Spread a very thin layer of frosting over the top and sides of the stacked cake to trap any loose crumbs. Pop the cake in the fridge for 15 minutes to let this layer set. This creates a smooth, clean canvas for your final decorative layer.
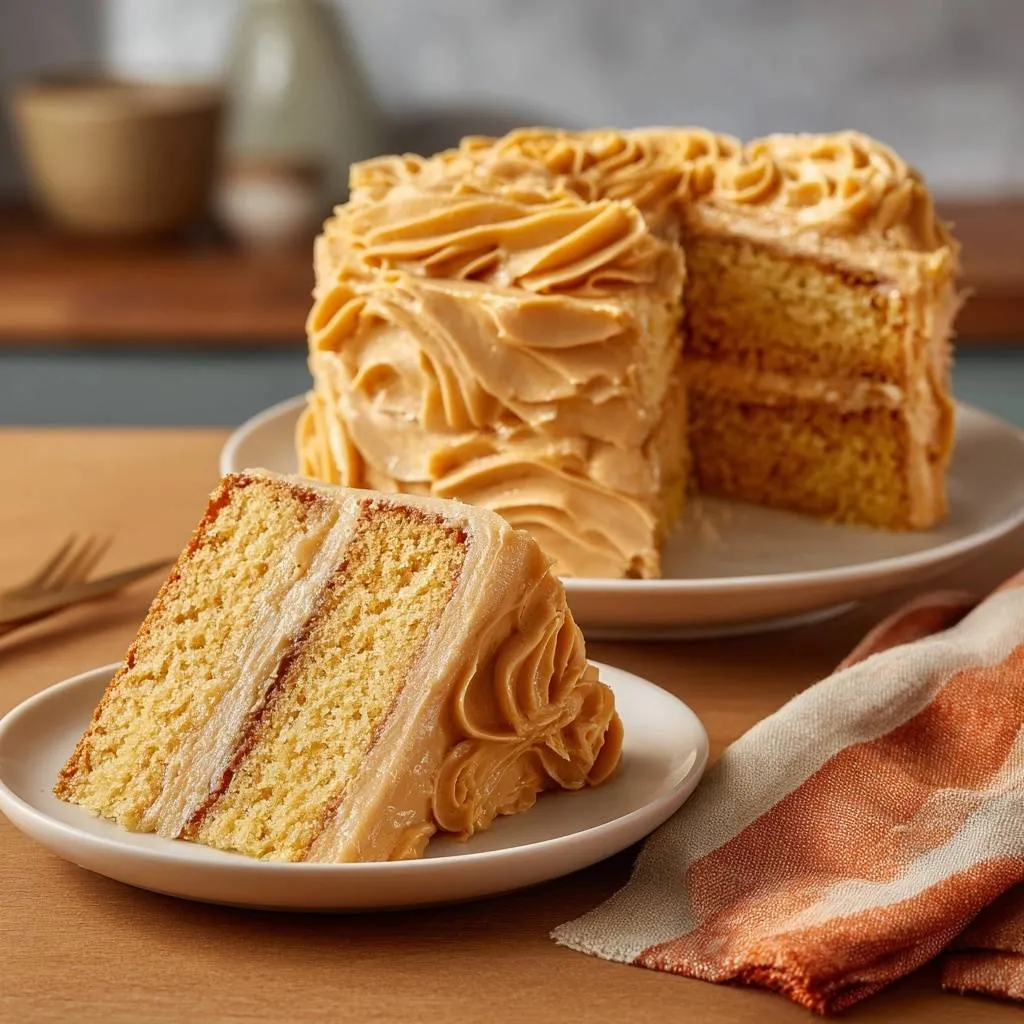
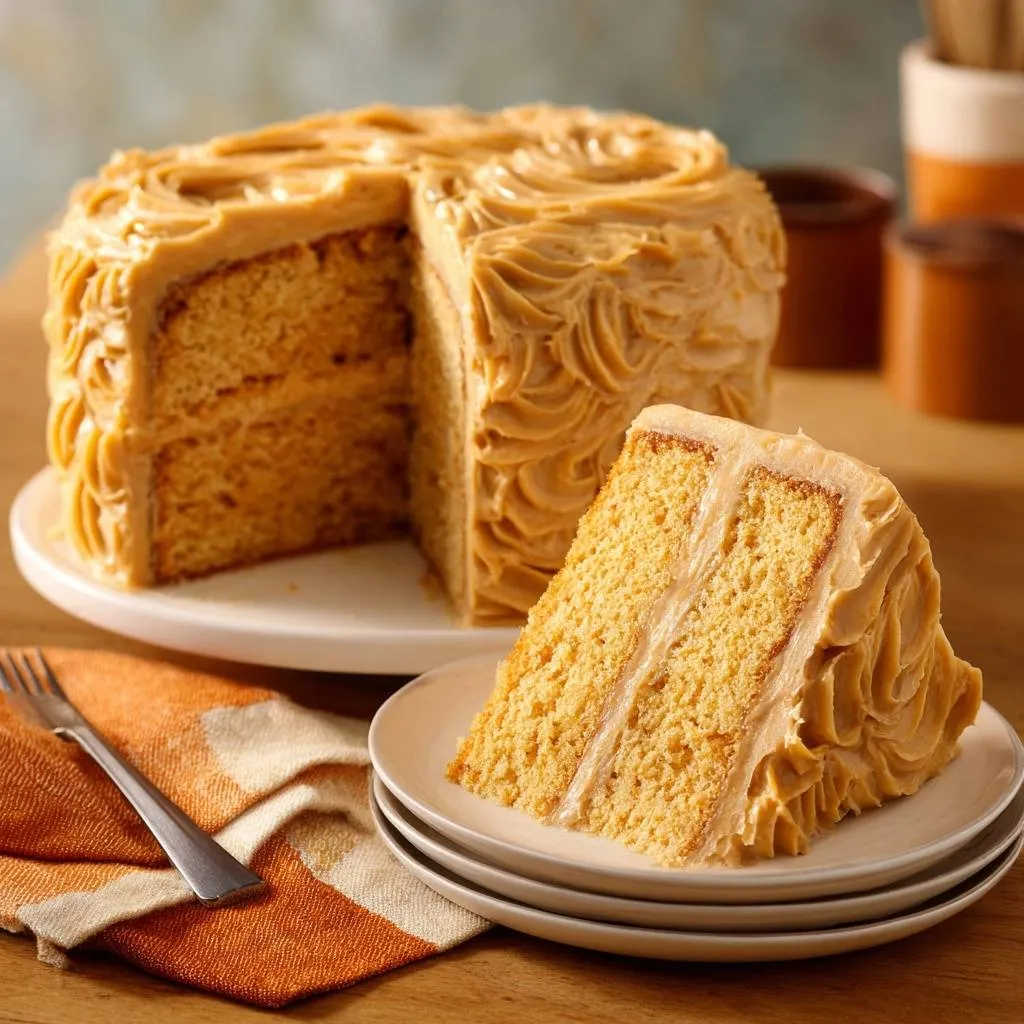
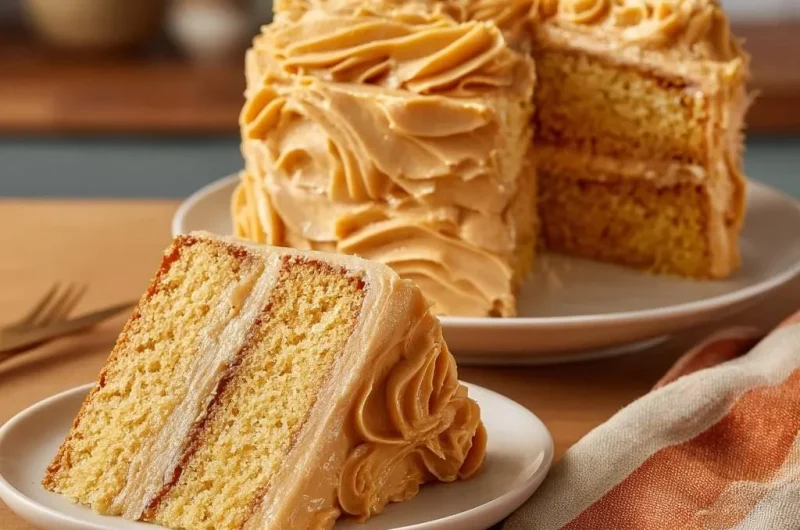
For the final finish, don’t worry about making it perfectly smooth. Traditional Southern cakes are known for their deep, rustic swirls. Use the back of a large spoon to “swoop” the frosting, creating ridges and valleys. These little pockets are perfect for catching extra bits of caramel flavor in every bite.
Troubleshooting Common Caramel Cake Hurdles
If your frosting is too runny to stay on the cake, it’s usually because the caramel base was still too warm. You can fix this by adding more powdered sugar or by placing the entire bowl of frosting in the fridge for 10 minutes to firm up. Just don’t leave it too long, or it will become too stiff to spread.
On the flip side, if the frosting is so stiff it’s tearing the cake, simply whisk in a teaspoon of warm heavy cream. This will loosen the structure and restore that spreadable, glossy finish. Remember, the frosting will continue to firm up as it sits on the cake, so a little softness during assembly is okay.
If you find the cake layers are sticking to the pans, try running a thin knife around the edges while they are still slightly warm. For future bakes, always use parchment paper rounds at the bottom of your pans. It’s the only 100% guaranteed way to ensure your cakes pop out perfectly every single time.
Make-Ahead Strategies and Storage Logistics
This cake is actually a fantastic candidate for making ahead of time. You can bake the cake layers up to two days in advance. Just wrap them tightly in plastic wrap and keep them at room temperature. You can even freeze the layers for up to a month; just thaw them in the fridge before frosting.
Once the cake is frosted, it can sit at room temperature in a cake dome for about three days. The high sugar content in the frosting acts as a natural preservative. If you live in a very humid or hot climate, you might want to store it in the fridge to keep the frosting from softening too much.
If you do refrigerate the cake, make sure to take it out at least two hours before serving. Caramel frosting is best enjoyed at room temperature when it has a soft, fudge-like consistency. Cold caramel can feel a bit hard and waxy, so give it time to “wake up” before you slice into it.
Expert Tips for the Perfect Slice
To get those clean, beautiful slices you see in magazines, use a tall chef’s knife dipped in hot water. Wipe the blade dry between every single cut. The heat from the metal will glide through the dense caramel frosting without squishing the soft cake underneath.
Because this cake is incredibly sweet and rich, I recommend serving smaller slices than you would for a standard sponge cake. It pairs beautifully with something sharp or bitter to cleanse the palate. A cold glass of whole milk is the classic choice, but a cup of strong, unsweetened black tea is a sophisticated alternative that balances the sugar perfectly.
What to Try Next
To complement your Southern Caramel Layer Cake, consider these sweet and savory options.
- For a delightful breakfast or brunch addition, try these fluffy pumpkin spice pancakes, featuring warm autumnal spices that echo the cake’s comforting profile.
- For a savory contrast, these cheesy beef waffles offer a satisfying texture and a rich flavor that can balance the sweetness of the cake.
Frequently Asked Questions
Can I use dark brown sugar instead of light?
Yes, you can use dark brown sugar if you prefer a deeper, more intense molasses flavor. It will make the frosting a darker amber color and slightly more moist. However, light brown sugar is the traditional choice for that classic “butterscotch” caramel profile.
Why did my frosting turn into fudge before I could spread it?
This usually happens if the caramel base was boiled for too long or if it cooled down too much before you added the powdered sugar. If it becomes too stiff to work with, simply beat in a tablespoon of warm heavy cream to soften it back to a spreadable consistency.
Can I make this in a 9×13 pan instead of layers?
Absolutely, this recipe works great as a sheet cake. You will need to bake it for about 35 to 40 minutes. Since you aren’t stacking layers, you can skip the crumb coat and just spread the frosting in thick, decorative waves over the top of the cooled cake.
How do I prevent the cake from sticking to the pan?
The best method is to grease the pan with butter, add a spoonful of flour and shake it around to coat, and then place a circle of parchment paper at the very bottom. This double-layer of protection ensures the cake releases cleanly without leaving the bottom behind.
My frosting is pale; how do I get that deep amber color?
The color comes from the browning of the butter and the caramelization of the brown sugar. To get a deeper color, make sure you allow the mixture to reach a full, bubbling boil for the full two minutes. Using dark brown sugar will also naturally result in a much deeper, richer hue.
Caramel Layer Cake
Course: DessertCuisine: AmericanDifficulty: medium12
servings25
minutes35
minutes610
kcal60
MinutesThis classic Southern cake pairs a moist, buttery sponge with a rich caramel frosting. The recipe specifically addresses the common issue of grainy frosting by using a boiled caramel base cooled to a precise temperature before adding twice-sifted powdered sugar.
Ingredients
For the Cake:
2 and 1/2 cups all-purpose flour
1 and 1/2 cups granulated sugar
1 cup unsalted butter, softened
4 large eggs, room temperature
1 cup whole milk, room temperature
2 teaspoons baking powder
1 teaspoon vanilla extract
1/2 teaspoon salt
For the Silky Caramel Frosting:
1 cup unsalted butter (2 sticks)
2 cups packed light brown sugar
1/2 cup heavy cream
1/2 teaspoon salt
1 teaspoon vanilla extract
4 to 5 cups powdered sugar, sifted twice
Directions
- Preheat your oven to 350°F (175°C). Grease and flour two 8-inch round cake pans. For extra security, line the bottoms with parchment paper.
- In a large bowl or stand mixer, cream the softened butter and granulated sugar on medium-high speed for 3-5 minutes until very light and fluffy. Add eggs one at a time, beating well after each addition. Mix in the vanilla extract.
- In a separate bowl, whisk together the flour, baking powder, and salt.
- With the mixer on low, add the dry ingredients to the butter mixture in three parts, alternating with the milk (starting and ending with flour). Do not overmix; stop as soon as the last streaks of flour disappear.
- Divide the batter evenly between the prepared pans. Bake for 30 to 35 minutes, or until a toothpick inserted into the center comes out clean.
- Cool in the pans for 10 minutes, then invert onto wire racks to cool completely. The cakes must be entirely cold before frosting.
- To solve the gritty frosting problem: Melt 1 cup of butter in a heavy-bottomed saucepan over medium heat. Stir in the brown sugar and heavy cream.
- Bring the mixture to a gentle boil, stirring constantly to ensure the brown sugar dissolves. Once it reaches a full boil, stop stirring and let it boil for exactly 2 minutes.
- Remove from heat and stir in the salt and vanilla. Pour the hot caramel into a large heat-proof mixing bowl. Let it cool for 45-60 minutes until it is lukewarm (about 85°F). If the base is too hot, it will melt the powdered sugar and create a grainy texture.
- Once lukewarm, use an electric mixer on low speed to gradually beat in the twice-sifted powdered sugar one cup at a time. Increase speed to medium and whip for 2-3 minutes until the frosting is thick, glossy, and holds a stiff peak. If it is too thin to hold the swirls shown in the image, add more powdered sugar 1/4 cup at a time.
- Place one cake layer on a serving plate. Spread a generous 1/2 inch of frosting over the top. Stack the second layer.
- Apply a thin “crumb coat” of frosting to the exterior and chill for 15 minutes. Use the remaining frosting to create the deep, decorative swirls and ridges shown in the image using an offset spatula or the back of a large spoon.
Notes
- The cakes must be entirely cold before frosting. For the frosting, ensure the boiled caramel base cools to approximately 85°F (lukewarm) to prevent the powdered sugar from melting and creating a grainy texture.