Most oven-baked rice dishes end in a soggy, gummy heartbreak that feels more like porridge than a meal. You’ve likely been there before, pulling back the foil only to find the rice at the bottom swimming in a pool of unabsorbed liquid while the top remains crunchy. It’s a frustrating kitchen fail that usually stems from the “dump and bake” method, which ignores how starch actually behaves under heat.
This Sweet and Sour Pineapple Meatball Bake solves that problem forever with a specific par-boiling technique. By controlling the hydration of the rice before it ever hits the oven, we create a dish where every grain stays distinct and fluffy. Meanwhile, the meatballs stay incredibly juicy because they steam gently on top of the rice bed before getting a high-heat glaze at the very end.
The secret to this recipe’s success is the 80/20 beef blend and the cold-water rinse after par-boiling the rice. That rinse is non-negotiable because it strips away the excess surface starch that causes clumping. When you combine that clean rice with the bright acidity of pineapple and a thick, mahogany glaze, you get a balanced meal that hits every corner of your palate.
The Science of Par-Boiling for Perfect Rice
Rice is packed with amylose and amylopectin, two types of starch that react differently to water. When you bake raw rice in a casserole, the starch granules burst and release a sticky film that binds the grains together into a mushy mass. This is why standard recipes often feel heavy or “gluey” in the mouth.
By boiling the rice for exactly six minutes, you are essentially performing a controlled pre-hydration. This short window allows the rice to absorb just enough water to soften the outer layer without collapsing the structure of the grain. Therefore, the rice enters the oven about 60% cooked, leaving just enough room for it to soak up the flavorful pineapple juice and meat drippings later.
Rinsing the par-boiled rice under cold water is the most important step in this entire process. It shocks the grain, stopping the cooking process instantly so the rice doesn’t overcook while you’re prepping the meatballs. More importantly, it washes away the gummy starch “dust” that would otherwise turn your bake into a brick. You’ll notice the grains feel firm and slippery, which is exactly what you want for a light, airy texture.
Essential Components for the Meatball Base
For the meatballs, quality starts with the fat content of your meat. I always recommend an 80/20 ground beef blend because the fat renders out during the bake, basting the rice below with savory richness. If you use a lean 95/5 blend, the meatballs will likely turn out dry and crumbly, lacking that melt-in-your-mouth quality we’re after.
Panko breadcrumbs act as a “spacer” in this recipe rather than a heavy filler. Unlike traditional Italian breadcrumbs, Panko is flaky and light, creating tiny air pockets within the meatball that trap juices. When you add the beaten egg, it acts as a protein binder that holds everything together without making the mixture feel dense or rubbery.
Using dried aromatics like garlic powder and ground ginger is a deliberate choice here. While fresh is often better, powders distribute more evenly throughout the meat mixture in a short mixing time. This ensures that every single bite has a consistent, warm spice profile that complements the sweet and sour glaze perfectly.
Selecting the Right Sweet and Sour Glaze
Not all store-bought sauces are created equal, and choosing the wrong one can ruin the texture of your meatballs. You want to look for a “glaze-style” sauce that is thick and translucent, rather than a thin dipping sauce. A high-quality glaze usually has a higher sugar content, which is vital for the final stage of baking.
That sugar is what allows the Maillard reaction to occur, giving the meatballs that beautiful, dark red sheen and slightly tacky exterior. If your sauce is too watery, it will simply run off the meat and disappear into the rice, leaving your meatballs looking pale and unappetizing. Look for a sauce that coats the back of a spoon heavily.
Fresh vs. Canned Pineapple: Juice Ratios
While I usually advocate for fresh produce, canned pineapple is actually the superior choice for this specific bake. Canned pineapple chunks come packed in a measured amount of juice that is consistent every single time. This juice is the primary hydrating liquid for your rice, and its sugar-to-acid ratio is perfectly balanced for cooking.
Fresh pineapple is unpredictable because its water content varies wildly depending on ripeness. Furthermore, fresh pineapple contains an enzyme called bromelain, which can actually break down the proteins in the meat and make your meatballs mushy if left to marinate. Stick with the canned version to ensure your liquid ratios remain precise and your meat stays firm.
Step-by-Step: Preparing the Meatball Bake
Success in this dish comes down to the order of operations. You want to move efficiently so the rice doesn’t sit too long and the meat stays cold until it’s ready for the oven. Start by getting your water boiling before you even touch the meat, as the rice prep is the foundation of the entire meal.
Phase 1: The 6-Minute Rice Prep
Drop your long-grain white rice into a large pot of salted, boiling water. Set a timer for exactly six minutes; do not guess! You aren’t looking for fluffy, edible rice at this stage. Instead, the grains should feel “al dente,” meaning they have a distinct, slightly hard bite in the very center.
Immediately drain the rice into a fine-mesh sieve and run cold tap water over it for about 30 seconds. Toss the rice with your hand to make sure the water reaches the center of the pile. Once it’s cool to the touch and the water runs clear, let it drain thoroughly so you aren’t adding unintended moisture to the baking dish.
Phase 2: Mixing and Shaping the Meatballs
When mixing your beef, breadcrumbs, and spices, use a very light touch. I prefer to use my hands and “fold” the ingredients together rather than squeezing them. Overworking the meat compresses the fibers, which leads to tough, bouncy meatballs that feel like golf balls. Stop the moment you can’t see any more dry breadcrumbs.
Aim for meatballs that are about 1.5 inches in diameter, roughly the size of a ping-pong ball. This size is the “sweet spot” for this recipe because it allows the center of the meatball to reach a safe temperature at the exact moment the rice finishes steaming. You should end up with about 18 to 20 meatballs, which fits perfectly in a 9×13 dish.
Phase 3: Layering for Optimal Steam Distribution
The architecture of the dish is what makes the “Anti-Soggy” secret work. Spread the par-boiled rice in an even layer first, then scatter the frozen peas. When you pour the mixture of pineapple juice and soy sauce over the top, it will settle at the bottom. This creates a shallow reservoir of liquid that will turn into steam once the dish is covered.
For a similar textural success, consider these cheesy beef stuffed peppers.
Place the meatballs directly on top of the rice bed. Do not bury them! By sitting on top, the meatballs act as little weights that keep the rice submerged in the steam, while the fat from the beef drips down to season the grains. Tuck the pineapple chunks into the gaps to ensure every bite of rice gets a hit of fruitiness.
The Two-Stage Baking Technique for Texture
We use a two-stage baking process to achieve two different goals. The first 25 minutes at 375°F, tightly covered with foil, is the “steaming phase.” The foil traps the moisture from the pineapple juice, forcing it back into the par-boiled rice grains until they are tender and fragrant. This is where the rice finishes its transformation.
The second stage is the “glazing phase.” By removing the foil and cranking the heat to 400°F for the last 10 minutes, you allow the surface moisture to evaporate. This prevents the dish from being “soupy.” More importantly, the intense heat sets the sweet and sour sauce on the meatballs, turning it into a thick, sticky glaze that clings to the meat.
Troubleshooting Common Meatball Bake Issues
If you find that your rice is still a bit crunchy in the center after the first 25 minutes, your foil seal likely wasn’t tight enough. Steam escaped, leaving the rice dehydrated. To fix this, add two tablespoons of water, reseal the foil tightly, and give it another five minutes before proceeding to the uncovered stage.
If your meatballs are falling apart when you try to serve them, it usually means the meat mixture was too wet or the meatballs weren’t rolled tightly enough. Ensure you use a “large” egg, as a “medium” egg might not provide enough protein to bind the 1.5 pounds of beef. Also, make sure your Panko hasn’t gone stale, as it needs to be dry to absorb the meat juices.
Lastly, if the sauce seems to have disappeared, you likely used a “dipping” style sauce that was too thin. You can easily fix this by brushing on an extra layer of sauce during the final five minutes of the 400°F bake. This will give you that glossy, professional finish even if the first layer soaked in.
Flavor Variations and Ingredient Swaps
While beef provides the best flavor for the rice, you can certainly use ground turkey or chicken for a lighter version. However, since poultry is much leaner, I recommend adding a tablespoon of olive oil to the meat mixture. This replaces the missing fat and ensures the meatballs don’t become dry and chalky in the oven.
If you want more crunch, try adding diced red bell peppers or sliced water chestnuts along with the frozen peas. These vegetables hold up well to the steaming process and add a nice textural contrast to the soft rice. Just be sure to pat the vegetables dry before adding them so you don’t throw off the liquid-to-rice ratio.
Make-Ahead Instructions and Storage Solutions
This is a fantastic meal-prep dish because you can par-boil the rice up to 24 hours in advance. Just store the rinsed, cooled rice in an airtight container in the fridge. You can also roll the meatballs ahead of time. When you’re ready to eat, simply layer everything in the dish and bake as directed, adding about five extra minutes to the covered baking time since the ingredients are starting cold.
Leftovers should be stored in an airtight container in the refrigerator for up to three days. Rice tends to dry out when chilled, so when you reheat it, I recommend placing a damp paper towel over the bowl. This creates a mini-steam chamber in the microwave that restores the moisture to the rice and keeps the meatballs juicy.
What to Serve with Pineapple Meatball Bake
Since this bake is quite sweet and savory, it pairs beautifully with side dishes that offer a fresh or bitter contrast. A simple plate of steamed bok choy or garlicky sautéed spinach works wonders to cut through the richness of the beef and the sugar in the glaze.
A crisp cucumber salad dressed with rice vinegar and a pinch of chili flakes is another excellent choice. The cool, crunchy cucumbers and the sharp vinegar act as a palate cleanser between bites of the warm, sticky meatball bake. Avoid serving this with other heavy starches like bread, as the rice is already quite filling.
Expert Tips for a Professional Finish
Can I use brown rice for this meatball bake?
You can use brown rice, but it requires a much longer par-boiling time. Brown rice has a tough outer bran layer that takes longer to soften. You would need to boil it for about 15-18 minutes before rinsing. Additionally, you may need to add an extra 1/4 cup of pineapple juice to the baking dish to account for the higher fiber content’s absorption rate.
Why are my meatballs tough and rubbery?
Tough meatballs are almost always the result of over-mixing the meat. When you work the beef too much, the proteins begin to cross-link and toughen up, similar to kneading bread dough. Use a light, folding motion with your fingers and stop as soon as the ingredients are combined. Also, ensure you aren’t using meat that is too lean; 80/20 is the gold standard for a tender texture.
Can I freeze this meatball bake after cooking?
I do not recommend freezing the entire bake once it is finished. Rice often changes texture when frozen and thawed, becoming grainy or mushy. However, you can freeze the raw meatballs separately. When you’re ready to cook, thaw the meatballs in the fridge overnight and then proceed with the par-boiling and baking steps as fresh.
How do I get a darker, stickier glaze on the meatballs?
If you want that restaurant-quality “char” on your meatballs, you can use the broiler for the final two minutes of cooking. After the 10-minute uncovered bake at 400°F, turn your oven to the high broil setting. Watch it very closely, as the high sugar content in the sweet and sour sauce can go from perfectly caramelized to burnt in seconds.
What if I don’t have Panko breadcrumbs?
If you don’t have Panko, you can use crushed crackers or even toasted breadcrumbs made from a few slices of white bread. Avoid using the very fine, “sandy” Italian breadcrumbs found in canisters, as they can make the meatballs feel dense. If you must use them, reduce the amount to 1/3 cup to keep the meatballs light.

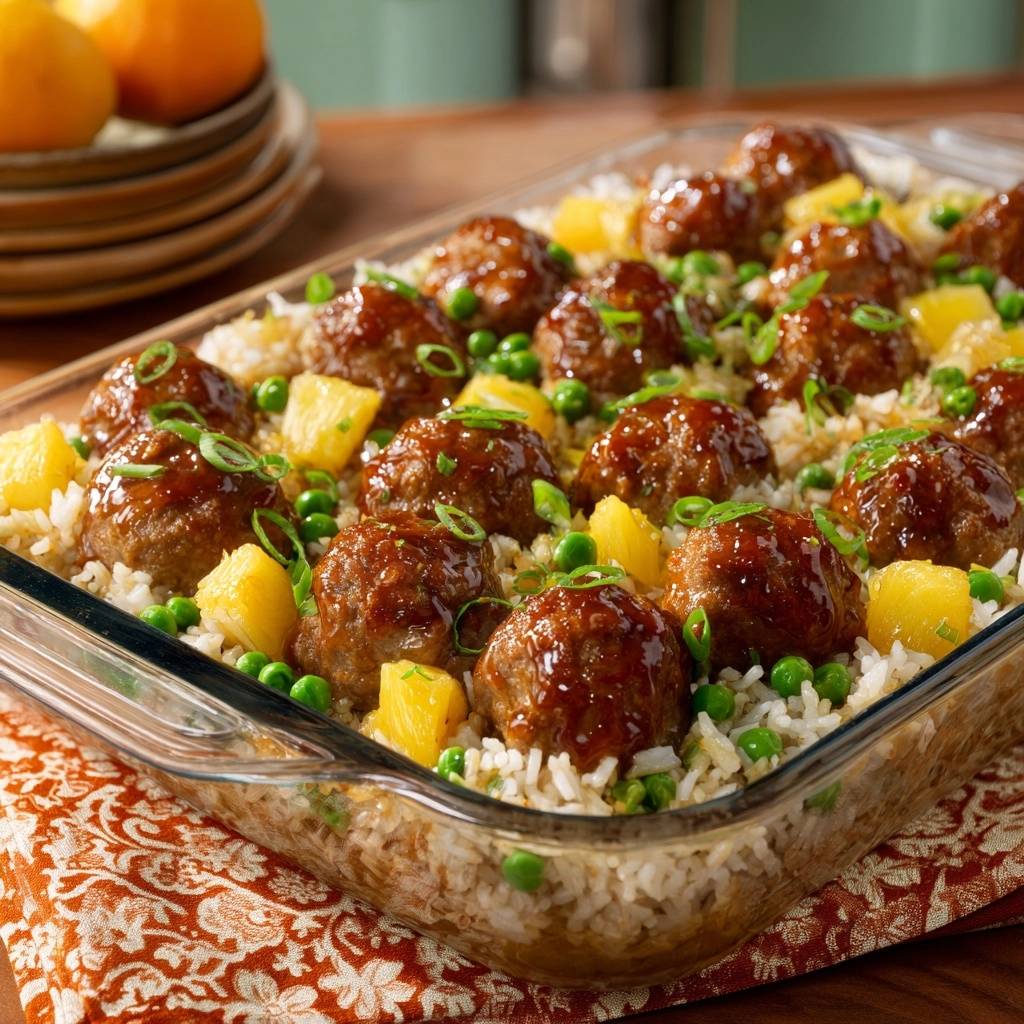
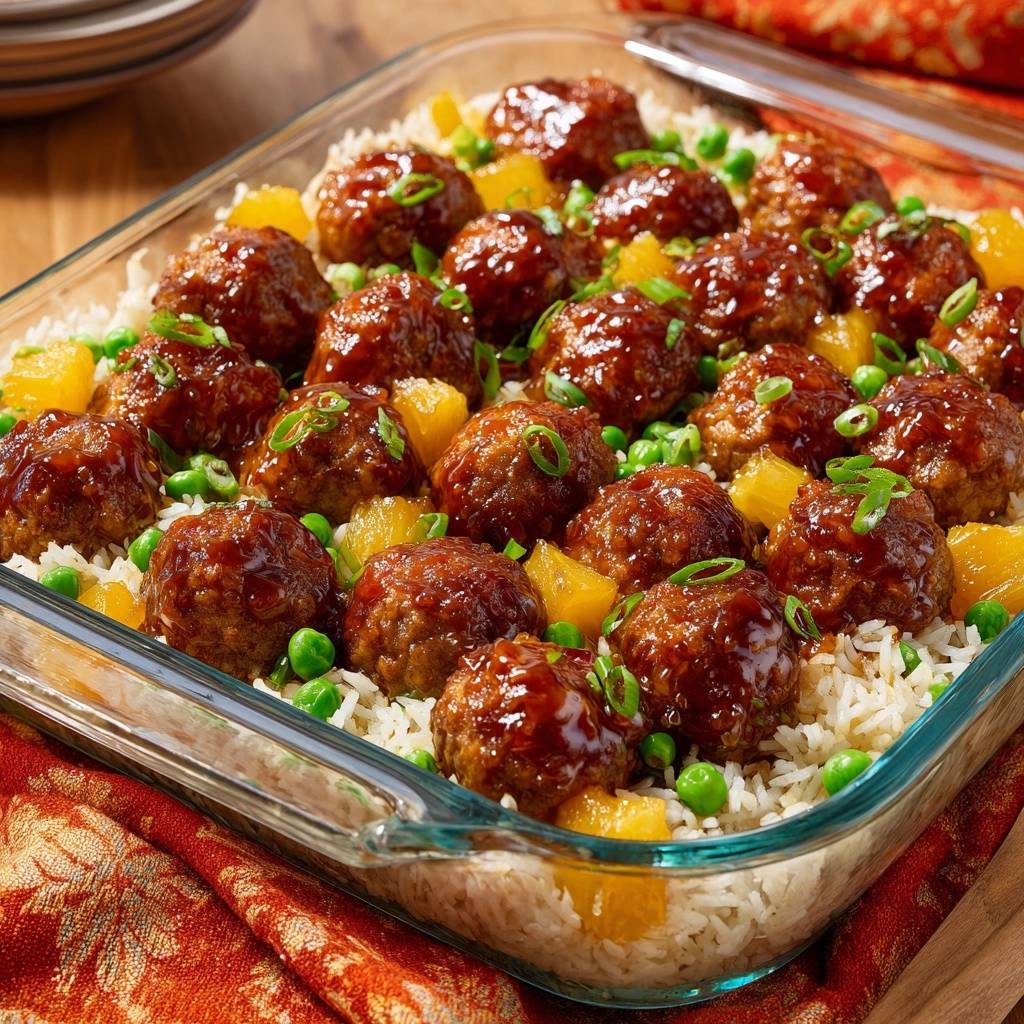
Pineapple Meatball Bake
Course: Main CourseCuisine: AmericanDifficulty: easy6
servings20
minutes35
minutes485
kcal55
MinutesThis oven casserole solves the problem of mushy rice by using a specific par-boiling method. Juicy beef meatballs are glazed with sweet and sour sauce and baked over a bed of rice, peas, and pineapple chunks for a complete family meal.
Ingredients
1.5 lbs ground beef (80/20 blend for juiciness)
1/2 cup Panko breadcrumbs
1 large egg, beaten
2 cups long-grain white rice
1 can (20 oz) pineapple chunks, juice reserved
1 cup frozen peas
3/4 cup high-quality sweet and sour sauce (thick glaze style)
2 tablespoons soy sauce
1 teaspoon garlic powder
1/2 teaspoon ground ginger
2 green onions, thinly sliced on a bias
Salt and black pepper to taste
Directions
- Preheat your oven to 375°F (190°C). Lightly grease a 9×13 inch glass baking dish.
- The Rice Secret: Bring a large pot of salted water to a boil. Add the 2 cups of rice and boil for exactly 6 minutes (par-boiling). Drain immediately and rinse with cold water to stop the cooking. This removes excess surface starch and ensures the rice won’t turn into mush in the oven.
- In a large bowl, combine the ground beef, breadcrumbs, egg, garlic powder, ginger, salt, and pepper. Mix gently by hand until just combined. Do not overwork the meat or the meatballs will be dense.
- Roll the mixture into 1.5-inch meatballs (about 18-20 total).
- Spread the par-boiled rice in an even layer at the bottom of the prepared baking dish. Evenly scatter the frozen peas over the rice.
- In a small bowl, whisk together 1/2 cup of the reserved pineapple juice, the soy sauce, and 1/4 cup of the sweet and sour sauce. Pour this thin liquid evenly over the rice layer. This provides the exact amount of moisture needed to finish the rice grains.
- Arrange the meatballs in rows on top of the rice. Tuck the pineapple chunks into the spaces between the meatballs.
- Using a spoon or brush, coat the top of each meatball generously with the remaining 1/2 cup of thick sweet and sour sauce. This creates the deep mahogany glaze seen in the image.
- Cover the dish tightly with heavy-duty aluminum foil. Bake for 25 minutes.
- Remove the foil. Increase oven heat to 400°F and bake for an additional 10 minutes. This final blast of heat sets the glaze on the meatballs and allows any excess moisture on the surface of the rice to evaporate.
- Garnish with fresh sliced green onions and serve immediately directly from the dish.
Notes
- The secret to non-soggy rice is boiling the rice for exactly 6 minutes before baking. Ensure the dish is sealed tightly with foil to create a steam chamber for the rice to finish cooking perfectly.