
Most home cooks have experienced the disappointment of a homemade feta dip that looks beautiful but feels like wet sand on the tongue. It’s a common frustration because feta is naturally stubborn and crumbly. However, when you nail the technique, you get a dip that is impossibly light, airy, and sophisticated.
The real joy of this Whipped Feta and Garlic Dip lies in the dramatic contrast of temperatures and textures. You have the chilled, tangy cloud of cheese sitting beneath a pool of warm, spicy, honey-kissed garlic oil. It’s a sensory experience that hits every part of your palate at once.
To achieve that restaurant-quality finish, we have to move beyond just “blending” ingredients. The secret is a specific emulsification process that focuses on breaking down the cheese proteins. By following this method, you’ll create a velvet-smooth base that holds its shape perfectly on a piece of warm pita.
The Science of Achieving a Grit-Free Texture
Feta is a high-protein, lower-fat cheese compared to its creamier cousins like brie or mascarpone. Because of its molecular structure, it naturally resists smoothing out when cold. If you toss cold feta into a food processor, the proteins stay tightly bound in tiny, hard clumps that no amount of blending can fully erase.
To fix this, we introduce “buffers” in the form of full-fat Greek yogurt and softened cream cheese. These ingredients act as lubricants that coat the feta proteins. As the blades spin, the cream cheese provides the necessary fat to help the feta particles slide past each other rather than sticking together in grainy clusters.
Temperature is your most important tool here. If your ingredients are cold, the fats stay solid and the emulsion will never truly form. Therefore, you must let your feta, cream cheese, and yogurt sit on the counter until they reach room temperature. This ensures the fats are pliable enough to whip into a stable, airy foam.

Essential Components for the Whipped Feta Base
The foundation of this dish is 8 ounces of high-quality feta cheese. Always look for feta sold in blocks submerged in brine. Pre-crumbled varieties are often coated in anti-caking agents like cellulose, which are designed to prevent clumping but will absolutely ruin your chances of a smooth texture.
Full-fat Greek yogurt is non-negotiable for the necessary acidity and “tang” that cuts through the richness. If you use non-fat yogurt, the dip will likely turn out watery and thin. The yogurt provides the moisture needed to get the food processor blades moving without thinning the dip too much.
Cream cheese serves as the structural stabilizer. While some traditional recipes use only olive oil, the addition of softened cream cheese ensures the dip has a “visual thickness.” It allows the dip to stand tall in the bowl and maintain those beautiful spoon swirls even after sitting out for an hour.
Selecting the Right Olive Oil and Aromatics
Since we aren’t cooking the olive oil at high heat for the base, its natural flavor profile is front and center. Use a high-quality Extra Virgin Olive Oil (EVOO) with grassy or peppery notes. This oil doesn’t just add fat; it carries the aroma of the cheese and helps the dip melt on your tongue.
Fresh garlic is the soul of this recipe. Avoid the pre-minced jars, as they often have a metallic or sour aftertaste. You need the sharp, pungent bite of fresh cloves to balance the heavy fats of the dairy. When sautéed correctly, that sharpness transforms into a mellow, nutty sweetness.
The Crunch Factor: Walnuts and Toasted Seeds
A smooth dip needs a “heavy ring” of texture to keep things interesting. Finely crushed walnuts or toasted sesame seeds provide an earthy, bitter contrast to the salty cheese. This isn’t just a garnish; it’s a functional part of the dish that adds a satisfying snap to every bite.
Smoked paprika is the secret weapon for the topping. It provides a gorgeous golden-red tint to the oil, making it look like liquid jewels. Beyond the color, it adds a subtle wood-fired aroma that makes the garlic and honey topping taste like it was prepared over an open flame.
Step-by-Step: Emulsifying the Feta Base
A food processor is much better than a blender for this recipe. Blenders often require too much liquid to get the blades spinning, which leads to a runny dip. The wide base of a food processor allows the heavy cheese mixture to move freely, ensuring every single grain of feta is pulverized.
The “3 to 4 minute” rule is where most people fail. You might think the dip looks done after sixty seconds, but keep going. At the two-minute mark, the mixture often looks slightly curdled or dull. However, by the four-minute mark, the friction of the blades warms the fats just enough to create a glossy, “stiff peak” consistency.
Stop the motor at least twice during this process to scrape down the sides with a rubber spatula. Feta likes to hide in the corners of the bowl. By forcing those stray bits back into the center, you guarantee that the final product is uniform and free of any hidden lumps.
The Slow Drizzle: Incorporating the Oil
Physics plays a huge role in the fluffiness of your dip. If you dump the olive oil in all at once, the cheese proteins will be overwhelmed, and the oil will simply sit on top. This results in a greasy, separated mess that feels heavy in the mouth.
Instead, keep the motor running and stream the oil in a thread-thin line. This technique traps tiny droplets of fat within the protein matrix of the cheese. You’ll actually see the dip “grow” in volume and turn a shade lighter as it aerates. This stable emulsion is what keeps the dip fluffy for hours.
Infusing the Garlic and Honey Topping
To avoid bitter garlic, use the “cold start” method. Place your minced garlic and olive oil in a cold skillet, then turn the heat to medium-low. This allows the garlic to gently soften and release its oils into the pan as the temperature rises, rather than searing the outside while the inside stays raw.
Watch for the garlic to turn a deep golden brown. Once it looks slightly crisp, stir in the honey, smoked paprika, and red pepper flakes. The oil will immediately take on a vibrant red hue. The honey will thin out and bubble, creating a glossy glaze that coats the walnuts perfectly.
Be careful not to cook the honey for more than 30-60 seconds. You want it to remain a pourable syrup. If it cooks too long, it can become tacky or turn into hard candy once it hits the cold cheese. The goal is a warm, pourable topping that seeps into the crevices of the whipped feta.
Plating for Maximum Visual Impact
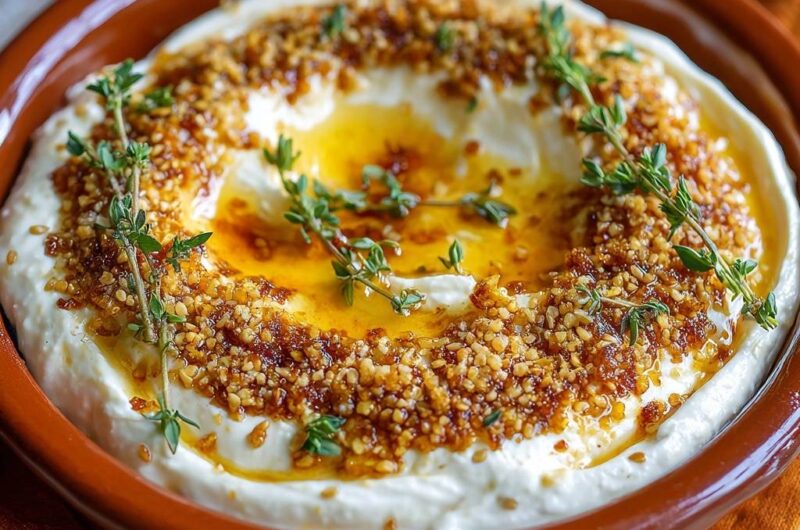
Plating is where you turn a simple dip into a centerpiece. Spread the whipped feta into a shallow bowl rather than a deep one. Use the back of a large spoon to press down in the center, then move the spoon in a circular motion to create a deep well and a wide “trench” around the inner edge.
These architectural valleys aren’t just for looks. They act as reservoirs for the warm garlic oil and honey. By creating these wells, you ensure that every scoop of pita bread captures a perfect ratio of the airy cheese base and the crunchy, spicy topping.
Finally, lay the fresh thyme sprigs across the top. The heat from the garlic oil will slightly wilt the leaves, releasing their herbal oils. This creates an immediate aromatic hit the moment the bowl is placed on the table, signaling to your guests that they’re about to eat something special.
Troubleshooting Common Whipped Feta Issues
If your dip turns out too runny, it’s usually because the yogurt had too much whey or the feta was too wet. Don’t panic. You can fold in an extra tablespoon of softened cream cheese, or simply chill the dip in the fridge for 30 minutes. The fats will firm up as they cool, giving the dip more body.
Bitter garlic is almost always a result of high heat. If you accidentally burn the garlic, it’s best to start the topping over. The bitterness will overwhelm the delicate honey and feta. To prevent this, keep your skillet on the lowest setting possible and move the garlic constantly with a spoon.
If the texture is still grainy after four minutes of blending, your ingredients were likely too cold. You can fix this by letting the processor bowl sit in a warm spot for ten minutes, then processing again. The slight increase in temperature will help the remaining feta solids melt into the cream cheese.
In the rare event the oil separates and the dip looks greasy, you need to re-emulsify. Add a teaspoon of warm water or a tiny bit more yogurt and pulse the processor rapidly. The extra moisture helps the fat droplets “re-hook” onto the proteins, smoothing the mixture back out.
Optimal Pairings for a Mediterranean Spread
While standard crackers work in a pinch, this dip deserves better. Warm, pillowy pita bread is the classic choice. If you have the time, brush the pita with a little olive oil and toast it in a pan until it’s charred in spots. The smoky flavor of the bread mimics the smoked paprika in the dip.
For a crunchier option, try charred sourdough or thick-cut cucumber slices. Persian cucumbers are ideal because they have thin skins and a sweet crunch that balances the saltiness of the feta. Radishes and snap peas also provide a fresh, peppery bite that cuts through the richness of the dairy.
If you’re building a full spread, serve this alongside roasted carrots or charred bell peppers. The natural sugars in roasted vegetables are a dream when paired with the tangy, salty profile of the whipped cheese. It’s a versatile dish that works as well for a casual snack as it does for a fancy appetizer tray.
Storage and Make-Ahead Instructions
You can absolutely make the whipped feta base up to two days in advance. Store it in an airtight container in the refrigerator. Keep in mind that the dip will firm up significantly when cold, so you’ll need to take it out of the fridge about 30 minutes before serving to regain that airy texture.
Never microwave the dip to warm it up. The high heat will cause the cheese to break and turn into a puddle of oil. If you’re in a rush, you can give it a quick 30-second whip in the food processor to incorporate some air back into the chilled base.
For the best results, store the garlic and walnut topping in a separate small container at room temperature. If you store the topping on the dip, the walnuts will lose their crunch and the honey will sink into the cheese. Assemble the dish just before serving to maintain the beautiful contrast of the warm oil and cold dip.
How long does whipped feta stay fresh in the fridge?
You can store the whipped feta base in an airtight container for up to 4 to 5 days. However, the texture is best within the first 48 hours. If the dip separates slightly after sitting, just give it a quick stir with a spoon to bring it back together. Always store the topping separately to keep the nuts crunchy.
Why is my whipped feta grainy?
Graininess usually happens for two reasons: the ingredients were too cold or you didn’t blend it long enough. Feta needs heat from the food processor blades and room-temperature fats to fully break down. Make sure you process the mixture for at least 3 to 4 minutes, even if it looks smooth earlier.
Can I use a different type of nut or seed?
Yes, this recipe is very flexible. If you don’t like walnuts, toasted pine nuts or slivered almonds work beautifully. For a nut-free version, use toasted sesame seeds or hulled sunflower seeds. The goal is to provide a crunchy, earthy element to contrast the creamy cheese.
Can I freeze whipped feta dip?
I don’t recommend freezing this dip. Dairy products like Greek yogurt and cream cheese tend to change texture when frozen and thawed, often becoming grainy or watery. Since it only takes 10 minutes to whip up, it’s much better to make it fresh or keep it in the fridge for a few days.
What can I use if I don’t have a food processor?
If you don’t have a food processor, you can use a high-speed blender, but you may need to stop and scrape the sides more frequently. A hand mixer can work in a pinch if the feta is very soft, but the texture will be more “fluffy and chunky” rather than “velvet-smooth.”
Is there a substitute for honey in the topping?
If you want to avoid honey, maple syrup is a great alternative. It provides a similar sweetness and consistency. If you prefer a savory-only topping, you can omit the sweetener entirely and just use the garlic, oil, and spices, though the honey really helps balance the saltiness of the feta.
If you enjoy working with sweet syrups, you might also appreciate this honey blueberry streusel cheesecake.
Whipped Feta Dip
Course: AppetizerCuisine: MediterraneanDifficulty: easy6
servings10
minutes5
minutes210
kcal15
MinutesA light and airy whipped feta dip that eliminates grainy textures by using cream cheese and specific blending techniques. Topped with a crunchy garlic, honey, and walnut infused oil.
Ingredients
8 ounces high-quality feta cheese (in brine, drained), room temperature
1/2 cup Greek yogurt, full fat
1/2 cup cream cheese, softened (essential for the visual thickness and smoothness shown)
1/4 cup extra virgin olive oil, divided
4 cloves garlic, finely minced
1 tablespoon honey
1/2 cup finely crushed walnuts or toasted sesame seeds (for the heavy textured ring)
1/2 teaspoon smoked paprika (for the golden-red oil tint)
4-5 fresh thyme sprigs
Pinch of red pepper flakes
Directions
- To solve the gritty texture problem, ensure your feta, cream cheese, and yogurt are at room temperature. Place the feta, cream cheese, and Greek yogurt into a food processor.
- Process the mixture for a full 3 to 4 minutes. Stop halfway to scrape down the sides. This extended blending time breaks down the feta proteins and incorporates the cream cheese for a perfectly smooth, thick base that holds its shape.
- While the processor is running, slowly drizzle in 2 tablespoons of the olive oil. This creates a stable emulsion that keeps the dip fluffy.
- In a small skillet over medium-low heat, add the remaining 2 tablespoons of olive oil and the minced garlic. Sauté for 2-3 minutes until the garlic is deeply golden and slightly crisp.
- Stir in the honey, smoked paprika, and red pepper flakes. Add the crushed walnuts (or sesame seeds) directly into the skillet and toss for 30 seconds to coat them in the infused oil. This creates the thick, crunchy topping seen in the image.
- Spread the whipped feta into a shallow bowl. Use the back of a spoon to create a deep circular well in the center and a wide “trench” around the inner edge.
- Spoon the toasted nut and garlic mixture into the circular trench. Pour the remaining golden honey-oil from the pan into the center well.
- Garnish with whole fresh thyme sprigs laid across the top as pictured. Serve immediately with warm pita or crusty bread.
Notes
- Using room temperature ingredients is essential to prevent a gritty texture. The cream cheese provides the necessary thickness and visual smoothness.