Most people have experienced the disappointment of a dessert bar that looks beautiful but collapses into a soggy, limp mess the moment you take a bite. It’s a common frustration with fruit-based blondies because the moisture from the berries often migrates into the crumb, destroying that coveted chewiness. These White Chocolate Cranberry Bliss Bars solve that problem entirely with a specialized “Anti-Soggy Bottom” technique that ensures every square remains sturdy and decadent.
You’ll love the sensory contrast in every mouthful, from the sharp, bright tartness of the cranberries to the buttery richness of the white chocolate. The addition of fresh orange zest provides a citrus aromatic that cuts through the sweetness, creating a balanced flavor profile that far surpasses any coffee-shop version. By carefully managing the ratio of fats to sugars, we create a base that is dense and fudgy rather than cakey or dry.
The secret to this professional-grade texture lies in how we treat the fruit before it ever touches the batter. By creating a structural barrier around the cranberries, we lock in their juices so they don’t bleed into the dough. This small but critical step is what separates a mediocre home bake from a bakery-quality masterpiece that holds its shape even under a thick layer of velvety frosting.
The Chemistry of the Anti-Soggy Bottom Secret
Baking is essentially a series of chemical reactions, and fruit hydration is often the most unpredictable variable. When you toss dried cranberries in a small amount of flour, you are creating a protective coating that serves two purposes. Firstly, it increases the surface friction of the fruit, preventing it from sinking to the bottom of the pan. Secondly, the flour acts as a sponge, absorbing any surface moisture the fruit releases during the heat of the bake.
Sugar also plays a massive role in the final crumb because it is hygroscopic, meaning it attracts and holds onto water. In this recipe, the high concentration of light brown sugar ensures the bars stay moist and chewy for days. However, if the fruit releases too much liquid, the sugar-flour bond breaks down, resulting in that dreaded mushy texture. The flour-coating technique keeps the hydration levels balanced so the crumb remains tight and tender.
Furthermore, the choice to use melted, cooled butter instead of creamed butter is intentional. Creaming butter traps air, which leads to a light, cake-like rise. By using melted butter, we keep the batter dense and heavy. This results in a fudgy, concentrated blondie that provides the perfect structural foundation for the heavy white chocolate cream frosting we’ll add later.
Essential Components for White Chocolate Cranberry Bliss Bars
Success starts with your ingredients, and for these bars, the quality of your flour and fats is paramount. I recommend using standard All-Purpose flour, but be careful not to over-measure. Use the “spoon and level” method rather than scooping directly from the bag, which can pack the flour down and lead to a dry, crumbly bar. The light brown sugar is equally important because its molasses content provides the deep, toffee-like flavor and the essential chewiness.
When it comes to the white chocolate, there is a significant difference between standard baking chips and high-quality couverture chocolate. Baking chips often contain stabilizers to help them hold their shape, while couverture has a higher cocoa butter content. For the frosting, you want that higher cocoa butter percentage to ensure a smooth, glossy finish that sets firmly. If your chocolate feels waxy, it likely has too much palm oil and won’t melt as cleanly.
We use a combination of dried and fresh cranberries for a specific reason. The dried cranberries inside the base provide a concentrated, chewy sweetness that won’t mess with the bake time. The fresh cranberries on top offer a pop of acidity and a beautiful visual contrast. Finally, never skip the orange zest. The natural oils in the zest provide an acidic brightness that prevents the cream cheese frosting from feeling too heavy or cloying on the palate.
Selecting High-Quality White Chocolate
Technically, white chocolate isn’t chocolate at all because it lacks cocoa solids, but it relies heavily on cocoa butter for its flavor and texture. When shopping, check the label for “cocoa butter” as the primary fat source. Avoid brands that list “vegetable oil” or “hydrogenated palm oil” near the top of the ingredients. Real cocoa butter melts at body temperature, which gives the frosting a luxurious mouthfeel and ensures it sets properly in the fridge without becoming oily or separated.
Step-by-Step: Preparing the Blondie Base
Start by whisking your melted butter and sugars together until the mixture looks smooth and glossy. When you add the eggs, you need to whisk vigorously for at least a full minute. You’ll notice the color lighten and the texture become slightly aerated. This creates a very thin, crackly top on the blondie, similar to a high-end brownie, which adds a wonderful textural element to the finished bar.
Once you sift in the dry ingredients, switch to a spatula and fold gently. You want to stop the moment you see the last streak of flour disappear. Over-mixing at this stage develops gluten, which will turn your “bliss” bars into tough, bread-like squares. The batter will be quite thick and heavy, so don’t be alarmed if you have to use a bit of muscle to spread it into the corners of your parchment-lined pan.
Watch the oven closely toward the end of the bake. You are looking for the edges to turn a deep golden brown and pull away slightly from the sides of the pan. The center should still look a bit soft and underdone. If you wait until the center is firm, you’ve over-baked them, and they will lose that fudgy interior as they cool. Using a parchment paper “sling” is vital here; it allows you to lift the entire block out once cooled for perfectly clean cuts.
Technique: Crafting the Stable White Chocolate Ganache Frosting
This frosting is a hybrid between a cream cheese icing and a white chocolate ganache, making it much more stable than what you’d find on a cupcake. The key is to ensure your cream cheese is truly at room temperature before you start. If it’s even slightly cold, the melted white chocolate will seize upon contact, creating tiny, hard lumps of chocolate throughout your frosting that are impossible to smooth out.
Slowly stream the melted (but slightly cooled) white chocolate into the cream cheese while your mixer is running. This “tempering” process allows the fats to emulsify smoothly. The resulting frosting should be thick, opaque, and hold its shape when swirled. It provides a rich, creamy counterpoint to the dense blondie base. If the frosting feels too soft, let it sit for five minutes to allow the cocoa butter to begin firming up before you spread it.
Before you even think about frosting, the blondie base must be completely cold. If there is any residual heat in the bars, the frosting will melt and soak into the base, ruining the distinct layers we’ve worked so hard to create. I often pop the pan into the fridge for twenty minutes before frosting just to be safe. This ensures the white chocolate layer stays sitting proudly on top of the cranberry base.
Achieving the Professional Visual Finish
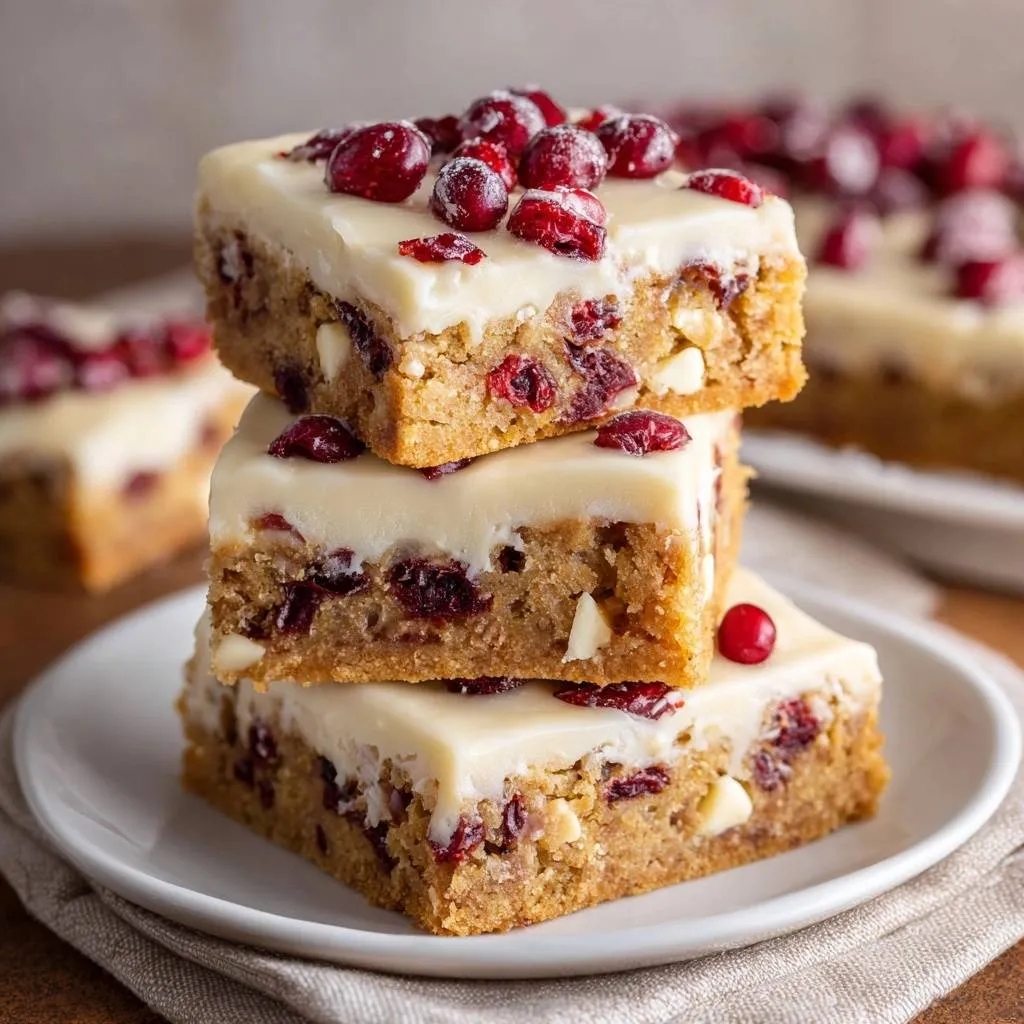
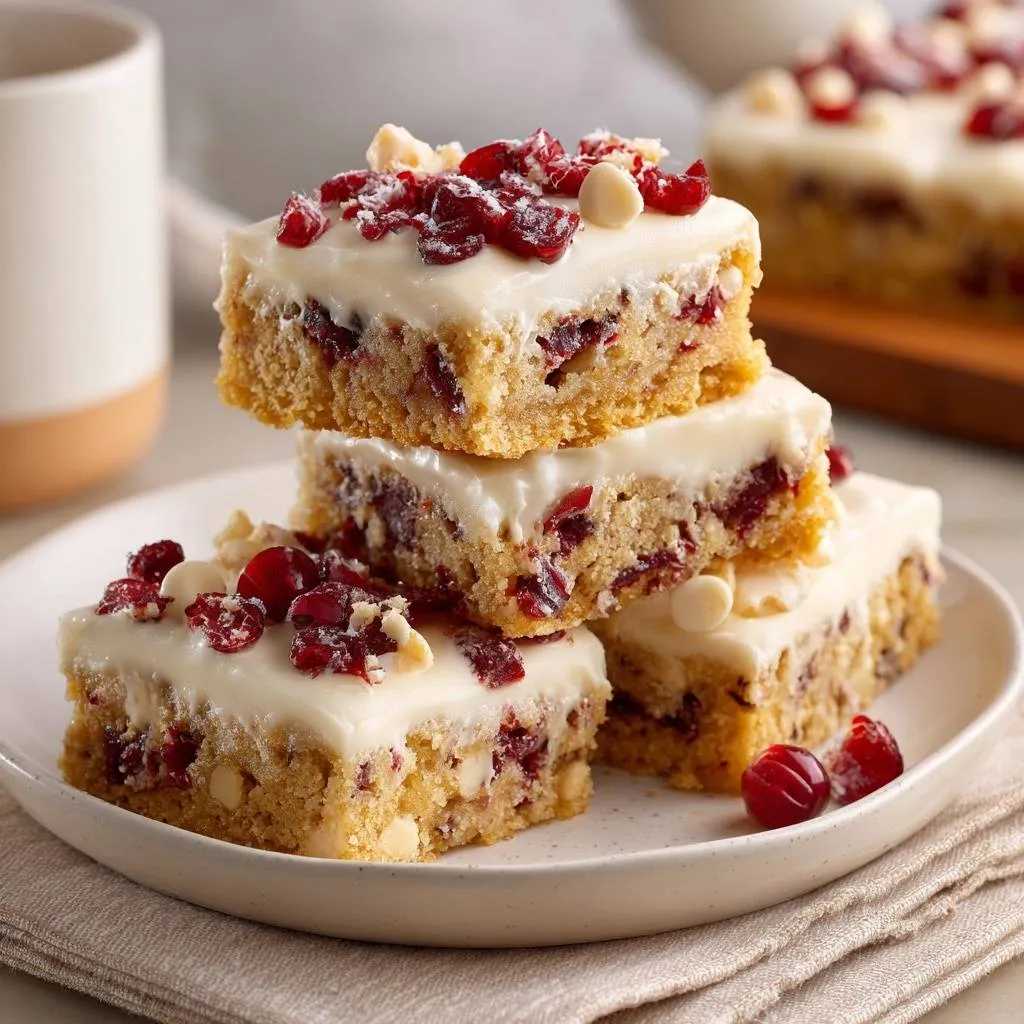
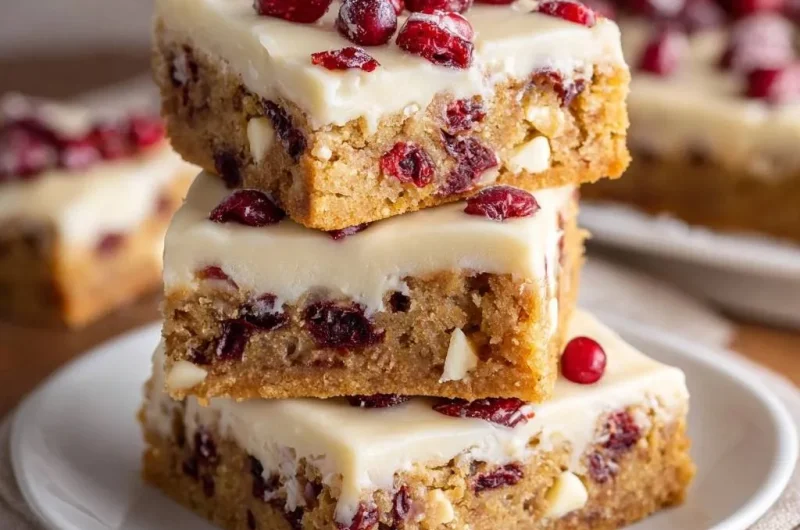
To get that “bakery-case” look, the topping is just as important as the bake. After spreading your frosting, arrange the fresh cranberries on top. To create a beautiful wintry effect, lightly dust the berries with a pinch of granulated sugar. The sugar crystals catch the light and mimic the appearance of frost, making the bars look incredibly festive and high-end without much extra effort.
For a similar texture to this crumble topping, also consider the delicious strawberry cheesecake crumble bars.
Cutting the bars is where many people lose the professional aesthetic. For the sharpest edges, use a long, sharp chef’s knife. Dip the blade into a tall glass of hot water, wipe it dry, and make one clean slice. Repeat the cleaning and dipping process for every single cut. This prevents the frosting from dragging down into the blondie layer, keeping your squares (or triangles) looking crisp and defined.
Troubleshooting Common Baking Hurdles
If your frosting ends up runny, it’s usually due to one of two things: the white chocolate was too hot when added, or you used a low-fat cream cheese spread from a tub. Always use full-fat brick cream cheese for the best stability. If it’s already runny, try chilling the frosting for 15 minutes before spreading it to see if the cocoa butter will set the mixture back up.
Crumbly bars are almost always a result of over-baking or over-measuring the flour. Remember that these bars continue to cook in the hot pan after you pull them out of the oven. If they seem “done” in the center while in the oven, they will be overdone by the time they cool. If your white chocolate seizes while melting, it likely came into contact with a drop of water or was overheated. Always melt white chocolate in short 20-second bursts, stirring well in between.
For a truly fudgy texture in your baking, explore fudgy cocoa brownies.
Storage, Make-Ahead, and Freezing Protocols
Because of the cream cheese in the frosting, these bars must be stored in the refrigerator. They actually taste better on the second day after the flavors have had time to meld together. Place them in an airtight container, using sheets of parchment paper between layers to prevent the frosting from sticking to the bottoms of the bars above them. They will stay fresh and delicious for up to five days.
If you want to make these well in advance, they freeze beautifully. I recommend “flash freezing” the sliced bars on a baking sheet for an hour until the frosting is hard, then wrapping them individually in plastic wrap and placing them in a freezer bag. They will keep for up to three months. When you’re ready to eat, thaw them in the refrigerator overnight. Avoid thawing at room temperature, as the condensation can make the frosting lose its matte finish.
Expert Tips for Flavor Customization
While the classic cranberry and orange combination is hard to beat, you can easily tweak this recipe. Adding half a cup of toasted macadamia nuts to the batter provides a buttery crunch that complements the white chocolate perfectly. If you prefer a different citrus profile, swapping the orange zest for lime zest creates a “cran-lime” flavor that is incredibly refreshing and unexpected.
For a high-contrast visual, you can melt a small amount of dark chocolate and drizzle it in thin lines over the finished frosting. This adds a touch of bitterness that balances the sweet white chocolate. If you’re baking during the winter months, adding a half-teaspoon of ground ginger to the flour mix gives the bars a subtle, spicy warmth that pairs beautifully with the tart cranberries.
Looking for More Sweet Ideas?
Round out your dessert table with these other sweet treats that share a love for satisfying textures and delightful flavors.
- If you enjoy the satisfying crunch of baked goods, you’ll appreciate these Homemade Chocolate Chip Granola Bars.
- For a different kind of comforting bake, consider these Fluffy Diner-Style Pancakes; they offer a soft texture contrast.
Frequently Asked Questions
Can I use frozen cranberries instead of fresh for the topping?
Yes, you can use frozen cranberries, but you must thaw them completely and pat them very dry with a paper towel first. Frozen berries tend to release more juice than fresh ones, which can cause the red color to bleed into your white frosting. If they are dry, they will work perfectly and provide that same signature tartness.
Why do my bars need to chill for 30 minutes before cutting?
The chilling time is essential for the white chocolate in the frosting to set. Because we use melted white chocolate rather than just powdered sugar, the frosting needs a lower temperature to become firm. If you cut them while they are at room temperature, the frosting will squish out the sides, and you won’t get those clean, professional edges.
Can I substitute margarine for the unsalted butter?
I strongly advise against using margarine in this recipe. Margarine has a higher water content and a lower melting point than butter, which will compromise the structural integrity of the blondie. The butter is what gives these bars their rich, fudgy texture and helps the base stay sturdy enough to support the thick layer of frosting.
How do I prevent the white chocolate from burning in the microwave?
White chocolate has a very low burning point because of its high sugar and milk solid content. To melt it safely, use a microwave-safe bowl and heat in 15 to 20-second intervals. Stir the chocolate thoroughly after every interval, even if it doesn’t look melted yet. The residual heat is usually enough to finish the job without scorching the chocolate.
Is there a gluten-free flour blend that works best for this specific density?
A high-quality 1-to-1 gluten-free baking flour that contains xanthan gum works best for this recipe. Because these are dense blondies rather than a light sponge cake, the gluten-free flour mimics the texture quite well. Just be sure to still use the flour-tossing technique for the cranberries to prevent them from sinking in the slightly thinner gluten-free batter.
White Chocolate Cranberry Bars
Course: DessertCuisine: AmericanDifficulty: medium12
servings20
minutes25
minutes450
kcal45
MinutesA premium blondie recipe featuring a chewy base loaded with white chocolate chips and dried cranberries, topped with a stable white chocolate cream cheese frosting and orange zest. The recipe utilizes a flour-coating method for the fruit to maintain perfect texture.
Ingredients
For the Blondie Base:
1 cup unsalted butter, melted and cooled
1 cup light brown sugar, packed
1/2 cup granulated sugar
2 large eggs, room temperature
2 teaspoons vanilla extract
2 1/4 cups all-purpose flour (divided)
1/2 teaspoon salt
1/2 teaspoon baking soda
1 cup white chocolate chips (high quality)
1 cup dried cranberries
For the White Chocolate Cream Frosting:
6 ounces cream cheese, softened
1/2 cup powdered sugar
1/2 cup white chocolate chips, melted and slightly cooled
1 teaspoon orange zest
1/2 teaspoon vanilla extract
For the Topping:
1/2 cup fresh or frozen cranberries (thawed and patted dry)
1 tablespoon granulated sugar (for dusting)
Directions
- Preheat your oven to 350°F (175°C). Line a 9×9 inch square baking pan with parchment paper, leaving an overhang on the sides for easy removal.
- The Anti-Soggy Secret: In a small bowl, toss the 1 cup of dried cranberries with 2 tablespoons of the measured flour. This coating creates a structural barrier that prevents the fruit from sinking to the bottom and absorbing excess moisture, ensuring a perfectly chewy crumb.
- In a large bowl, whisk together the melted butter, brown sugar, and granulated sugar until fully combined and smooth. Add the eggs and vanilla, whisking vigorously for 1-2 minutes until the mixture lightens slightly in color.
- Sift in the remaining flour, salt, and baking soda. Fold gently with a spatula until just a few streaks of flour remain.
- Fold in the flour-coated cranberries and the 1 cup of white chocolate chips. The batter will be thick.
- Spread the batter evenly into the prepared pan, smoothing the top with an offset spatula. Bake for 22-25 minutes. The edges should be golden brown, but the center should still look slightly soft (it will firm up as it cools). Let the bars cool completely in the pan.
- For the Frosting: In a medium bowl, beat the softened cream cheese and powdered sugar until smooth. Slowly stream in the melted white chocolate while beating constantly. Stir in the orange zest and vanilla. This creates the thick, opaque, stable layer seen in the image.
- Spread the frosting in a thick, even layer over the cooled blondies.
- The Visual Finish: Top the frosting with the fresh cranberries. For the professional look shown in the image, lightly dust the top of the berries with a pinch of granulated sugar or powdered sugar to mimic a frosted appearance.
- Chill the bars for at least 30 minutes to set the frosting before lifting the parchment paper out and slicing into squares.
Notes
- The ‘Anti-Soggy Secret’ involves tossing dried cranberries in 2 tablespoons of flour before adding to the batter. Ensure the bars are completely cooled before frosting and chilled for 30 minutes before slicing.