We’ve all been there. You spend an hour carefully measuring ingredients, whisking the perfect batter, and waiting for that heavenly chocolate aroma to fill your kitchen. Then comes the moment of truth: the inversion. You flip the pan, hold your breath, and lift, only to find half of your beautiful cake still glued to the metal. It’s a kitchen heartbreak that can ruin any baker’s day.
This recipe changes the game by focusing on the physics of the release just as much as the flavor of the cake. By using a specialized “Pan Release Paste” instead of standard sprays or flour, you ensure that every intricate ridge of your Bundt pan remains intact. Whether you’re using a classic design or a high-detail modern mold, this method delivers a professional, sharp-edged finish every single time.
For similarly smooth results with filled cookies, see the cheesecake stuffed cookies no-leak method.
The secret to this success isn’t just the paste; it’s the timing. Most people flip too early or wait until the cake is cold, but the sweet spot is exactly ten minutes. This allows the internal structure to firm up enough to hold its weight while the sugars are still warm and fluid. I’ve found that using a silicone pastry brush to apply the cocoa-butter mixture is the only way to guarantee total coverage in those hard-to-reach nooks.
If you appreciate this focus on cake release, you might also enjoy exploring old-fashioned gingerbread cake.
The Chemistry of a Moist Chocolate Crumb
Achieving a crumb that stays moist for days requires a bit of kitchen science. In this recipe, buttermilk plays a starring role. Its natural acidity works to break down long gluten strands, resulting in a tender, almost velvety texture that melts in your mouth. If you notice the batter looks a bit thin, don’t worry; that’s exactly what we want for a tight, moist crumb.
While many traditional cakes rely on butter for flavor, we’re using vegetable oil here. Oil remains liquid at room temperature, which means your cake won’t turn dry or crumbly even after a day or two on the counter. It provides a consistent richness that carries the cocoa flavor beautifully without competing with it.
The final piece of the puzzle is the “blooming” process. By adding hot coffee to the cocoa powder, we dissolve the solids and release trapped flavor compounds. You’ll actually smell the chocolate intensify the moment the hot liquid hits the bowl. This step ensures the deepest possible flavor profile while providing the moisture needed for that signature Bundt density.
Essential Components for the Perfect Bundt
Quality ingredients make a massive difference in a cake this simple. I always recommend using room-temperature eggs and buttermilk. When your ingredients are at the same temperature, they emulsify much more easily, creating a smooth, stable batter that rises evenly in the oven. Cold buttermilk can cause the oil to clump, leading to an uneven bake.
For the cocoa, a standard unsweetened natural cocoa powder works best here. Because we are using baking soda, we need the acidity of natural cocoa to trigger the leavening process. If you use Dutch-processed cocoa, which is neutralized, you might find the cake doesn’t rise quite as high or has a slightly different texture.
Don’t skip the salt! It might seem counterintuitive in a sweet cake, but salt is a flavor enhancer. It cuts through the sugar and highlights the earthy, fruity notes of the chocolate. Use a fine sea salt so it dissolves completely into the batter without leaving any salty “hot spots.”
Why Hot Coffee Outperforms Boiling Water
I often get asked if the coffee makes the cake taste like a mocha. Surprisingly, it doesn’t! The coffee acts as a background supporter, making the chocolate taste more like “itself.” It adds a layer of complexity and earthiness that plain water simply can’t provide.
If you are sensitive to caffeine, you can absolutely use decaf coffee or even a very dark tea. The most important factor is the heat. The liquid must be hot to properly bloom the cocoa and melt the sugar crystals, ensuring a silky batter that flows into every corner of your pan.
Mastering the Foolproof Pan Release Paste
Commercial cooking sprays often contain lecithin, which can build up a sticky residue on your pans over time. Flouring a pan often leaves a white, dusty film on the outside of a dark chocolate cake, which looks unappealing. Our cocoa-butter paste solves both problems simultaneously.
By mixing equal parts melted butter and cocoa powder, you create a hydrophobic barrier. This means the moisture in the cake won’t soak into the pan’s surface. The cocoa powder in the paste blends perfectly with the cake’s exterior, leaving you with a dark, matte, and professional finish that looks like it came from a high-end bakery.
This paste is especially vital for vintage cast aluminum pans or newer, highly decorative molds. It fills in the microscopic pores of the metal, creating a slick surface that the cake simply cannot grip. It’s a small extra step that saves you from the frustration of a ruined dessert.
Applying the Coating to Intricate Designs
When you’re applying the paste, think of it like painting a masterpiece. Use a pastry brush to work the mixture into every single groove. You want a thin, even coat. If you see the paste “pooling” in the deep points of the pan, brush it out. Excess paste can actually “fry” the edges of the cake, leading to a greasy or pitted texture.
I like to do this step right before I mix the wet and dry ingredients. This gives the butter a moment to slightly firm up on the cool metal of the pan, ensuring it stays exactly where you put it when the batter is poured in.
Step-by-Step: Mixing and Aerating the Batter
Start by whisking your dry ingredients in a large bowl. You want to make sure there are no large clumps of cocoa or baking soda. Once that’s done, add your buttermilk, oil, eggs, and vanilla. Beat this on medium speed. You’ll see the batter go from a dusty brown to a thick, glossy chocolate paste.
Now comes the careful part. Turn your mixer to the lowest setting and slowly stream in the hot coffee. Go slow so you don’t splash yourself or “scramble” the eggs with the heat. The batter will become very thin and liquid—this is exactly what you want. It should look like a thick chocolate milk.
Pour the batter into your prepared pan slowly. I like to pour it into one spot and let it flow naturally around the ring. This helps prevent air pockets from getting trapped in the decorative bottom of the pan. Give the pan a firm tap on the counter once it’s filled to pop any stubborn bubbles.
Precision Baking and the Critical Cooling Window
Place your pan on the middle rack of the oven. This ensures the heat circulates evenly around the tube of the Bundt pan. If the rack is too high, the top (which becomes the bottom) will burn before the center is done. Start checking for doneness at the 45-minute mark using a long wooden skewer.
Once the skewer comes out clean or with just a few moist crumbs, remove the cake from the oven. Now, set a timer for 10 minutes. This is the most important part of the process. During these 10 minutes, the cake’s structure sets as it begins to pull away slightly from the edges of the pan.
If you try to flip it immediately, the cake is too fragile and will likely break. If you wait until it’s cold, the sugar will have cooled and acted like a glue, sticking the cake to the metal. Ten minutes is the “Goldilocks” zone for a perfect release.
The Inversion Technique for Clean Lines
After the 10 minutes are up, give the pan a few gentle taps on the kitchen counter. You might even hear a slight “thump” as the cake releases. Place a wire cooling rack over the top of the pan, then quickly and confidently flip the whole thing over.
Lift the pan straight up. If you feel resistance, stop! Set it back down and give the sides another gentle tap. Usually, with the cocoa-butter paste, the cake will slide out effortlessly, revealing all those beautiful, sharp lines you worked so hard for.
Troubleshooting Common Bundt Baking Obstacles
If your cake “domes” too much in the oven, it can make the cake sit crooked on the plate. You can gently press down on the dome with a clean kitchen towel immediately after taking it out of the oven to flatten it. Alternatively, once it’s flipped, you can trim the bottom with a serrated knife so it sits level.
If your cake collapses, it’s often due to expired baking soda or over-mixing the batter once the flour is added. Over-mixing creates too much gluten, which traps air that then escapes, causing the cake to fall. Keep your mixing to a minimum once the wet and dry ingredients meet.
For a leaking pan, which sometimes happens with two-piece Bundt pans, place a baking sheet on the rack below to catch any drips. However, this batter is thick enough that it usually stays put in any standard one-piece Bundt mold.
Storage Solutions and Make-Ahead Instructions
This is one of those rare cakes that actually tastes better on the second day. The oil-based crumb absorbs the moisture from the air, making it even fudgier. Keep it under a cake dome or wrapped tightly in plastic wrap at room temperature for up to three days.
If you want to freeze it, this cake handles the cold beautifully. Wrap the entire cooled cake in a double layer of plastic wrap and then a layer of foil. It will stay fresh for up to three months. Just thaw it at room temperature while still wrapped to keep the moisture inside.
For individual treats, freeze slices on a baking sheet before wrapping them. This way, you can pull out a single piece whenever a chocolate craving hits. A quick 15-second zap in the microwave makes it taste like it’s fresh out of the oven.
Expert Tips for Professional Presentation
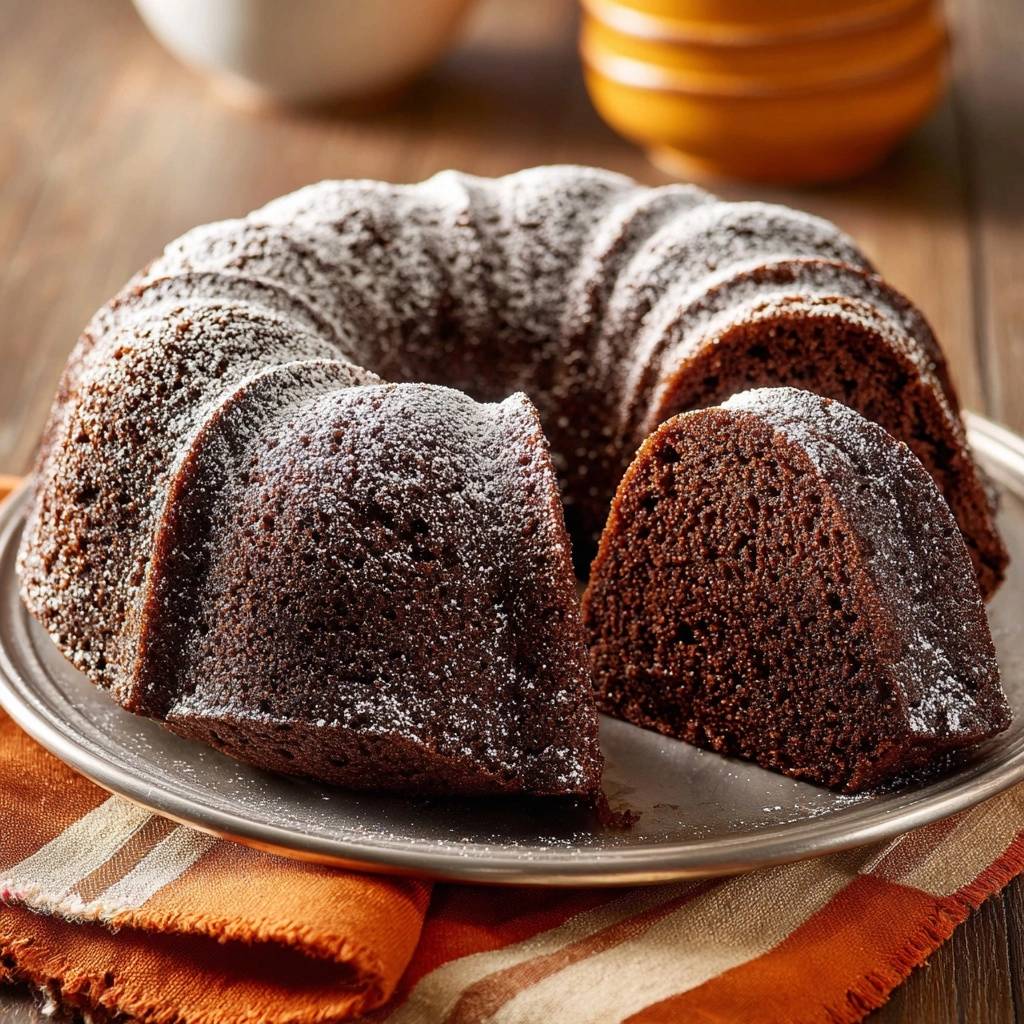
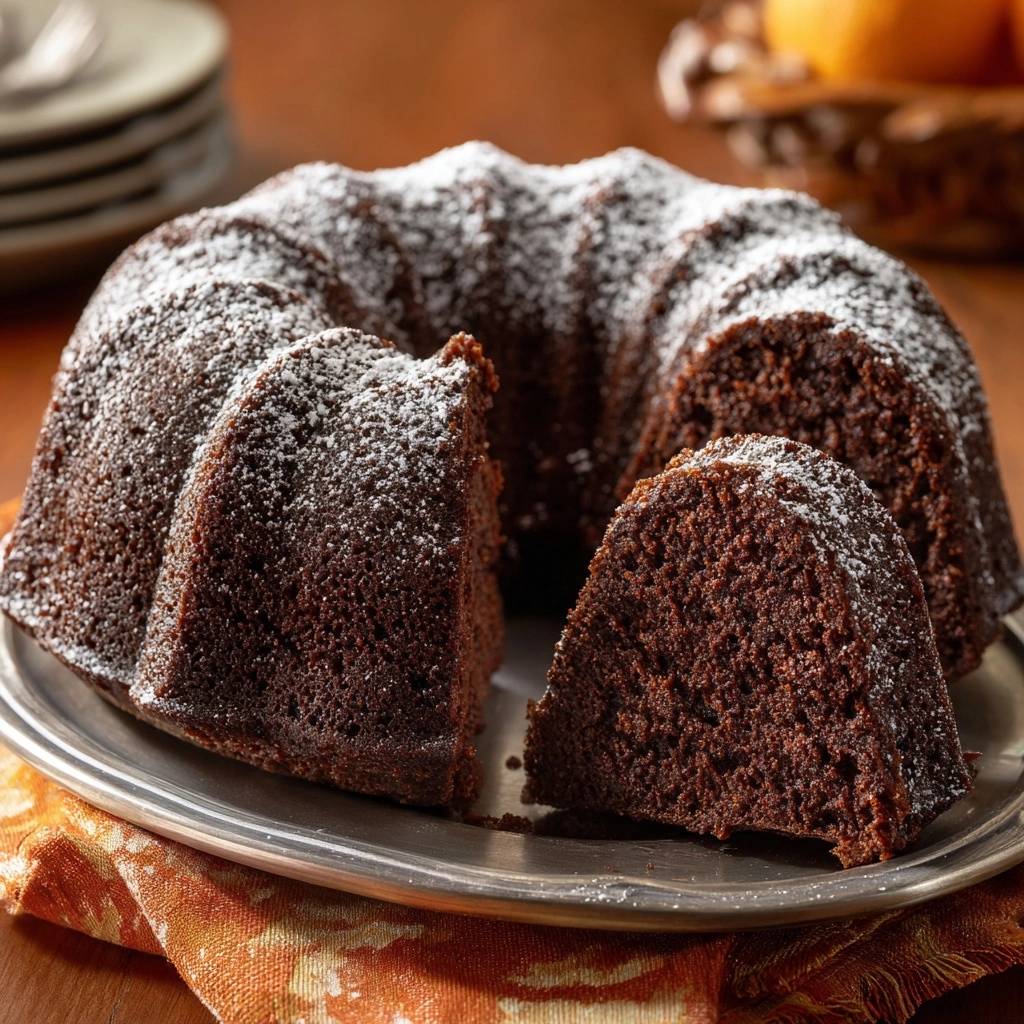
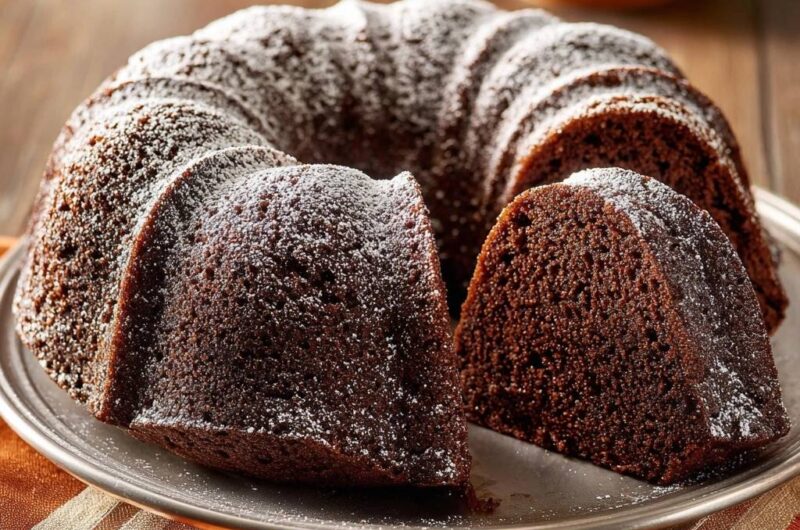
While a simple dusting of powdered sugar is classic, you can easily elevate the look. A simple chocolate ganache made with equal parts warm cream and chocolate chips can be drizzled over the top for a dramatic “drip” effect. The dark glaze against the matte cake looks stunning.
Complementary Flavors
Enjoying this chocolate Bundt cake might inspire you to explore other sweet creations. Consider these recipes for more delightful baked goods.
- For a delightful morning treat or afternoon snack, try these glazed carrot walnut muffins, offering a different texture and warm spice notes.
- If you enjoy citrus and sweet pairings, give these glazed orange creamsicle cookies a try for a bright, refreshing flavor.
When it comes time to serve, use a long, thin serrated knife. Use a gentle sawing motion rather than pressing down hard. This preserves the decorative shape of each slice and prevents the moist crumb from being squashed. Serve it with a dollop of whipped cream or a few fresh raspberries to balance the deep chocolate flavor.
Frequently Asked Questions
Can I use a different pan size for this recipe?
This recipe is designed for a standard 10-12 cup Bundt pan. If you use a smaller 6-cup pan, you will have enough batter for two cakes or several mini-Bundts. Just be sure to adjust the baking time down to about 25-30 minutes for smaller pans. Never fill a Bundt pan more than two-thirds full, or it will overflow and create a mess in your oven.
My cake turned out dry; what went wrong?
The most common culprit for a dry cake is over-baking. Every oven is different, so start checking your cake 5-10 minutes before the recipe suggests. Another possibility is “packing” your flour. When measuring flour, spoon it into the measuring cup and level it off with a knife. If you scoop directly with the cup, you can end up with 25% more flour than needed, which dries out the crumb.
Can I substitute the buttermilk if I don’t have any?
Yes, you can make a quick substitute at home. Measure one cup of regular milk and remove one tablespoon. Replace that tablespoon with either white vinegar or lemon juice. Let it sit for about 5-10 minutes until it looks slightly curdled. This provides the necessary acidity to react with the baking soda and tenderize the cake just like real buttermilk would.
Why did my cake stick even though I used the paste?
If you used the paste and it still stuck, check the condition of your pan. If the non-stick coating is scratched or worn away, even the best paste can struggle. Also, ensure you didn’t let the cake cool for longer than 15 minutes. As the cake cools completely, the sugars solidify and act like a glue. If it does get stuck, try putting it back in a warm oven for 2-3 minutes to soften the sugars before trying to flip again.
Is the coffee flavor mandatory for this recipe?
The coffee flavor is not mandatory, but the heat is. If you prefer not to use coffee, simply use one cup of boiling water. The heat is required to “bloom” the cocoa powder, which intensifies the chocolate flavor and ensures a smooth batter. You won’t get the same depth of flavor as you would with coffee, but the texture of the cake will remain perfectly moist and delicious.
Chocolate Bundt Cake
Course: DessertCuisine: AmericanDifficulty: medium12
servings15
minutes50
minutes340
kcal65
MinutesThis professional bakery-style chocolate cake uses a hot coffee bloom technique for deep flavor and a specific pan-release paste made of butter and cocoa to ensure every detail of the bundt design remains intact.
Ingredients
2 cups all-purpose flour
2 cups granulated sugar
3/4 cup unsweetened cocoa powder
2 teaspoons baking soda
1 teaspoon baking powder
1 teaspoon salt
1 cup buttermilk, room temperature
1/2 cup vegetable oil
2 large eggs, room temperature
2 teaspoons vanilla extract
1 cup hot coffee (or hot water)
2 tablespoons melted butter mixed with 2 tablespoons cocoa powder (for pan prep)
Powdered sugar for dusting
Directions
- Preheat your oven to 350 degrees F.
- Prepare the pan release paste by mixing the 2 tablespoons of melted butter with 2 tablespoons of cocoa powder. Use a pastry brush to coat every single nook and cranny of your Bundt pan. This cocoa-butter barrier is the secret to a clean release without the white floury residue.
- In a large bowl, whisk together the flour, sugar, cocoa powder, baking soda, baking powder, and salt.
- Add the buttermilk, oil, eggs, and vanilla. Beat on medium speed until well combined.
- Reduce speed to low and carefully pour in the hot coffee. This “blooms” the cocoa for a deeper flavor and creates a thin batter that ensures a moist crumb.
- Pour the batter into the prepared pan. Bake for 45 to 55 minutes, or until a toothpick inserted into the center comes out clean.
- This is the critical step for the hook: Let the cake cool in the pan for exactly 10 minutes. Too short and the structure is too weak; too long and the sugar begins to “glue” to the sides.
- Gently tap the pan on the counter to loosen the edges, then invert onto a wire rack. The cake will slide out effortlessly.
- Once completely cool, dust with powdered sugar and serve.
Notes
- The secret to success is cooling the cake for exactly 10 minutes before inverting. Using hot coffee instead of water helps bloom the cocoa powder for a richer chocolate taste.