
Why Old-Fashioned Raisin Pie Endures
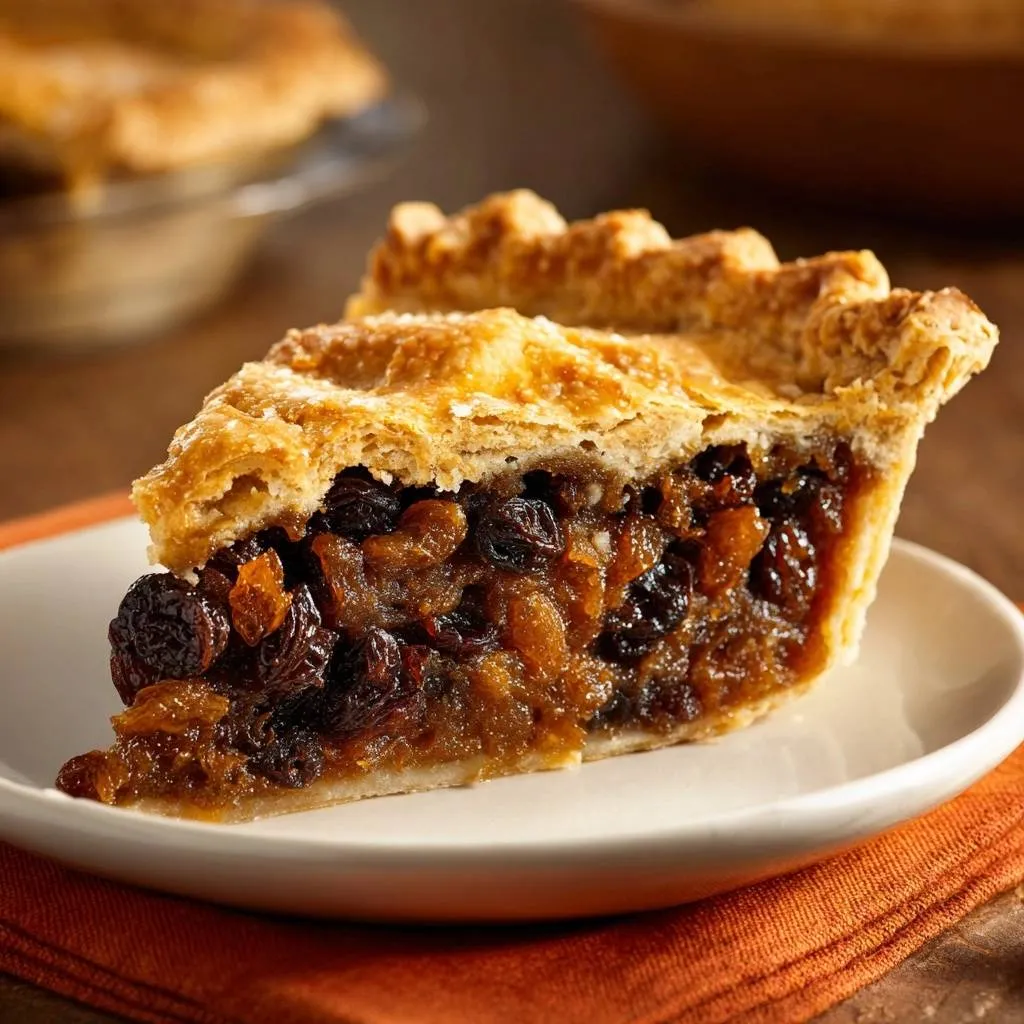
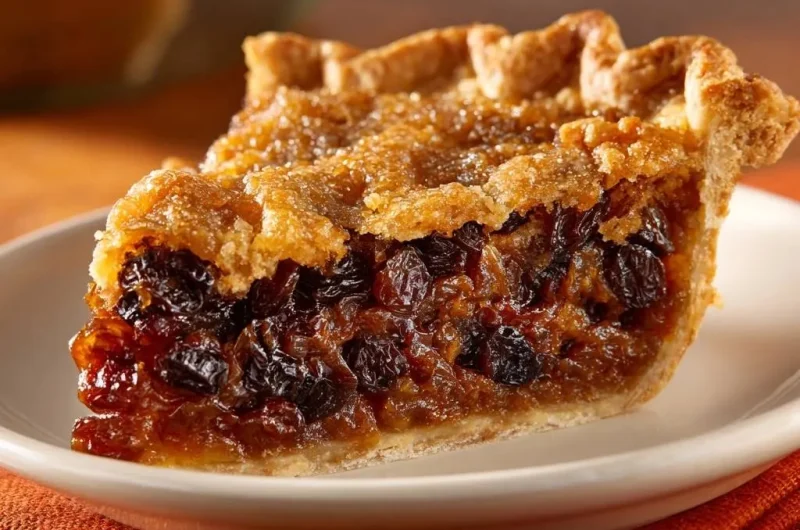
Picture this: a slice of old-fashioned raisin pie where the crust shatters into flaky layers from top to bottom, no soggy mess in sight. You’ve probably bitten into versions that disappoint with a mushy bottom. This recipe fixes that forever by cooking the filling on the stovetop first.
That’s why it endures. Raisins, those humble pantry gems, shine in Depression-era desserts when fresh fruit was scarce. Folks stretched budgets with this sweet, sticky treat that feels like a warm hug.
Here’s the pro tip that proves it works: chill the stovetop filling for 30 minutes. That step locks in thickness so steam doesn’t wreck your bottom crust. Oh man, the first bite melts with plump raisins and crisp perfection.
For a similar citrusy sweetness, check out these glazed orange creamsicle cookies.
History of Old-Fashioned Raisin Pie Recipes
Raisin Pie in Early American Kitchens
Pioneers loved old-fashioned raisin pie because raisins traveled well on wagon trains. Unlike finicky apples or cherries, they stored forever without spoiling. So, families baked this pie for special Sundays, filling homes with that cozy cinnamon-like aroma from the fruit itself.
Evolution to Stovetop Filling Technique
By the 19th century, American cookbooks featured raw raisin fillings, but wartime cooks adapted. They pre-cooked on the stovetop to thicken and evaporate moisture. Therefore, this method modernizes tradition, delivering flaky crust every time without losing that authentic chew.
Key Ingredients for Flawless Old-Fashioned Raisin Pie
Plumping Raisins for Texture
Thompson seedless raisins work best in old-fashioned raisin pie. They plump beautifully when simmered in water and sugar, turning chewy and juicy. Skip super-dried ones; they stay tough.
Sugars and Acids in Balance
Granulated sugar keeps things smooth, while brown sugar adds molasses depth to old-fashioned raisin pie. Lemon juice cuts the sweetness with bright zing, preventing a cloying bite. Don’t skip it, or the filling tastes flat.
Raisins form the heart of old-fashioned raisin pie. They soak up that sweet water boil, swelling into tender bursts. Use 2 cups for plump texture without overwhelming the pie.
Flour thickens everything perfectly. Its 3 tablespoons create a jam-like consistency when heated. In addition, fresh lemon juice brightens the mix, balancing sugars so you get sweet-tart harmony.
Don’t overlook the butter and egg wash. Cold butter dotted on top melts into richness. The beaten egg gives a shiny, golden crust, while coarse sugar adds crunch. Pro tip: unsalted butter prevents over-salting.
No raisins? Try chopped dates, but adjust sugar down. Store-bought crusts save time, but homemade yields flakier results with cold ingredients.
Science of Crisp Crust in Raisin Pie
Starch Gelatinization Prevents Sogginess
Flour’s starches in the filling swell with heat during stovetop cooking for old-fashioned raisin pie. Cooling then sets that gel, trapping moisture. So, no soggy bottom crust sneaks in.
High-Heat Baking for Flake
Start at 425°F to trigger Maillard browning on top crust in raisin pie. Drop to 375°F for even cooking. Egg wash proteins crisp up beautifully under that heat.
Steam ruins most raisin pies, but not this one. The stovetop step evaporates excess water first. Then, chilling the filling prevents hot moisture from softening the dough during baking.
Cold fat in the crust creates those flaky layers. High initial heat sets the structure fast. Therefore, you end up with shatteringly crisp edges and a tender middle.
For another take on a great crust, check out our creamy lemon crumble bars.
Equipment Choices for Raisin Pie Success
Grab a heavy 9-inch metal pie plate for even heat in old-fashioned raisin pie. Glass works too, but metal crisps faster. A wire rack is key for cooling; it lets steam escape from below.
Medium saucepan handles the stovetop filling smoothly. Use a pastry brush for even egg wash and a sharp knife for vents. No fancy tools needed. In addition, chill your rolling pin if dough fights back.
Phase 1: Stovetop Raisin Filling Mastery
Combine 2 cups raisins, 1 1/2 cups water, 1 cup granulated sugar, 1/4 cup brown sugar, 3 tablespoons flour, 1 tablespoon lemon juice, and 1/4 teaspoon salt in a saucepan. Heat over medium, stirring constantly. You’ll see it bubble and thicken into glossy jam after 8 to 10 minutes. That sweet, fruity smell fills your kitchen.
Keep stirring to avoid lumps. The mixture transforms from watery to thick, coating your spoon. Pro tip: if it doesn’t boil, cook longer for foolproof thickness.
Phase 2: Cooling and Chilling Strategy
Stir in 1 teaspoon vanilla and 2 tablespoons butter off heat. Let it cool to room temp, then fridge for 30 minutes. Chilling solidifies the starches, so no steam sogs your crust later.
This step saves your pie. Skip it, and you’ll regret the mush. However, you can prep ahead; it holds in the fridge up to 2 days.
Phase 3: Assembling Old-Fashioned Raisin Pie
Fit one unbaked 9-inch crust into your pie plate, pressing gently. Spoon in the chilled filling. Top with the second crust, crimp edges tightly, and cut 4 to 5 vents for steam escape.
Brush with beaten egg for shine, then sprinkle 2 tablespoons coarse sugar. Even crimps seal everything in. Feel the dough’s chill; it promises flakiness.
Phase 4: Baking for Golden Perfection
Bake at 425°F for 15 minutes, then drop to 375°F for 25 to 30 more until deep golden. Place on the lower oven rack for crisp bottom. Cool on a wire rack 2 hours minimum; it sets the filling firm.
If edges brown too fast, tent with foil. The aroma hits peak deliciousness around 30 minutes. Patience here rewards every slice.
Avoiding Soggy Crust in Raisin Pie
Runny Filling Fixes
Runny old-fashioned raisin pie filling means undercooked stovetop phase. Rework leftovers by simmering 5 more minutes with 1 teaspoon cornstarch slurry. Chill again before rebaking.
Crust Browning Control
Burning edges on raisin pie? Crimp a foil ring around them after 20 minutes. It shields without steaming the crust soft.
Soggy crust plagues old-fashioned raisin pie makers. Usually, it’s skipping the chill or raw filling. Stir constantly on stovetop, and always cool fully. Under-baking leaves doughy spots, so check for deep gold.
Uneven crimps let steam leak wrong. Press firmly and twist. Therefore, your pie holds shape and stays crisp longest.
Flavor Twists on Classic Raisin Pie
Add 1/2 teaspoon cinnamon or nutmeg to the stovetop mix for spice in old-fashioned raisin pie. Swap lemon for orange juice for citrus pop. Mix golden and dark raisins for varied chew.
Stir in chopped walnuts after cooling for crunch. Reduce sugars by 1/4 cup if you like tart. Keep the crisp method intact; it elevates every twist.
Make-Ahead Guide for Raisin Pie
Make filling 2 days ahead; store covered in fridge. Assemble and freeze unbaked pies up to 3 months. Thaw overnight, then bake as directed.
Room temp holds 2 days max. Fridge lasts 5 days in airtight container. Freeze slices individually; thaw and reheat at 350°F for 15 minutes on a rack to revive crispness.
Pairing Sides with Old-Fashioned Raisin Pie
Serve warm old-fashioned raisin pie with vanilla ice cream for creamy contrast. Sharp cheddar slices add savory tradition. Whipped cream lightens the richness.
Black coffee cuts the sweet. Herbal tea warms it up. Fresh apple slices on the side echo pioneer roots.
What to Pair with Your Raisin Pie
Enjoying a slice of Old-Fashioned Raisin Pie with Crisp Crust is even better with these complementary treats.
- For a warm, spiced addition, consider making this Honey Pumpkin Bread, perfect for a cozy fall feel.
- If you’re leaning towards breakfast flavors, whip up some Fluffy Diner-Style Pancakes to enjoy alongside your pie.
Troubleshooting Old-Fashioned Raisin Pie Issues
Store-Bought Crust Compatibility
Yes, store-bought crust shines in old-fashioned raisin pie. Chill it 15 minutes before filling to firm up. Follow the recipe’s bake temps for flaky results.
Vegan and Gluten-Free Swaps
For vegan old-fashioned raisin pie, use plant butter and aquafaba for egg wash. Gluten-free? Swap a 1:1 flour blend in filling and GF crust dough. Crisp method still works perfectly.
How do I store leftovers of Old-Fashioned Raisin Pie?
Keep old-fashioned raisin pie in an airtight container at room temp for 2 days max. Refrigerate up to 5 days; cover loosely to avoid softening. It freezes well whole or sliced for 3 months. Thaw in fridge overnight, then warm at 350°F on a rack 10-15 minutes. Crust stays crisp if you avoid microwaving.
Why is my Old-Fashioned Raisin Pie crust soggy?
Soggy crust in old-fashioned raisin pie usually comes from skipping the stovetop cook or chill. Moisture steams the bottom during baking. Fix it next time by boiling the filling until thick and fridge-chilling 30 minutes. Also, bake on the lower rack and cool fully on a wire rack for air flow.
Can I substitute ingredients in Old-Fashioned Raisin Pie?
No raisins? Use chopped dates or dried cranberries, but simmer longer for plumpness. Out of lemon juice? White vinegar works, 1 tablespoon. Brown sugar swap: all granulated, but lose some depth. For less sweet, cut total sugar by 1/4 cup. Crust-wise, puff pastry mimics flakiness in a pinch.
Why is my filling runny after baking?
Runny filling means the stovetop didn’t thicken enough. Starch needs full boil and constant stirring for 8-10 minutes. If it happens, cool scraps, mix in 1 teaspoon cornstarch with water, re-simmer to glossy, chill, and remake the pie. Test thickness by coating a spoon.
How can I make mini Old-Fashioned Raisin Pies?
Scale filling by half for 12 muffins tins lined with crust. Bake at 425°F 10 minutes, then 375°F 15-20 more. Chill filling same way. Perfect for parties; they set faster so cool just 1 hour. Top with extra coarse sugar for bite-sized crunch.
Raisin Pie
Course: DessertCuisine: AmericanDifficulty: medium8
servings20
minutes45
minutes450
kcal180
MinutesTired of raisin pie with a mushy bottom crust? This method cooks the filling stovetop first to thicken it, then chills before assembly for flaky layers top to bottom.
Ingredients
2 unbaked 9-inch pie crusts (store-bought or homemade)
2 cups raisins
1 1/2 cups water
1 cup granulated sugar
1/4 cup packed brown sugar
3 tablespoons all-purpose flour
1 tablespoon lemon juice
1 teaspoon vanilla extract
1/4 teaspoon salt
2 tablespoons unsalted butter, cut into small pieces
1 egg, beaten (for egg wash)
2 tablespoons coarse sugar (turbinado or demerara), for sprinkling
Directions
- In a medium saucepan over medium heat, combine raisins, water, granulated sugar, brown sugar, flour, lemon juice, and salt. Cook, stirring constantly, until mixture thickens and boils, about 8 to 10 minutes. This stovetop step evaporates excess moisture and creates a glossy, jam-like filling that wont seep into the crust.
- Remove from heat, stir in vanilla and butter. Let cool completely at room temperature, then chill in fridge for 30 minutes. Cooling locks in the thick texture, preventing any steam from soggifying the bottom crust during baking.
- Preheat oven to 425 degrees F. Fit one pie crust into a 9-inch pie plate, pressing gently into bottom and sides.
- Spoon chilled filling into crust. Top with second crust, crimp edges to seal, and cut 4 to 5 vents. Brush top with beaten egg for golden shine, then sprinkle evenly with coarse sugar.
- Bake 15 minutes at 425 degrees F, then reduce to 375 degrees F and bake 25 to 30 minutes more until crust is deep golden and flaky. Cool on wire rack at least 2 hours before slicing to set fully.
- Serve warm or at room temp. Each bite delivers plump raisins in sticky-sweet filling cradled by shatteringly crisp crust.
Notes
- Cool on wire rack at least 2 hours before slicing to set fully. Serve warm or at room temperature.