For years, the dream of serving picture-perfect, intact enchiladas was often crushed by a soggy reality. I’ve personally battled the frustration of tortillas falling apart, but I’ve finally cracked the code to truly perfect beef enchiladas that hold their shape and deliver incredible flavor in every single bite.
This recipe isn’t just another enchilada guide; it’s a revolutionary approach to ensure your tortillas remain tender yet sturdy, brimming with a rich, savory filling without any mushy disappointment. Get ready to elevate your Tex-Mex game and create the ultimate homemade enchiladas.
Beyond Basic: Why Our Perfect Beef Enchiladas Win Every Time
The “No-Soggy Tortilla” Revolution: Your Secret Weapon
The hallmark of these perfect beef enchiladas is our unique “dip and fry” technique for the corn tortillas. This quick step creates an essential barrier against the sauce, preventing them from becoming waterlogged.
It ensures your enchiladas stay beautifully structured and satisfyingly tender, setting this recipe apart from the rest.
Flavorful Filling, Every Bite
Our beef enchilada filling is meticulously seasoned, blending aromatic spices with savory ground beef and softened onions and garlic. Every forkful offers a balanced, deeply satisfying taste experience.
It’s the kind of rich, comforting flavor that makes homemade enchiladas truly unforgettable.
Easy to Follow, Impressively Delicious
Despite its impressive results, this recipe for perfect beef enchiladas is surprisingly straightforward. We’ve broken down each step into simple, actionable instructions.
Home cooks of all skill levels can confidently create a restaurant-quality Tex-Mex dinner that will delight everyone at the table.
What You’ll Need: Ingredients for Flawless Enchiladas
The Heart of the Meal: Beef and Aromatics
Ground Beef: Opt for an 80/20 lean-to-fat ratio for the best flavor without excessive grease. The fat renders down, infusing the spices with rich beefy notes.
Yellow Onion & Garlic: Finely dicing the yellow onion ensures it melts seamlessly into the filling, providing a subtle sweetness. Freshly minced garlic is always superior for vibrant flavor.
Chili Powder, Cumin, Oregano: These classic Tex-Mex spices are non-negotiable for authentic flavor. Use high-quality, fresh spices for maximum aromatic impact.
Salt & Pepper: Season generously throughout the cooking process. Tasting and adjusting is key to a perfectly balanced beef enchilada filling.
The Tortilla Foundation: Corn Tortillas
Corn Tortillas (6-inch): Corn tortillas are traditional for enchiladas, offering a robust flavor and texture that flour tortillas simply can’t replicate. Their slight corn flavor pairs beautifully with the rich filling.
Look for fresh, pliable tortillas. Stale tortillas are more prone to cracking during the rolling process, even with our special treatment.
For similarly pliable results, learn the secret to savory beef enchiladas.
Saucy & Cheesy Layers
Red Enchilada Sauce: A good quality red enchilada sauce is crucial. You can use your favorite store-bought brand or make it from scratch for an extra layer of depth.
Its vibrant flavor blankets the enchiladas, adding moisture and spice.
Shredded Monterey Jack or Mexican Blend Cheese: These cheeses melt beautifully, creating that irresistible gooey, stretchy texture. Their mild, creamy flavor complements the beef and sauce without overpowering them.
Essential Garnishes for Freshness
Diced White Onion: A sprinkle of fresh white onion adds a crisp, sharp contrast to the rich enchiladas. It provides a delightful textural crunch and a zesty bite.
Chopped Fresh Cilantro: Bright, herbaceous cilantro is the perfect finishing touch. Its fresh, citrusy notes cut through the richness, elevating the overall flavor profile of your homemade enchiladas.
Gathering Your Gear: Essential Tools for Perfect Enchiladas
Having the right tools makes the enchilada-making process smooth and enjoyable. These are the essentials you’ll need for this beef enchilada recipe.
The Skillet Stars
Large Skillet: Essential for browning the ground beef and developing the rich flavors of your filling. A cast-iron or heavy-bottomed skillet works best for even heat distribution.
Small Skillet: This is critical for our “dip and fry” tortilla technique. Its smaller size helps maintain a consistent oil temperature for quickly warming the tortillas.
Baking Dish & Utensils
9×13 Inch Baking Dish: The standard size for baking a batch of 10-12 enchiladas. Choose a ceramic or glass dish for even baking.
Shallow Dish: Perfect for dipping your tortillas into the enchilada sauce. A pie plate or a shallow bowl works wonderfully.
Basic Kitchen Utensils: Spoons, spatulas, and measuring cups are all you need. Simple tools for a truly satisfying meal.
Crafting Your Perfect Beef Enchiladas: Step-by-Step Guide
Prep Work: Oven & Dish
Preheat your oven to 375°F (190°C) to ensure it’s ready for baking as soon as your enchiladas are assembled. Lightly grease a 9×13 inch baking dish with olive oil or cooking spray.
This simple step prevents the enchiladas from sticking and makes for easier serving later.
Building the Flavorful Beef Filling
Heat 1 tablespoon of olive oil in a large skillet over medium-high heat. Add the ground beef and cook, breaking it apart with a spoon, until it’s fully browned.
Crucially, drain any excess fat from the skillet to prevent a greasy filling. Then, add the finely diced yellow onion and cook until softened, about 3-5 minutes, allowing its sweetness to develop.
Stir in the minced garlic, chili powder, cumin, and dried oregano. Cook for just 1 minute more until the spices become wonderfully fragrant; this “blooming” step deepens their flavor. Season generously with salt and pepper to taste, then remove from heat.
The Tortilla Transformation: Dip & Fry Technique
This is the secret to non-soggy tortillas! Pour about 1/2 cup of red enchilada sauce into a shallow dish. In a separate small skillet, add a thin layer of olive oil (about 1-2 tablespoons) and heat over medium heat.
Briefly dip each corn tortilla into the warm enchilada sauce, ensuring it’s lightly coated but not saturated. Immediately place it in the hot oiled skillet for about 10-15 seconds per side.
This quick fry makes the tortilla pliable and creates a protective barrier, preventing it from absorbing too much sauce later. It’s key for tender yet intact enchiladas. Set aside on a plate and repeat for all tortillas, adding more oil as needed.
Assembling Your Masterpiece
Spread about 1/2 cup of enchilada sauce evenly across the bottom of your prepared baking dish. This forms the first flavorful layer and prevents the bottom enchiladas from drying out.
Take one prepared tortilla and spoon about 2-3 tablespoons of the beef filling down the center. Sprinkle with a tablespoon of shredded cheese. Carefully roll the tortilla up tightly and place it seam-side down in the baking dish.
Repeat this process with the remaining tortillas and filling, arranging them snugly in a single layer in the dish. This careful arrangement ensures even cooking and a beautiful presentation.
The Final Bake
Once all enchiladas are rolled and placed, pour the remaining red enchilada sauce evenly over the top. Ensure every enchilada is generously coated for maximum flavor and moisture.
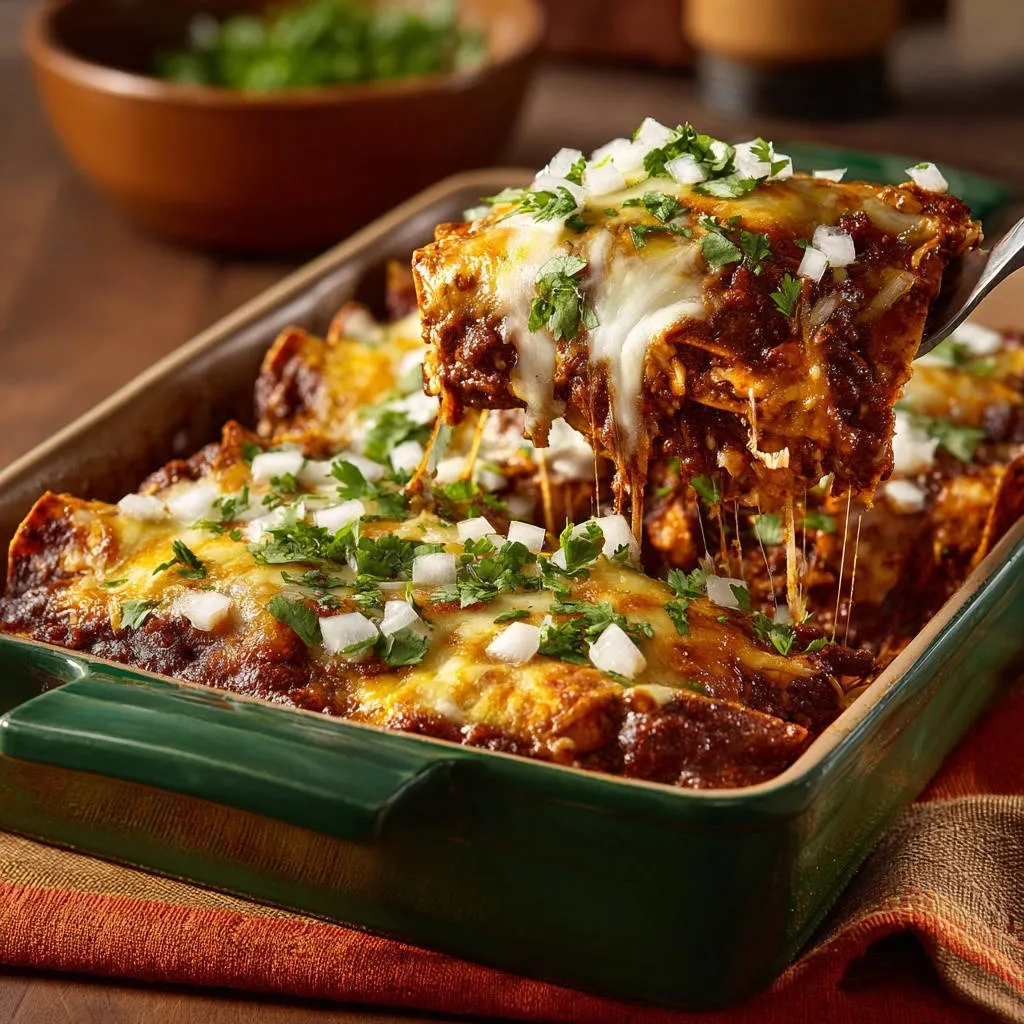
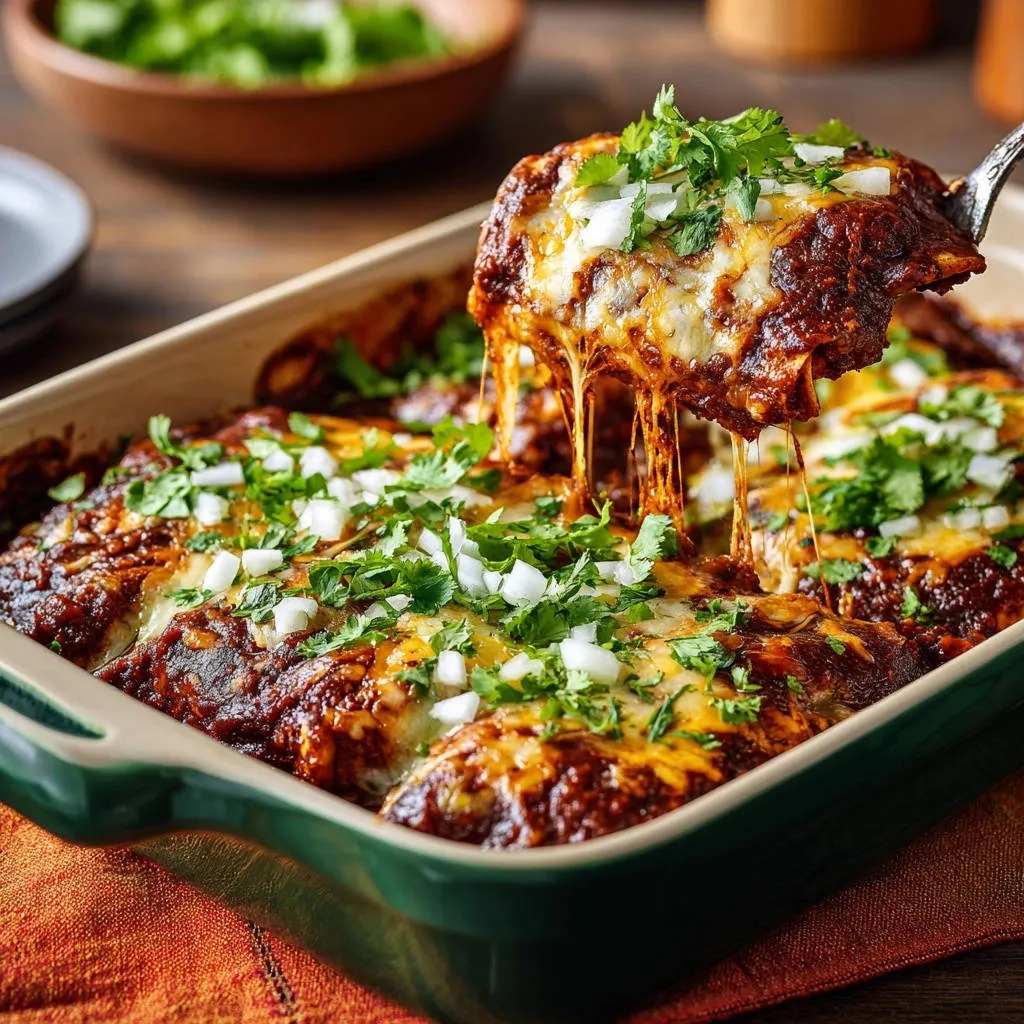
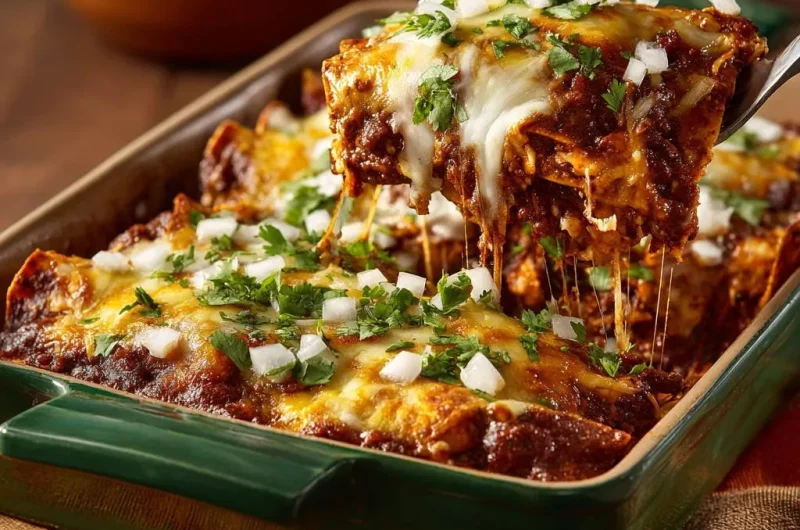
Sprinkle the remaining shredded cheese generously over the entire dish. This creates that delicious, bubbly, golden-brown crust we all love on perfect beef enchiladas.
Bake for 20-25 minutes, or until the cheese is melted and bubbly, and the enchiladas are heated through. For an extra golden-brown finish, broil for the last 1-2 minutes, watching very carefully to prevent burning.
Rest & Garnish for Perfection
Remove the baked enchiladas from the oven and let them stand for 5 minutes before serving. This crucial resting period allows the enchiladas to set, making them much easier to serve without falling apart.
Finally, garnish generously with fresh diced white onion and chopped cilantro. These fresh additions provide a bright, zesty contrast to the rich, warm enchiladas.
Chef’s Secrets: Elevating Your Perfect Beef Enchiladas Game
Draining the Fat: Why It Matters
Properly draining the fat from the ground beef is essential for a clean-tasting, non-greasy filling. Excess fat can make your enchiladas feel heavy and detract from the delicate balance of flavors.
It also helps the filling bind better and prevents your sauce from becoming overly oily.
Don’t Rush the Spices
When adding your chili powder, cumin, and oregano, allow them to cook for a full minute after stirring them into the beef and aromatics. This process, called “blooming,” gently toasts the spices in the hot oil.
Blooming significantly enhances their aroma and deepens their complex flavors, making your beef enchilada filling truly shine.
The Broiler’s Kiss for Golden Cheese
For that irresistible golden-brown, bubbly cheese topping, consider a quick pass under the broiler. After baking, place the dish 6-8 inches from the broiler element.
Watch it like a hawk – it takes only 1-2 minutes to achieve a perfect crust. This step adds a fantastic textural element to your perfect beef enchiladas.
The Importance of Resting
Resist the urge to serve your enchiladas immediately out of the oven. A brief 5-minute rest allows the internal filling to settle and the sauce to be reabsorbed slightly.
This makes the enchiladas much firmer and easier to transfer from the dish to plates, maintaining their beautiful shape and preventing a messy presentation.
Common Questions About Perfect Beef Enchiladas
Can I use flour tortillas instead of corn?
While corn tortillas are traditional and provide the best structure for preventing sogginess with this method, you can use flour tortillas. However, the “dip and fry” technique is still highly recommended.
Flour tortillas tend to absorb more liquid, so be mindful of over-dipping. They may also yield a slightly different texture.
How can I make this spicier?
To increase the heat, add a pinch of cayenne pepper or a teaspoon of hot sauce to the beef filling. For fresh heat, finely dice a jalapeño or serrano pepper and sauté it with the yellow onion.
A dash of a spicier enchilada sauce or a sprinkle of red pepper flakes on top before baking also works wonders.
Can I prepare the filling ahead of time?
Absolutely! The beef filling can be made up to 2-3 days in advance. Cook it completely, let it cool, and store it in an airtight container in the refrigerator.
When ready to assemble, simply reheat the filling gently on the stovetop or in the microwave until warm. This saves significant time on busy weeknights.
What’s the best way to reheat leftovers?
For best results, reheat individual portions of perfect beef enchiladas in the microwave until heated through, about 1-2 minutes per serving. For larger portions or to crisp up the cheese, use an oven.
Place leftovers in an oven-safe dish, cover loosely with foil, and bake at 350°F (175°C) for 15-20 minutes, or until warmed through. Remove the foil for the last few minutes if you desire a crispy cheese topping.
Serving Suggestions & Storage Solutions
What to Serve Alongside Your Enchiladas
Perfect beef enchiladas are hearty on their own, but pairing them with simple sides can complete the meal. Classic choices include fluffy Mexican rice and tender black or pinto beans.
For a refreshing contrast, serve with a crisp green salad tossed with a light vinaigrette, or a simple avocado salad.
Make-Ahead Magic: Tips for Prepping in Advance
Beyond the filling, you can also grate the cheese and chop your garnishes (white onion and cilantro) a day ahead. Store them separately in airtight containers in the refrigerator.
You can even assemble the entire pan of enchiladas up to 24 hours in advance. Cover tightly with plastic wrap and refrigerate. Add an extra 5-10 minutes to the baking time when cooking from cold.
Storing Leftovers Safely
Store any leftover perfect beef enchiladas in an airtight container in the refrigerator for up to 3-4 days. Ensure they are completely cooled before storing to prevent condensation.
For longer storage, freeze individual enchiladas or a whole pan (unbaked or baked) for up to 2-3 months. Thaw overnight in the refrigerator before reheating or baking.
Your Journey to Perfect Beef Enchiladas Starts Now!
You now have all the tools and expertise to create truly perfect beef enchiladas, free from the dreaded soggy tortilla dilemma. This recipe is more than just a meal; it’s a celebration of flavor and a testament to clever cooking techniques.
Don’t wait any longer to experience this Tex-Mex triumph. Dive in, make these incredible homemade enchiladas, and savor every tender, flavorful bite. I can’t wait to hear how much you love them!
Beef Enchiladas
Course: Main CourseCuisine: MexicanDifficulty: medium4
10-12 enchiladas (4-6 servings)30
minutes25
minutes450
kcal60
minutesSay goodbye to soggy enchiladas! This recipe reveals the secret to tender yet intact tortillas, holding a delicious beef and cheese filling without falling apart. Enjoy perfectly shaped enchiladas every time.
Ingredients
1 tablespoon olive oil, plus more for frying tortillas
1 lb ground beef
1/2 yellow onion, finely diced
2 cloves garlic, minced
1 teaspoon chili powder
1/2 teaspoon ground cumin
1/4 teaspoon dried oregano
Salt and freshly ground black pepper to taste
10-12 corn tortillas (6-inch)
2 cups red enchilada sauce
2 cups shredded Monterey Jack or Mexican blend cheese, divided
1/4 cup diced white onion, for garnish
1/4 cup chopped fresh cilantro, for garnish
Directions
- Preheat oven to 375F (190C). Lightly grease a 9×13 inch baking dish.
- Prepare the filling: Heat 1 tablespoon olive oil in a large skillet over medium-high heat. Add ground beef and cook, breaking it apart with a spoon, until browned. Drain any excess fat.
- Add diced yellow onion to the skillet and cook until softened, about 3-5 minutes. Stir in minced garlic, chili powder, cumin, and oregano. Cook for 1 minute more until fragrant. Season with salt and pepper. Remove from heat.
- Prepare the tortillas: Pour about 1/2 cup of enchilada sauce into a shallow dish. In a separate small skillet, add a thin layer of olive oil (about 1-2 tablespoons) and heat over medium heat. Briefly dip each corn tortilla into the warm enchilada sauce to lightly coat it. Then, immediately place it in the hot oiled skillet for about 10-15 seconds per side, just until it’s pliable and slightly warmed, but not crispy. This quick dip and fry makes them flexible for rolling and creates a barrier against sogginess. Set aside on a plate. Repeat for all tortillas, adding more oil to the skillet as needed.
- Assemble the enchiladas: Spread about 1/2 cup of enchilada sauce on the bottom of the prepared baking dish.
- Take one prepared tortilla, spoon about 2-3 tablespoons of the beef filling down the center. Sprinkle with a tablespoon of shredded cheese. Roll it up tightly and place it seam-side down in the baking dish. Repeat with remaining tortillas and filling.
- Pour the remaining enchilada sauce evenly over the rolled enchiladas.
- Sprinkle the remaining shredded cheese generously over the top.
- Bake for 20-25 minutes, or until the cheese is melted and bubbly and the enchiladas are heated through. If you like, broil for the last 1-2 minutes for extra golden-brown cheese, watching carefully to prevent burning.
- Remove from oven and let stand for 5 minutes before serving. Garnish with diced white onion and fresh cilantro.
Notes
- The key to non-soggy enchiladas is briefly dipping tortillas in warm enchilada sauce then quickly frying them.