What Makes Quesabirria Tacos Irresistible
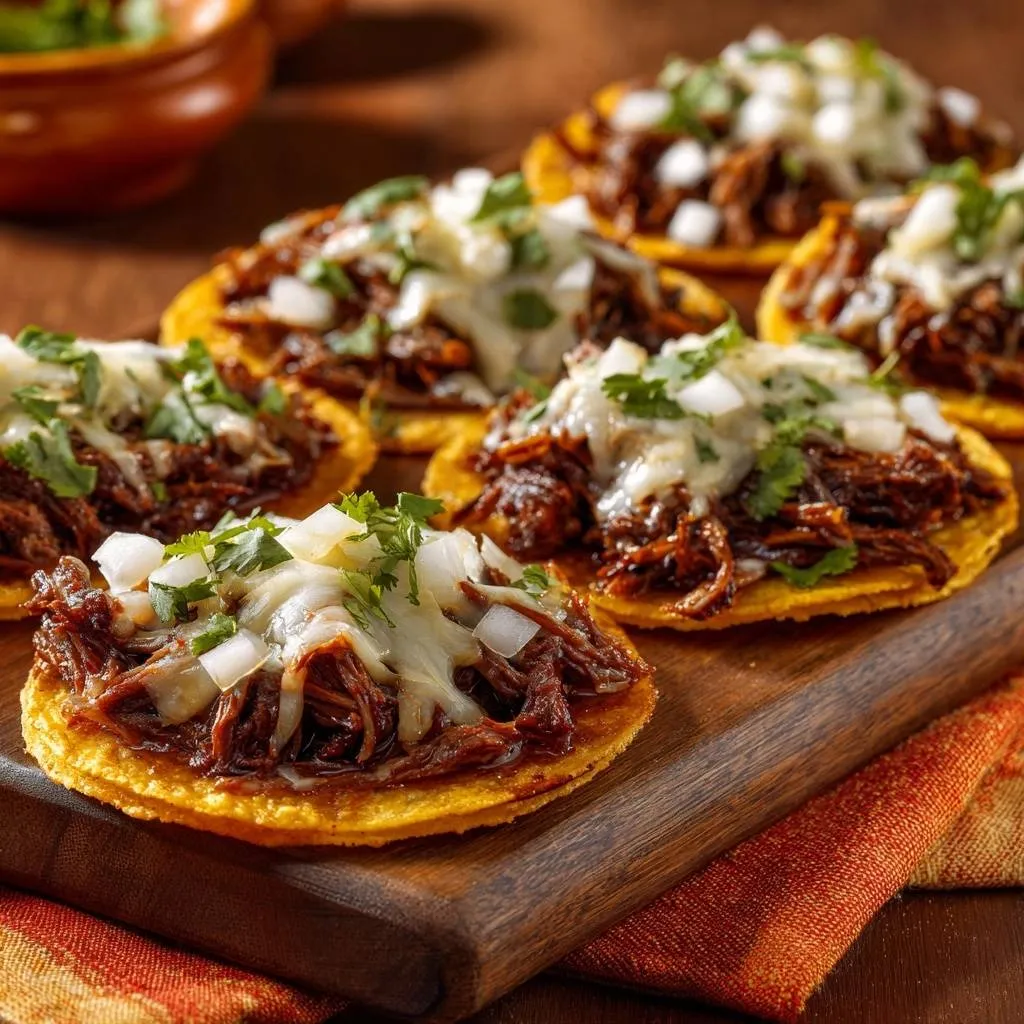
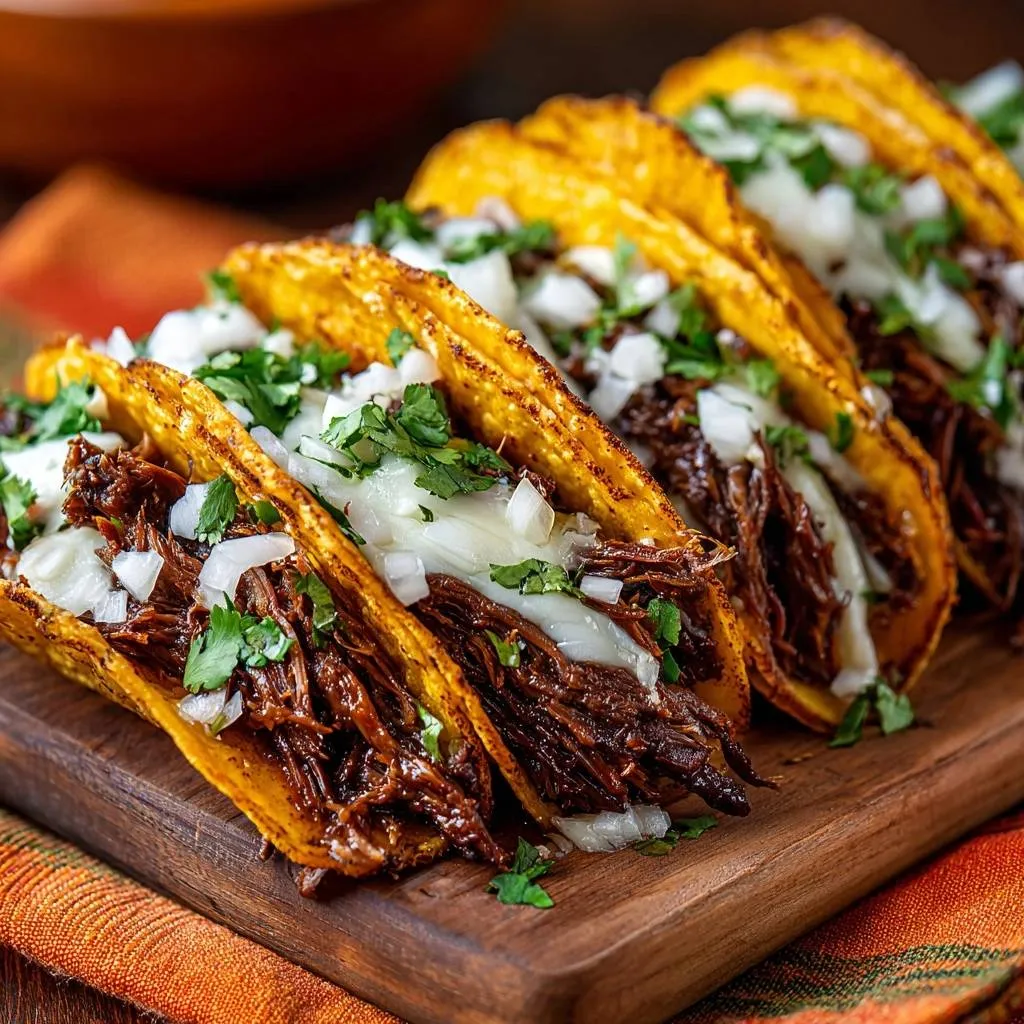
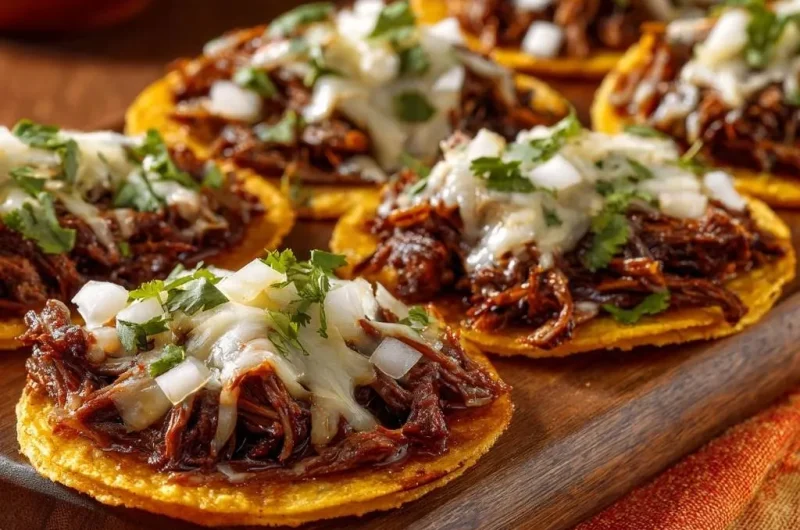
Picture this: saucy, shredded beef that’s fall-apart tender, tucked into corn tortillas that stay crunchy with every dip into rich consommé. No more mushy disappointments. These quesabirria tacos deliver that perfect contrast of juicy meat against crispy, cheese-sealed edges.
For guaranteed moist meat, explore these restaurant-style shredded beef tacos.
However, most home cooks end up with soggy messes because they skip the screaming-hot skillet. That’s why this recipe changes everything. You’ll get street-food perfection right in your kitchen.
Oh man, the first time I nailed this, the cheese bubbled up like a golden seal, locking in all that flavor. The secret? Preheat your cast-iron until it’s smoking hot. That extreme heat evaporates moisture instantly, so your tacos crunch bite after bite. From Jalisco’s birria roots, quesabirria exploded in Tijuana with that cheesy twist, and now it’s a U.S. food truck favorite.
Key Ingredients for Authentic Quesabirria Tacos
You’ll need 2.5 pounds of beef chuck roast, cut into 4 chunks. It braises into fork-tender shreds thanks to its marbling. One large white onion splits duties: half quartered for the braise, half diced fresh on top.
In addition, grab 4 cups low-sodium beef broth, 2 teaspoons ground cumin, 2 teaspoons dried oregano, 1 teaspoon salt, and 1 teaspoon black pepper. These build deep, earthy layers without overpowering. Then, 12 corn tortillas, 3 cups shredded Oaxaca cheese (or Monterey Jack), a bunch of fresh cilantro, and 1 cup salsa verde finish it bright and tangy.
Therefore, source grass-fed chuck if you can; it shreds juicier. Corn tortillas crisp better than flour, which steams soft. Fresh cilantro cuts the richness perfectly.
Beef Chuck Roast: Choosing the Right Cut
Chuck roast shines because its connective tissue melts into gelatin during a 3-hour braise. That gives you juicy, pull-apart shreds. Trim excess fat before searing to avoid greasy results, unlike leaner cuts that dry out.
Compared to brisket, chuck’s marbling tenderizes faster. Short ribs work too, but they’re pricier. Stick to 2.5 pounds for 12 tacos.
Spices and Broth: Building Deep Flavor Layers
Cumin and oregano create an earthy base that clings to the beef. The quartered onion adds subtle sweetness to the braising liquid. Low-sodium broth lets you control salt, preventing a too-salty consommé.
Therefore, rub spices generously before searing. This locks in flavor from the start.
Cheese and Toppings: Crisp Seal and Fresh Finish
Oaxaca cheese melts stringy and creates a barrier against sogginess; use 3 cups for 12 tacos, about 1/4 cup per side. Monterey Jack subs well if needed. Cilantro’s herbaceous punch balances the rich beef, while salsa verde’s tang brightens every bite.
Fresh toppings keep it vibrant. Chop cilantro just before serving for max aroma.
History and Evolution of Quesabirria Tacos
Quesabirria started as birria stew in Jalisco, Mexico, traditionally made with goat. Street vendors in Tijuana stuffed it with cheese into corn tortillas, crisping them on griddles. “Quesa” just means cheesy, but it transformed the dish.
In addition, U.S. food trucks popularized beef versions for broader appeal. The consommé dipping tradition stays key; it nods to the stew’s roots. Now, it’s everywhere from LA carts to home kitchens.
However, beef chuck makes it accessible. You’ll love how this evolution brings authentic crunch without the hunt for goat.
Science of Braising Beef for Quesabirria Tacos
Braising breaks down collagen at 160-180°F over 3 hours into gelatin, so your beef shreds juicy. The initial sear triggers Maillard reaction, building hundreds of flavor compounds for that deep browned taste. A tight Dutch oven lid traps steam and keeps it moist.
Furthermore, onion and spices tweak pH for faster tenderness. Without the sear, you’d miss those crusty bits that make every bite pop. Pro tip: rest beef 5 minutes post-braise; it pulls apart easier.
Why 3-Hour Braise Achieves Fork-Tender Beef
Start with a boil, then simmer at 190°F. Collagen melts above 160°F, turning tough into tender around hour 3. Test by pulling with a fork; it should shred cleanly.
If not, braise 30 minutes more. Patience here pays off big.
Searing’s Role in Flavor Development
High heat over 400°F browns the surface fast, creating savory compounds. Seared beef tastes richer than straight-braised. Always do all sides, about 2 minutes each.
Therefore, don’t skip this; it’s your flavor foundation.
Equipment Essentials for Perfect Quesabirria Tacos
A Dutch oven holds steady heat for braising. For tacos, a cast-iron skillet hits 500°F+ to crisp tortillas instantly. Use a metal spatula to press without melting plastic.
In addition, an instant-read thermometer checks beef at 205°F for doneness. No thermometer? Fork test works. Instant Pot speeds braising but changes texture slightly.
Dutch Oven vs. Instant Pot for Braising
Dutch oven’s thick walls keep a low simmer even. Instant Pot cuts time to 90 minutes under pressure, but shreds get mushier. For authentic texture, go Dutch oven.
However, Instant Pot saves time on weeknights.
Cast-Iron Skillet: Key to Crispy Tortillas
It retains heat like a champ, evaporating moisture on contact. Skimmed beef fat smokes at 400°F without burning. Preheat 3 minutes till smoking; non-stick can’t handle the heat.
Therefore, invest here for no-soggy wins.
Step-by-Step: Braising Saucy Quesabirria Beef
Season beef chunks with 1 teaspoon salt, 1 teaspoon pepper, 2 teaspoons cumin, and 2 teaspoons oregano. Sear in Dutch oven over medium-high, 8 minutes total for deep brown crust. Add quartered onion and 4 cups broth; boil, cover tight, simmer low 3 hours till fork-tender.
Remove beef, shred with forks against the grain. Strain liquid, skim 1/2 cup fat from top. Mix shreds with 1 cup hot consommé to stay moist. Smell that rich aroma? That’s success.
Pro tip: don’t overcrowd during sear, or it steams instead of browns.
Seasoning and Searing Beef Chunks
Rub spices evenly for full coverage. Sear 2 minutes per side without moving; crust forms golden. Deglaze pan with broth to lift browned bits.
This step builds unbeatable depth.
Braising and Shredding Process
Onion quarters perfume the liquid sweetly. At 3 hours, beef pulls easy. Shred hot for best texture; cool too much and it fights the forks.
Strain while warm for clean consommé.
Mastering Crispy Quesabirria Taco Assembly
Heat cast-iron over high 3 minutes till smoking. Add 1 teaspoon reserved fat. Lay tortilla, add 1/4 cup saucy beef and 1/4 cup cheese; top with more cheese.
Press 30 seconds till edges bubble crisp. Flip, press again 30 seconds. Cheese melts into a seal. Work in batches of 2-3 to keep heat screaming.
Top with diced onion, cilantro, salsa verde. Dip in extra consommé. Crunchy heaven!
High-Heat Skillet Technique Explained
500°F evaporates steam fast; no soggy risk. Fat prevents sticking and adds beefy flavor. Pressing spreads cheese evenly for the barrier.
Therefore, patience on preheat is key.
Filling, Pressing, and Flipping Tacos
Exact 1/4 cup portions prevent overflow. Bubble at edges means ready to flip. Use spatula edge to loosen gently.
Hot and fast keeps them perfect.
Avoiding Common Quesabirria Taco Pitfalls
Soggy tortillas come from low heat or too many in the pan. Overcrowding drops temp, steaming instead of crisping. Dry beef happens without consommé remix.
However, skim fat carefully; too much smokes out. Overbraise turns shreds mushy past 3.5 hours. Fixes? Single layer, screaming heat, precise timing.
Pro tip: assemble fresh; don’t stack pre-cook.
Preventing Soggy Tortillas Every Time
High heat plus cheese seal blocks moisture. No stacking; cook one-by-one if needed. Fat lubes without sogginess.
Visual cue: instant sizzle on tortilla drop.
Keeping Shredded Beef Juicy
Toss shreds in hot 1 cup consommé right away. Skim fat precisely with a spoon. Reheat gently if needed.
This keeps every bite saucy.
Flavor Variations for Quesabirria Tacos
Swap Oaxaca for Monterey Jack; it melts similar. Add chipotles to braise for smoky heat. Chicken thighs sub for beef, braise 2 hours.
For vegan, jackfruit shreds mimic texture. Spice up with guajillo chiles in broth. Try pickled onions over raw for tangier top.
Therefore, tweak to your taste; base stays solid.
Perfect Pairings for Quesabirria Tacos
Dip in warm consommé cups first. Mexican rice soaks up juices, elote salad adds creamy crunch. Lime wedges brighten it all.
Horchata cools spice, agua fresca refreshes. Finish with churros for sweet contrast. Acidic sides balance the rich beef perfectly.
Make-Ahead Guide for Quesabirria Tacos
Braise beef 2 days ahead; store in consommé airtight in fridge. Shreds freeze 3 months in zip bags with liquid. Thaw overnight, reheat in hot skillet.
However, assemble tacos fresh for crisp. Save skimmed fat in jar up to a week. Party prep made easy.
Pro tip: braised beef tastes better day 2.
Quesabirria Tacos: Top Troubleshooting Questions
How do I store Quesabirria Tacos leftovers?
Store shredded beef in airtight container with consommé up to 4 days in fridge. Tacos crisp best fresh, so refrigerate fillings separate. Reheat beef in skillet with splash of broth; refry tortillas for crunch. Freezes well up to 3 months; thaw in fridge, avoid refreezing after.
Why are my Quesabirria Tacos soggy?
Low skillet heat or overcrowding traps steam. Solution: preheat cast-iron smoking hot 3 minutes, cook 2-3 max per batch. Cheese must seal both sides with firm 30-second presses. Add fat each time; no stacking uncooked.
Can I substitute the Oaxaca cheese?
Yes, Monterey Jack melts great and strings similarly. Mozzarella works if low-moisture; avoid cheddar, it doesn’t seal as well. Use 3 cups total; fresh-grated beats pre-shredded for smooth melt without anti-caking agents.
Why isn’t my beef tender after braising?
Chuck needs full 3 hours at low simmer above 160°F. Test with fork pull; if tough, braise 30-45 minutes more. Don’t rush boil; tight lid keeps moisture in. Low-sodium broth prevents drying.
Can I use flour tortillas for Quesabirria Tacos?
No, flour steams softer and soggier than corn. Corn’s texture crisps perfectly with high heat. If you must, double-fry but expect less crunch. Stick to 6-inch corn for authentic bite.
Quesabirria Tacos
Course: Main CourseCuisine: MexicanDifficulty: medium12
tacos30
minutes3
hours450
kcal180
MinutesSaucy shredded beef tacos are amazing until the tortillas turn mushy. This recipe fixes it with a screaming-hot skillet technique and quick double-sided sear that crisps the corn tortillas perfectly while the cheese melts and seals in the juicy beef.
Ingredients
2.5 lbs beef chuck roast, cut into 4 large chunks
1 large white onion, 1/2 quartered for braising and 1/2 diced for topping
4 cups low-sodium beef broth
2 tsp ground cumin
2 tsp dried oregano
1 tsp salt
1 tsp black pepper
12 corn tortillas
3 cups shredded Oaxaca cheese or Monterey Jack
1 bunch fresh cilantro, chopped
1 cup prepared salsa verde
Directions
- Season beef chunks generously with salt, pepper, cumin, and oregano. In a large Dutch oven over medium-high heat, sear beef on all sides until deeply browned, about 8 minutes total. Add quartered onion and beef broth. Bring to a boil, then cover tightly and reduce to low simmer. Braise for 3 hours until fork-tender.
- Remove beef to a cutting board, shred with two forks. Strain braising liquid (consommé) and reserve 1/2 cup fat skimmed from top for crisping tacos. Mix shredded beef back into 1 cup hot consommé to keep moist.
- Heat a large cast-iron skillet or griddle over high heat until smoking hot, about 3 minutes. This is the key to no soggy tacos: extreme heat evaporates moisture instantly. Add 1 tsp reserved beef fat to skillet.
- Place 1 corn tortilla in skillet. Immediately pile on 1/4 cup saucy beef and 1/4 cup cheese. Top with more cheese to weigh it down. Press firmly with spatula for 30 seconds until edges crisp and bubble. Flip taco and press again for 30 seconds to crisp second side. Cheese melts and forms a barrier against sogginess. Slide onto plate. Repeat with remaining tortillas, adding fat as needed. Work in batches to keep skillet screaming hot.
- Top hot crispy tacos with diced onion, cilantro, and salsa verde. Serve with extra consommé for dipping. Enjoy tacos that stay crunchy bite after bite!
Notes
- Use Oaxaca cheese for authenticity or Monterey Jack as substitute. Key to crispy tacos: extreme skillet heat and cheese barrier. Serve with extra consommé for dipping.