I spent years perfecting the technique to avoid dry, chewy cubes of meat, a frustrating experience common to many home cooks when making stew. This specific recipe for Rich Dutch Oven Beef Stew solves that problem with a foolproof, two-step process that guarantees the beef melts in your mouth.
This method builds incredible depth of flavor and delivers that luxurious, velvety sauce you’ve always dreamed of. Trust this process, and your pursuit of guaranteed tender beef will be over.
For more depth in your beef stew, explore a similar slow-braised beef and white bean stew.
Why This Rich Dutch Oven Beef Stew Delivers Guaranteed Tenderness
We all dread the moment of cutting into tough stew meat, which completely defeats the entire purpose of a comforting winter meal. This failure usually stems from not properly preparing the meat surface or cooking at inconsistent temperatures.
For even more tender results, explore slow braised beef short ribs.
The combination of the essential dry flour coat and the deep sear technique forms an immediate crust around the beef. This critical step locks in internal moisture, preventing the meat from turning stringy during the long braise.
Finally, the long, low-temperature cooking ensures tough connective tissues (collagen) completely break down into rich, mouth-coating gelatin. This conversion is the scientific secret that gives this Rich Dutch Oven Beef Stew its signature fall-apart tenderness.
Setting the Scene: Essential Equipment for Dutch Oven Braising
The Power of Heavy-Bottomed Cookware
A heavy-bottomed, tightly-lidded Dutch oven, typically made of cast iron or enamel-coated cast iron, is non-negotiable for superior stew. Its mass provides unrivaled heat retention and extremely even temperature distribution.
This consistent heat is crucial during the minimum 3-hour braise, ensuring every piece of meat cooks identically without temperature fluctuations that can cause toughness.
Must-Have Prep Tools
For efficient execution, ensure you have a sturdy silicone spatula for effective scraping of the fond, a quality sharp chef’s knife for preparing vegetables, and accurate measuring cups.
A large, shallow bowl is also essential for properly coating the beef cubes before the searing process begins.
Deep Dive into Flavor: The Ingredients That Define This Stew
Choosing the Perfect Cut: Why Chuck Roast Reigns Supreme
Beef chuck roast is the optimal cut for stew because it is highly marbled and rich in connective tissue (collagen). This collagen is precisely what transforms into gelatin during the long, moist cooking environment.
Cutting the beef into consistent 1.5-inch cubes ensures they hold their shape throughout the braising process and cook evenly, leading to uniform, perfect tenderness.
The Essential Flour Coating Blend
The simple flour, salt, and pepper coating serves two major, interconnected functions in this recipe. Firstly, it facilitates the essential deep, dark crust formation during the initial sear.
Secondly, the residual flour that adheres to the meat acts as a natural thickener for the stew liquid later on, helping to build that glossy, rich sauce consistency.
The Non-Alcoholic Braising Liquid Advantage (Grape Juice and Substitutes)
The non-alcoholic cooking liquid (such as unsweetened grape juice or a non-alcoholic red wine substitute) provides necessary acidity and depth. This acidity helps further tenderize the meat and balances the intense richness of the beef broth.
If you choose to omit this liquid, you can replace it with an equal amount of beef broth, though the final flavor depth will be less complex. Alternatively, use one teaspoon of balsamic vinegar diluted with water to maintain an acidic profile.
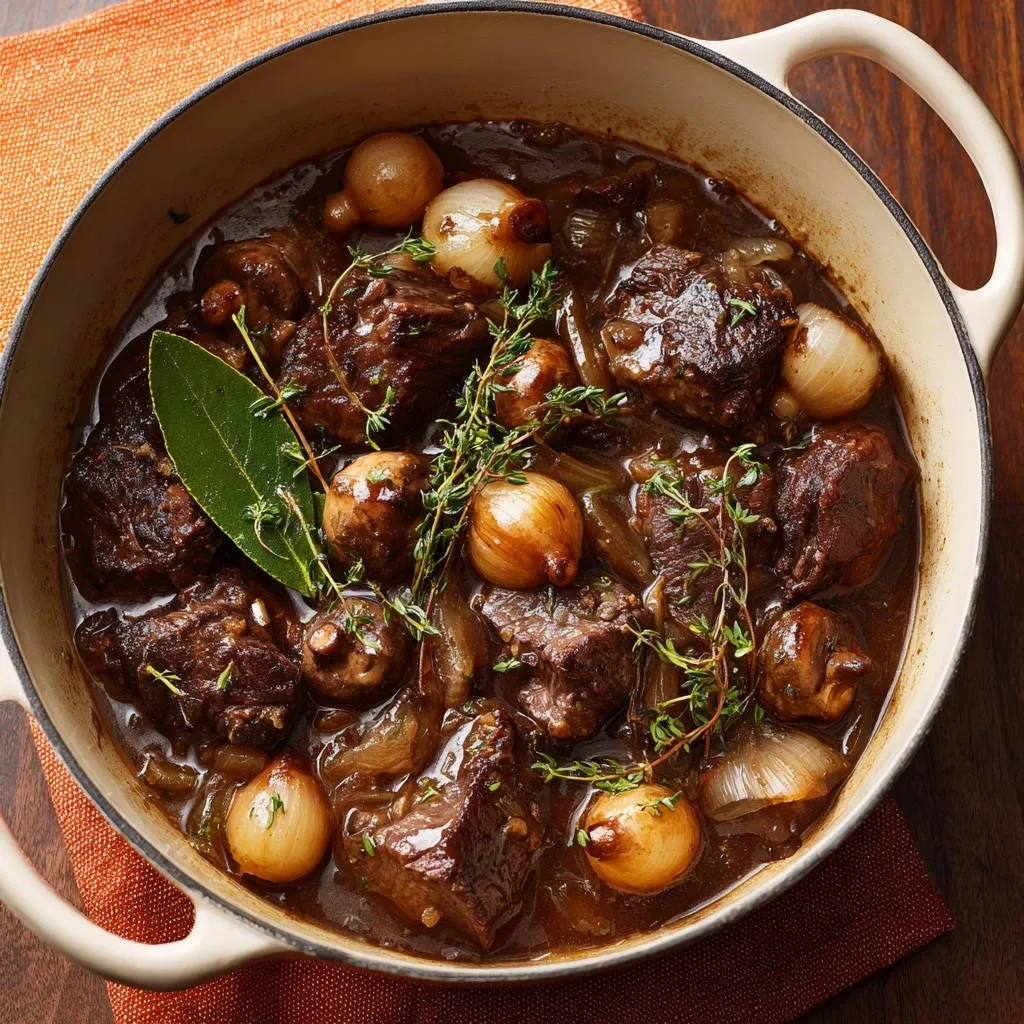
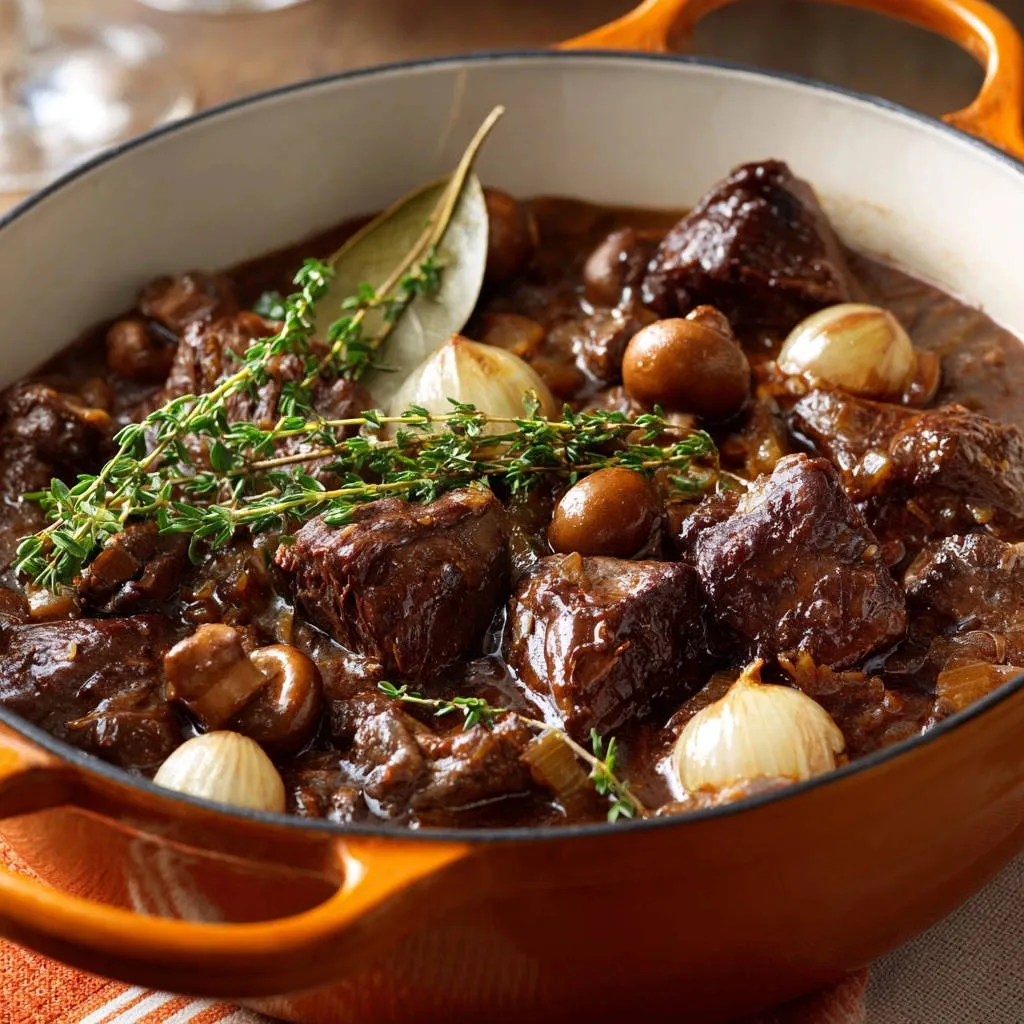
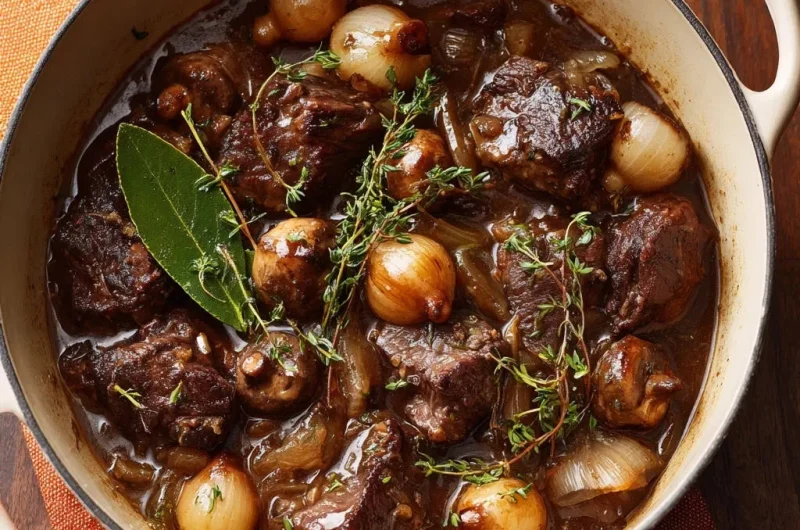
Building the Aromatics: Pearl Onions, Mushrooms, and Fond
Using both thinly sliced yellow onion and whole pearl onions adds layers of sweetness and textural contrast that holds up well during braising. Button mushrooms provide an essential earthy, umami base.
Tomato paste is a crucial flavor binder; cooking it briefly with the aromatics concentrates its savory, umami flavor (a technique known as pincer), vastly improving the stew’s profile.
The Two-Step Method: Guaranteed Fall-Apart Rich Dutch Oven Beef Stew
Step 1: The Essential Dry Coat for a Perfect Crust
Pat the beef cubes completely dry using paper towels before beginning the flour coating process. Dry meat is absolutely essential for achieving a proper sear, as any surface moisture will cause the meat to steam instead of crusting.
After lightly tossing the beef in the flour mixture, gently shake off the excess. Too much flour will burn in the pot and lead to a gummy sauce, but a light coating ensures a crisp exterior.
Step 2: The Deep Sear Technique: A Crucial Tenderness Lock-In
Heat the olive oil in your Dutch oven over medium-high heat until it is shimmering hot. This is the visual cue that the oil is ready for immediate crust formation.
Sear the beef in small, single-layer batches to avoid overcrowding the pot, which would instantly drop the temperature and prevent a good crust. Do not turn the meat until a dark, mahogany-brown crust forms after about 3 to 4 minutes per side.
This deep sear is the “Tenderness Lock-In”; it is crucial for preventing the beef exterior from breaking down too early or turning tough and stringy during the long braise. Remove the seared beef to a clean bowl and set it completely aside.
Building the Robust Flavor Base: Vegetables and Deglazing
Reduce the heat to medium and add the sliced yellow onion. Cook the onions until softened, using this time to scrape up all the flavorful browned bits (fond) from the pot bottom, integrating them into the base.
Add the mushrooms, pearl onions, and minced garlic, cooking for about three minutes until fragrant. Next, stir in the tomato paste and cook it for one minute to intensify its savory depth.
Pour in the non-alcoholic cooking liquid and bring it to a simmer, scraping up any final remaining fond. Allow this liquid to reduce slightly, which concentrates its flavor before you add the broth.
The Guaranteed Tender Solution: Low and Slow Braise
Return all of the seared beef to the pot, pour in the beef broth, and add the bay leaves and fresh thyme sprigs. Ensure the liquid covers the meat adequately for proper moisture during the braise.
Bring the stew to a gentle simmer on the stovetop, then immediately cover the pot tightly with the lid. Transfer the Dutch oven to a preheated low oven set to 300°F.
This low, consistent braising temperature for 3 to 4 hours is the essential component; it allows the tough collagen to slowly melt into gelatin. Do not rush this step, as only patience delivers the characteristic fall-apart beef texture of this Rich Dutch Oven Beef Stew.
Finishing Touches and Seasoning Adjustment
Once the meat shreds easily with a fork, carefully remove the Dutch oven from the oven. Before serving, remove and discard all the bay leaves and the woody stems of the thyme sprigs.
Tasting and adjusting the final seasoning with additional salt and pepper is critical after the long braise. The liquid concentrates significantly during the cook, so a final check ensures perfect flavor balance.
Chef’s Secrets: Troubleshooting and Elevating Your Stew
Why Is My Stew Meat Still Tough? Common Mistakes and Fixes
If your meat is tough, it means the collagen has not fully dissolved into gelatin yet. The most common error is impatience or braising at a temperature that was slightly too high.
The simple fix is to cover the pot tightly and return it to the 300°F oven for another 45 minutes to an hour. The only true solution for tough stew meat is providing more low and slow cooking time.
Achieving a Thicker, Restaurant-Quality Sauce
If the sauce is thinner than you prefer, the easiest fix is removing the lid during the last 30 minutes of braising. This allows excess liquid to evaporate and the sauce to naturally reduce and thicken.
For immediate results, create a slurry by whisking one tablespoon of cornstarch with two tablespoons of cold water. Stir this mixture into the simmering stew on the stovetop until the desired velvety thickness is reached.
Elevating the Herbs: When to Add Fresh Thyme
Adding the bay leaves and thyme sprigs at the beginning allows their deeper, woodsy flavors to infuse thoroughly into the liquid base during the extensive braise.
For a brighter, contrasting flavor and professional finish, stir in a handful of chopped fresh flat-leaf parsley or chives just before serving. These fresh herbs add a pleasant, clean note that cuts through the richness.
Dealing with Too Much Fat in the Rich Dutch Oven Beef Stew
Even with a good quality cut, some fat will naturally render out during the long cook time, resulting in a thin layer floating on the surface. You can easily skim this excess off with a large shallow spoon before the stew is served.
For the cleanest, richest flavor, allow the entire stew to chill overnight in the refrigerator. The solidified fat cap can then be effortlessly lifted off the top before reheating.
Serving Suggestions, Storage, and Prep Strategies
Perfect Pairings: What to Serve with Your Comfort Stew
Creamy, buttery mashed potatoes are the definitive classic, perfectly designed to soak up every drop of the luxurious sauce.
Wide, rustic egg noodles or flat pappardelle are excellent choices for a comforting pasta pairing that complements the rich sauce.
Always ensure you have a generous supply of crusty bread or homemade dinner rolls to scoop up the remaining sauce (the best part!).
Round Out Your Meal
Looking for more hearty main courses to complement your beef stew?
- For a lighter but still satisfying option, consider the Garlic Herb Grilled Chicken Salad, offering fresh herbs that will cut through the richness.
- If you want another comforting, baked element, the Golden Cornbread and Herb Stuffing provides a wonderful texture contrast.
Storage and Reheating Best Practices
Store leftover Rich Dutch Oven Beef Stew in an airtight container in the refrigerator for up to 4 days. It reheats perfectly on the stovetop over medium-low heat, stirring occasionally to prevent sticking.
For longer storage, freeze cooled portions in freezer-safe containers for up to 3 months. Always thaw the stew overnight in the refrigerator before reheating gently.
The Make-Ahead Advantage: Does Stew Get Better Overnight?
Stews dramatically improve overnight because resting allows the flavors to fully meld and the gelatin to set. This results in a thicker, more harmonious and flavorful dish the next day.
You can execute the first two critical steps-searing the beef and building the flavor base-up to two days ahead of time. Store the components separately, and then combine them for the braise when ready to cook the full dish.
Frequently Asked Questions About Dutch Oven Stew
Can I Use Different Vegetables, like Carrots or Potatoes?
Yes, robust root vegetables like carrots, parsnips, or small waxy potatoes make excellent additions to the stew for texture and flavor. However, they should not be added at the beginning of the braise.
Add these denser vegetables halfway through the braise, after approximately 2 hours. This timing ensures they are perfectly tender but not mushy by the time the fall-apart beef is ready.
What If I Don’t Have a Dutch Oven?
While the Dutch oven is optimal for its heat distribution, you can substitute a heavy-bottomed stockpot with a very tight-fitting lid. Ensure the pot can be transferred safely to the oven.
A slow cooker or Crockpot can also be used for the braising time. If using one, you must still execute the crucial searing and fond-building steps on the stovetop first, as this foundational flavor cannot be achieved solely in the slow cooker.
Is it necessary to use the non-alcoholic cooking liquid?
The non-alcoholic liquid is not strictly necessary, but it greatly contributes to the complexity and depth of the final dish. It provides a necessary acidic lift that cuts through the richness.
If you skip it entirely, your stew will still be delicious but slightly less nuanced. You can compensate by adding a teaspoon of cider vinegar to the broth or simply adding more beef broth.
Mastering this specific two-step technique-the deep sear followed by the low and slow braise-is the key to unlocking guaranteed fall-apart beef in your kitchen. This method permanently eliminates the risk of tough, dry meat and delivers a superior result.
Go ahead and plan a comforting evening centered around this incredible Rich Dutch Oven Beef Stew. Once you experience the velvety sauce and tender meat, this recipe will immediately become your trusted winter staple.
Ready to impress your family and friends with true cooking expertise? Don’t forget to share your cooking triumphs and the secret to your guaranteed tender beef stew!
Beef Stew
Course: Soups-StewsCuisine: AmericanDifficulty: medium6
servings25
minutes3
hours550
kcal240
minutesThis definitive beef stew recipe guarantees fall-apart tenderness using a deep sear technique and a long, slow braise. Perfected over years of testing, this comforting meal features deeply flavored beef, hearty mushrooms, and pearl onions simmered in a rich broth. Skip the tough, dry results and make the only beef stew you’ll need this winter.
Ingredients
3 pounds beef chuck roast, cut into 1.5 inch cubes
1/4 cup all-purpose flour
1 teaspoon salt
1/2 teaspoon black pepper
2 tablespoons olive oil
1 large yellow onion, thinly sliced
8 ounces button mushrooms, whole or halved
1 cup pearl onions, peeled
3 cloves garlic, minced
1 cup non-alcoholic cooking liquid (such as unsweetened grape juice or non-alcoholic red wine substitute)
3 cups beef broth, low sodium
1 tablespoon tomato paste
2 bay leaves
4 sprigs fresh thyme
Directions
- Prepare the Beef: Pat the beef cubes completely dry using paper towels. In a shallow bowl, combine the flour, salt, and pepper. Toss the dried beef cubes in the mixture until lightly coated. Remove the excess flour by shaking off the pieces gently. This dry coating is essential for the crust.
- Execute the Deep Sear Technique (The Tenderness Lock-In): Heat the olive oil in a large Dutch oven over medium-high heat until shimmering hot. Do not overcrowd the pot; sear the beef in small, single-layer batches. Sear each batch for 3 to 4 minutes per side, turning only when a dark brown crust has formed. A deep crust ensures the beef holds up during the long braise and prevents the meat from turning stringy. Remove the seared beef to a clean bowl and set aside.
- Build the Flavor Base: Reduce the heat to medium. Add the sliced yellow onion to the pot and scrape up any browned bits (fond) from the bottom. Cook for 5 to 7 minutes until softened. Add the whole mushrooms, pearl onions, and minced garlic. Cook for 3 minutes until fragrant. Stir in the tomato paste.
- Deglaze and Combine: Pour in the non-alcoholic cooking liquid and bring to a simmer, scraping up any remaining fond on the bottom of the pot. Cook for 2 minutes until slightly reduced. Return all of the seared beef to the pot.
- The Fall-Apart Braise (The Guaranteed Tender Solution): Pour in the beef broth until the meat is almost completely submerged. Add the bay leaves and thyme sprigs. Bring the stew up to a simmer on the stovetop, then cover the pot tightly with the lid. Transfer the Dutch oven to an oven preheated to a low 300 degrees F. Braise for a minimum of 3 to 4 hours, or until the beef shreds easily with a fork. Do not rush this step; the low and slow heat is what breaks down the tough connective tissues into gelatin, giving you that truly tender, fall-apart texture.
- Finish and Serve: Remove the stew from the oven. Remove the bay leaves and thyme stems before serving. Taste and adjust seasoning with additional salt and pepper if needed. Serve hot over mashed potatoes or egg noodles.
Notes
- The low, slow braise (minimum 3 hours at 300°F) is essential for breaking down connective tissue. Serve hot over mashed potatoes or egg noodles.