Forget everything you know about mushy, sad side dishes that sit neglected at the edge of the plate. This recipe is a masterclass in sensory contrast, pitting the blistering, charred heat of oven-roasted carrots against a pillow of chilled, aerated yogurt. When you take that first bite, you get the shattering crunch of a perfectly dried chickpea followed by the velvety smoothness of the whipped base.
For more delicious roasted veggies, check out this hearty veggie & chickpea bowl.
The beauty of this dish lies in the temperature play. Most people serve roasted vegetables on a warm plate, but by spreading them over cold yogurt, you create a vibrant flavor profile that feels light yet incredibly satisfying. It’s a center-of-the-table masterpiece that proves vegetables can be the star of the show when you treat them with the right techniques.
The secret to that restaurant-quality finish is moisture management. If your vegetables are even slightly damp when they hit the oil, they’ll steam instead of sear. I’ve found that the most important tool in your kitchen for this recipe isn’t a fancy knife, but a simple, clean kitchen towel to ensure every single chickpea is bone-dry before it ever sees the oven.
The Physics of Crunch: Why Moisture is the Enemy
To achieve a truly addictive crunch, you have to understand the Maillard reaction. This chemical reaction between amino acids and reducing sugars gives browned food its distinctive flavor and texture. However, this reaction cannot happen effectively in the presence of excess water because the temperature won’t rise above the boiling point of 212°F until the moisture evaporates.
When you roast chickpeas that are still damp, they spend the first ten minutes in the oven steaming themselves from the outside in. This results in a mealy, soft center rather than a crisp shell. By removing the surface moisture, the olive oil can immediately begin frying the exterior of the legume. Similarly, the high heat transforms the natural sugars within the carrots into a deeply caramelized crust, turning a humble root vegetable into something candy-like and complex.
The Preheated Cast Iron Advantage
Cast iron is a powerhouse because of its incredible thermal mass. Unlike a thin aluminum baking sheet that loses heat the moment you open the oven door, a cast iron skillet holds onto that energy. By preheating the skillet, you create a screaming hot surface that provides immediate conductive heat. This sears the carrots the second they touch the metal, locking in their structure and preventing that “boiled” texture that plagues so many home-cooked veggie dishes.
Essential Components for Roasted Carrots and Crispy Chickpeas
Quality ingredients are the foundation here, starting with the yogurt. You absolutely must use full-fat Greek yogurt for the whipped base. The higher fat content provides the structural stability needed to hold air when whisked, creating a “cloud” that won’t turn into a puddle under the weight of the hot carrots. Low-fat versions often contain thickeners that can become grainy or runny when they hit the warmth of the roasted vegetables.
The spice blend is equally vital. Smoked paprika provides an earthy depth that mimics a wood-fired oven, while cumin adds a nutty warmth. We use red pepper flakes to create a “hot honey” effect during the roasting process. As the honey and oil mingle with the flakes in the high heat of the skillet, they create a spicy-sweet glaze that clings to the blistered skins of the carrots, offering a punchy contrast to the cooling lemon-infused yogurt.
Selecting and Prepping the Carrots
Look for small-to-medium whole carrots, ideally with the green tops still attached. I like to trim the tops down to about an inch; it adds a rustic, farm-to-table aesthetic and gives you a little “handle” if you’re eating these as finger food. Instead of peeling them, just give them a vigorous scrub. The skin contains a lot of flavor and helps maintain the carrot’s integrity during the high-heat roast, providing a better snap when you bite into it.
For a similarly delightful experience with tender roots, explore glazed carrots with creamy yogurt.
The Chickpea Drying Ritual
This is the most labor-intensive part of the recipe, but it’s non-negotiable. After rinsing your chickpeas, roll them around in a clean kitchen towel. You want to rub them until they are completely matte and dry. If the thin, translucent skins start to flake off, just toss them away. Removing those skins actually helps the oil and spices penetrate the chickpea directly, which leads to a much more consistent and long-lasting crunch once they’ve cooled slightly.
More to Explore
Round out your meal with these other satisfying chickpea recipes.
- For an extra layer of spiced crunch, try these crispy spiced roasted chickpeas, which share a similar preparation method.
- If you enjoy the flavors of the Mediterranean, you’ll appreciate this Mediterranean zesty chickpea salad for a refreshing addition.
Step-by-Step: Achieving the Perfect Char
Once your oven and skillet are at 425°F, you have to move quickly. When you pull that hot pan out, the sizzle you hear as the vegetables hit the surface is the sound of success. That immediate sear is what prevents the carrots from getting limp. Therefore, you must ensure you aren’t overcrowding the pan. If the carrots are piled on top of each other, they will trap steam between them, ruining all your hard work in the drying phase.
Give the vegetables plenty of breathing room so the hot air can circulate entirely around each piece. Halfway through the roasting time, give the skillet a good shake or use tongs to roll the chickpeas. You’re looking for carrots that are tender when pierced with a fork but have dark, blistered spots on the outside. The chickpeas should feel firm to the touch and look like golden nuggets of flavor.
Aerating the Whipped Yogurt Base
While the oven does the heavy lifting, you can focus on the yogurt. Whisking the Greek yogurt with lemon juice and a pinch of salt does more than just season it; it incorporates tiny air bubbles into the fat. This aeration creates a light, voluminous texture that feels sophisticated on the tongue. It transforms the yogurt from a simple dollop into a supportive base that can hold the heavy, roasted components without collapsing into a flat sauce.
The Two-Minute Cooling Window
Timing is everything when it comes to assembly. If you dump the hot vegetables onto the yogurt the second they come out of the oven, the residual heat will break the emulsion of the yogurt, turning it into a liquid mess. However, if you wait too long, you lose that beautiful temperature contrast. Let the skillet sit on the counter for exactly two minutes. This allows the initial “surface fire” of the vegetables to calm down while keeping the centers piping hot.
Flavor Variations and Ingredient Swaps
This formula is incredibly versatile if you want to experiment with what’s in your pantry. You can easily swap the carrots for parsnips or heirloom beets, though keep in mind that beets may take a bit longer to soften. If you want to change the cultural profile of the dish, swap the parsley for fresh mint or dill. This shifts the flavor from a warm, earthy Middle Eastern vibe to a bright, Mediterranean feel that pairs beautifully with a squeeze of extra lemon.
For those looking for a different base, labneh is a fantastic substitute for Greek yogurt as it is even thicker and more tart. If you need a dairy-free option, silken tofu blended with a little lemon and olive oil can mimic the creamy texture of the whipped yogurt quite well. You can also play with the crunch factor by adding toasted walnuts or slivered almonds to the skillet during the last five minutes of roasting.
What to Serve with Roasted Carrots and Crispy Chickpeas
This dish is hearty enough to stand alone as a light lunch, but it truly shines when paired with complementary textures. Warm flatbread or za’atar manakish is perfect for scooping up the extra whipped yogurt and stray chickpeas. The soft bread provides a nice counterpoint to the crunchy vegetables. If you want to keep things on the lighter side, a bright arugula salad with a simple lemon-tahini dressing adds a peppery bite that cuts through the richness of the yogurt.
For a more substantial meal, serve this alongside a fluffy quinoa pilaf or some toasted couscous. The grains act as a sponge for the honey-chili oil drizzle that pools at the bottom of the plate. Because the dish is so rich in texture and flavor, you don’t need a complex main course. A simple roasted chicken or a piece of seared fish would be more than enough to round out the table.
Troubleshooting Common Roasting Mistakes
If your chickpeas come out chewy instead of crispy, it usually boils down to two things: moisture or oil. If they weren’t dry enough, they steamed. If they weren’t coated thoroughly in oil, they dehydrated into hard pebbles rather than frying into crispy snacks. Next time, ensure every chickpea has a glossy coat of oil before hitting the pan. Also, check your oven temperature with a thermometer; many ovens run cool, and you need that true 425°F for the best results.
If your yogurt base feels too thin, it might be the brand of yogurt you chose. Some “Greek-style” yogurts aren’t actually strained and contain extra liquid. You can fix this by straining the yogurt through a piece of cheesecloth or a coffee filter for an hour before whisking. If you accidentally over-char the carrots, don’t panic. The bitterness of a dark char can be balanced by adding an extra drizzle of honey or a sprinkle of salt right before serving.
Why are my chickpeas still chewy?
Chewy chickpeas are almost always caused by residual moisture. If the surface of the chickpea is wet, it cannot reach the temperatures required for frying. Additionally, ensure you are using enough olive oil. The oil acts as a heat conductor, surrounding the chickpea and ensuring the heat is distributed evenly. Without enough oil, the chickpeas simply dry out and become tough rather than light and crispy.
Can I use a standard baking sheet?
You can certainly use a standard baking sheet, but you might miss out on some of the deep searing that cast iron provides. Aluminum doesn’t hold heat as well as cast iron, so the temperature of the pan will drop when you add the cold vegetables. To compensate, let your baking sheet preheat in the oven for at least 10 minutes, and consider upping the oven temperature to 435°F to ensure a quick sear.
How do I store leftovers without losing the crunch?
Crispy chickpeas are notorious for losing their texture in the fridge because they absorb moisture from the air. For the best results, store the roasted vegetables and the whipped yogurt in separate airtight containers. When you’re ready to eat, re-crisp the carrots and chickpeas in an air fryer or a dry skillet for a few minutes until they regain their snap. Assemble the dish fresh with the cold yogurt right before serving.
Is there a substitute for Dukkah?
Dukkah is a wonderful Egyptian spice and nut blend, but if you don’t have it, you can make a quick “cheat” version. Simply toast some sesame seeds in a dry pan with crushed hazelnuts or almonds and a pinch of coriander seeds. Crush them together with a mortar and pestle or the bottom of a heavy skillet. This provides that essential nutty crunch and aromatic finish that makes the dish feel truly professional.
The Final Flourish: Plating for Visual Impact
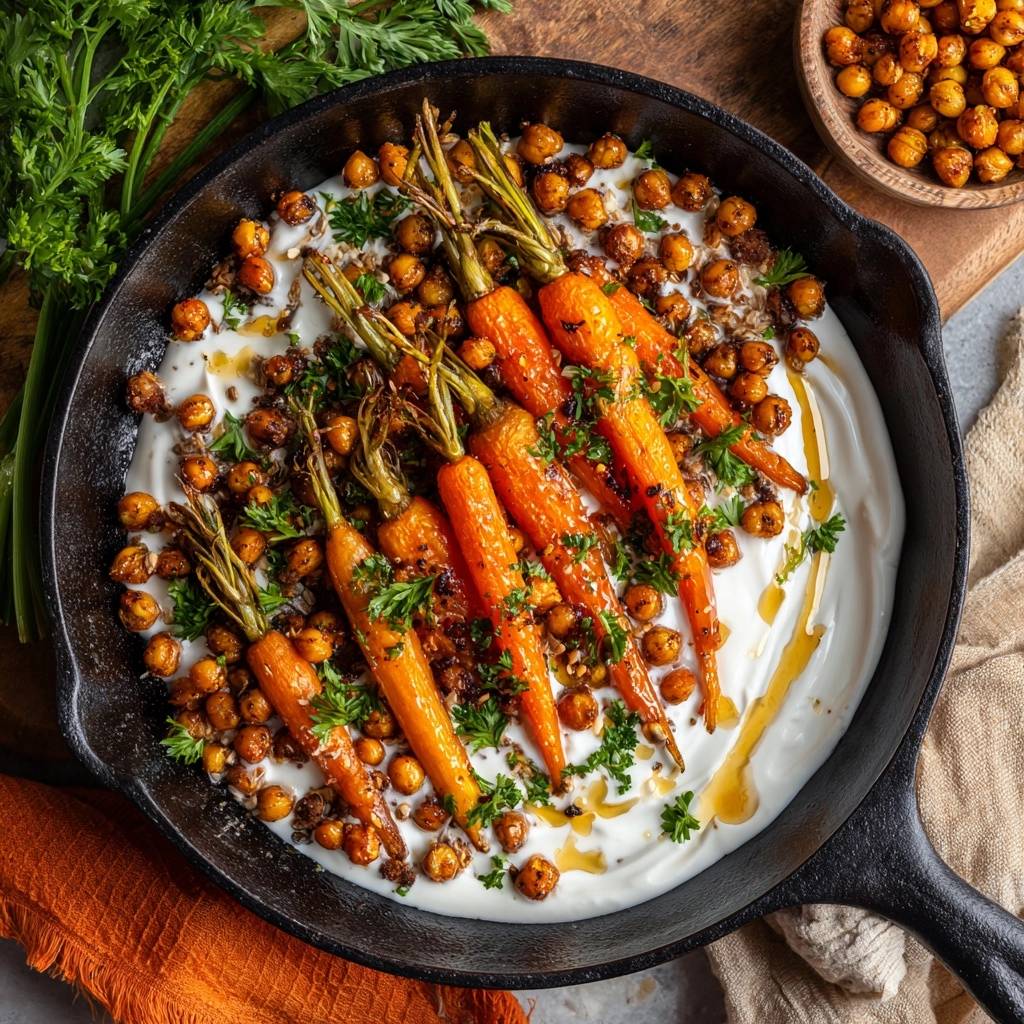
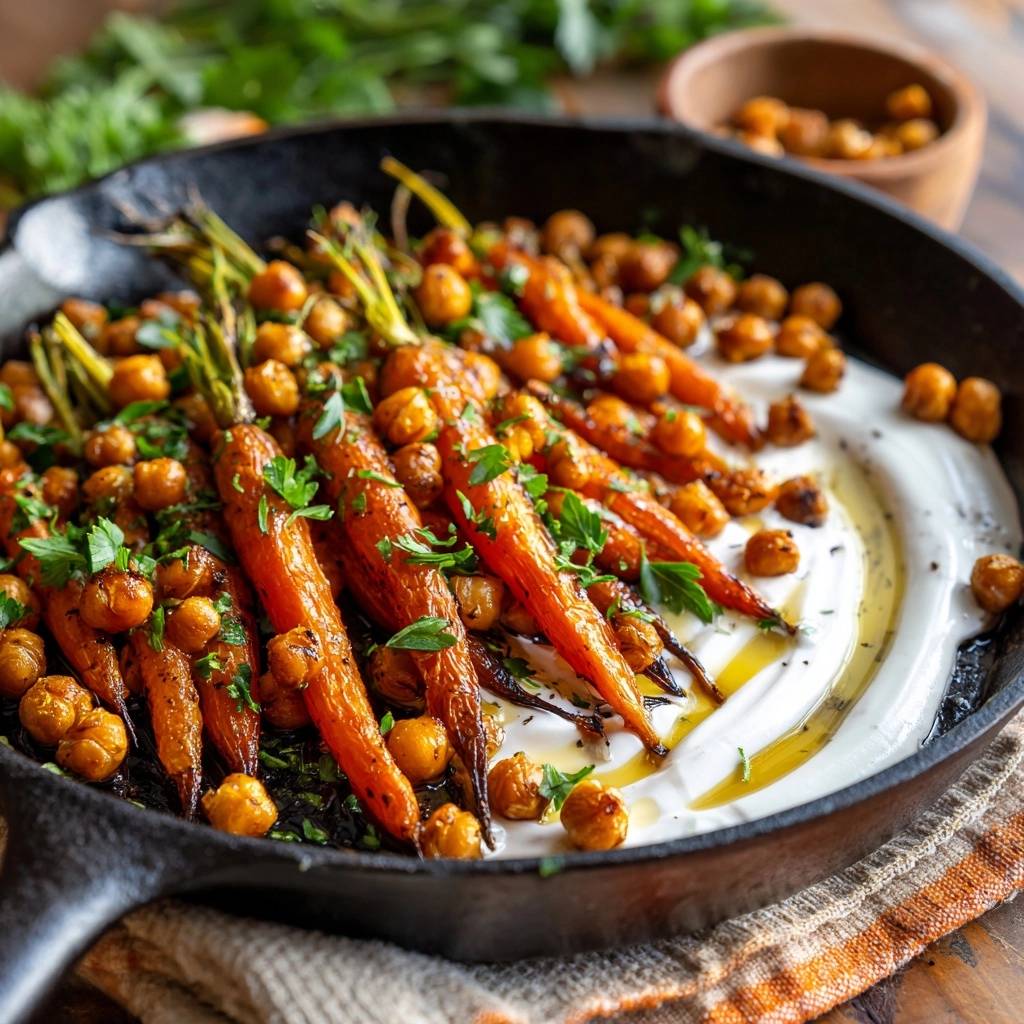
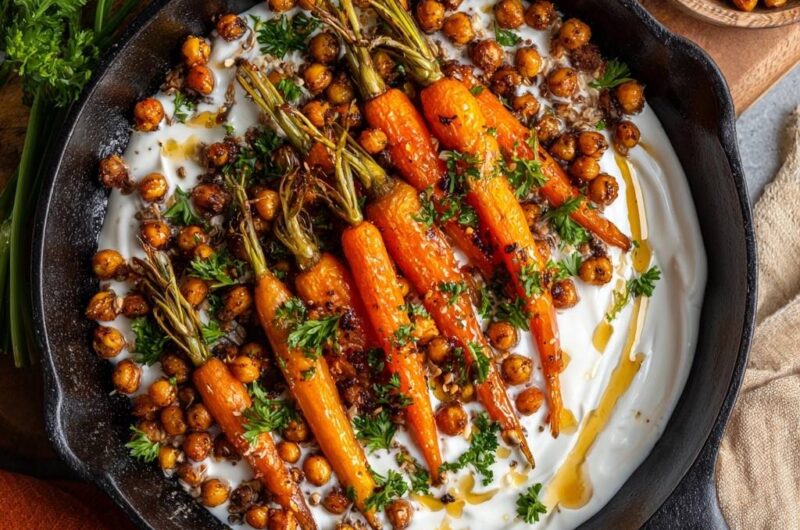
To get that restaurant-style look, use the “swoosh” technique. Place a large dollop of the whipped yogurt in the center of a platter or the skillet, then use the back of a large spoon to swirl it outward in a circular motion. This creates “valleys” that will catch the honey and oil drippings. It also provides a stable bed for the carrots so they don’t roll around when you move the dish to the table.
When arranging the carrots, think about height rather than width. Stack them slightly haphazardly over the yogurt to create a sense of volume. Scatter the chickpeas into the gaps and finish with a generous drizzle of the remaining olive oil and honey. The oil will catch the light and give the dish a glossy, photographic finish. Finally, don’t be shy with the parsley; the bright green color makes the orange carrots and golden chickpeas pop visually.
Roasted Carrots and Chickpeas
Course: Side DishCuisine: MediterraneanDifficulty: easy4
servings15
minutes30
minutes310
kcal45
MinutesA vibrant dish featuring deeply caramelized carrots and crunchy chickpeas served over a cool, creamy whipped Greek yogurt base, finished with a sweet and spicy drizzle.
Ingredients
1 bunch small-to-medium whole carrots (tops trimmed to 1 inch), scrubbed
1 can (15 oz) chickpeas, rinsed and drained
3 tablespoons olive oil, divided
1 teaspoon smoked paprika
1 teaspoon ground cumin
1/2 teaspoon garlic powder
1/2 teaspoon red pepper flakes (for the “hot honey” effect)
Salt and black pepper to taste
1.5 cups plain Greek yogurt (full fat preferred for the visual thickness)
1 tablespoon lemon juice
1 tablespoon honey or maple syrup
1/4 cup fresh parsley, roughly chopped
Optional: 1 tablespoon dukkah or toasted sesame seeds for extra texture
Directions
- Preheat your oven to 425°F (220°C). Place a large 10 or 12-inch cast iron skillet inside the oven while it preheats. A screaming hot pan is essential for immediate searing and preventing sogginess.
- The most critical step for the chickpeas: Spread the drained chickpeas onto a clean kitchen towel. Rub them vigorously to remove all surface moisture. If the thin skins come off, discard them-this helps them get even crispier. Let them air dry for 5 minutes while the oven finishes heating.
- In a large bowl, toss the dry chickpeas and carrots with 2 tablespoons of olive oil, paprika, cumin, garlic powder, red pepper flakes, salt, and pepper until heavily coated.
- Carefully pull the hot skillet from the oven. Immediately add the carrot and chickpea mixture. You should hear a loud sizzle. Arrange the carrots so they are not overlapping to ensure even browning.
- Roast for 25 to 30 minutes. At the 15-minute mark, shake the pan or use tongs to roll the chickpeas and flip the carrots. The carrots should be tender with charred, blistered skins, and the chickpeas should be golden and firm.
- While the vegetables roast, prepare the whipped yogurt: In a bowl, whisk the Greek yogurt with lemon juice and a pinch of salt until light and airy.
- Assembly: Once the vegetables are done, remove the skillet from the oven. Let it cool for 2 minutes so the yogurt doesn’t immediately melt. Carefully spread the whipped yogurt directly into the skillet (or onto a platter), swirling it with the back of a spoon.
- Arrange the hot roasted carrots and chickpeas over the yogurt.
- Finish the dish: Drizzle with the remaining tablespoon of olive oil and the honey. Garnish heavily with fresh parsley and optional dukkah. Serve immediately while the vegetables are hot and the yogurt is cold.
Notes
- The secret to the crunch is ensuring chickpeas are bone-dry before roasting. Using a preheated cast iron skillet prevents sogginess and ensures immediate searing.