
For years, I chased that elusive perfect stack-light, airy, and never dense-often ending up with flat, rubbery disappointments. My journey to consistently fluffy pancakes changed everything, and now I’m sharing the ultimate secret to achieving incredible
S’mores Pancakes
. This recipe isn’t just about recreating a campfire classic; it’s about delivering unbelievably tender, golden-brown stacks that melt in your mouth, guaranteed to elevate any morning.Beyond the Campfire: Why These S’mores Pancakes Reign Supreme
The “Never Dense” Promise: Achieving That Perfect Fluff
Many pancake recipes yield dense, heavy results, a common frustration for home cooks. Our method specifically targets this issue, ensuring every bite is light and airy, reminiscent of a cloud.
The secret lies in precise ingredient ratios, gentle mixing techniques, and a crucial batter resting period. These steps work in harmony to develop an incredibly tender crumb, preventing the dreaded overdeveloped gluten that leads to tough pancakes.
For that perfect gooey campfire flavor, check out these gooey campfire s’mores.
A Flavor Adventure for Breakfast (or Any Time!)
Imagine the nostalgic delight of gooey marshmallows, melted chocolate, and crunchy graham cracker crumbs-all nestled within a warm, fluffy pancake. This recipe transforms a beloved campfire treat into an irresistible breakfast or dessert indulgence.
These S’mores Pancakes are perfect for a special weekend brunch, a fun family breakfast, or even a unique dessert. They offer a comforting sweetness and playful texture that appeals to all ages.
Effortless Indulgence: Simple Steps, Stunning Results
Despite their impressive appearance and luxurious taste, these fluffy pancakes are surprisingly easy to make. Our clear, concise instructions guide you through each step, ensuring success even for novice bakers.

You’ll achieve stunning, Instagram-worthy breakfast stacks with minimal fuss, making indulgent mornings more accessible than ever. The payoff of warm, golden brown pancakes topped with rich chocolate syrup and creamy whipped cream is truly worth every simple step.
Crafting Your Masterpiece: The Essential Ingredients
Pancake Foundation: Dry Ingredients for Unbeatable Lift
All-Purpose Flour: The backbone of your pancake structure. Using the correct amount ensures tenderness without becoming cakey or tough.
Granulated Sugar: Adds a touch of sweetness and helps with that beautiful golden-brown caramelization on the griddle.
Baking Powder: This is your primary leavening agent, crucial for those incredible fluffy pancakes. Always check its freshness for optimal lift.
Salt: A small amount balances the sweetness and enhances all the other flavors, making each bite more vibrant.
The Liquid Gold: Wet Ingredients for Perfect Moisture
Milk: Provides the necessary hydration for the batter, resulting in a tender and moist pancake texture.
Large Egg: Acts as an emulsifier, binding the ingredients together, adding richness, and contributing to the overall structure and tenderness of the pancakes.
Vegetable Oil: Adds essential moisture and helps create a very tender crumb. It also contributes to the golden hue during cooking.
S’mores Magic: Chips, Mallows, and Graham Cracker Love
Mini Chocolate Chips: These are vital for easy melting and even distribution. The “mini” size prevents them from sinking to the bottom of the batter and allows for more chocolatey goodness in every bite.
Mini Marshmallows: Similarly, mini marshmallows melt into gooey pockets of sweetness without overpowering the pancake. They provide that classic S’mores texture beautifully.
Graham Cracker Crumbs: Offers that iconic crunch and honeyed flavor that defines S’mores. A quarter cup adds perfect textural contrast.
Whipped Cream, Chocolate Syrup, Caramel Syrup: These are the ultimate finishing touches, adding creamy texture and decadent drizzles to your homemade pancakes.
Your Kitchen Arsenal: Tools for Pancake Success
Large Mixing Bowls & Whisk: Essential for separating wet and dry ingredients. This ensures proper aeration and prevents overmixing, which is key for fluffy pancakes.
Nonstick Griddle or Pan: A well-seasoned nonstick surface is critical for effortlessly flipping pancakes without them sticking or tearing. This ensures a beautiful golden brown crust.
Ladle or 1/4 Cup Measuring Cup: Using a consistent measure for each pancake helps create uniform sizes, ensuring they cook evenly and stack beautifully.
Spatula: A thin, wide spatula is ideal for gently sliding under the pancakes. This allows for clean, easy flips without deflating your delicate, fluffy creations.
From Batter to Bliss: Your Step-by-Step Guide
The Foundation: Mixing Dry and Wet Separately
In a large bowl, whisk together the all-purpose flour, granulated sugar, baking powder, and salt until thoroughly combined. This initial step ensures all the leavening agents are evenly distributed, vital for consistent lift.
In a separate medium bowl, whisk together the milk, egg, and 2 tablespoons of vegetable oil. Keeping wet and dry separate prevents lumps and makes for easier, gentler combining later.
The Art of the Fold: Preventing Overmixing (and Adding Chips!)
Pour the wet ingredients into the dry ingredients. Stir gently with a spoon or spatula just until they are barely combined. A few lumps are not just acceptable, they are actively desired! Overmixing develops gluten, which leads directly to tough, flat pancakes.
If you’re adding 1/2 cup of mini chocolate chips to the batter, fold them in now with minimal additional stirring. This ensures they are evenly dispersed without compromising the delicate batter structure.
The Fluff Factor: The Crucial Batter Rest
Allow your pancake batter to rest undisturbed for 5 to 10 minutes. This resting period is one of the most critical steps for achieving truly light and airy S’mores Pancakes.
During this time, the flour fully absorbs the liquid, and the baking powder begins its work, creating tiny air pockets that translate into an incredibly soft and tender texture when cooked.
Griddle Gold: Perfect Heat for Golden Edges
Heat a lightly oiled griddle or nonstick pan over medium heat. To test the heat, drop a tiny bit of water onto the surface; it should sizzle immediately and evaporate.
Achieving the right medium heat is crucial. Too hot, and your pancakes will burn on the outside before cooking through; too cool, and they will become greasy and not brown properly.
Cooking Your S’mores Pancakes to Perfection
Pour about 1/4 cup of batter per pancake onto the hot griddle. Cook for 2-3 minutes per side, or until the edges appear set and plenty of bubbles form and burst on the surface.
Once you see those beautiful bubbles, it’s time for the flip! Cook for another 2-3 minutes on the second side until golden brown and cooked through.
The S’mores Reveal: Topping As You Cook for Melty Goodness
After you flip each pancake, immediately scatter a few mini marshmallows and mini chocolate chips directly on top. Don’t wait until they’re off the griddle!
The residual heat from the griddle will gently soften and melt these delicious toppings right into the pancake, creating those signature gooey pockets that make these S’mores Pancakes so irresistible.
Stacking and Serving Your Dream Pancakes
As each pancake finishes cooking, stack them directly onto a plate. The warmth from the cooked pancakes will keep everything soft and ready for the final step.
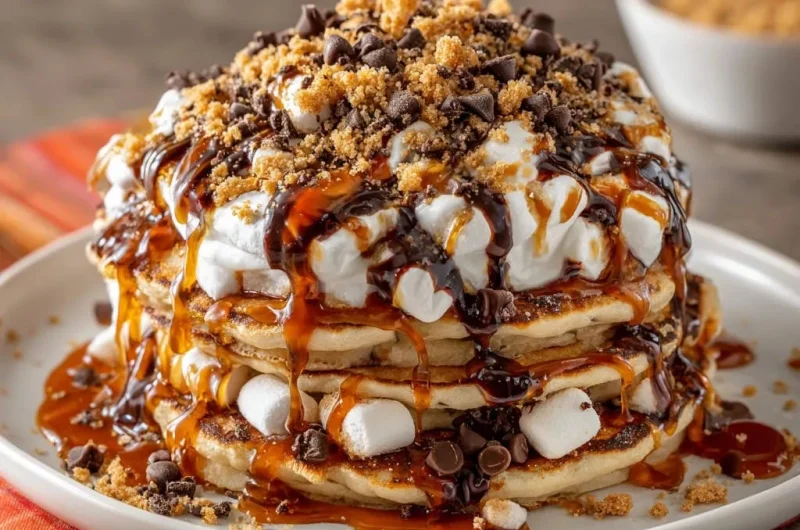
Now, the real fun begins: generously top your fluffy S’mores Pancakes with whipped cream, more mini marshmallows, mini chocolate chips, and a sprinkle of graham cracker crumbs. Finish with liberal drizzles of chocolate syrup and caramel syrup. Serve immediately and enjoy your indulgent treat!
Elevate Your Stack: Expert Tips for S’mores Pancake Perfection
Don’t Overmix! The Golden Rule: The absolute cornerstone of fluffy pancakes is minimal mixing. Overmixing develops gluten, leading to a chewy, tough texture. Stir just until the dry ingredients are moistened, embracing those delightful lumps.
Mastering Griddle Temperature: Medium heat is your sweet spot. If it smokes, it’s too hot; if pancakes are pale and greasy, it’s too cool. Test with a tiny drop of batter – it should spread slightly, sizzle, and brown within a minute.
The Art of the Flip: Wait for distinct bubbles to form across the surface and the edges to look set before flipping. A confident, swift flip is key to maintaining their airy structure.
Warm Holding: Keep cooked pancakes warm by placing them on a wire rack on a baking sheet in an oven preheated to its lowest setting (around 175-200°F). This ensures every serving is perfectly warm.
Fresh Ingredients Make a Difference: Always use fresh baking powder and milk. Baking powder loses its potency over time, directly impacting your pancakes’ lift and fluffiness. Fresh dairy also contributes to better flavor and texture.
Creative Twists and Serving Inspirations
Beyond Syrup: Unexpected Topping Combinations
While classic syrups are fantastic, consider adding a dollop of creamy peanut butter for a salty-sweet contrast. Fresh berries like raspberries or strawberries can cut through the richness beautifully.
A sprinkle of sea salt can elevate the chocolate flavors, or a handful of toasted chopped nuts can add an extra layer of crunch. Don’t be afraid to experiment with your favorite sweet breakfast additions.
Make it a Meal: Brunch Pairings
Transform your S’mores Pancakes into a complete brunch spread. Pair the sweetness with savory delights like crispy bacon strips, savory breakfast sausage, or perfectly scrambled eggs. The contrast creates a balanced and satisfying meal.
Seasonal S’mores: Festive Variations
Adapt this indulgent treat for holidays! For fall, consider adding a pinch of pumpkin pie spice to the dry ingredients for Pumpkin Spice S’mores Pancakes. During winter, a dash of peppermint extract or crushed peppermint candies can create a festive twist.
Plan Ahead for Pancake Bliss: Storage & Make-Ahead Tips
Storing Leftover Pancakes: Keeping Them Fresh
Cooked S’mores Pancakes can be stored in an airtight container in the refrigerator for up to 2-3 days. Ensure they are completely cooled before storing to prevent condensation, which can make them soggy.
Freezing for Future Cravings: Your Secret Stash
For longer storage, freeze your pancakes! Place cooled pancakes in a single layer on a baking sheet and freeze for about an hour until firm. Then, transfer them to a freezer-safe bag or container, separating layers with parchment paper. They will keep well for 1-2 months, ready for a quick reheat.
Prepping Ingredients in Advance: Streamline Your Morning
To save time, you can whisk together all the dry ingredients (flour, sugar, baking powder, salt) the night before. Store them in an airtight container at room temperature.
However, it’s best to combine the wet ingredients and mix them with the dry just before cooking to ensure the baking powder is most active, guaranteeing maximum fluffiness.
Pancake Pitfalls? Quick Fixes for Common Issues
Why Are My Pancakes Flat or Dense?
This is often caused by overmixing the batter, which develops gluten and results in a tough texture. It can also be due to old, inactive baking powder or skipping the essential batter rest.
Solution: Mix just until the dry ingredients are moistened, embrace the lumps, always use fresh baking powder, and allow the batter to rest for 5-10 minutes before cooking. This ensures a light, airy result.
Pancakes Sticking to the Griddle?
Pancakes stick when there’s insufficient oil on the griddle or the pan isn’t hot enough. A poorly seasoned nonstick pan can also contribute to this problem.
Solution: Ensure your griddle is lightly but adequately oiled before each batch. Confirm the griddle is at the correct medium heat using the water sizzle test. If needed, lightly re-season your nonstick pan.
Marshmallows Too Crispy (or Not Melting)?
Marshmallows might get too crispy if added too early on a too-hot griddle, or not melt enough if added too late on a too-cool surface.
Solution: Scatter the mini marshmallows and chocolate chips immediately after flipping the pancake. The residual heat from the griddle and the cooking pancake will gently soften and melt them perfectly without burning.
Pancakes Burning Before Cooking Through?
If your pancakes are browning too quickly on the outside while remaining raw in the middle, your griddle heat is too high.
Solution: Lower the heat to medium-low and be patient. Cooking at a slightly lower temperature for a longer duration allows the heat to penetrate and cook the pancake through evenly, ensuring a golden brown exterior and a fully cooked interior.
Your S’mores Pancakes Questions Answered
Can I use regular chocolate chips instead of mini?
Yes, you can, but mini chocolate chips are highly recommended. Their smaller size ensures better distribution throughout the batter and melts more consistently into gooey pockets. Regular chips tend to sink and create larger, heavier pockets of chocolate.
Is chilling the batter really necessary?
The 5 to 10-minute resting period for the batter is absolutely necessary for optimal fluffiness, as it allows ingredients to hydrate and baking powder to activate. Chilling the batter beyond this rest is not specified for this recipe and won’t significantly impact the texture, though some recipes do call for it for deeper flavor development.
What’s the best way to reheat S’mores Pancakes?
For the best results, reheat pancakes in a toaster oven or oven (350°F for 5-7 minutes) until warmed through and slightly crisp. Microwaving works for speed but can sometimes make them a little chewier. You can also briefly warm them on a nonstick pan over low heat.
Can I make this recipe gluten-free?
Yes, you can substitute the all-purpose flour with a 1:1 gluten-free flour blend. Be aware that the texture might be slightly different, and you may need to adjust the milk quantity slightly to achieve the right batter consistency.
Can I make the batter ahead of time?
For the fluffiest results, it’s best to mix the wet and dry ingredients just before cooking after the short rest. You can prepare and combine the dry ingredients ahead of time and store them in an airtight container, then add the wet ingredients when you’re ready to cook.
Ready to Indulge? Your S’mores Pancakes Await!
You now possess the expertise to create extraordinary
S’mores Pancakes
-fluffy, golden, and bursting with nostalgic flavor, destined to become a cherished recipe. Bid farewell to dense, disappointing pancakes and embrace consistently perfect stacks that will delight everyone.Don’t just dream of this sweet breakfast sensation; make it a reality this weekend. Whip up a batch, gather your loved ones, and transform your kitchen into a haven of indulgent aromas. We’d love to see your creations; share your photos and tell us about your experience in the comments below!
S’mores Pancakes
Course: BreakfastCuisine: AmericanDifficulty: easy8
pancakes15
minutes20
minutes350
kcal35
minutesSay goodbye to flat pancakes! This simple method guarantees unbelievably airy, golden S’mores Pancakes every time. Loaded with chocolate, marshmallows, and graham crackers, it’s easier than you think to achieve perfection.
Ingredients
1 and 1/2 cups all-purpose flour
2 tablespoons granulated sugar
1 tablespoon baking powder
1/2 teaspoon salt
1 and 1/4 cups milk
1 large egg
2 tablespoons vegetable oil, plus extra for cooking
1/2 cup mini chocolate chips (for batter, optional)
1 cup mini marshmallows
1/2 cup mini chocolate chips (for topping)
1/4 cup graham cracker crumbs
Whipped cream (from a can or homemade)
Chocolate syrup
Caramel syrup
Directions
- In a large bowl, whisk together the flour, granulated sugar, baking powder, and salt. This ensures all the leavening is evenly distributed.
- In a separate medium bowl, whisk together the milk, egg, and 2 tablespoons vegetable oil until well combined.
- Pour the wet ingredients into the dry ingredients. Stir gently with a spoon or spatula just until combined. A few lumps are perfectly fine and even desired here; overmixing develops gluten and leads to tough, flat pancakes. If using, gently fold in 1/2 cup mini chocolate chips now.
- Allow the batter to rest for 5 to 10 minutes. This gives the flour time to absorb the liquid and allows the baking powder to start working, which is key for a light, fluffy texture.
- Heat a lightly oiled griddle or nonstick pan over medium heat. Test the heat by dropping a tiny bit of water on it; it should sizzle and evaporate.
- Pour about 1/4 cup of batter per pancake onto the hot griddle. Cook for 2-3 minutes per side, or until golden brown and bubbles form on the surface before flipping.
- As each pancake cooks, after flipping, immediately scatter a few mini marshmallows and chocolate chips on top. The residual heat will soften them.
- Stack the cooked pancakes on a plate. Top generously with whipped cream, more mini marshmallows, mini chocolate chips, and graham cracker crumbs.
- Drizzle liberally with chocolate syrup and caramel syrup. Serve immediately and enjoy your perfectly fluffy S’mores pancakes!
Notes
- Do not overmix batter; resting is key for light, fluffy pancakes.