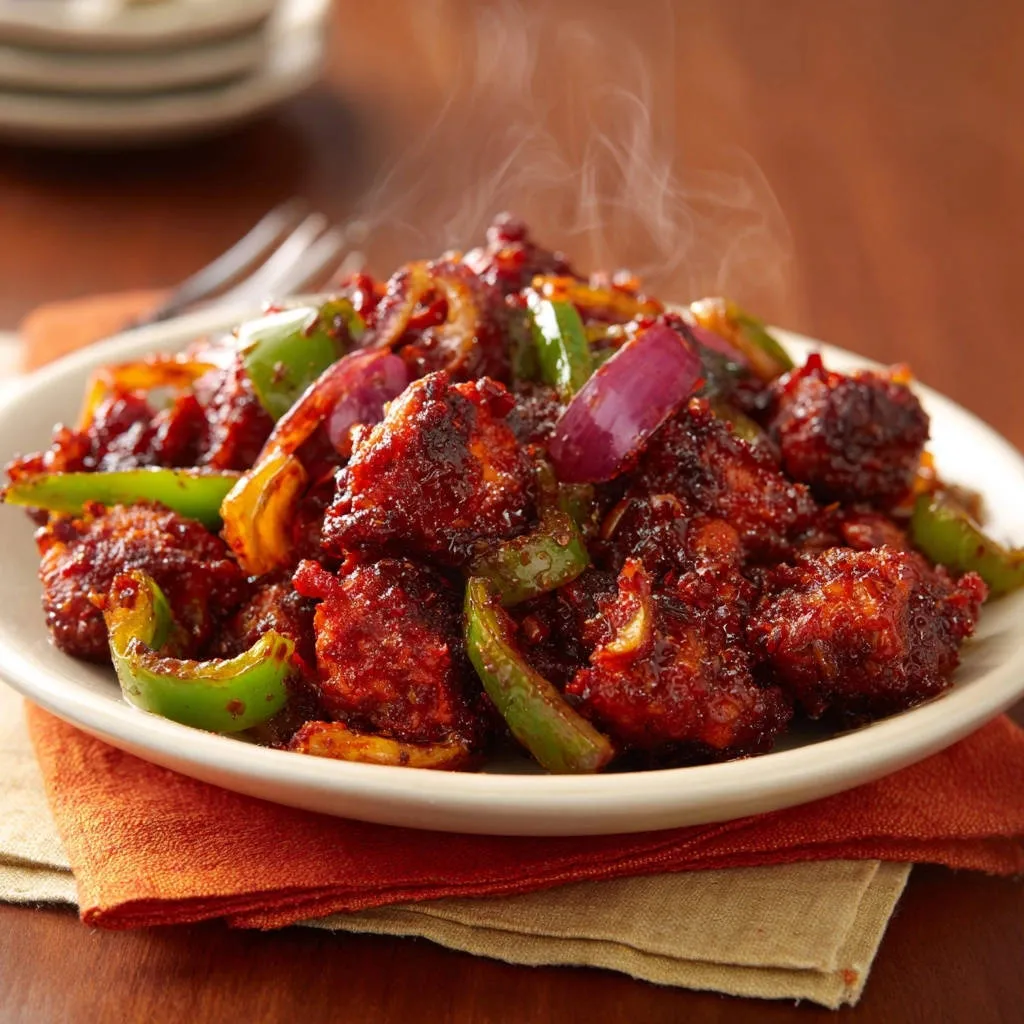
I spent years frustrated by beautiful crispy fried chicken turning instantly mushy the moment it touched a liquid sauce. This proprietary technique solves that common culinary heartache, resulting in guaranteed, perfect Spicy Chili Glazed Chicken Bites every single time.
We achieve this by optimizing the initial batter and mastering a high-viscosity glaze that acts as a protective shield. The result is tender chicken encased in a fiery, sweet, and unbelievably crispy shell that holds its crunch for the entire meal.The Anti-Soggy Breakthrough: Why This Glaze Stays Crisp
Achieving a crispy, glazed chicken bite that doesn’t immediately become saturated requires a tactical approach, addressing both the coating structure and the sauce physics.
For more ideas on achieving a great glaze, check out this crispy glazed chicken.
This recipe uses three specific techniques that work in tandem to create a durable, moisture-resistant exterior, solving the perennial problem of soggy takeaway chicken.
The Dual-Action Coating: Flour, Cornstarch, and Baking Powder
The intentional ratio of 1 cup cornstarch to 1/2 cup flour is critical; cornstarch inhibits gluten development while providing superior surface area for maximum crunch when fried.
The small but mighty addition of baking powder is essential; it creates microscopic air bubbles in the batter, which expand rapidly in the hot oil.
This expansion results in a lighter, puffier, and significantly airier shell that resists density and ultimately reduces moisture absorption.
High Viscosity Glaze: The Barrier Against Moisture Absorption
The secret lies in creating a highly viscous (thick) glaze using a cornstarch slurry added right at the end of the sauce reduction process.
When this specific consistency coats the fried surface, it forms a dense, almost non-porous layer that physically blocks moisture from penetrating the crisp coating underneath.
Unlike standard, thin sauces that quickly saturate the crust, this high-viscosity barrier ensures the crunch is locked in the moment the glaze touches the chicken.
Timing is Everything: The 30-Second Final Toss
Even with the perfect glaze barrier, minimizing contact time is essential to maintain peak crispness. The chicken must be tossed quickly and thoroughly.
The strict 20- to 30-second window is the maximum acceptable time frame to ensure every piece is evenly coated while guaranteeing the anti-soggy integrity of the crust.
Building the Perfect Bite: Key Ingredients & Flavor Layers
A phenomenal texture requires an equally phenomenal flavor profile. Here is the breakdown of the quality and function of the foundational ingredients.
Choosing Your Base: Chicken Thighs vs. Breasts
Boneless, skinless chicken thighs are highly recommended for superior flavor retention, inherent juiciness, and a more robust texture that stands up well to frying.
Breasts are a lean alternative and cook slightly faster, but they require vigilance to avoid dryness; if using breasts, ensure they are cubed uniformly for even cooking.
The Essential Trio of the Glaze Sauce
Low-sodium soy sauce forms the savory, umami-rich backbone of the glaze, providing depth without adding overwhelming saltiness to the final dish.
Packed brown sugar and rice vinegar provide a crucial sweet and tangy contrast, balancing the heat and giving the glaze its signature glossy, deep red shine.
Chili garlic sauce is the heat star, offering fermented chili depth and potent spice that builds complexity, rather than just sharp, flat heat.
The Aromatic Foundation: Ginger and Garlic
For truly vibrant and authentic flavor, never substitute fresh ingredients here. Powdered aromatics are simply too dull for a recipe this flavorful.
Freshly grated ginger provides a bright, pungent lift, while four cloves of minced garlic add a robust and indispensable aromatic foundation.
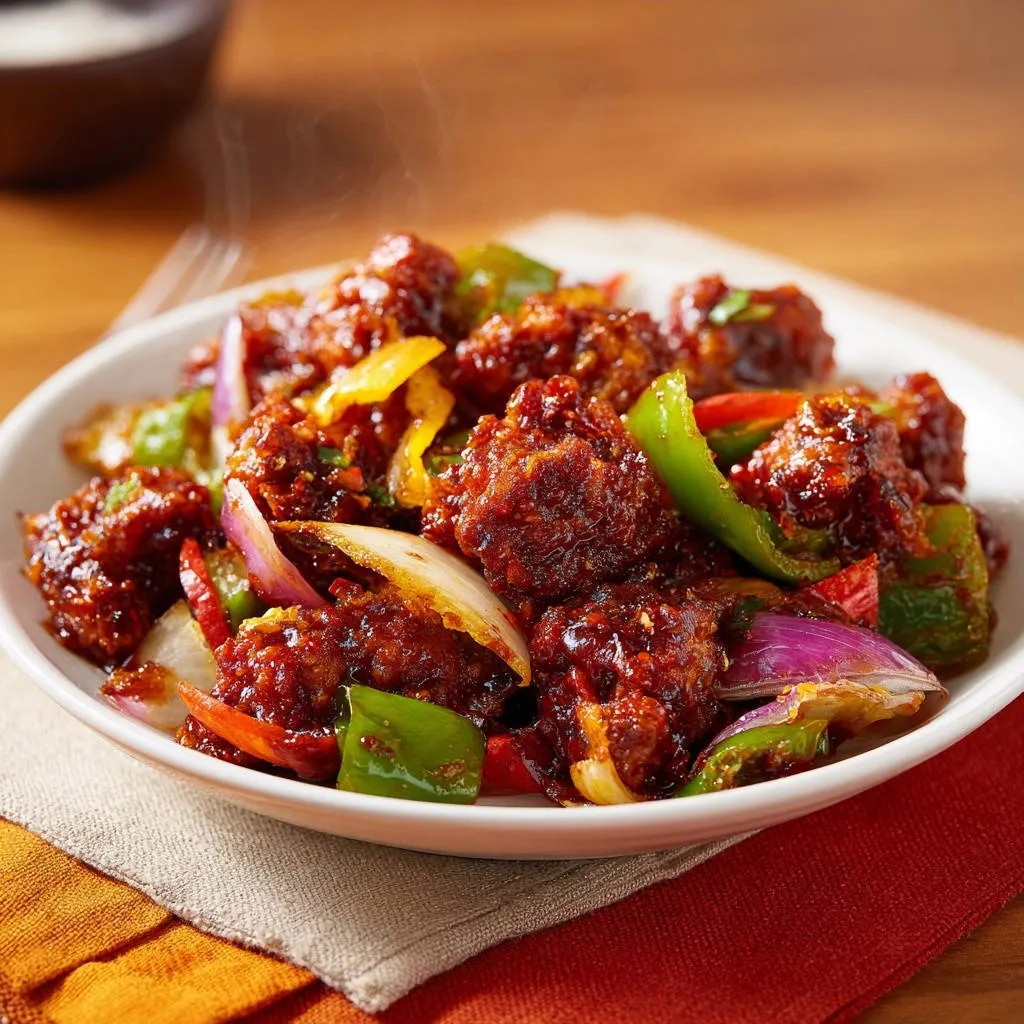
Vegetable Prep: Achieving the Tender-Crisp Texture
The green bell pepper and red onion must be cut into thick, substantial strips, preventing them from wilting or becoming flimsy during the short sauté time.
They are added briefly to the boiling sauce and cooked for 3 to 4 minutes only, ensuring they retain a significant crunch to contrast the tender chicken and sticky glaze.
Essential Kitchen Tools for Frying Success
Preparation is key to safe, efficient frying. These tools are necessary to ensure the perfect texture and safety when preparing your chicken bites.
Deep Fry Thermometer: Necessary for maintaining the precise 350°F oil temperature, which is crucial for achieving internal doneness and a professional crisp exterior without burning.
High-Sided Wok or Deep Pan: A wok is ideal due to its sloped sides and even heat distribution, but any sturdy deep pan works best for safely minimizing oil splatter.
Wire Rack: Draining the fried chicken on a wire rack (rather than paper towels) is critical for airflow, preventing steam buildup that would instantly initiate sogginess.
Spider Strainer or Slotted Spoon: These tools allow for the quick, safe, and efficient removal of chicken batches from the hot oil, ensuring consistent results.
Frying, Glazing, and Tossing: A Step-by-Step Masterclass
Follow these precise steps, paying close attention to temperature and timing, to guarantee the ultimate anti-soggy result for your chicken.
-
The Dry Chicken Mandate:
Before coating, ensure the chicken pieces are patted meticulously dry with paper towels. Residual moisture will dilute the batter and drastically reduce the crispness potential.
-
Mixing the Perfect Batter:
Combine all dry coating ingredients first (flour, cornstarch, baking powder, salt, pepper), then add the 3/4 cup of water, whisking just until a smooth, thick batter forms.
Avoid overmixing, as excessive whisking can activate gluten, resulting in a tough crust instead of the desired airy shell. The batter should fully coat the back of a spoon.
-
Achieving the Target Oil Temperature (350°F):
Use a thermometer to confirm the oil is exactly 350°F (175°C). Oil that is too cold causes the chicken to absorb grease; too hot causes the exterior to burn prematurely.
Fry the coated chicken in small batches (no more than 10-12 pieces at a time) to prevent the oil temperature from dropping drastically when the chicken is added.
-
Glaze Reduction and Flavor Infusion:
Combine all liquid glaze ingredients (excluding the cornstarch slurry) and bring to a rapid, rolling boil. Allow it to boil vigorously for the specified 2 minutes to concentrate the savory and spicy flavors.
-
Sautéing the Vegetables to Tender-Crisp:
Add the thick strips of bell peppers and red onions to the boiling sauce. Cook them only until slightly softened, which takes approximately 3-4 minutes.
They must retain a significant crunch to provide essential textural contrast against the soft chicken interior.
-
Creating the Anti-Soggy Slurry and Thickening:
Whisk the cornstarch slurry (cornstarch and cold water) quickly just before adding it, ensuring no lumps remain in the mixture. Reduce the heat to low, then pour slowly while stirring constantly.
The sauce will thicken almost instantly into a sticky, high-viscosity glaze. This protective glaze should be noticeably thicker than standard stir-fry sauces, easily coating the back of a spoon.
-
The Final, Crucial Toss:
Immediately remove the wok from the heat once the sauce is perfectly thick and glossy. Add the fried chicken pieces and the sautéed vegetables back into the wok.
Rapidly and thoroughly toss the chicken with the glaze for no more than 30 seconds, minimizing moisture contact time. Serve these Spicy Chili Glazed Chicken Bites immediately while piping hot.
Chef’s Secrets & Troubleshooting for Maximum Crunch
Troubleshooting: Why Didn’t My Glaze Thicken Properly?
The primary failure point for thickening is improper slurry preparation. Cornstarch must be completely dissolved in COLD water before being introduced to the hot liquid.
If you add the slurry too fast, or if the glaze is not actively simmering when the slurry is introduced, it will often lump or fail to reach the high-viscosity state necessary to protect the chicken crust.
Troubleshooting: My Chicken Isn’t Staying Crispy After 5 Minutes
Soggy chicken is usually caused by oil temperature dropping too low during frying, which leads to the coating absorbing oil instead of flash-frying.
The second culprit is excessive time spent tossing the chicken in the glaze. Reiterate the importance of the rapid 30-second toss and serving immediately.
Always use your deep-fry thermometer and give the oil time to recover back to 350°F between every single batch of chicken you fry.
Advanced Technique Tips for Perfect Chicken Bites
Double Fry for Ultimate Crunch: For professional-level crispness, adopt the double-fry method. Fry the chicken initially for 4 minutes, remove, let rest for 5 minutes, then return to oil heated to 375°F for 1-2 minutes until deep golden brown.
Controlling the Heat Level: The recipe uses 2 tablespoons of chili garlic sauce for medium heat. For a significantly milder flavor, cut this quantity in half to 1 tablespoon.
For true fire, add a splash of sriracha or a few dashes of dried red chili flakes to the glaze while it is reducing to ramp up the intensity.
The Importance of Oil Disposal: Always allow used frying oil to cool completely before pouring it into a non-recyclable sealed container, such as an old jar or carton, and disposing of it with household trash.
Never pour used cooking oil down the sink drain, as it will clog pipes.
Flavor Pairings: What to Serve Alongside Your Chicken Bites
The intense, sticky, and spicy flavor profile of this chicken requires simple, balancing side dishes that either absorb the excess glaze or cut through the richness.
Classic Side Dishes for Absorbing the Glaze
Steamed white rice, such as aromatic Jasmine or Basmati, is the perfect neutral foundation to soak up the excess, sticky sauce.
Alternatively, simple lo mein noodles or a quick garlic fried rice work beautifully as carriers for the intense, savory flavor of the glaze.
Cooling, Acidic Counterparts
The richness of the glaze is perfectly countered by acidic, fresh sides. Try a quick pickled radish or a simple cucumber salad dressed with a splash of rice vinegar.
Blanched, crisp broccoli or sautéed green beans tossed in a light soy-ginger vinaigrette offer essential texture and freshness, cleansing the palate between bites.
Make-Ahead Tips and Storage for Maximum Freshness
Can I Prep the Chicken Ahead of Time?
You can pre-cut the chicken, chop the vegetables, and fully mix the liquid glaze sauce (minus the cornstarch slurry) 1-2 days in advance and store everything separately in the refrigerator.
Crucially, only mix the cornstarch and flour batter when you are 5 minutes away from frying, as the baking powder loses its rising power quickly once combined with water.
The Golden Rule of Reheating Leftovers
Never reheat these glazed chicken pieces in the microwave, as the steam generated will instantly and completely destroy the crispness we worked so hard to achieve.
The best method is to use a high-heat oven (400°F) or an air fryer for 5-7 minutes until the exterior is sizzling hot and slightly revived.
Because the glaze is engineered to be thick, it will re-adhere to the chicken without completely liquefying, retaining some of its satisfying stickiness and texture.
Frequently Asked Questions About Chili Glazed Chicken
How Can I Make This Gluten-Free?
Yes, this recipe is easily adapted for those avoiding gluten. Substitute the all-purpose flour in the batter with rice flour or a quality gluten-free baking blend.
Additionally, ensure you swap the standard soy sauce for tamari or coconut aminos to keep the savory, umami flavor profile intact while maintaining gluten-free integrity.
Can I Bake or Air Fry the Chicken Instead of Deep Frying?
While deep frying yields the ultimate puffy, crispy texture, air frying is a respectable alternative for a healthier bite, though the result will be less crispy.
Toss the fully battered chicken pieces with a light spray of vegetable oil and cook in the air fryer at 400°F for 15-20 minutes, flipping halfway, until golden and cooked through.
For baked chicken, use the same oil spray method and bake at 425°F for 20-25 minutes on a wire rack placed over a baking sheet.
Is it Safe to Freeze Spicy Chili Glazed Chicken Bites?
Freezing pre-coated or glazed chicken is not recommended, as the delicate fried texture will be completely ruined upon thawing and reheating, turning spongy.
However, the completed glaze sauce (before the final thickening slurry is added) freezes exceptionally well; thaw, reheat, thicken with a fresh slurry, and coat a newly fried batch of chicken.
Ready to Impress? Share Your Spicy Chili Glazed Chicken Bites Masterpiece!
Mastering the perfect crispy glaze can seem intimidating, but by utilizing the dual-action batter and the crucial high-viscosity thickening secret, success is within reach for any home cook.
Remember that the minute details-maintaining oil temperature, cutting the vegetables thick, and executing the rapid 30-second toss-are what separate a messy dish from a restaurant-quality triumph.
Now that you have the knowledge and the confidence, grab your thermometer and conquer the crispy glaze. You are now equipped to handle this challenge.
We encourage you to share your results and let us know how much you enjoyed creating these unforgettable, perfectly crispy Spicy Chili Glazed Chicken Bites!
Spicy Chili Glazed Chicken
Course: Main CourseCuisine: AsianDifficulty: medium4
servings20
minutes25
minutes650
kcal45
minutesSay goodbye to soggy sauced chicken! This revolutionary technique uses a unique glaze viscosity to guarantee perfectly crispy fried chicken bites every time, even when coated in a sticky, sweet, and spicy chili sauce. Serve over rice for the ultimate takeout experience.
Ingredients
1.5 pounds boneless skinless chicken (thigh or breast), cut into 1-inch cubes
1 large green bell pepper, cut into thick strips
1 large red onion, cut into thick strips
1 cup cornstarch
1/2 cup all-purpose flour
1 teaspoon baking powder
1 teaspoon salt
1/2 teaspoon black pepper
3/4 cup water
Vegetable oil, for frying
For the Glaze Sauce:
1/2 cup soy sauce (low sodium preferred)
1/4 cup brown sugar, packed
2 tablespoons rice vinegar (non-alcoholic)
1 tablespoon sesame oil
1/2 cup water
1/4 cup ketchup
1 tablespoon fresh grated ginger
4 cloves fresh minced garlic
2 tablespoons chili garlic sauce (adjust to heat preference)
2 tablespoons cornstarch
4 tablespoons cold water (for slurry)
Directions
- Prepare the Chicken Coating: In a medium bowl, whisk together the cornstarch, all-purpose flour, baking powder, salt, and pepper. Add the 3/4 cup of water and whisk until a smooth, thick batter forms.
- Coat and Fry the Chicken: Pat the chicken pieces very dry. Toss the chicken in the batter until fully coated. Heat 2 inches of vegetable oil in a deep pan or wok to 350 degrees F. Fry the chicken in batches for 5 to 7 minutes until fully cooked and light golden brown. Remove and drain on a wire rack.
- The Anti-Soggy Coating Technique: The Sauce Reduction: In a separate small bowl, whisk together the 2 tablespoons of cornstarch and 4 tablespoons of cold water to create the slurry. Set aside.
- Glaze Preparation: In a large wok or skillet, combine all Glaze Sauce ingredients (soy sauce, brown sugar, rice vinegar, sesame oil, 1/2 cup water, ketchup, ginger, garlic, chili sauce), excluding the cornstarch slurry. Bring the sauce to a boil over medium-high heat. Let it boil vigorously for 2 minutes to reduce slightly.
- Sauté Vegetables: Add the bell pepper strips and red onion strips to the sauce and cook for 3 to 4 minutes until they are slightly tender-crisp.
- Lock in the Crisp: Reduce the heat to low. Whisk the cornstarch slurry quickly one last time, then slowly pour it into the boiling sauce while stirring continuously. The sauce will thicken instantly into a very sticky, thick glaze that barely coats the back of a spoon. This high-viscosity glaze is the secret to preventing the fried crust from absorbing moisture.
- The Final Toss: Once the sauce is thick and glossy, immediately remove the wok from the heat. Add the fried chicken pieces and rapidly toss the chicken with the glaze and vegetables for only 20 to 30 seconds, ensuring every piece is coated but minimizing the time the chicken spends wet. Serve immediately while still piping hot to maintain the guaranteed crispy texture.
Notes
- Ensure the glaze is extremely thick before tossing the chicken to maintain crispness.