There is nothing more frustrating than spending time achieving perfectly crispy chicken tenders, only for the crust to immediately dissolve into a sad, soggy mess upon saucing. I’ve cracked the code on this exact pain point, creating a highly viscous, intense glaze that adheres beautifully without penetration.
This recipe for Sticky Garlic Ginger Crispy Chicken Tenders delivers an unbeatable crunch and a vibrant flavor profile, thanks entirely to a specific sauce reduction technique that ensures your crispiness lasts.
For another take on crispy chicken, explore these sweet and spicy chicken bites.
The Anti-Soggy Secret: Why This Sticky Garlic Ginger Chicken Is Unbeatable
The Critical Difference: Achieving High Viscosity in the Glaze
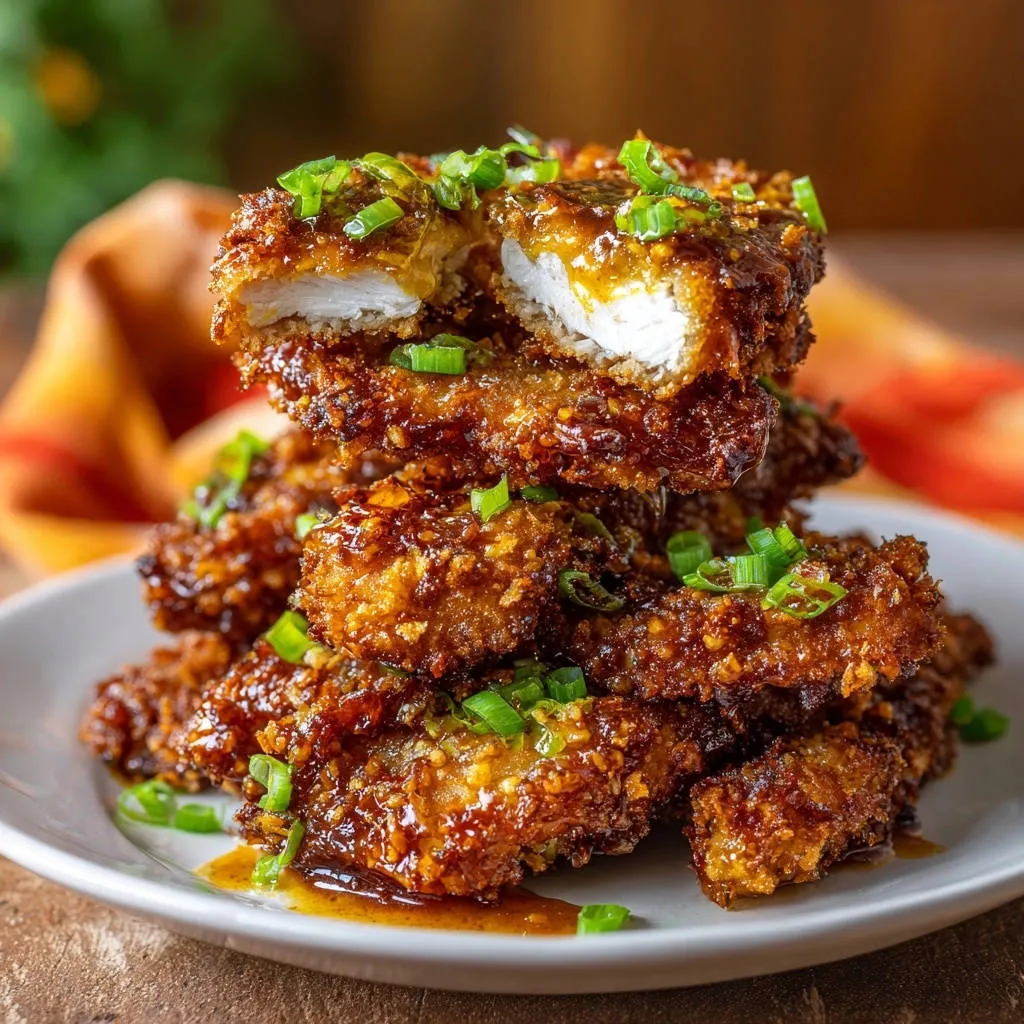
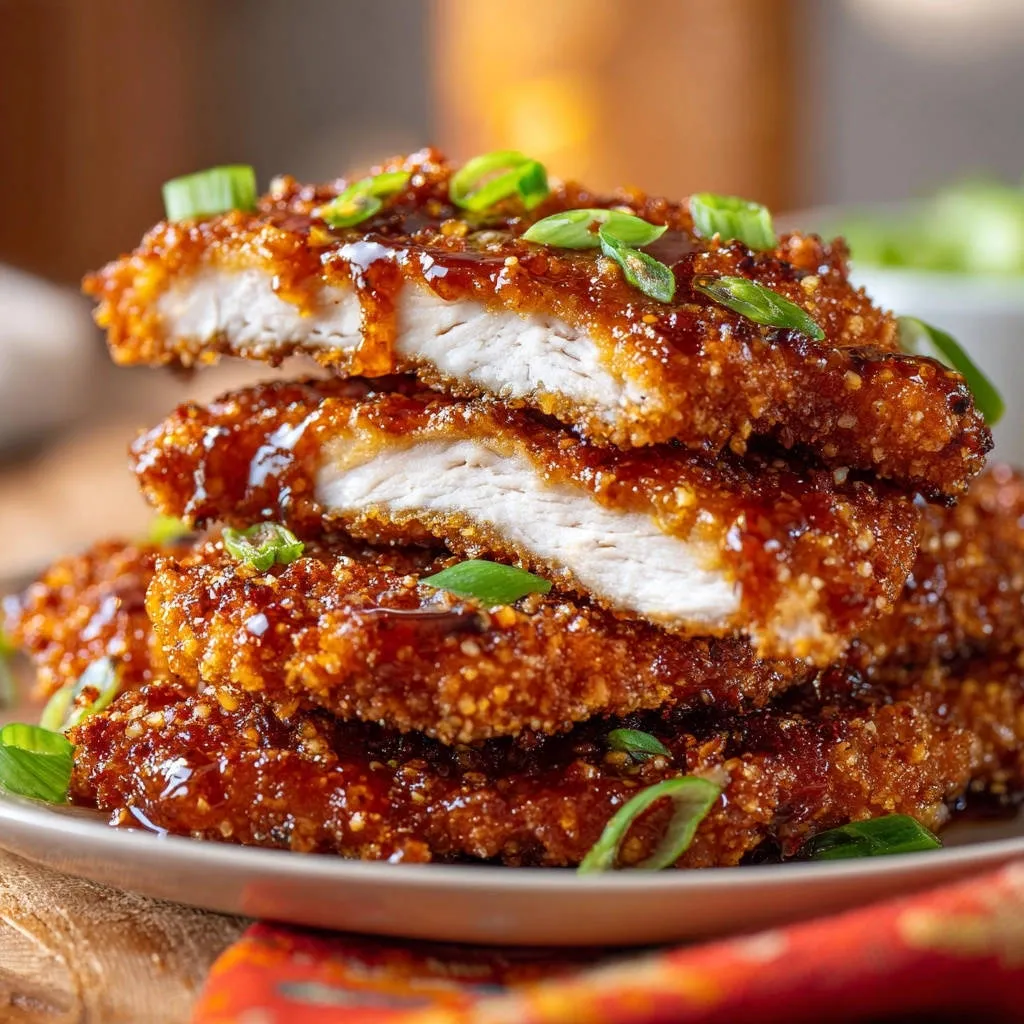
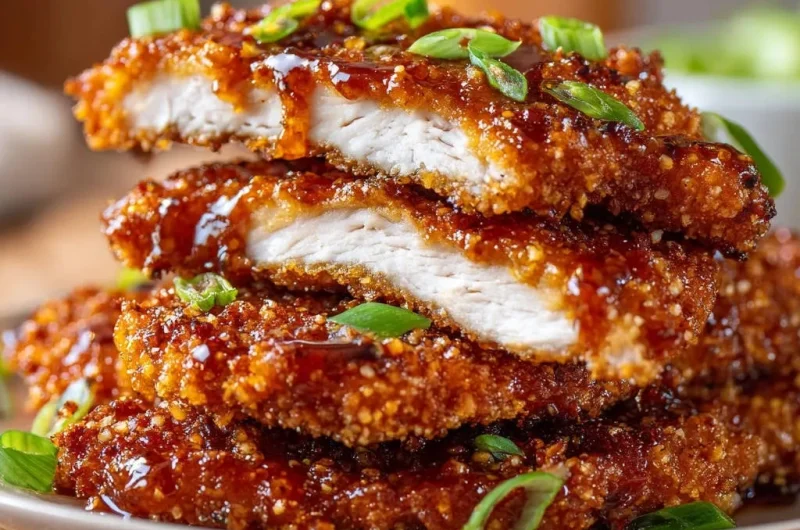
The secret lies in thickening the glaze until it has high viscosity-meaning it moves slowly and coats the back of a spoon thickly. This ultra-thick consistency allows the sauce to sit on top of the crispy crust rather than soaking in and breaking it down.
For a different twist on bold flavors, try these spicy chili glazed chicken bites.
We achieve this texture using a cornstarch slurry added at the precise moment the main sauce ingredients have reduced and intensified.
More Chicken Creations to Try
If you enjoyed these sticky garlic ginger chicken tenders, you might like these other chicken dishes.
- For an extra crispy chicken experience, check out these Crispy Glazed Chicken Wings, using a similar double-fry method for amazing texture.
- Explore a different preparation with this Sesame Ginger Chicken Salad, which highlights the sesame and ginger flavors in a fresh way.
Crunchy Coatings That Last: Panko Power
Panko breadcrumbs are essential here because their large, jagged flake structure creates more surface area and air pockets than standard breadcrumbs. This structure creates a resilient, shatteringly crisp shield that is far more resistant to moisture.
Flavor Depth vs. Sweetness Balance
The key to an addictive glaze is balancing the sticky sweetness of honey or brown sugar with deeply savory, umami notes. Rice vinegar provides the necessary tang to cut through the richness, preventing the final glaze from being overwhelmingly cloying.
Assembling Your Arsenal: Ingredients for Sticky Garlic Ginger Crispy Chicken Tenders
The Chicken and Breading Base
Cutting the chicken breast or tenders into uniform 1-inch strips ensures even cooking times, guaranteeing that every piece finishes simultaneously with a juicy interior.
Using a three-step dredge-flour, egg, and finally Panko-is mandatory for building the strong, robust shell needed to protect the meat from the aggressive, hot glaze.
The Aromatic Glaze Base: Sweet, Salty, and Spicy
Fresh grated ginger and minced garlic are non-negotiable; their powerful, volatile oils infuse the sauce far more effectively than dried powders.
While honey provides a classic floral sweetness, brown sugar can be used for a deeper, more molasses-like flavor, both working equally well in this specific reduction method.
Rice vinegar adds a crucial acidic lift, ensuring the final flavor is bright and sharp, perfectly complementing the rich sweetness and salinity.
The Secret Weapon: Creating the Cornstarch Slurry
The slurry is simply cornstarch mixed with cold water, and it must be cold to prevent immediate clumping when it hits the hot liquid.
The perfect ratio ensures controlled thickening; the cornstarch molecules swell and trap the liquid, creating the desired high-viscosity, glossy glaze.
Essential Tools for Frying and Air Frying Perfection
Having the right equipment is critical, especially when dealing with high heat and oil, or when precision cooking is required for maximum crunch.
Deep Frying Must-Haves
Digital Thermometer: Essential for maintaining 350°F oil temperature. Too cold, and the chicken gets greasy; too hot, and the exterior burns before the inside cooks.
Wire Rack: Crucial for post-fry draining to ensure 360-degree airflow, which prevents the crispy crust from steaming and sweating on a flat surface.
Air Frying for Maximum Convenience
High-Heat Oil Spray: Essential for a golden crust without excessive fat, helping the Panko achieve that desirable crispy texture.
Preheat Functionality: Preheating the air fryer to 390°F ensures immediate crisping upon entry, mimicking the rapid cooking effect of deep fat frying.
Step-by-Step Mastery: Cooking the Sticky Garlic Ginger Crispy Chicken Tenders
Dredging for a Durable Crust: The Firm Press
Set up your three-stage dredging station: flour, egg, and Panko. To keep the process clean, designate one hand the ‘wet hand’ (for egg) and the other the ‘dry hand’ (for flour and Panko).
After dipping the strip in the egg, the final step requires you to firmly press the Panko coating onto the chicken. This firm press creates a compact, resilient shell that is far less likely to detach during cooking or saucing.
Frying Methods: Deep vs. Air Fryer Decisions
For deep frying, heat your oil to a stable 350°F and cook chicken in small batches for 4 to 6 minutes per side. Overcrowding drops the oil temperature quickly, leading to soggy, oily results.
If using an air fryer, preheat to 390°F, lightly spray the basket, and ensure the chicken pieces are in a single layer. Cook for 10 to 12 minutes, flipping halfway, for ultimate golden crispness.
The Critical Sauce Reduction and Slurry Technique
Combine the honey, soy sauce, rice vinegar, ginger, garlic, and pepper flakes in a small saucepan. Bring to a gentle simmer and let it bubble for 3 to 4 minutes to allow the flavors to deepen and concentrate.
Whisk your cold slurry mixture one final time, then slowly pour it into the simmering sauce while stirring continuously. Continue stirring until the sauce transforms quickly into a glossy, highly viscous glaze that coats the back of a spoon and drips very slowly-this is the anti-soggy cue.
The Final Toss: Locking in the Crisp
It is essential that the chicken is hot when it enters the bowl, as the residual heat aids in the rapid setting and adherence of the thick glaze.
Place the hot, crispy chicken in a clean mixing bowl and pour only half of the prepared sauce over the top. Use tongs to gently and quickly toss the tenders until they are just evenly coated, immediately plating them to maintain crispness. Drizzle the remaining sauce over the plated chicken for an extra glossy finish.
Chef’s Secrets: Elevating the Crispy Texture and Flavor
The Double Fry Method: For restaurant-level crunch, consider frying the chicken once until barely cooked through, removing it to rest for five minutes, and then frying it again briefly at 375°F just before coating. This drives out internal moisture for maximum crunch.
Keep It Hot: Never attempt to toss the sauce with cold or lukewarm chicken. The residual heat helps the thick glaze set immediately upon contact, creating that necessary moisture barrier.
The Cornflake Alternative: If you desire an even more rugged, shatteringly crisp exterior, replace Panko with coarsely crushed cornflakes. Ensure they are the plain, unsweetened variety for the best savory result.
Fresh Ginger is Non-Negotiable: Avoid using ground ginger. The fresh grated ginger provides the pungent, moist heat necessary for the authentic ‘Sticky Garlic Ginger Crispy Chicken Tenders’ flavor profile and aromatic punch.
Troubleshooting Sticky Glazes: Avoiding Common Mistakes
Problem: The Coating is Falling Off During Cooking
This usually happens because the initial coatings were too wet or not pressed firmly enough. Make sure you shake off all excess flour and egg before moving to the next stage.
The “firm press” when applying the Panko is the single most important technique to create a robust, adherent shell.
Problem: My Sauce Became Lumpy or Didn’t Thicken
Lumpiness occurs when the cornstarch slurry wasn’t mixed thoroughly or when it was added too quickly to the simmering sauce.
If the sauce didn’t thicken, it likely means the heat was too low. The sauce must be actively simmering when the slurry is introduced for the cornstarch to properly activate.
Problem: The Finished Tenders Are Still Soggy Immediately After Coating
This relates directly back to the USP: the glaze was not thick enough. If the sauce does not slowly coat the back of a spoon, you must add a little more slurry and simmer until the desired viscosity is reached.
A thin sauce allows moisture to permeate the Panko crust, instantly destroying the crispness; the thick glaze creates a protective layer.
Serving Suggestions and Smart Storage Solutions
Perfect Sides and Pairings
Serve these intense Sticky Garlic Ginger Crispy Chicken Tenders with neutral, cooling sides to balance the sweet and spicy heat.
Classic steamed white or brown rice is perfect for absorbing residual glaze, or try them alongside a refreshing Asian slaw or simple garlic sesame noodles.
Make-Ahead Tips and Reheating Strategies
You can prepare the chicken up to the dredging stage (before frying). Arrange the coated chicken on a tray, cover it loosely, and refrigerate for up to 24 hours before cooking.
The sauce can also be made ahead and stored in the fridge. Gently reheat the sauce on the stovetop before tossing with the hot chicken.
To reheat leftovers, use an oven or air fryer at 350°F for about 5-8 minutes until crisp again; NEVER use the microwave, which turns the coating rubbery. Only sauce the reheated chicken immediately before serving.
Frequently Asked Questions About Crispy Chicken Tenders
Can I Bake These Instead of Fry or Air Fry?
Yes, you can bake them, but manage your expectations; the results will be less crisp than frying. Place the coated chicken on an elevated wire rack over a baking sheet.
Bake at a high temperature, around 425°F (220°C), for 18-22 minutes, flipping halfway. The rack is vital for achieving crispness on the underside.
What is the Best Substitute for Panko?
Coarsely crushed corn flakes are the superior substitute for their comparable texture and airiness, providing a beautiful shatter.
Alternatively, finely crushed butter crackers can work in a pinch, offering a rich flavor, but watch them closely as they tend to brown faster than Panko.
How Do I Make This Recipe Gluten-Free?
The entire recipe can easily be made gluten-free. Substitute the all-purpose flour with a 1:1 gluten-free baking blend that contains xanthan gum.
Replace the Panko with certified gluten-free breadcrumbs or the aforementioned crushed cornflakes, and ensure you use GF tamari instead of standard soy sauce.
Ready to Impress? Share Your Sticky Garlic Ginger Crispy Chicken Tenders Masterpiece!
Mastering the glaze technique is the final frontier in achieving truly exceptional glazed chicken. This method guarantees a satisfying, audible crunch that holds up beautifully under the bold, sticky sauce.
Now that you know the anti-soggy secret, go ahead and create these amazing Sticky Garlic Ginger Crispy Chicken Tenders in your own kitchen. We can’t wait to hear how this game-changing recipe elevated your weeknight cooking!
Crispy Chicken Tenders
Course: Main CourseCuisine: AsianDifficulty: easy4
servings20
minutes15
minutes550
kcal35
minutesSay goodbye to sad, soggy tenders! This revolutionary technique uses a high-viscosity, intensely flavored garlic ginger sauce that locks onto the crispy coating without dissolving it. It’s the anti-soggy secret for perfect sticky chicken every time.
Ingredients
For the Chicken:
1.5 pounds boneless skinless chicken breasts or tenders, cut into 1 inch strips
1 teaspoon salt
1/2 teaspoon black pepper
1/2 cup all-purpose flour
2 large eggs, lightly beaten
2 cups Panko breadcrumbs (or crushed corn flakes for extra crunch)
Vegetable oil, for frying or air fryer spray
For the Sticky Sauce:
1/2 cup honey (or brown sugar)
1/4 cup low sodium soy sauce
2 tablespoons rice vinegar
1 tablespoon fresh grated ginger
3 cloves garlic, minced
1 tablespoon cornstarch mixed with 2 tablespoons cold water (slurry)
1/2 teaspoon crushed red pepper flakes (optional)
For Garnish:
2 green onions, thinly sliced
Directions
- Prepare the Chicken and Breading: Season the chicken strips with salt and pepper. Set up a standard dredging station: one bowl of flour, one bowl of beaten egg, and one bowl of Panko. Working one piece at a time, dredge the chicken in the flour, shaking off excess. Dip in the egg, letting excess drip away. Finally, firmly press the strips into the Panko to ensure a thick, full coating. This firm press is critical for a strong crust.
- Cook the Chicken: Fry the chicken until golden brown, crispy, and cooked through (internal temperature of 165 degrees F).
- Deep Fry: Heat 2 inches of oil to 350 degrees F. Fry chicken in batches for 4 to 6 minutes per side. Drain well on a wire rack over paper towels.
- Air Fry: Preheat air fryer to 390 degrees F. Lightly spray the basket and the chicken with oil. Cook for 10 to 12 minutes, flipping halfway, until golden and cooked.
- The Sauce Reduction (The Anti-Soggy Secret): In a small saucepan, combine the honey, soy sauce, rice vinegar, ginger, garlic, and red pepper flakes. Bring the mixture to a simmer over medium heat. Let it bubble gently for 3 to 4 minutes to allow the sauce to thicken slightly and deepen in flavor.
- Lock in the Crisp: Whisk the cornstarch slurry and pour it slowly into the simmering sauce. Stir continuously. The sauce should quickly transform into a glossy, thick glaze. Crucially, the sauce must be thick enough to coat the back of a spoon and drip very slowly. This high viscosity is the secret to preventing the glaze from penetrating and dissolving the crisp coating. Remove immediately from heat.
- Final Toss and Serve: Place the hot, crispy chicken in a large, clean mixing bowl. Pour half of the prepared thick sauce over the chicken. Using tongs, quickly and gently toss the chicken just until evenly coated. Plate immediately and drizzle the remaining sauce over the top for extra shine. Garnish generously with sliced green onions and serve right away while the exterior is still crunchy.
Notes
- The key to crispiness is firmly pressing the Panko coating, and ensuring the final sauce is highly viscous (thick) using the cornstarch slurry.