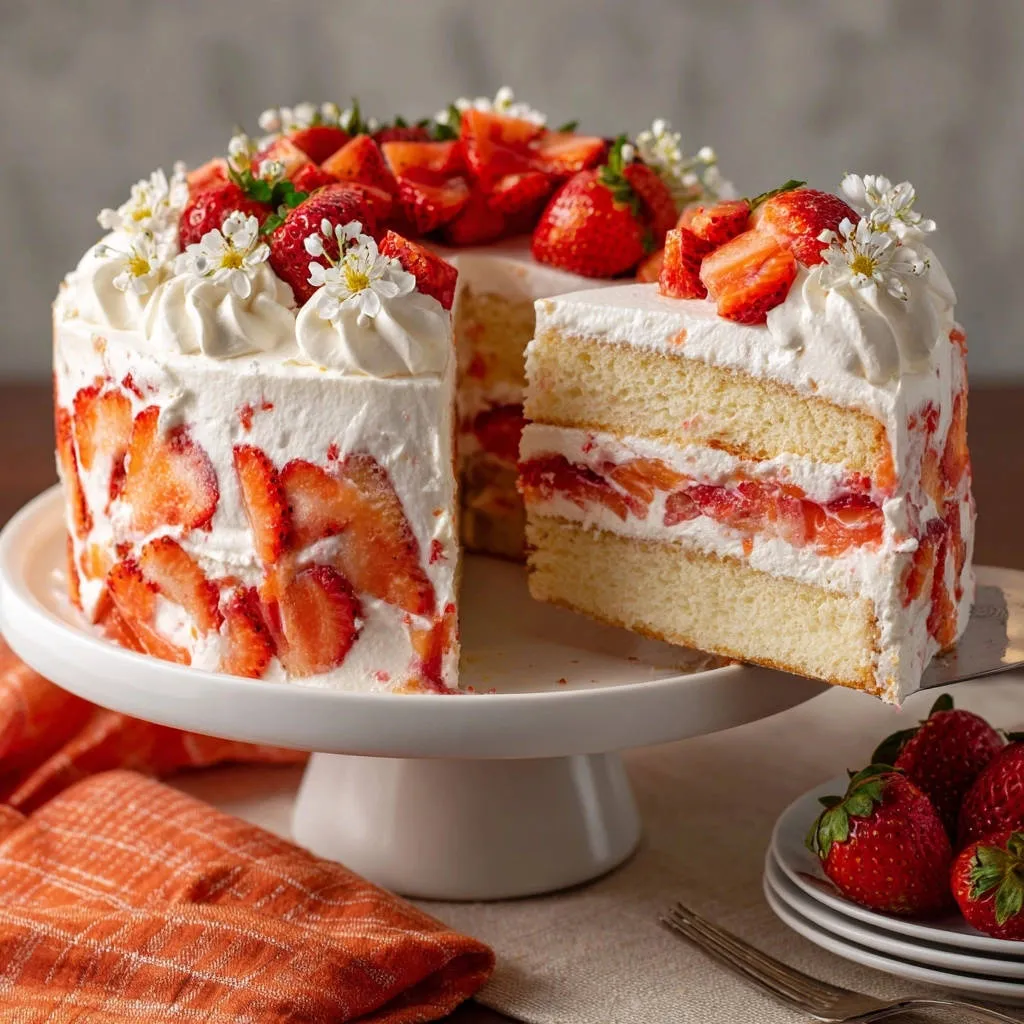
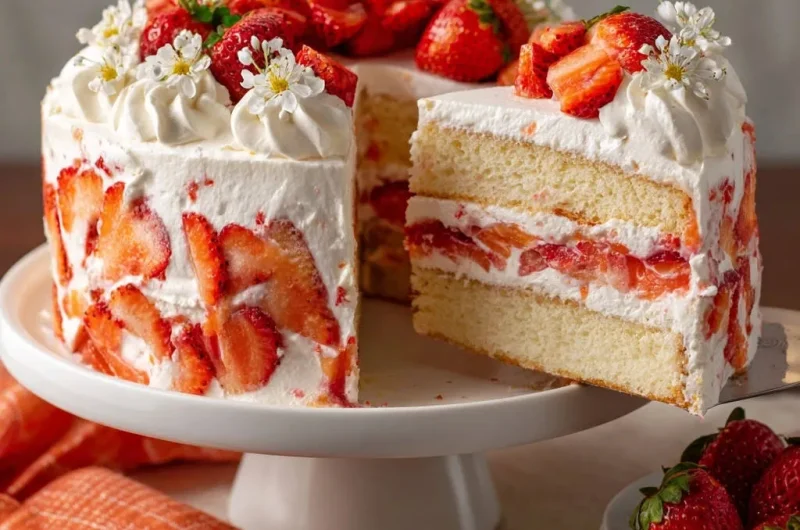
I used to dread cutting into a layered cake, fearing a dry or dense crumb. But after years of perfecting, I’ve cracked the code to the ultimate Strawberry Dream Cake – a recipe that promises consistently light, fluffy layers that perfectly cradle fresh berries and cloud-like whipped cream.
This isn’t just another cake; it’s a celebration of tender cake, vibrant fruit, and ethereal cream. Get ready to create a showstopper that tastes as incredible as it looks, leaving everyone asking for the recipe.
For a comforting seasonal treat, consider this delicious caramel pecan pumpkin cake.
Why This Strawberry Dream Cake Delivers Pure, Airy Bliss
This particular Strawberry Dream Cake stands apart because it addresses the common struggles of home bakers. It guarantees a cake that is never dense, always light, and beautifully balanced in flavor.
The “Never Dense” Promise: Achieving That Perfect Light-as-Air Crumb
The secret to a truly light-as-air crumb in this Strawberry Dream Cake lies in the magic of separated eggs. Whipping egg whites into a stable meringue and gently folding them into the batter creates countless tiny air pockets.
This technique ensures a delicate, airy sponge that never feels heavy or dense. Each bite melts in your mouth, a testament to careful preparation and smart baking science.
The Magic of Fresh Strawberries and Cloud-Like Cream
Beyond the tender cake, the true “dream” comes from the fresh strawberries and ethereal whipped cream frosting. Juicy, sweet berries provide a burst of natural flavor, perfectly balancing the richness.
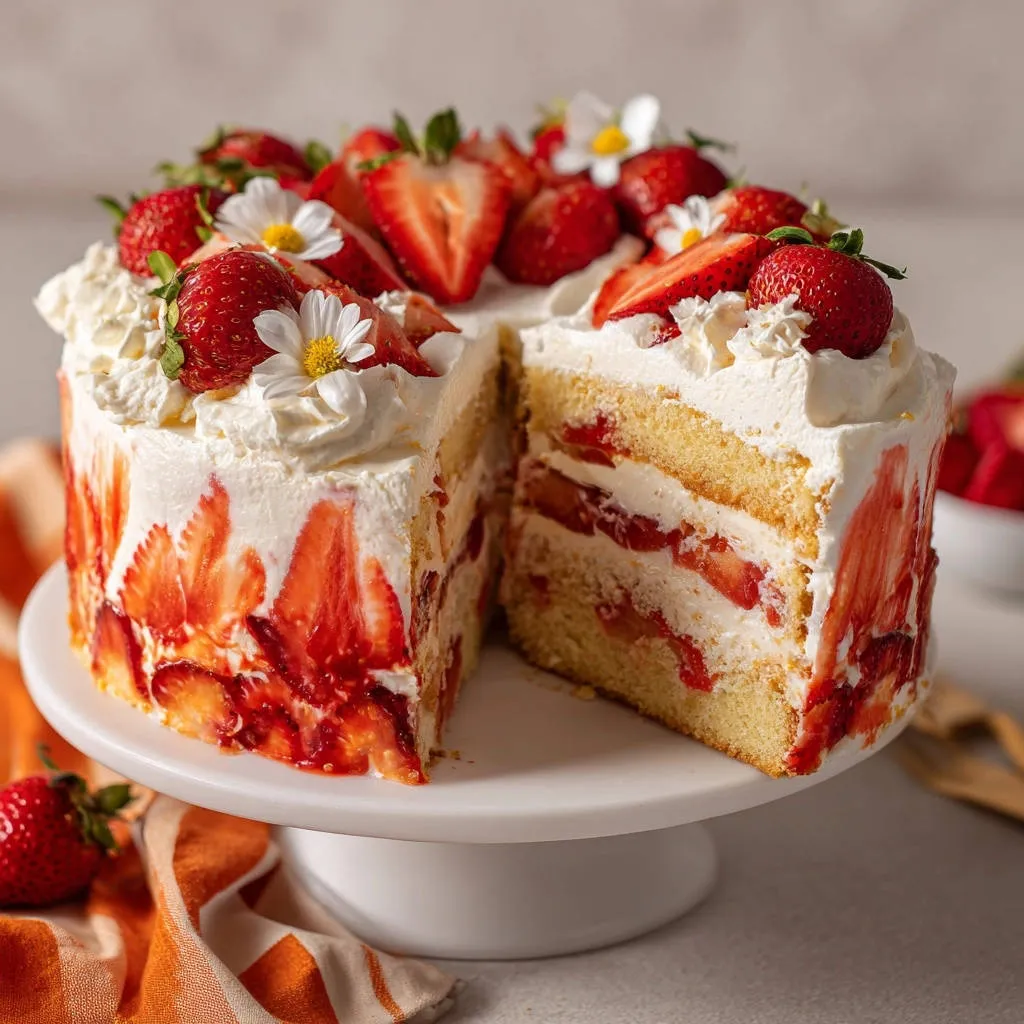
The frosting is a cloud of lightly sweetened cream, which enhances the fruit without overwhelming the delicate cake. This creates a harmonious symphony of textures and tastes, making every forkful a delight.
Foolproof Fluffiness: Cracked the Code for Consistent Success
Through careful testing, I’ve refined this recipe to be consistently foolproof. Even if you’re new to baking, you’ll achieve that desired light and fluffy cake every single time with confidence.
Every step is designed to maximize airiness and ensure your layers hold up beautifully. This detailed guide builds confidence with every successful bake of this exquisite fresh strawberry dessert.
The Building Blocks: Ingredients for Your Dreamy Creation
Selecting quality ingredients is the first step toward baking excellence. Here’s a breakdown of what you’ll need and why each component is essential for a sublime layer cake recipe.
For the Feather-Light Cake Base
All-Purpose Flour: Providing the essential structure without weighing it down.
Baking Powder & Salt: The leavening agents that lift and balance the flavors.
Eggs (Separated): Crucial for the unique texture, yolks for richness, whites for air.
Granulated Sugar: Sweetness and tenderizing, divided for different stages.
Whole Milk & Vegetable Oil: Contributing moisture, tenderness, and a fine crumb.
Vanilla Extract: Aromatic depth that elevates the cake’s overall flavor.
Whipped Cream Frosting: Pillowy Perfection
Heavy Cream (Very Cold): The foundation for stable, airy frosting.
Powdered Sugar (Sifted): Sweetens and stabilizes the cream without grittiness.
Vanilla Extract: Enhancing the classic, creamy flavor profile.
Fresh Berry Filling & Elegant Garnish
Fresh Strawberries: The star of the show, providing juicy sweetness and vibrant color.
Edible Flowers (Optional): For a touch of delicate beauty and visual appeal.
Essential Tools for Baking Success
Having the right equipment makes the baking process smoother and ensures professional results. Gather these tools before you begin crafting your Strawberry Dream Cake.
Two 8-Inch Round Cake Pans: The perfect size for even baking and classic layers.
Parchment Paper: Ensures easy release and prevents sticking.
Electric Mixer (Stand or Handheld): Indispensable for whipping eggs and cream to perfection.
Large Mixing Bowls: Separate bowls for wet and dry ingredients, and for beating egg whites and cream.
Wire Rack: For complete and even cooling of your cake layers.
Serrated Knife: For leveling cake layers if needed, ensuring a flat top.
Rubber Spatula: Crucial for gentle folding, preserving the airy texture.
Baking Your Way to Bliss: A Detailed Guide
Follow these precise steps to create an airy sponge cake that forms the foundation of your amazing Strawberry Dream Cake. Each instruction is designed for optimal flavor and texture.
Preheat and Prepare Pans: Preheat your oven to 350F (175C). Grease and flour two 8-inch round cake pans, lining the bottoms with parchment paper.
Proper pan prep prevents sticking and ensures a beautiful release, saving you from frustration later.
Whisk Dry Ingredients: In a medium bowl, whisk together the all-purpose flour, baking powder, and salt. Set aside.
This ensures leavening agents and flavor are evenly distributed throughout the cake batter.
Craft the Golden Egg Yolk Batter: In a large mixing bowl, beat the egg yolks with 1 cup of the granulated sugar until the mixture is very pale yellow and thick, about 3-5 minutes with an electric mixer. Stir in the milk, vegetable oil, and vanilla extract until just combined.
Beating the yolks and sugar thoroughly creates a stable, emulsified base for your cake.
Combine Wet and Dry Gently: Gradually add the dry ingredient mixture to the wet egg yolk mixture, mixing on low speed until just combined and no streaks of flour remain. Do not overmix.
Overmixing develops gluten, which can lead to a tough, dense cake. Mix until just incorporated for a tender crumb.
Mastering the Meringue: The Key to Airiness: In a separate, very clean large bowl, beat the egg whites with an electric mixer on medium speed until soft peaks form. Gradually add the remaining 1/2 cup of granulated sugar, continuing to beat on high speed until stiff, glossy peaks form.
This meringue is vital for the cake’s signature fluffiness; stiff, glossy peaks hold the most air, which will lift your cake.
Folding for Fluffiness: Preserving the Air: Gently fold about one third of the whipped egg whites into the cake batter to lighten it. Then, carefully fold in the remaining egg whites in two additions, using a spatula to gently lift and turn the batter until no streaks of white remain.
A light touch is essential here to preserve the air you just whipped in, ensuring a truly airy cake. Avoid stirring vigorously.
Baking to Perfection & Cooling Gracefully: Divide the batter evenly between the two prepared cake pans. Bake for 25-30 minutes, or until a wooden skewer inserted into the center of each cake comes out clean. Let the cakes cool in their pans for 10 minutes, then invert them onto a wire rack to cool completely.
Cooling in the pan briefly prevents breakage, while complete cooling on a rack is critical before frosting. Warm cakes will melt your whipped cream.
Prepare Your Radiant Strawberries: While the cakes cool, prepare your strawberries. Reserve about 1 cup of the best looking whole or halved strawberries for the top decoration. Slice the remaining strawberries for the filling and the sides of the cake.
Organizing your fruit beforehand makes assembly smooth and visually appealing, ensuring your best berries are showcased.
Crafting Your Signature Whipped Cream: Make the whipped cream frosting. In a large, very cold bowl (chilled bowl and beaters help), beat the heavy cream, powdered sugar, and vanilla extract on high speed until stiff peaks form. Be careful not to overbeat, or it might become grainy.
Cold equipment and careful beating are key to a stable, fluffy whipped cream that won’t separate. Watch it closely as it thickens.
Assembling Your Edible Masterpiece, Layer One: Once the cakes are completely cool, level them with a serrated knife if needed to create flat tops. Place one cake layer on your serving platter. Spread a generous layer of whipped cream over it. Arrange a layer of sliced strawberries evenly over the cream.
Leveling ensures a beautiful, even cake, and a generous cream layer is part of the dream experience. This creates a balanced flavor and texture.
Assembling Your Edible Masterpiece, Layer Two: Carefully place the second cake layer on top. Frost the entire cake with the remaining whipped cream, making sure to cover the sides. Gently press sliced strawberries around the sides of the cake into the cream for that beautiful visible fruit layer.
The visible strawberries on the sides add to the cake’s charm and hint at the delicious filling within. Take your time for a neat finish.
Final Flourishes & Setting: Decorate the top with the reserved strawberries and any edible flowers you might be using. Refrigerate the cake for at least 30 minutes before serving to allow the cream to set and the flavors to meld perfectly.
Chilling is a crucial final step to ensure the cake holds its shape and develops its full flavor potential. This patience will be rewarded.
Chef’s Secrets: Elevating Your Cake Game
Beyond the recipe steps, these expert tips will help you perfect your Strawberry Dream Cake and ensure it’s truly unforgettable.
The Art of Not Overmixing: Once flour is added to the wet ingredients, mix only until just combined. Overmixing develops gluten, leading to a tough, chewy cake rather than a tender, fluffy one.
Temperature Matters for Eggs and Cream: Ensure your eggs are at room temperature for better emulsion with the sugar. Conversely, heavy cream should be very cold, along with your mixing bowl and beaters, for optimal whipping.
Chill Your Whipped Cream Before Using: If your whipped cream feels a little soft after beating, pop it into the fridge for 10-15 minutes. This can help it firm up for easier frosting and a more stable cake.
Sourcing the Freshest Berries: The quality of your strawberries truly shines through. Choose ripe, fragrant berries that are firm and uniformly colored for the best flavor and appearance in your fresh strawberry dessert.
Gentle Folding for Maximum Air: When incorporating the egg whites, use a rubber spatula and a gentle “cut-and-fold” motion. This technique minimizes deflating the whites, preserving the cake’s airy texture.
Common Baking Hurdles & How to Solve Them
Don’t let minor setbacks discourage you! Here are solutions to common challenges you might encounter when baking your airy sponge cake.
Why is My Cake Dense and Not Fluffy?
This is often due to overmixing the batter after adding flour, or deflating the egg whites during the folding process. Be gentle and mix only until combined for the batter, and fold the whites slowly and lightly to retain air.
My Whipped Cream Won’t Stiffen or is Grainy. What Went Wrong?
If it won’t stiffen, your cream likely wasn’t cold enough, or your bowl/beaters weren’t chilled. For grainy cream, you’ve probably overbeaten it past the stiff peak stage, causing the fats to separate. Always watch it carefully.
My Cake Layers Stuck to the Pan!
Ensure your pans are thoroughly greased and floured, and that you line the bottoms with parchment paper. Allowing the cakes to cool in the pan for the recommended 10 minutes before inverting also helps them release cleanly.
Why are My Strawberries Bleeding Color into the Cream?
Very ripe or very juicy strawberries can release more liquid. To minimize this, you can lightly blot sliced strawberries with a paper towel before adding them to the cake. Chilling the assembled cake also helps immensely.
Presentation & Preservation: Enjoying Your Cake
You’ve put effort into creating this beautiful Strawberry Dream Cake; here’s how to ensure it tastes its best when served and stays fresh.
Serving Suggestions: The Perfect Slice
For the cleanest slices, use a long, sharp serrated knife. Wipe the knife clean between each cut to prevent smearing the cream. Serve chilled for the best texture and flavor experience, especially with the delicate whipped cream frosting.
A light dusting of powdered sugar over the top just before serving can add a final elegant touch, enhancing its visual appeal without extra sweetness.
Storing Your Strawberry Dream Cake
This cake is best enjoyed within 2-3 days. Store it in an airtight container in the refrigerator to keep the cream fresh and prevent the cake from drying out. The flavors will continue to meld beautifully over time.
Can I Make This Ahead?
You can bake the cake layers a day in advance, wrap them tightly in plastic, and store them at room temperature. The whipped cream frosting is best made fresh on the day of assembly for optimal fluffiness and stability. Assemble the cake a few hours before serving to allow it to chill.
Your Most Asked Questions About This Recipe
Here are answers to common questions about making this delightful fresh strawberry dessert, ensuring you have all the information for a successful bake.
Can I Use Frozen Strawberries for the Filling?
While fresh strawberries are highly recommended for their texture and vibrant flavor, you can use frozen. Thaw them completely and drain any excess liquid very well before slicing and using to prevent a soggy cake layer.
What About a Gluten-Free Version?
You can substitute the all-purpose flour with a 1:1 gluten-free baking blend that contains xanthan gum. Ensure all other ingredients are also gluten-free. The texture might vary slightly but should still be delicious and airy.
Can I Reduce the Sugar Content?
You can slightly reduce the sugar in the cake batter by up to 1/4 cup without significantly impacting the structure. However, reducing the sugar in the meringue or whipped cream might affect their stability and texture, so proceed with caution.
Can I Use a Different Kind of Fruit?
Absolutely! This recipe is adaptable. Raspberries, blueberries, or sliced peaches would also be delightful in this layer cake recipe. Just ensure the fruit is ripe and prepared similarly to the strawberries, draining any excess moisture.
Ready to Bake? Share Your Strawberry Dream Cake Story!
Now that you have all the secrets to crafting the ultimate Strawberry Dream Cake, it’s time to unleash your inner baker! This recipe is more than just a dessert; it’s an experience waiting to unfold in your kitchen.
We encourage you to try this incredibly light and fluffy cake, share it with loved ones, and savor every exquisite bite. Don’t forget to come back and tell us about your baking triumphs in the comments below!
Strawberry Dream Cake
Course: DessertCuisine: AmericanDifficulty: medium8
servings45
minutes30
minutes450
kcal120
minutesThis recipe cracks the code to making light-as-air, fluffy cake layers that perfectly complement fresh strawberries and a delicate whipped cream frosting. Learn to master the technique for airy sponges that hold up beautifully, creating a stunning and delicious dessert for any occasion.
Ingredients
For the Cake:
1 1/2 cups all purpose flour
1 1/2 teaspoons baking powder
1/2 teaspoon salt
6 large eggs, separated
1 1/2 cups granulated sugar, divided
1/2 cup whole milk
1/2 cup vegetable oil
2 teaspoons vanilla extract
For the Whipped Cream Frosting:
3 cups heavy cream, very cold
1/2 cup powdered sugar, sifted
1 teaspoon vanilla extract
For the Filling and Decoration:
2 pounds fresh strawberries, hulled and sliced
Small edible flowers for garnish (optional)
Directions
- Preheat your oven to 350F (175C). Grease and flour two 8-inch round cake pans, lining the bottoms with parchment paper.
- In a medium bowl, whisk together the all purpose flour, baking powder, and salt. Set aside.
- In a large mixing bowl, beat the egg yolks with 1 cup of the granulated sugar until the mixture is very pale yellow and thick. This might take 3-5 minutes with an electric mixer. Stir in the milk, vegetable oil, and vanilla extract until just combined.
- Gradually add the dry ingredient mixture to the wet egg yolk mixture, mixing on low speed until just combined and no streaks of flour remain. Do not overmix.
- In a separate, very clean large bowl, beat the egg whites with an electric mixer on medium speed until soft peaks form. Gradually add the remaining 1/2 cup of granulated sugar, continuing to beat on high speed until stiff, glossy peaks form. This step is vital for the cake’s fluffiness.
- Gently fold about one third of the whipped egg whites into the cake batter to lighten it. Then, carefully fold in the remaining egg whites in two additions, using a spatula to gently lift and turn the batter until no streaks of white remain. The lighter touch here preserves the air you just whipped in.
- Divide the batter evenly between the two prepared cake pans. Bake for 25-30 minutes, or until a wooden skewer inserted into the center of each cake comes out clean. Let the cakes cool in their pans for 10 minutes, then invert them onto a wire rack to cool completely.
- While the cakes cool, prepare your strawberries. Reserve about 1 cup of the best looking whole or halved strawberries for the top decoration. Slice the remaining strawberries for the filling and the sides of the cake.
- Make the whipped cream frosting. In a large, very cold bowl (chilled bowl and beaters help), beat the heavy cream, powdered sugar, and vanilla extract on high speed until stiff peaks form. Be careful not to overbeat, or it might become grainy.
- Once the cakes are completely cool, level them with a serrated knife if needed to create flat tops. Place one cake layer on your serving platter. Spread a generous layer of whipped cream over it. Arrange a layer of sliced strawberries evenly over the cream.
- Carefully place the second cake layer on top. Frost the entire cake with the remaining whipped cream, making sure to cover the sides. Gently press sliced strawberries around the sides of the cake into the cream for that beautiful visible fruit layer.
- Decorate the top with the reserved strawberries and any edible flowers you might be using. Refrigerate the cake for at least 30 minutes before serving to allow the cream to set and the flavors to meld perfectly.
Notes
- Chilling the cake before serving is crucial for the cream to set and flavors to meld.