Few things in the kitchen feel as defeating as watching a gorgeous cake deflate the moment you pull it from the oven. You spend time measuring and mixing, only to end up with a crater in the center and a gummy texture that no amount of frosting can hide. This Ultimate Double Chocolate Layer Cake is specifically designed to end that frustration forever.
The secret to this recipe isn’t just the deep, decadent cocoa flavor; it’s the structural integrity of the sponge. We’ve balanced the moisture levels to ensure a crumb that stays incredibly soft while remaining sturdy enough to stack. By focusing on the science of the rise, you’ll get a perfectly level top every single time you bake.
Expertise in baking often comes down to understanding how ingredients react to heat. The real game-changer here is the “blooming” technique, where we use hot coffee to hydrate the cocoa powder. This doesn’t just intensify the chocolate flavor; it actually stabilizes the batter’s temperature so the leavening agents work more efficiently. You’ll notice the difference in the very first bite.
The Chemistry of a Stable Chocolate Sponge
Creating a cake that doesn’t sink requires a delicate balance between strength and tenderness. When you mix flour with liquid, you develop a protein web called gluten. While too much gluten makes a cake tough, too little gluten causes the air bubbles to pop and the cake to collapse. This recipe uses just enough all-purpose flour to build a “skeleton” that supports the weight of the sugar and cocoa.
Chocolate cakes are notoriously prone to sinking because cocoa solids are heavy and don’t provide any structure themselves. Furthermore, the high sugar content that makes a cake moist also weakens the protein bonds. Therefore, we must rely on the expansion of carbon dioxide bubbles to lift the batter. If those bubbles grow too large too quickly, they burst before the cake sets, leading to that dreaded sunken middle.
To prevent this, we control the timing of the chemical reaction. By ensuring the batter isn’t over-aerated during the mixing process, we keep the bubbles small and uniform. These tiny pockets of air are much more stable and less likely to escape. Consequently, the cake rises evenly and maintains its height as the proteins and starches solidify in the heat of the oven.
Why Hot Coffee Prevents the Center from Collapsing
Adding hot coffee is the “Skyscraper” technique of the baking world. When the hot liquid hits the cocoa powder, it “blooms” the chocolate, dissolving any stubborn lumps and releasing trapped flavor oils. However, the benefits go beyond taste. The heat from the coffee begins to hydrate the starches in the flour immediately, creating a thicker, more stable base before the pans even hit the oven rack.
This thermal head start means the baking soda reacts at the precise moment the batter is thick enough to hold the resulting gas. Instead of the air bubbles struggling to lift a cold, heavy batter, they move through a warm, pre-set environment. This results in a sustained, reliable rise that won’t crash when the oven door opens.
Essential Components for the Ultimate Double Chocolate Layer Cake
Quality ingredients are the foundation of any great bake, but their temperature is just as important as their brand. For this Ultimate Double Chocolate Layer Cake, you should prioritize Dutch-processed cocoa powder. This variety is treated with alkali to neutralize its natural acidity, resulting in a darker color and a smoother, more mellow chocolate profile that won’t interfere with your leavening agents.
You must use room temperature buttermilk and eggs to ensure a smooth emulsion. If you use cold ingredients, the vegetable oil can seize or the batter can curdle, leading to an uneven crumb. If you’re out of buttermilk, you can easily make a substitute by adding a tablespoon of lemon juice to a cup of whole milk and letting it sit for five minutes. The acidity is crucial because it triggers the baking soda.
Don’t skip the salt, either. While it might seem counterintuitive in a sweet dessert, salt is a flavor enhancer that cuts through the richness of the sugar. It also helps to strengthen the gluten structure slightly, providing another layer of insurance against sinkage. Use a fine sea salt so it dissolves evenly throughout the dry ingredients during the sifting phase.
Selecting the Right Fat: Oil vs. Butter
While many traditional cakes call for creamed butter, this recipe relies on vegetable oil for a specific reason. Butter contains water and milk solids which can make a cake feel dry once it’s refrigerated. Oil, however, remains liquid at room temperature and even when chilled. This ensures your cake stays incredibly moist and tender for days.
The oil acts as a tenderizer, coating the flour proteins and preventing them from forming long, tough gluten strands. This results in a “melt-in-your-mouth” texture that contrasts beautifully with the thick fudge frosting. Since oil doesn’t provide flavor like butter does, we rely on the coffee and high-quality vanilla to provide the aromatic depth.
The Role of Chemical Leaveners in Height Retention
This recipe uses a combination of baking soda and baking powder to achieve the perfect lift. Baking soda is a powerful base that reacts instantly with the acidic buttermilk to provide an initial boost. Meanwhile, the baking powder provides a secondary “timed-release” lift that occurs once the batter heats up in the oven. This two-stage process is vital for height retention.
Always check the expiration dates on your tins. Leaveners lose their potency over time, and using old powder is a guaranteed way to end up with a flat cake. If you aren’t sure if your baking soda is still active, drop a pinch into a little vinegar. If it doesn’t fizz violently, it’s time to buy a fresh box.
Step-by-Step: Building the Perfect Structural Crumb
The process begins with the “Sift and Whisk” phase. Do not skip sifting the cocoa and flour together. Cocoa powder is notorious for forming small, hard clumps that won’t break down during mixing. Sifting ensures a perfectly smooth dry mix and distributes the baking soda and powder evenly so you don’t get “tunnels” or large holes in your finished cake.
Once you add the buttermilk, oil, eggs, and vanilla, use an electric mixer on medium speed for exactly two minutes. You’ll see the batter transform from a shaggy mess into a glossy, smooth ribbon. This stage is where you build the necessary strength. The batter should look uniform and slightly thickened before you introduce the final liquid component.
Watch for visual cues during this mix. The color should lighten slightly as air is incorporated, but it shouldn’t look foamy. If you see large bubbles forming on the surface, turn the mixer down. You want a dense, stable emulsion that feels heavy on the whisk. This provides the “grip” the cake needs to climb the sides of the pan.
The Gentle Fold: Incorporating Hot Liquids Without Over-Mixing
After the initial two-minute mix, it’s time to add the hot coffee. This is the most critical moment for preventing sinkage. Switch to a hand whisk or a large spatula and pour the hot liquid in slowly. Stir gently by hand just until the batter is uniform. The mixture will be very thin, which is exactly what you want for a light, airy crumb.
Avoid the temptation to use the electric mixer here. Over-beating at this stage develops excess gluten and traps too much air. If the cake rises too rapidly like a soufflé, it will inevitably collapse because the structure hasn’t had time to bake through. A gentle hand ensures the cake rises at a steady, manageable pace.
Precision Baking: Oven Calibration and Pan Preparation
Proper pan prep is your insurance policy. Grease the pans thoroughly and line the bottoms with parchment paper. This doesn’t just help with release; it prevents the bottom of the cake from overcooking and becoming tough. The parchment allows the cake to expand upward without being “stuck” to the bottom, which can cause tension and cracking.
Preheat your oven for at least 20 minutes before baking to ensure the temperature is stable. When you place the pans inside, do it quickly and close the door gently. Slamming the oven door can send a shockwave through the delicate, unset batter, causing the air bubbles to burst and the center to drop. Trust the timer and don’t peek until at least 30 minutes have passed.
Critical Cooling: The 10-Minute Pan Rule
The 10-minute rule is non-negotiable for a level cake. When the cake first comes out of the oven, the internal structure is still very fragile and soft. If you try to flip it onto a wire rack immediately, the weight of the cake can cause it to break or compress. The pan acts as an “exoskeleton,” supporting the sides while the proteins finish setting.
During these ten minutes, “carry-over cooking” occurs. The residual heat from the pan gently finishes the center of the cake without drying out the edges. Once the time is up, run a thin knife around the edge and invert the cakes onto a cooling rack. Removing them from the pan at this point allows steam to escape, preventing the cake from becoming soggy.
Assembling the Layers with Chocolate Fudge Frosting
Before you even think about frosting, the cakes must be completely cool to the touch. If the layers are even slightly warm, the fudge frosting will melt and the layers will slide right off each other. For the best results, you can even wrap the cooled layers in plastic and pop them in the fridge for an hour to firm them up.
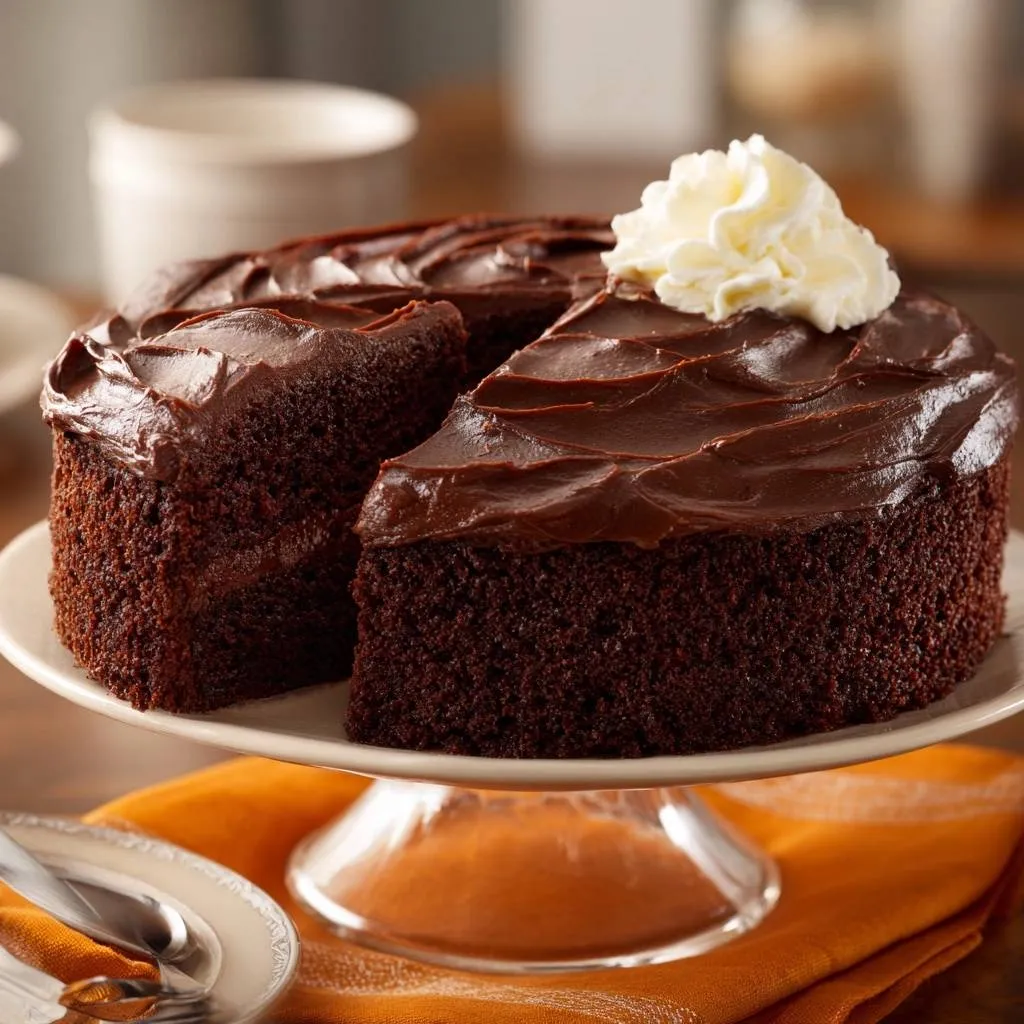
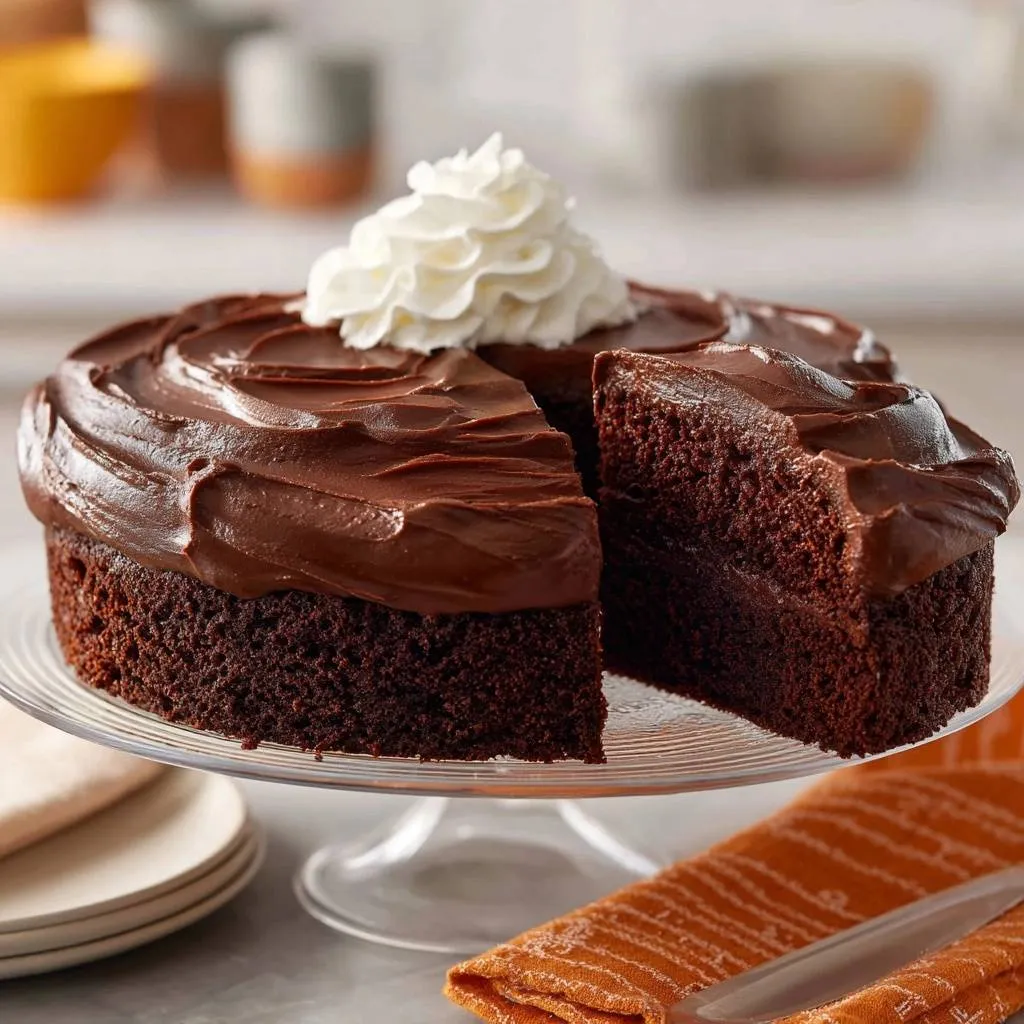
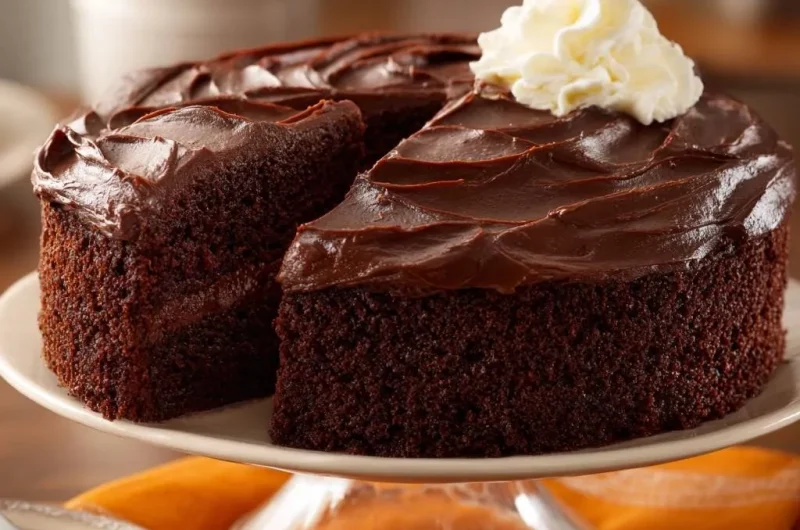
To achieve the “naked cake” look, place a thick layer of frosting on the bottom cake and spread it right to the edge. Place the second layer on top, bottom-side up, to ensure a perfectly flat surface. Instead of frosting the sides, focus on creating beautiful, deep “swoops” on the top with the back of a spoon. This rustic style highlights the beautiful dark crumb of the cake.
The contrast between the dense, rich fudge frosting and the light, airy cake is what makes this dessert so addictive. To finish, add a generous dollop of fresh whipped cream. The coolness of the cream cuts through the intensity of the chocolate, creating a balanced bite that isn’t overly cloying. It’s a professional presentation with very little effort.
Troubleshooting Common Chocolate Cake Failures
If your cake ends up dry, you likely overbaked it or used too much flour. Always spoon your flour into the measuring cup rather than scooping it directly, which packs the flour down. If the cake is gummy or has a wet streak in the middle, it was either underbaked or the baking soda was expired. A toothpick should come out with a few moist crumbs, but no wet batter.
A “domed” cake usually means your oven was too hot. The outside set too quickly, forcing the middle to push upward. You can fix this by using “cake strips” around your pans or lowering your oven temperature by 25 degrees. If the cake sticks to the pan despite greasing, ensure you are using parchment paper. It is the only foolproof way to get a clean release every time.
Make-Ahead Strategies and Storage Solutions
This cake is a fantastic candidate for making ahead of time. In fact, the flavor often improves the next day as the cocoa notes deepen. You can bake the layers up to two days in advance. Just wrap them tightly in two layers of plastic wrap and store them at room temperature. This keeps the moisture locked inside the sponge.
For longer storage, these layers freeze beautifully. Wrap them in plastic and then a layer of aluminum foil; they will stay fresh for up to three months. When you’re ready to serve, thaw them in the fridge overnight while still wrapped. Once frosted, the cake can stay at room temperature for about three days, provided it’s kept under a cake dome to prevent it from drying out.
Expert Tips for Professional Results
For the most accurate results, use a kitchen scale to measure your flour (one cup is typically 120-125 grams). This prevents the most common cause of a heavy, dry cake. Before putting your pans in the oven, give them a firm tap on the counter. This pops any large, erratic air bubbles that could cause uneven holes in the crumb.
Invest in high-quality vanilla extract rather than imitation flavoring. Since this recipe has a simple flavor profile, the quality of the vanilla really shines through. Also, ensure your coffee is truly hot—steaming, but not necessarily boiling—to get the best bloom from your cocoa powder. This is the secret to that professional, deep-dark color.
To get those perfect frosting swoops, use a small offset spatula or the back of a tablespoon. Start in the center and work your way out in a spiral motion, pushing the frosting toward the edges. Don’t worry about perfection; the rustic, textured look is part of the charm of this Ultimate Double Chocolate Layer Cake.
How should I store leftovers of this chocolate cake?
You should store the frosted cake in an airtight container or under a cake dome at room temperature for up to 3 days. If your kitchen is particularly warm, you can keep it in the refrigerator, but let it sit out for 30 minutes before serving to soften the frosting. For long-term storage, you can freeze individual slices wrapped in plastic for up to 2 months.
Why did my cake still sink in the middle?
The most common reason for sinking is opening the oven door too early or slamming it shut, which collapses the air bubbles before the structure is set. Another culprit is over-mixing the batter once the liquid is added; this creates too much air that the cake’s structure can’t support. Ensure your baking soda is fresh and that your oven is truly at 350°F using an oven thermometer.
Can I use something other than coffee?
Yes, you can substitute the hot coffee with boiling water. The coffee is used to enhance the chocolate flavor without making the cake taste like mocha, but boiling water will still “bloom” the cocoa and provide the necessary heat for the rise. You could also use hot tea or even hot malted milk for a different flavor twist.
Can I make this recipe gluten-free?
You can substitute the all-purpose flour with a high-quality 1:1 gluten-free flour blend that contains xanthan gum. Because this batter is quite thin and relies on the “blooming” method, gluten-free blends usually perform very well. However, be sure not to over-bake, as gluten-free cakes can dry out faster than traditional ones.
What is the best way to get the cakes out of the pan without breaking?
The most reliable method is to grease the pans with shortening or butter, dust them with cocoa powder (instead of flour to avoid white streaks), and line the bottom with a circle of parchment paper. After the mandatory 10-minute cooling period in the pan, run a thin plastic spatula around the edges to loosen the cake before inverting it onto a rack.
For more brownie inspiration, check out these pecan crusted cheesecake bites.
Double Chocolate Layer Cake
Course: DessertCuisine: AmericanDifficulty: medium12
servings20
minutes35
minutes510
kcal55
MinutesA rich and airy chocolate cake featuring Dutch-processed cocoa and hot coffee to create a deep flavor profile. This recipe focuses on temperature control and mixing techniques to ensure a perfectly level crumb that holds its height.
Ingredients
2 cups all-purpose flour
2 cups granulated sugar
3/4 cup unsweetened cocoa powder (Dutch-processed preferred)
2 teaspoons baking soda
1 teaspoon baking powder
1 teaspoon salt
1 cup buttermilk, room temperature
1/2 cup vegetable oil
2 large eggs, room temperature
2 teaspoons vanilla extract
1 cup hot brewed coffee (or boiling water)
2 cups chocolate fudge frosting (thick consistency)
Whipped cream for garnish
Directions
- Preheat your oven to 350 degrees F (175 degrees C). Grease and flour two 8-inch or 9-inch round cake pans. For the best release, line the bottoms with parchment paper.
- In a large bowl, sift together the flour, sugar, cocoa, baking soda, baking powder, and salt. Whisk thoroughly to ensure the leavening agents are evenly distributed; this prevents uneven rising and sinking.
- Add the buttermilk, vegetable oil, eggs, and vanilla extract to the dry ingredients. Mix on medium speed with an electric mixer or whisk for about 2 minutes until the batter is well-combined and smooth.
- To solve the sinking issue, pour in the hot coffee last. This “blooms” the cocoa for a deeper flavor and ensures the baking soda reacts at the optimal time. Stir gently by hand until the batter is thin and uniform. Do not over-beat, as excess gluten development or trapped air bubbles will cause the cake to rise too fast and then crash.
- Divide the batter evenly between the prepared pans.
- Bake for 30 to 35 minutes, or until a toothpick inserted into the center comes out clean.
- The most important step for stability: Leave the cakes in the pans for exactly 10 minutes before transferring to a wire rack. This allows the internal protein structure to set while the cake is still supported by the pan walls.
- Once completely cool, stack the layers with a thick layer of chocolate frosting in the middle. Frost the top with decorative swoops as seen in the image, leaving the sides “naked” or exposed to showcase the crumb. Finish with a dollop of fresh whipped cream before serving.
Notes
- The blooming method with hot coffee and the 10-minute resting period in the pan are essential to prevent the cake from sinking.