There is nothing more disappointing than biting into a supposedly fluffy layer cake only to find it dense, dry, or collapsed in the center. After years of perfecting this specific geometry, I cracked the code: the secret to truly tender baking lies not just in the ingredients, but in their temperature stability.
This recipe for the Ultimate Coconut Layer Cake guarantees an unbelievably airy crumb that melts in your mouth every single time. It achieves this perfection by utilizing a critical, yet simple, technique that prevents the butter from seizing during the mixing stage.
For similarly fluffy results, check out our guide on fudgy chocolate cupcakes.
The Temperature Secret: Why Most Coconut Cakes Fail
The Critical Role of Room Temperature Liquids
When cold liquids are introduced to the properly creamed butter and sugar mixture, the delicate emulsion breaks instantly. The cold fat clumps back together, releasing the air pockets meticulously built during the creaming process.
This process, known as seizing, immediately hinders the leavening process and leads directly to a heavy, dense final texture. Achieving true room temperature (around 70°F) for all wet ingredients prevents this chemical shock, ensuring the fat and liquid remain perfectly combined for maximum stability.
Decoding the Tender Crumb: Buttermilk vs. Coconut Milk
The profound moisture and richness in this cake come from a powerful pairing of buttermilk and full-fat coconut milk.
Buttermilk provides necessary acidity, which reacts vigorously with the baking soda to create robust lift and a signature tender crumb texture. Full-fat canned coconut milk is essential here, providing intense, creamy coconut flavor and high levels of stabilizing fat for deep, lasting moisture penetration.
Elevating Your Ingredients: Quality is Key to Flavor
Essential Ingredients for the Layer Cake
The Flour Foundation: We use standard All-Purpose flour, but it must be sifted to ensure no clumps and to maximize aeration before mixing. Pre-sifting is crucial for achieving the desired light cake structure.
Choosing Your Coconut Milk: You must use full-fat canned coconut milk, not the watered-down beverages sold in refrigerated cartons. The high fat content (typically 17-22%) provides necessary richness and superior texture.
The Extracts: Using both vanilla and coconut extracts creates a layered, complex flavor profile. This blending prevents the cake from tasting one-note or having the artificial bite sometimes associated with coconut extract alone.
Achieving Silky Smooth Buttercream
Sifting the powdered sugar is non-negotiable; it removes tiny, stubborn lumps that make the finished frosting gritty and unpleasant on the palate.
We use chilled full-fat coconut milk in the frosting, which is key to controlling the stability and stiffness of the final buttercream. The cold liquid helps the emulsified butter stay firm, resulting in a thick, pipeable, and highly stable coconut buttercream.
Tools of the Trade: Setting Up Your Ultimate Baking Station
- Stand Mixer or Hand Mixer: Essential for achieving the full 4 to 5 minutes of high-speed creaming necessary for proper air incorporation.
- Digital Scale: Highly recommended for accurately measuring all ingredients and for dividing the batter evenly between the pans to ensure perfectly level layers.
- Fine-Mesh Sifter: For aerating the flour, baking powder, and soda, and for removing lumps from the powdered sugar.
- Wire Cooling Rack: Provides necessary air circulation underneath the baked layers, preventing steam buildup that causes sogginess.
Baking Your Ultimate Coconut Layer Cake: Step-by-Step Guide
- Preparation & Dry Ingredients:
Preheat your oven to 350°F. Ensure the cake pans are thoroughly greased and floured, which is crucial for preventing sticking, especially with high-fat batters. Whisking the leaveners with the sifted flour ensures they are perfectly distributed, guaranteeing uniform rise across the entire layer.
- Creating the Temperature-Controlled Liquid (The Fluffiness Secret):
Combine the buttermilk, coconut milk, vanilla, and coconut extracts in a separate bowl. This mixture must be at true room temperature (around 70°F) to prevent the butter from seizing.
If the liquids feel cool to the touch, briefly warm them up-10 seconds in the microwave is often enough-to ensure the ideal temperature for mixing stability.
- Mastering the Creaming Process:
In a large bowl, beat the softened butter and granulated sugar on medium-high speed for a full 4 to 5 minutes.
The mixture must turn noticeably pale yellow and become very fluffy, signaling maximum air incorporation. Add the eggs one at a time, allowing 30 seconds between additions for each egg to fully emulsify and integrate before adding the next one.
- The Art of Gentle Incorporation: Avoiding Overmixing:
Follow the alternation method: Add half of the dry ingredients and mix on low until just combined. Next, slowly stream in the temperature-controlled liquid mixture while mixing on the lowest speed to maintain the emulsion.
Finally, add the remaining dry ingredients and mix only until no streaks of flour remain-you must stop the mixer immediately at this point. Overmixing activates the gluten, resulting in a tough, dense crumb structure.
- Timing and Cooling for Perfect Layers:
Divide the batter evenly between the prepared pans and bake for 28 to 32 minutes. The layers are done when a toothpick inserted into the center comes out completely clean.
Allow the layers to cool in the pan for the initial 10 minutes; this critical step helps them firm up, minimizing the risk of tearing or breakage when you invert them onto a wire rack to finish cooling completely.
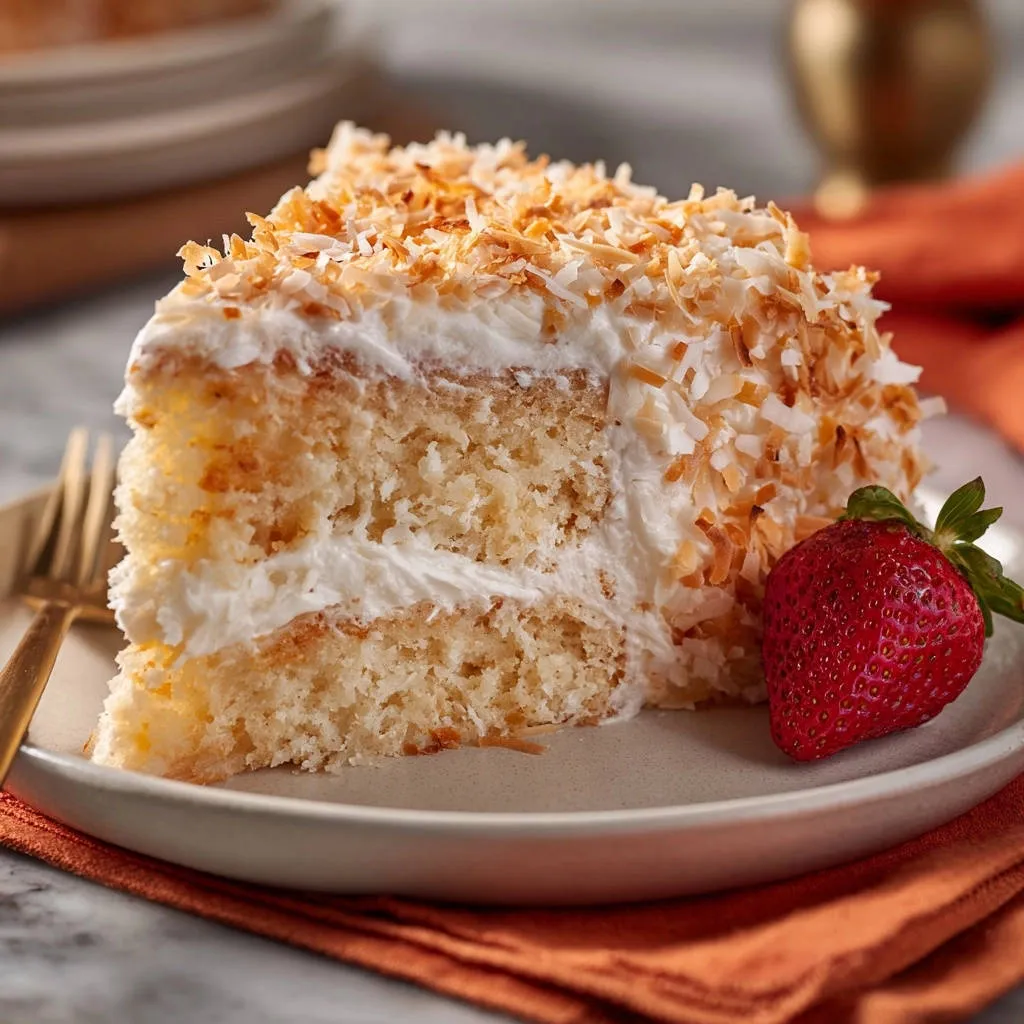
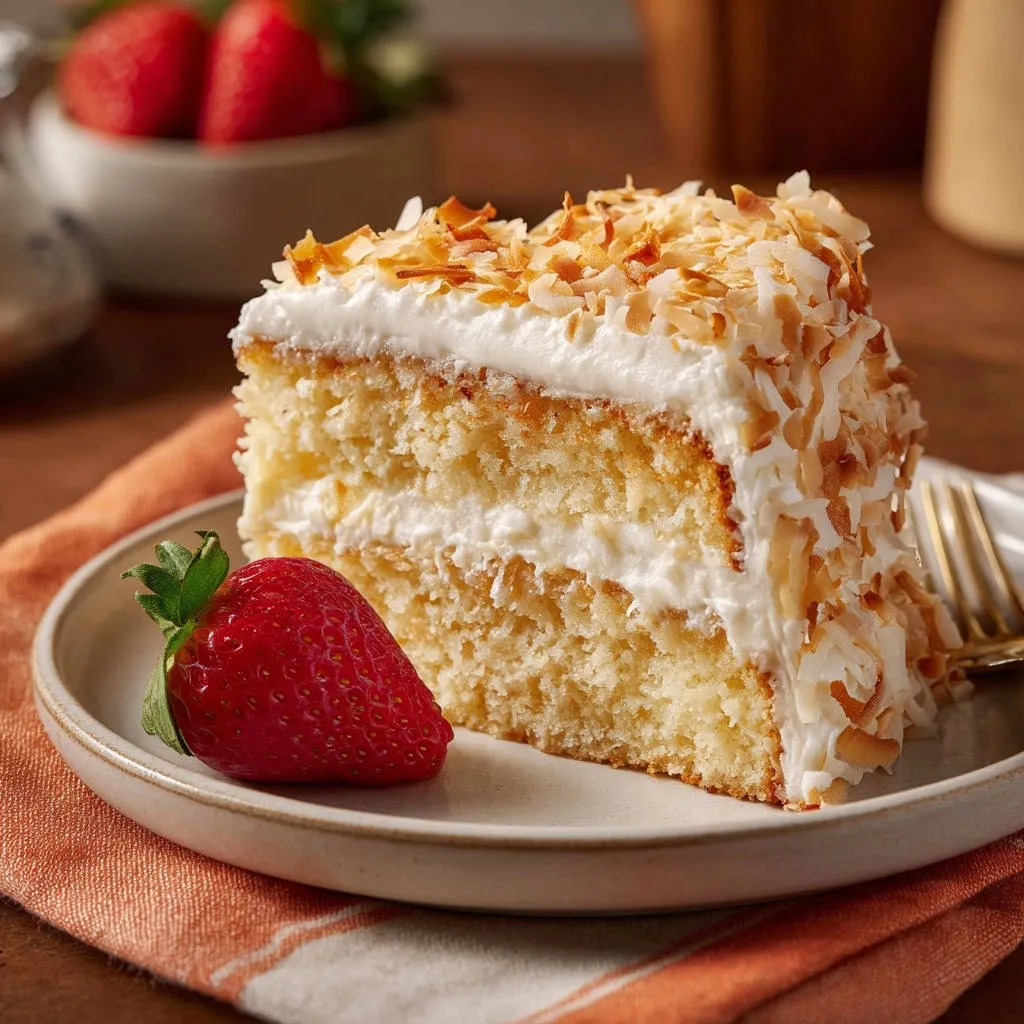
Crafting the Coconut Buttercream and Toasted Perfection
Toasting Coconut for Maximum Flavor and Crunch
Toasting sweetened shredded coconut dramatically intensifies its flavor and provides a necessary textural contrast to the soft cake.
You can toast the coconut either in a thin layer on a baking sheet in the oven (stirring every 2 minutes) or quickly in a dry skillet over medium-low heat. It is essential that the toasted flakes are completely cool before applying them to the buttercream, as any residual heat will melt the frosting.
The Trick to Non-Gritty, Stable Buttercream
Start by whipping the 1 cup of softened butter until it is smooth and light. Begin gradually adding the sifted powdered sugar, alternating with small splashes of the chilled coconut milk.
The alternation prevents a grainy texture and helps control the frosting consistency. If your kitchen is warm, using ice-cold coconut milk helps stabilize the emulsion quickly, ensuring the resulting buttercream is thick, creamy, and holds its shape perfectly.
Assembly and Garnish: Achieving a Bakery-Worthy Finish
Once the cake layers are completely cool, place the first layer on your serving plate and spread a generous filling of buttercream.
After stacking the second layer, apply a thin layer of frosting-known as the crumb coat-to seal in any loose crumbs. Let this set for 15 minutes before applying the final, thick layer of buttercream smoothly across the top and sides.
Press the cooled, toasted coconut flakes firmly onto the sides using your palm until the cake is fully covered. Chilling the finished Ultimate Coconut Layer Cake for at least one hour before slicing is mandatory for achieving the cleanest, most professional slice.
Troubleshooting & Expert Tips for Ultimate Coconut Cake Success
Common Cake Problems and Quick Fixes
Problem: The Cake Sank in the Middle. This is usually caused by opening the oven door too early, sudden temperature fluctuations, or inadequate mixing of leavening agents. Ensure your oven thermometer is accurate and avoid disturbing the cake during the final 10 minutes of baking time.
Problem: The Cake is Dry or Crumbly. This failure is almost always due to overmixing the batter after the flour is introduced, which develops tough gluten, or simply overbaking the layers. Use a timer and stick strictly to the visual cue of “no streaks of flour” during mixing.
Problem: Buttercream is Too Thin. If the frosting is too soft, place the bowl (covered) in the refrigerator for 15-20 minutes to chill slightly, then re-whip. If it needs density, slowly beat in an extra 1/4 cup of sifted powdered sugar until the desired stiffness is achieved.
Make-Ahead Strategies and Smart Storage Solutions
Cake layers can be baked up to three days in advance. Once completely cooled, wrap each layer tightly in plastic wrap, then an additional layer of aluminum foil, and store them at room temperature.
For longer storage, freeze the wrapped layers for up to three months and thaw them overnight in the refrigerator before frosting. Store the fully assembled, frosted cake in the refrigerator, but always allow it to sit at room temperature for 30 minutes before serving for optimal flavor and texture.
Flavor Variations: Going Beyond the Traditional Layer
Tropical Lime Twist: Add 1 tablespoon of finely grated lime zest to the wet ingredients for a bright, acidic counterpoint. This pairs beautifully with the rich, deep coconut flavor.
Piña Colada Cake: Fold 1/2 cup of finely drained crushed pineapple into the batter right before baking for a chewy, tropical texture. Drain the pineapple well to avoid adding excess moisture.
Almond Accent: Substitute the coconut extract with almond extract to create an amaretto-infused coconut layer cake, providing a subtle, sophisticated nutty base note.
Essential Coconut Cake FAQs Answered
What is the Best Type of Coconut Milk to Use (Canned vs. Carton)?
You must use full-fat canned coconut milk, specifically the kind used for curries and baking, which typically has a fat content of 17% to 22%. The high fat content is essential for both flavor and managing the necessary batter density.
Do not use the low-fat coconut beverage sold in cartons, as these are primarily water (1% to 2% fat) and will result in a rubbery, dry crumb structure.
Can I Make This Ultimate Coconut Layer Cake Gluten-Free or Dairy-Free?
Yes, for gluten-free results, use a high-quality 1:1 GF baking blend that already contains xanthan gum for structure. Ensure the mix you choose is intended for cup-for-cup substitution.
For a dairy-free cake, substitute the buttermilk with an equal amount of non-dairy milk (like almond or soy) mixed with 1 teaspoon of white vinegar, creating an acidic vegan buttermilk substitute.
How Long Will the Toasted Coconut Stay Crispy?
The toasted coconut will retain its crispiness for approximately 24 to 36 hours on the outside of the frosted cake. Once refrigerated, the high moisture content of the buttercream will slowly begin to soften the flakes.
If you need maximum crispiness, store the toasted flakes separately in an airtight container and press them onto the cake immediately before serving.
Ready to Impress? Share Your Ultimate Coconut Layer Cake Masterpiece!
Mastering the art of the Ultimate Coconut Layer Cake relies entirely on that single temperature control step-a technique that guarantees an incredibly tender crumb structure every time. This is truly the key to achieving professional-level baking stability in your home kitchen.
Now that you hold the secrets to the fluffiest coconut cake ever, it’s time to preheat your oven and enjoy the compliments. We can’t wait to see your masterpiece!

Coconut Layer Cake
Course: DessertCuisine: AmericanDifficulty: medium10
servings45
minutes30
minutes650
kcal75
minutesThis recipe guarantees an unbelievably tender and airy crumb by utilizing a unique temperature-controlled liquid method. Learn the single key step for preparing your buttermilk and coconut milk to prevent a dense, gummy cake. Finished with a creamy buttercream and toasted coconut, this is the ultimate tropical dessert.
Ingredients
For the Cake:
2 and 1/2 cups All-Purpose Flour (sifted)
1 and 1/2 cups Granulated Sugar
1 cup Unsalted Butter (softened, not melted)
3 large Eggs
3/4 cup Full-Fat Buttermilk (room temperature)
1/2 cup Canned Coconut Milk (full fat, room temperature)
2 teaspoons Baking Powder
1/2 teaspoon Baking Soda
1 teaspoon Salt
1 tablespoon Vanilla Extract
1 teaspoon Coconut Extract
For the Frosting and Topping:
1 cup Unsalted Butter (softened)
4 cups Powdered Sugar (sifted)
1/2 cup Full-Fat Canned Coconut Milk (chilled)
1 teaspoon Vanilla Extract
4 cups Sweetened Shredded Coconut (toasted)
1 Fresh Strawberry (for garnish)
Directions
- Prepare the Pans and Dry Ingredients
- Preheat oven to 350 degrees F. Grease and flour two 8-inch round cake pans. In a medium bowl, whisk together the sifted flour, baking powder, baking soda, and salt. Set aside.
- Create the Temperature-Controlled Liquid (The Fluffiness Secret)
- In a separate bowl, whisk together the buttermilk, coconut milk, vanilla extract, and coconut extract. It is vital that these liquids are at true room temperature (around 70 degrees F). If the liquids are cold, they will seize the creamed butter, leading to a dense cake.
- Cream the Fat and Sugar
- In a large mixing bowl, beat the softened butter and granulated sugar together on medium-high speed for 4 to 5 minutes, scraping down the sides often, until the mixture is pale yellow and very fluffy. Beat in the eggs one at a time, ensuring each is fully incorporated before adding the next.
- Integrate Dry and Wet Ingredients Carefully
- Add half of the dry ingredients to the butter mixture and mix on low speed until just combined. Next, slowly stream in the prepared buttermilk and coconut milk mixture (the temperature-controlled liquid) while mixing on low speed. This slow integration, ensuring the fats remain emulsified and the batter is stable, is the key to preventing density. Stop mixing immediately once the liquid is incorporated. Add the remaining dry ingredients and mix on the lowest speed only until no streaks of flour remain. Do not overmix.
- Bake the Layers
- Divide the batter evenly between the two prepared pans. Bake for 28 to 32 minutes, or until a toothpick inserted into the center comes out clean. Let the cakes cool in the pans for 10 minutes before inverting them onto a wire rack to cool completely.
- Toast the Coconut
- Spread the shredded coconut on a baking sheet. Toast in the oven (or a skillet on the stovetop) for 5 to 8 minutes, stirring frequently, until golden brown. Cool completely.
- Make the Buttercream
- Beat the 1 cup of softened butter until smooth. Gradually add the sifted powdered sugar, alternating with small splashes of the chilled coconut milk, mixing until the frosting is thick and creamy. Beat in the vanilla extract.
- Assemble the Cake
- Place one layer of cake on a serving plate. Spread a generous amount of frosting evenly across the top. Place the second layer on top. Frost the top and sides of the cake. Press the toasted coconut flakes firmly onto the frosting, covering the entire cake. Garnish with the fresh strawberry. Chill the cake for at least one hour before slicing for the cleanest, airiest slice.
Notes
- The key to airiness is ensuring liquid ingredients (buttermilk, coconut milk) are exactly room temperature (70°F) before mixing.