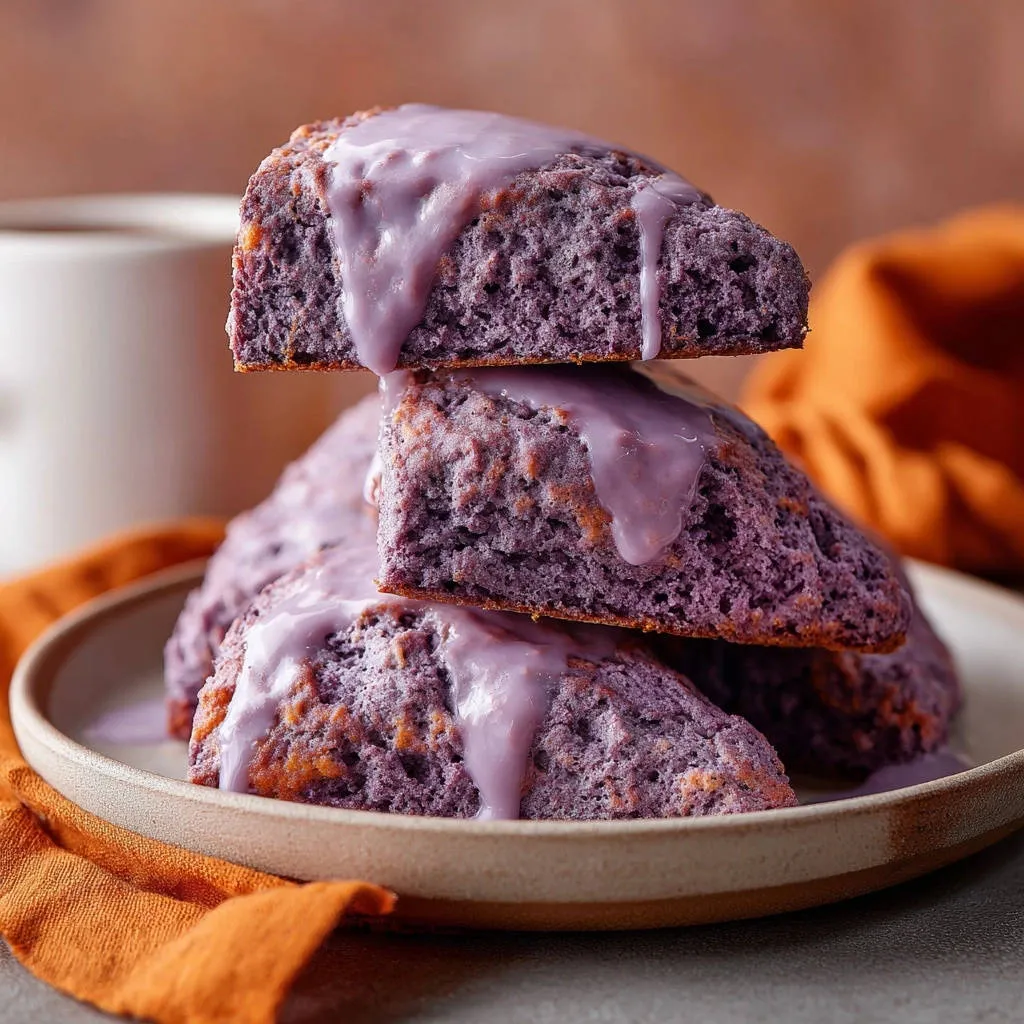
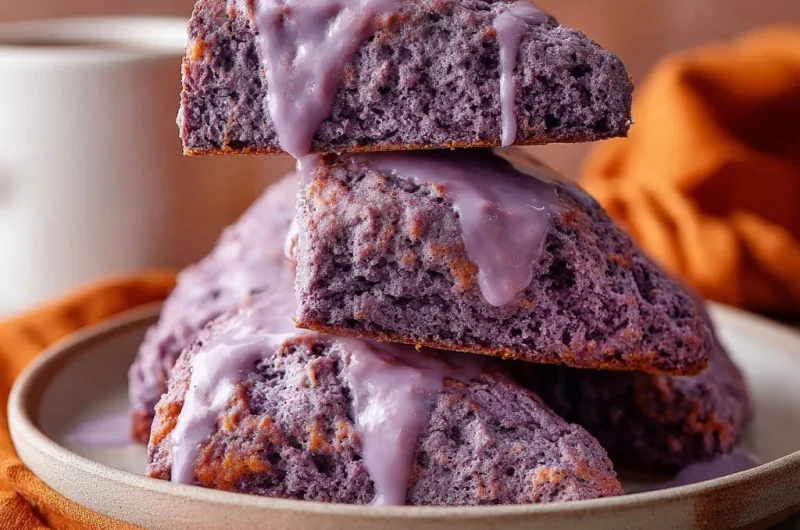
I used to believe achieving truly light and tender scones was a dark art, often resulting in dry, crumbly disappointments. That changed when I unlocked a simple, yet powerful secret to perfect texture, and this recipe for Whimsical Purple Scones showcases it beautifully.
These aren’t just any scones; they’re a vibrant spectacle of color and a melt-in-your-mouth experience, guaranteed to impress with their unique hue and irresistible delicate crumb.
Beyond Basic: Why These Whimsical Purple Scones Stand Out
This recipe isn’t just about pretty pastries; it’s about elevating your baking with reliable techniques and exciting flavors. Here’s what makes these purple delights truly special.
The Secret to Never-Dry, Fluffy Scones
The magic behind these incredibly tender scones lies in the precise handling of cold ingredients and minimal dough manipulation. We’re meticulously building pockets of butter and air, ensuring a light, fluffy interior every single time.
This approach actively combats the common problem of dense, dry scones, delivering a consistently delightful texture that practically dissolves in your mouth.
Vibrant Color, Irresistible Flavor
The stunning purple hue makes these scones an instant showstopper, perfect for brunches, tea parties, or simply brightening your morning. Whether you opt for food coloring or the subtle earthy notes of ube powder, the visual appeal is undeniable.
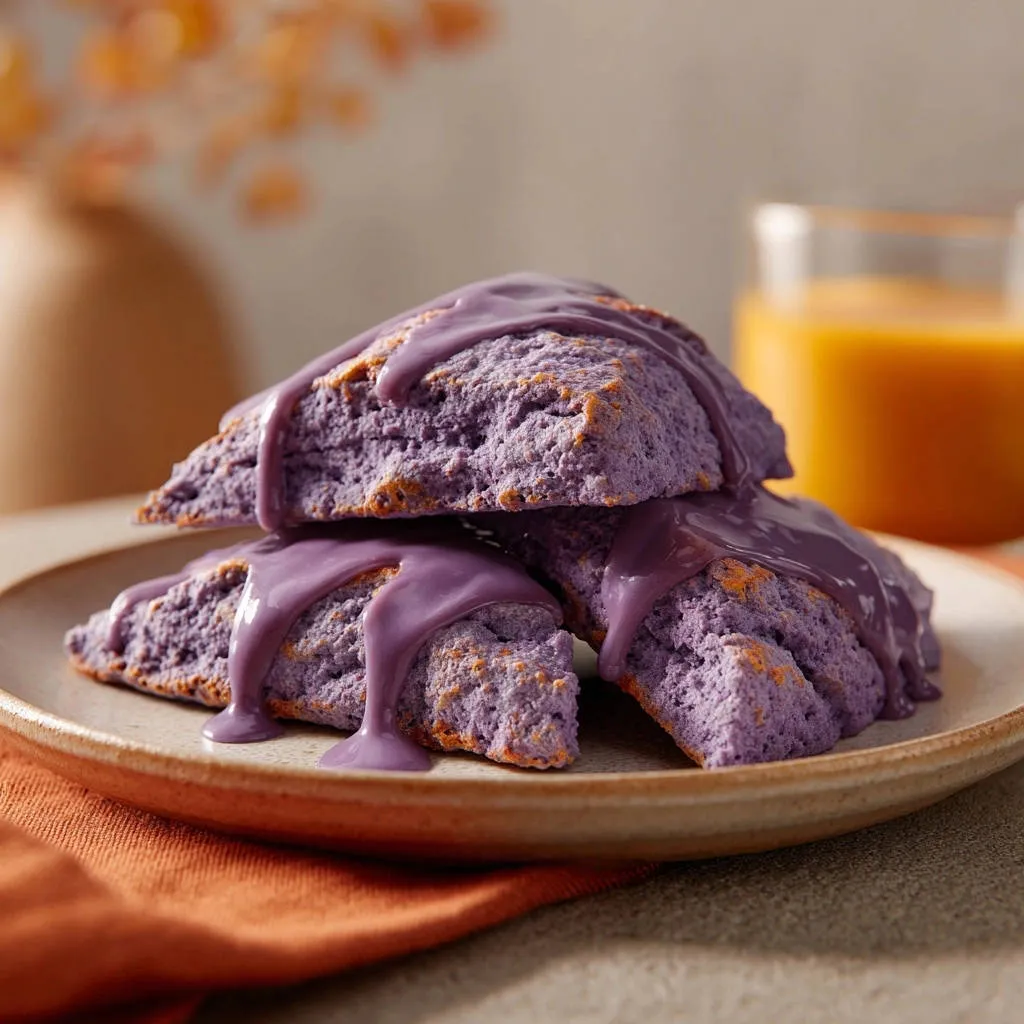
Beyond their beauty, these scones offer a balanced sweetness, making them a delicious treat that appeals to both the eyes and the palate.
Surprisingly Simple: Scone Perfection for Everyone
Despite their elegant appearance and perfect texture, this recipe is remarkably straightforward. We’ve demystified the scone-making process, breaking it down into easy, actionable steps.
Even if you’re a novice baker, you can achieve professional-quality results with these Whimsical Purple Scones, building confidence with every batch.
Gather Your Palette: Ingredients for Whimsical Purple Scones
Quality ingredients are the cornerstone of exceptional baking. Here’s a closer look at what you’ll need and why each component is vital for creating these tender, vibrant pastries.
Core Dry Ingredients: The Foundation
All-Purpose Flour: This provides the primary structure for our scones. Using all-purpose ensures a balanced gluten development, which is key to tenderness when handled correctly.
Granulated Sugar: Beyond sweetness, sugar contributes to the scone’s delicate crumb and helps with browning. It also tenderizes the dough, preventing a tough final product.
Baking Powder: Our essential leavening agent, baking powder is responsible for the scones’ lift and airy texture. Ensure yours is fresh for optimal rise.
Salt: A small amount of salt balances the sweetness and enhances all the other flavors, making the scones taste richer and more complex.
The Cold Butter Advantage: Key to Flakiness
Unsalted Butter, very cold and cubed: This is arguably the most critical ingredient. Very cold butter, cut into small pieces, creates steam as it melts in the hot oven.
This steam is what pushes the dough layers apart, resulting in that wonderfully flaky, tender texture characteristic of excellent scones.
Liquid Magic: Cream, Egg, and Brilliant Color
Cold Heavy Cream: Richness and moisture come from heavy cream, which also helps keep the dough temperature low. This coolness is vital for maintaining the integrity of the cold butter.
Large Egg: The egg adds richness, acts as a binder, and contributes to the overall structure and tenderness of the scone.
Purple Food Coloring or Ube Powder: For that whimsical hue! Gel food coloring offers vibrant color without adding extra liquid. Ube powder, from the purple yam, provides a natural purple color with a subtle, earthy, vanilla-like flavor, a delightful twist.
Glaze Components: The Sweet, Dazzling Finish
Powdered Sugar: The base for our smooth, quick-setting glaze, powdered sugar dissolves easily for a silky finish.
Milk or Lemon Juice: This liquid thins the powdered sugar to a drizzle-able consistency. Milk provides a classic sweet glaze, while lemon juice adds a bright, tangy counterpoint that complements the scone beautifully.
Optional Purple Food Coloring: A touch more purple food coloring in the glaze amplifies the whimsical aesthetic, making the final presentation even more striking.
Essential Kitchen Gear for Scone Success
Having the right tools ready makes the baking process smoother and more enjoyable. These simple items are all you need for making your Whimsical Purple Scones.
Mixing & Prepping Must-Haves
Large Mixing Bowl: For combining your dry ingredients and then the dough itself.
Small Bowl: Perfect for whisking together the wet ingredients.
Whisk: To evenly combine dry ingredients and ensure a smooth liquid mixture.
Pastry Blender or Forks/Fingertips: Essential for cutting cold butter into the flour mixture without warming it too much.
Measuring Cups and Spoons: Accurate measurements are crucial for baking consistency.
Rubber Spatula: Ideal for gently mixing the dough without overworking it.
Baking & Finishing Touches
Baking Sheet: A sturdy baking sheet provides an even heat transfer for consistent baking.
Parchment Paper: Linings your baking sheet prevents sticking and makes cleanup a breeze.
Wire Rack: Allows air circulation around the scones as they cool, preventing sogginess.
Sharp Knife or Round Cookie Cutter: For cleanly cutting your scone dough into uniform shapes. A 2.5 to 3-inch cutter works well.
Small Whisk (for glaze): Ensures your glaze is perfectly smooth and lump-free.
Crafting Your Whimsical Purple Scones: A Step-by-Step Guide
Let’s transform these simple ingredients into stunning, fluffy scones. Each step is designed for optimal results, focusing on precision and gentle handling.
Preparing Your Workspace and Dry Mix
- Preheat and Prep:
Preheat your oven to 400°F (200°C) and line a baking sheet with parchment paper. This ensures your oven is at the correct temperature and your baking surface is ready when the dough is prepared.
- Combine Dry Ingredients:
In a large bowl, whisk together the all-purpose flour, granulated sugar, baking powder, and salt. Thoroughly combining these dry components ensures an even distribution of leavening and flavor throughout every scone.
Incorporating the Cold Butter for Tenderness
- Cut in Cold Butter:
Add the very cold, cubed unsalted butter to your dry mixture. Using a pastry blender, two forks, or your fingertips, quickly cut the butter into the flour until it resembles coarse crumbs with some pea-sized pieces of butter still visible.
This crucial step creates tiny pockets of butter. As these melt during baking, they release steam, which is the secret to those wonderfully flaky, tender scone layers. Avoid overworking it, as warm butter leads to tough scones.
The Wet Mix and Gentle Combining
- Whisk Wet Ingredients:
In a separate small bowl, whisk together the cold heavy cream, the large egg, and your chosen purple food coloring or ube powder until uniform. The cold temperature of the cream helps maintain the chill in the butter for maximum tenderness.
- Gently Combine Wet and Dry:
Pour the whisked wet ingredients into the dry ingredients. Mix gently with a fork or spatula until just combined; the dough should still look a bit shaggy and moist. Resist the urge to overmix at all costs.
Overmixing develops gluten, which is the primary culprit behind tough, dense scones. A light hand here ensures that coveted tender crumb you’re after.
Shaping and Cutting Your Scones
- Pat Out the Dough:
Turn the dough out onto a lightly floured surface. Gently pat the dough into a round disc, about 1 inch thick. Do not knead it, as this would activate gluten and make your scones tough.
- Cut Scone Wedges:
Using a sharp knife, cut the dough disc into 8 even wedges. For a more traditional look, you can use a round cookie cutter, dipping it in flour between cuts and pressing straight down without twisting for clean edges and a good rise. If using a cutter, you may gently re-form scraps once.
- Arrange for Baking:
Carefully transfer the cut scones to your prepared baking sheet, leaving some space between them. This allows for even air circulation and prevents them from steaming rather than baking crisp.
Baking to Golden Perfection
- Bake Until Golden:
Bake for 15-18 minutes, or until the tops are lightly golden and the scones are cooked through. An instant-read thermometer inserted into the center of a scone should read around 200°F (93°C) for perfect doneness.
- Cool on a Rack:
Remove the scones from the oven and transfer them to a wire rack. Allow them to cool here while you prepare the glaze, allowing proper air circulation to prevent a soggy bottom.
The Dazzling Purple Glaze
- Prepare the Glaze:
For the glaze, whisk together the powdered sugar, 2-3 tablespoons of milk or lemon juice, and the optional purple food coloring in a small bowl until smooth. Adjust the liquid amount a little at a time until you reach your desired drizzle-able consistency.
- Glaze and Serve:
Once the scones are cool enough to handle but still slightly warm, generously drizzle them with the prepared purple glaze. Serving them slightly warm enhances their tender texture and delicious aroma. Enjoy these homemade fluffy blueberry scones or these vibrant purple ones immediately!
Unlock Scone Mastery: Expert Tips & Tricks
Elevate your scone game with these insightful tips, transforming good scones into truly exceptional ones.
The Cold Factor: Why Temperature Matters So Much
Keeping ingredients like butter and cream very cold is paramount. Cold butter creates steam pockets as it bakes, which results in those coveted flaky layers and prevents a tough scone. Cold cream also helps keep the butter from melting too soon into the dough.
Mastering the Mix: Hands-Off is Best
Overmixing is the archenemy of tender scones. Mix the dough just until combined; it should still look a bit shaggy. Excessive mixing develops gluten, leading to a tough, dense texture. Think minimal handling for maximum tenderness and a delicate crumb. It’s also crucial for other baked goods like easy fluffy biscuits.
Shaping for the Perfect Rise: Pat, Don’t Knead
When shaping, gently pat the dough into a disc rather than kneading. Kneading activates gluten, which we want to avoid for tender scones. For cutting, a sharp, floured knife or cookie cutter pressed straight down (without twisting) ensures a clean cut and an even rise.
Glaze Game: Timing and Consistency
Glaze your scones when they are still slightly warm, but not hot. This allows the glaze to set beautifully without melting completely or running off. Adjust the liquid in your glaze a little at a time to achieve a smooth, drizzle-able consistency – too thick, it won’t drip; too thin, it’ll run right off and absorb too much.
Achieving that Vibrant Purple Hue
For the deepest, most consistent purple, a gel food coloring is often more potent and concentrated than liquid food coloring. If using ube powder, note that it will impart a more earthy, slightly nutty, vanilla-like flavor along with its natural purple color, which can be a delicious, unique twist to your purple scone recipe.
Scone Saviors: Common Problems & Quick Fixes
Even expert bakers encounter challenges. Here’s how to troubleshoot common scone problems to ensure your Whimsical Purple Scones are always perfect.
My Scones Are Dry and Crumbly!
This is often due to overmixing the dough, which develops too much gluten, or adding too much flour. Ensure you measure flour by weight or spoon and level it carefully, and mix only until just combined.
Overbaking can also cause dryness, so keep an eye on your oven and bake only until lightly golden.
My Scones Didn’t Rise or Are Flat!
Flat scones usually point to old or inactive baking powder. Always check the freshness date. Another common culprit is butter that wasn’t cold enough or dough that was overworked, melting the butter too soon and inhibiting steam production.
Ensure all your ingredients are properly chilled and handle the dough as little as possible.
My Scones Spread Too Much in the Oven!
Excessive spreading can occur if your butter or dough gets too warm before baking, causing the butter to melt before it can create steam. Too much liquid in the dough can also contribute to spreading.
If your kitchen is warm, consider chilling the shaped scones for 15-20 minutes in the refrigerator before baking to firm up the butter.
The Purple Color Isn’t Vibrant Enough!
The intensity of the purple can vary with the type and amount of coloring used. Gel food coloring provides a more concentrated pigment than liquid. Natural ube powder might also produce a slightly softer, more natural purple compared to artificial dyes.
Don’t be afraid to add a bit more coloring to your wet ingredients if you desire a deeper hue.
Beyond the Bake: Serving & Storing Your Purple Delights
Once your beautiful Whimsical Purple Scones are baked, knowing how to serve and store them properly ensures maximum enjoyment.
Creative Serving Suggestions
These purple scones are delightful on their own, but they also pair wonderfully with a variety of accompaniments. Serve them with a dollop of clotted cream, your favorite fruit jam, or fresh berries for an elegant touch.
They are also perfect alongside a warm cup of coffee or tea, making for an exquisite breakfast or afternoon treat. Consider these a colorful companion to cranberry orange scones.
Optimal Storage for Freshness
For the best texture and flavor, scones are always best enjoyed on the day they are baked. If you have leftovers, store them in an airtight container at room temperature for up to 2 days.
For longer storage, they can be kept in the refrigerator for up to 4 days, though their texture will be slightly denser. Warm them briefly in the oven before serving for a refreshed taste.
Make-Ahead Magic: Prep for Later
You can prepare the scone dough in advance! After cutting the scones, arrange them on a parchment-lined baking sheet and freeze until solid (about 1-2 hours).
Transfer the frozen scones to a freezer-safe bag or container and store for up to 1 month. When ready to bake, place them directly on a prepared baking sheet and add a few extra minutes to the baking time.
Your Whimsical Purple Scones Questions Answered
We’re here to address some common inquiries, helping you perfect your Whimsical Purple Scones with confidence.
Can I make these dairy-free or gluten-free?
Yes, with some adjustments. For dairy-free, substitute the heavy cream with full-fat coconut milk (from a can, chilled, using only the thick cream) or a good quality dairy-free milk alternative, and use a plant-based butter substitute. For gluten-free, use a 1:1 gluten-free baking flour blend that contains xanthan gum. Expect slight changes in texture, but delicious results are still achievable.
Can I use fresh fruit in this recipe?
Absolutely! Fresh berries like blueberries or chopped raspberries (about 1/2 cup) can be gently folded into the dough just before patting it out. If using particularly juicy fruits, toss them lightly with a tablespoon of flour first to absorb excess moisture and prevent the dough from becoming too wet.
How long do these scones stay fresh?
These scones are at their peak freshness the day they are baked. You can store them in an airtight container at room temperature for up to 2 days. While they are still edible after this, their texture may start to become less delicate. Reheating them gently in a toaster oven can help revive them.
What’s the difference between purple food coloring and ube powder?
Purple food coloring primarily provides color without significantly altering the flavor of the scone. Ube powder, on the other hand, is made from purple yam and will impart not just its natural purple hue but also a distinct, subtly sweet, earthy, and vanilla-like flavor. The choice depends on whether you want pure color or a unique flavor profile.
Share Your Whimsical Purple Scones Masterpiece!
Now that you have the secrets to making truly exceptional, fluffy, and vibrant Whimsical Purple Scones, it’s time to create your own edible art!
I encourage you to try this recipe, experiment with the ube if you’re feeling adventurous, and share your stunning creations with the world. Tag us in your posts and let us know how these beautiful, tender pastries brought a smile to your face. Happy baking!
Purple Scones
Course: PastryCuisine: AmericanDifficulty: easy4
8 scones20
minutes18
minutes550
kcal38
minutesAchieve perfectly tender and fluffy scones every time with this simple recipe. These vibrant Whimsical Purple Scones are easy to make and guaranteed to impress with their beautiful color and delicious crumb. A melt-in-your-mouth pastry that’s truly a showstopper.
Ingredients
2 cups all-purpose flour
1/4 cup granulated sugar
1 tablespoon baking powder
1/2 teaspoon salt
1/2 cup (1 stick) unsalted butter, very cold and cubed
1/2 cup cold heavy cream
1 large egg
1/2 teaspoon purple food coloring or 1 tablespoon ube powder (for color)
For the Glaze:
1 cup powdered sugar
2-3 tablespoons milk or lemon juice
1/4 teaspoon purple food coloring (optional, for vibrant glaze)
Directions
- Preheat your oven to 400°F (200°C). Line a baking sheet with parchment paper.
- In a large bowl, whisk together the flour, granulated sugar, baking powder, and salt.
- Add the very cold, cubed butter to the dry ingredients. Use a pastry blender or your fingertips to quickly cut the butter into the flour mixture until it resembles coarse crumbs with some pea-sized pieces of butter remaining. This is crucial for tenderness.
- In a separate small bowl, whisk together the cold heavy cream, egg, and purple food coloring (or ube powder).
- Pour the wet ingredients into the dry ingredients. Mix gently with a fork or spatula until just combined. The dough should still be a bit shaggy and moist. Avoid overmixing; this is key to a tender scone.
- Turn the dough out onto a lightly floured surface. Gently pat the dough into a round disc about 1 inch thick. Do not knead it.
- Cut the dough into 8 wedges using a sharp knife or a round cookie cutter (if using a cutter, dip it in flour between cuts and press straight down without twisting).
- Arrange the scones on the prepared baking sheet, leaving some space between them.
- Bake for 15-18 minutes, or until the tops are lightly golden and the scones are cooked through.
- Let the scones cool on a wire rack while you prepare the glaze.
- For the glaze, whisk together the powdered sugar, milk or lemon juice, and optional purple food coloring until smooth and drizzle-able.
- Once the scones are cool enough to handle but still slightly warm, drizzle generously with the purple glaze. Serve immediately and enjoy that perfectly tender crumb!
Notes
- The key to tender scones is using very cold butter and avoiding overmixing the dough. Drizzle glaze when scones are warm but not hot.