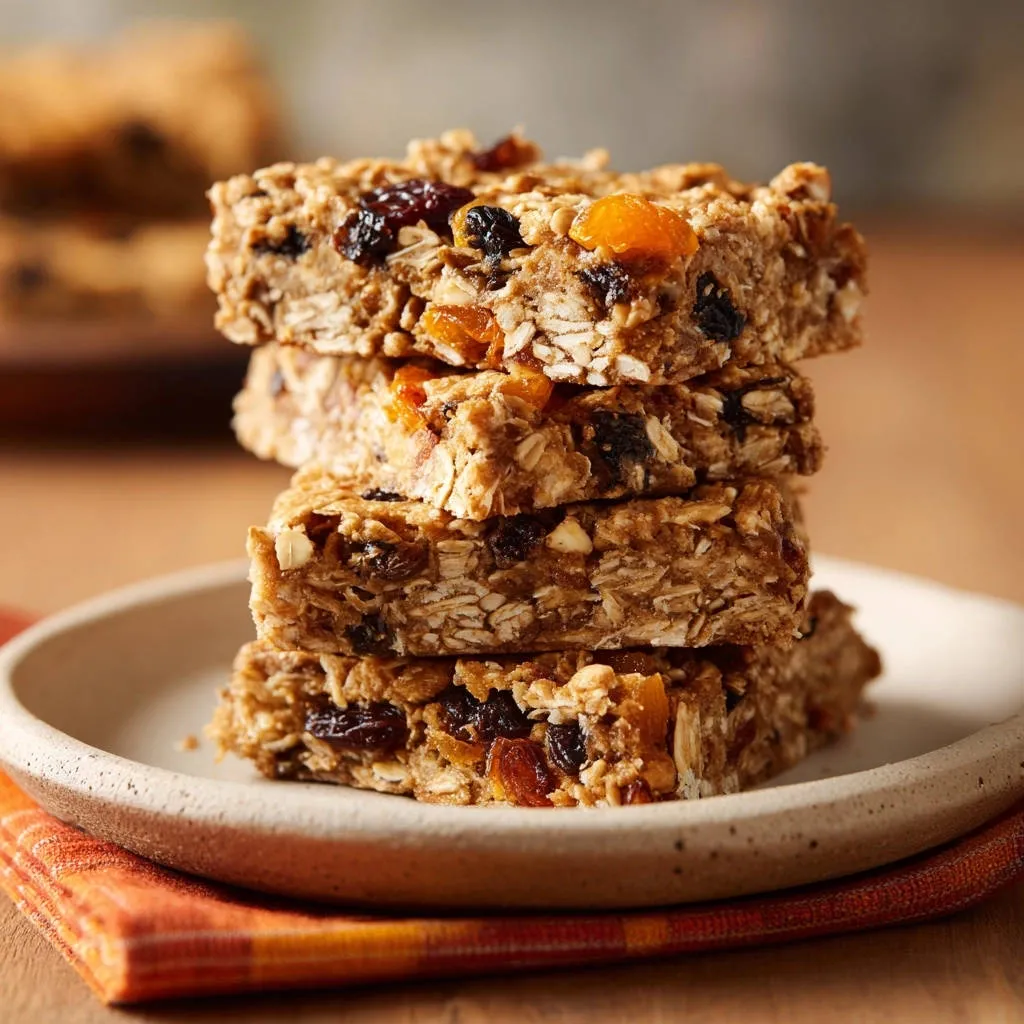
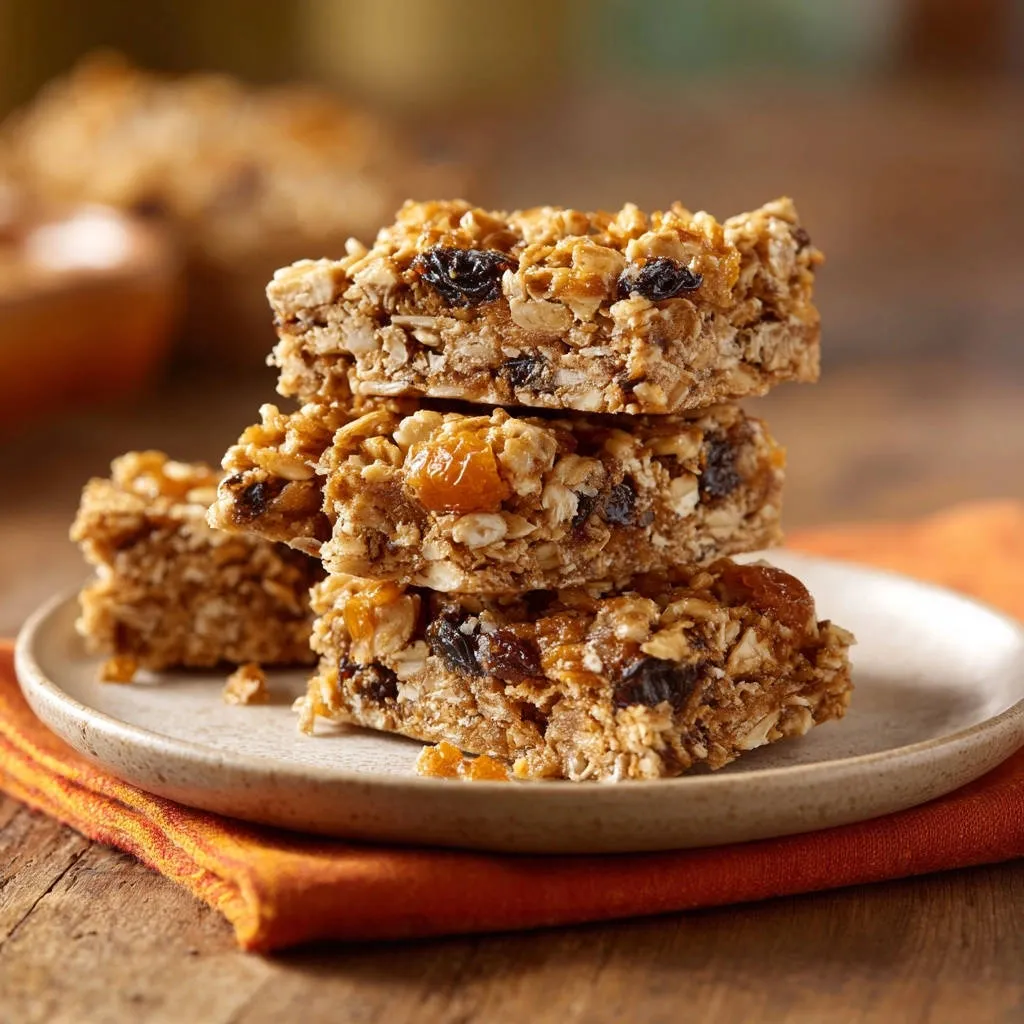
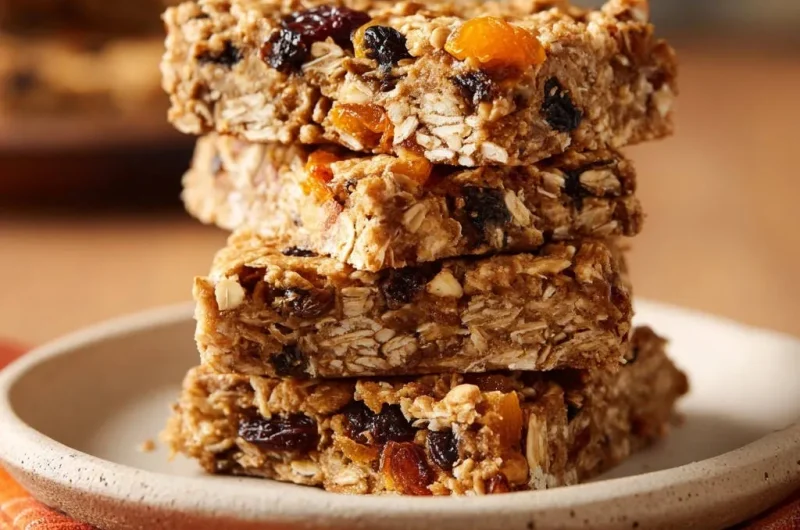
For years, I struggled with homemade bars that looked perfect in the pan but disintegrated into a pile of crumbs the second I tried to slice them. This recipe solved that problem permanently, delivering truly perfect Chewy Dried Fruit Oatmeal Bars every single time.
The secret lies in two non-negotiable techniques-a brief, focused boil of the binding syrup and a critical compaction step-which guarantee sturdy structure, exceptional chew, and clean edges.
Beyond Basic: Why This Recipe Guarantees Perfect Slices Every Time
The Problem Solved: Never Make Crumbling Granola Bars Again
The standard method of simply mixing warm syrup into oats doesn’t concentrate the sugars enough, leading to a flimsy structure that can’t hold up when cut.
Our method focuses on thickening the syrup through a specific 60-second rolling boil, creating a concentrated, super-sticky glue. Combined with intense pressure before baking, the result is a dense, cohesive bar that defies crumbling.
Fueling Your Day: Nutrition and Versatility
Old-fashioned rolled oats provide sustained, slow-releasing energy, while the dried fruits add natural sweetness and beneficial fiber.
These homemade treats are ideal for busy mornings, a post-workout boost, or as reliable, healthy snacks packed for school or hiking adventures.
Customization Potential: Make It Your Own
This recipe provides a flexible foundation where the structural integrity remains sound, regardless of the add-ins you choose.
Once you master the binding syrup and compaction, you can confidently swap out the dried fruits and nuts to create countless flavor combinations.
The Building Blocks of Flavor: Inside Your Chewy Dried Fruit Oatmeal Bars
The Essential Foundation: Choosing the Right Oats
We rely exclusively on old-fashioned rolled oats because their thick, flat structure is essential for chewiness and robust texture.
Avoid quick oats or instant oats, as they absorb moisture too rapidly and turn the bars mushy instead of pleasantly chewy.
The Sweet & Sticky Trinity: Butter, Sugar, and Honey
Unsalted butter adds necessary richness and helps the ingredients release from the pan smoothly.
Packed light brown sugar contributes essential moisture and a deeper molasses flavor profile that enhances the overall taste of these homemade granola bars.
Honey (or maple syrup, for a vegan option) acts as the primary sticky glue; when boiled and chilled, it locks the entire structure firmly into place.
Dried Fruit and Nut Combinations for Maximum Chew
Chopping larger dried fruits like apricots ensures they are evenly distributed throughout the mixture, preventing one bar from having a disproportionate amount of chew.
You can substitute the raisins or apricots with dried cranberries, chopped dried cherries, or dates, and swap almonds for crunchy pecans or walnuts.
For a similar moist texture in another treat, explore these chewy carrot oatmeal cookies.
Essential Gear and Preparation for No-Fail Baking
The Importance of the Correct Pan Size (8×8)
Using an 8×8 inch baking pan is critical because it guarantees the perfect height and density for truly chewy bars.
If you use a larger pan, such as a 9×13, the bars will be too thin, leading to a brittle texture that easily crumbles and loses its characteristic chew.
The Critical Parchment Paper Overhang Technique
The parchment paper must completely line the pan, leaving a two-inch overhang on opposing sides.
This overhang acts as a sling, allowing you to easily and cleanly lift the dense, chilled slab of Chewy Dried Fruit Oatmeal Bars out without damaging the edges.
List of Basic Tools
- Small saucepan for the binding syrup.
- Large mixing bowl for dry ingredients.
- 8×8 inch metal baking pan.
- Flat-bottom measuring cup or a sturdy spatula (essential for compaction).
Your Step-by-Step Guide to Chewy Dried Fruit Oatmeal Bars Perfection
Preparation and Preheating
Preheat your oven to 350°F (175°C) and prepare your pan first.
Line the 8×8 pan with parchment paper, ensuring a generous overhang on two sides, and lightly spray the paper with cooking oil for a dual layer of non-stick protection.
Combining the Dry Foundation
In a large bowl, thoroughly combine the rolled oats, chopped dried apricots, raisins, nuts, cinnamon, and fine sea salt.
Ensure the mixture is homogenous so that the flavorings and fruits are distributed evenly before the sticky syrup is introduced.
Achieving the Critical 60-Second Rolling Boil (The Binding Syrup Secret)
Over medium heat, melt the butter, brown sugar, and honey (or maple syrup) in a small saucepan, stirring constantly.
CRITICAL: Once the mixture reaches a full, rolling boil, stop stirring and allow it to boil vigorously for exactly 60 seconds to concentrate the sugars for maximum stickiness.
Immediately remove the pan from the heat after the minute is up, then stir in the vanilla extract to cool the mixture slightly.
Thorough Coating and Combining
Pour the hot binding syrup directly over the oat mixture in the large bowl.
Use a wooden spoon or spatula to stir until every single oat flake and piece of fruit is glossy, sticky, and completely saturated to guarantee no dry pockets in the finished bar.
The Compaction Technique That Guarantees Sturdiness
Transfer the sticky mixture into the prepared 8×8 inch pan, distributing it as evenly as possible.
CRITICAL: Using a flat-bottom measuring cup or the back of a spatula, press the mixture down with significant, even force across the entire pan.
The harder you press and compact the mass now-eliminating air pockets-the sturdier and cleaner the resulting oatmeal bars will be after chilling.
Baking and Visual Cues
Bake the bars for 22 to 25 minutes at 350°F.
They are finished when the edges are visibly golden brown, but the center still appears slightly soft and set.
The Non-Negotiable Chill Time
Remove the pan from the oven and let the bars cool completely at room temperature for a minimum of one hour.
CRITICAL: Transfer the pan to the refrigerator and chill for at least two hours, though four hours is truly ideal, as this extended cold time fully solidifies the concentrated syrup structure.
Clean Slicing and Storage
Use the parchment paper overhang to lift the fully set slab out of the pan and place it on a cutting board.
Slice the dense slab into 12 or 16 perfectly clean, sturdy bars, which can be stored in an airtight container at room temperature or refrigerated for up to a week.
Troubleshooting & Chef’s Tips for Flawless Chewy Dried Fruit Oatmeal Bars
Why Did My Bars Still Fall Apart? Common Mistakes
Syrup Not Boiled Long Enough: If the syrup didn’t reach a rolling boil for 60 seconds, the concentration of binding sugar was too low. Ensure you reach a full boil and time the minute exactly.
Insufficient Compaction: You must use significant, even force when pressing the mixture into the pan before baking. This compression literally eliminates air pockets and creates density.
Skipping the Chill: Cutting warm or room-temperature bars is guaranteed failure. The chilling process is non-negotiable for the concentrated syrup to fully set and lock the structure in place.
Flavor Variations and Dietary Customizations
Making Them Vegan: For vegan oatmeal fruit bars, ensure you substitute the butter with vegan butter sticks or coconut oil, and use maple syrup instead of honey for binding.
Adding Chocolate: Mix in mini chocolate chips after the mixture has cooled slightly (when combining with the syrup) but before pressing. This prevents the chips from melting entirely during the bake.
Spice It Up: Enhance the basic cinnamon flavor profile by adding a small pinch of ground nutmeg, allspice, or cardamom, which pairs beautifully with the dried fruits, especially in fall.
Maximizing Freshness: Storage and Serving Suggestions
How Long Do Chewy Dried Fruit Oatmeal Bars Last?
At room temperature, these sturdy bars will stay fresh and soft in an airtight container for up to 3 to 4 days.
For a chewier texture and extended freshness, store them refrigerated for up to one week; ensure they are tightly wrapped to prevent drying out.
Creative Ways to Enjoy and Serve Your Bars
For an elevated experience, drizzle the finished bars with melted white chocolate, dark chocolate, or a swirl of warmed almond butter.
They make an excellent substantial breakfast when served alongside a dollop of Greek yogurt and a strong cup of coffee.
Can I Make a Double Batch and Freeze Them?
Absolutely, Chewy Dried Fruit Oatmeal Bars freeze beautifully, making them ideal for meal prepping.
Wrap individual sliced bars tightly in plastic wrap, then place them in a freezer-safe bag for up to three months; thaw overnight in the refrigerator or at room temperature for a few hours.
Common Questions About Chewy Dried Fruit Oatmeal Bars Baking (FAQs)
Can I Use Quick Oats Instead of Rolled Oats?
No, you should strictly use old-fashioned rolled oats for this recipe. Quick oats are cut finer and thinner, causing them to absorb too much moisture too quickly, resulting in a less chewy, almost mushy texture that compromises the bar structure.
How Do I Prevent the Bars from Sticking to the Parchment Paper?
While the parchment paper does most of the heavy lifting, lightly spraying the paper with oil or cooking spray before adding the mixture creates a crucial second protective layer.
This is especially important after the aggressive compaction step, which presses the sticky syrup directly onto the paper.
What is the Best Substitute for Brown Sugar?
Granulated white sugar can be substituted, but be aware that it will slightly reduce the depth of flavor and overall chewiness because it lacks moisture.
To best mimic brown sugar’s properties, mix a standard cup of granulated sugar with one tablespoon of molasses; this restores both moisture retention and the signature caramel note.
Ready to Impress? Share Your Chewy Dried Fruit Oatmeal Bars Masterpiece!
You now possess the expert techniques necessary-from the critical syrup boil to the vigorous compaction-to create the sturdiest, most satisfying Chewy Dried Fruit Oatmeal Bars possible.
Bake this recipe with confidence, knowing that perfect, non-crumbling slices are guaranteed. We encourage you to try these treats and share your results!
Oatmeal Bars
Course: SnacksCuisine: AmericanDifficulty: easy12
to 16 bars15
minutes25
minutes240
kcal180
minutesThese homemade oatmeal bars are perfectly chewy and guaranteed not to crumble, thanks to a simple, critical step: boiling the binding syrup. Packed with oats, dried fruit, and nuts, they are a sturdy, healthy alternative to expensive store-bought versions. The key to perfect squares is proper compaction and a full chill.
Ingredients
2 cups old-fashioned rolled oats
1/2 cup chopped dried apricots
1/2 cup raisins or dried currants
1/4 cup chopped almonds or nuts of choice
1/2 teaspoon cinnamon
1/4 teaspoon fine sea salt
1/4 cup unsalted butter
1/4 cup packed light brown sugar
1/2 cup honey or maple syrup
1 teaspoon vanilla extract
Directions
- Preparation: Preheat your oven to 350 degrees F. Line an 8×8 inch baking pan completely with parchment paper, leaving an overhang on two sides (this is essential for clean removal). Lightly spray the paper with cooking spray.
- Mix Dry Ingredients: In a large bowl, combine the rolled oats, dried apricots, raisins, nuts, cinnamon, and salt. Set aside.
- Create the Binding Syrup (The Secret to No Crumbles): In a small saucepan over medium heat, melt the butter, brown sugar, and honey (or maple syrup). Stir constantly until the mixture comes to a full, rolling boil. Let it boil gently for 60 seconds without stirring, then immediately remove it from the heat. This quick boil concentrates the sugars, ensuring maximum stickiness. Stir in the vanilla extract.
- Combine and Coat: Pour the hot binding syrup over the oat mixture. Use a wooden spoon or spatula to stir until every oat and piece of fruit is completely coated in the sticky syrup.
- Critical Compaction Technique: Transfer the mixture into the prepared 8×8 inch pan. This is the moment to guarantee they hold their shape! Use a flat bottom measuring cup or the back of a spatula to press the mixture down hard and evenly across the entire pan. The surface should look dense and uniform. The harder you press now, the sturdier the bars will be later.
- Bake: Bake for 22 to 25 minutes, or until the edges are golden brown. The center should still look slightly soft.
- Set and Chill: Remove the pan from the oven. Let the bars cool completely at room temperature for at least one hour. Then, transfer the pan to the refrigerator and chill for a minimum of 2 hours (4 hours is ideal). The concentrated syrup needs cold time to fully set and lock the structure in place.
- Slice: Use the parchment paper overhang to lift the entire slab out of the pan. Place on a cutting board and slice into 12 or 16 bars. Because they were compacted and fully chilled, they will hold their shape perfectly and slice cleanly every time. Store in an airtight container at room temperature or in the fridge.
Notes
- The full 3-4 hour chilling time is essential for the concentrated sugar syrup to fully set, ensuring clean, perfect slices.