There’s nothing quite like the comforting aroma of freshly baked Classic Banana Nut Bread, yet achieving that elusive perfectly moist crumb can feel like a challenge. I used to face the same struggle, ending up with dry, crumbly loaves despite my best efforts.
After countless experiments, I finally cracked the code to consistently tender, melt-in-your-mouth Classic Banana Nut Bread, and I’m thrilled to share my foolproof recipe with you. Get ready to bake a loaf so good, it will become your go-to every time.
Why This Classic Banana Nut Bread Recipe Is Your New Favorite
The Undeniable Appeal of a Perfectly Moist Slice
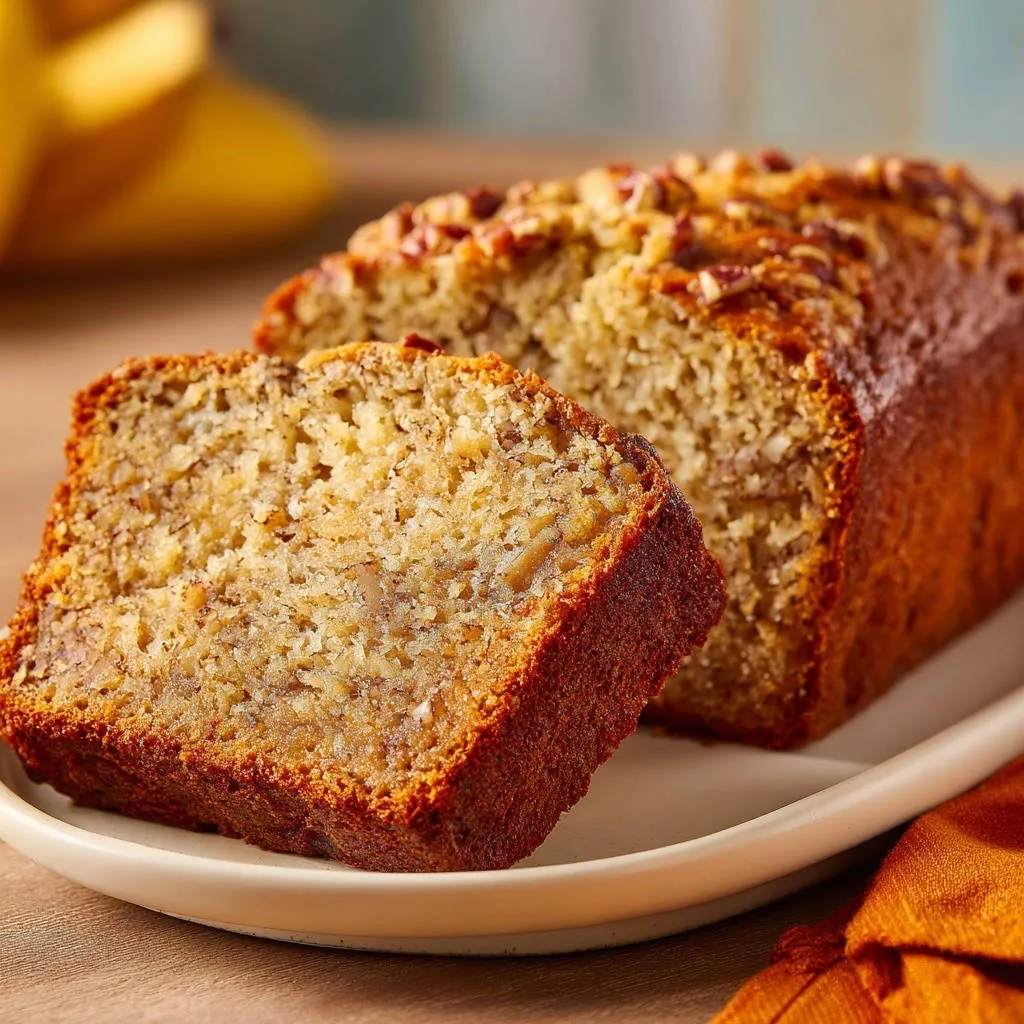
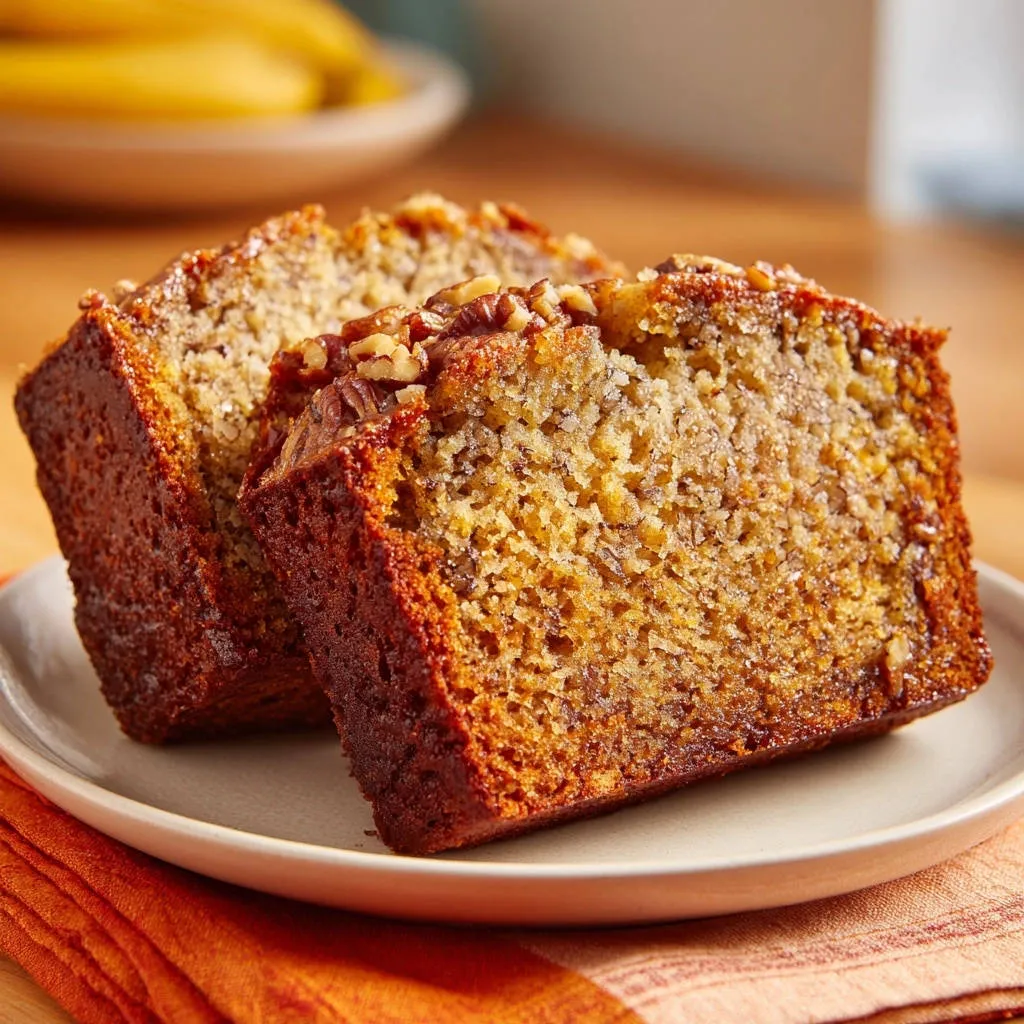
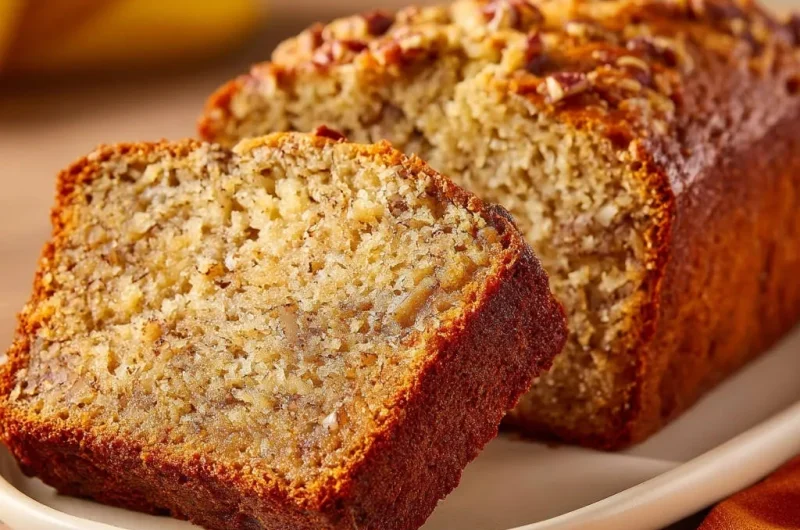
Imagine slicing into a loaf where every bite is soft, tender, and infused with rich banana flavor, complemented by a delightful crunch from nuts. That’s the magic of truly moist banana bread.
It’s the kind of treat that transforms a simple breakfast, an afternoon snack, or even a casual dessert into a moment of pure comfort.
Our Secret to Never-Dry Banana Bread (And Why It Works)
The core of our success lies in two crucial techniques often overlooked: gentle mixing and strategic cooling. Overmixing develops gluten, which directly leads to a tough, dry texture.
Additionally, allowing the loaf to cool properly in the pan ensures the internal moisture redistributes, locking in that desirable tenderness. These small steps make all the difference for this delicious Classic Banana Nut Bread.
Quick to Prep, Simple to Master: Your Baking Confidence Boost
This recipe is designed for both seasoned bakers and beginners, offering clear, concise steps that minimize fuss. You’ll find it incredibly straightforward to prepare, allowing you to achieve bakery-quality results right in your own kitchen.
It’s a truly reliable recipe that builds confidence with every successful, incredibly moist loaf you bake.
Gather Your Goodies: Essential Ingredients for Flawless Flavor
The Banana Factor: Why Ripeness Matters Most
Very ripe bananas are the undisputed star of this Classic Banana Nut Bread. Their high sugar content contributes natural sweetness, reducing the need for excessive added sugar, and their moisture ensures a tender crumb.
Look for bananas with extensive brown spots or even a nearly black peel – these are perfect. Their soft texture also makes them incredibly easy to mash, integrating smoothly into the batter.
The Wet Wonders: Creating a Flavorful Base
Melted unsalted butter adds rich flavor and contributes significantly to the bread’s moist texture. Granulated sugar sweetens the loaf and helps keep it tender, while a single large egg binds everything together, adding richness and structure.
Pure vanilla extract enhances the overall flavor profile, adding warmth and depth to the sweet banana notes.
Dry Mix Magic: The Foundation of Structure
All-purpose flour provides the necessary structure for the loaf, ensuring it holds its shape. Baking soda acts as our leavening agent, reacting with the acidic bananas to create lift and a light texture.
A touch of salt balances the sweetness, elevating all the other flavors without making the bread taste salty. This careful blend creates a robust foundation for your homemade banana bread.
Nutty Add-Ins: Crunchy Perfection (or Omissions)
Chopped pecans or walnuts add a delightful textural contrast and a warm, earthy flavor to this Classic Banana Nut Bread. Their crunch is a welcome complement to the soft, moist crumb.
For a touch more crunch, try making ultimate walnut banana bread next.
If nuts aren’t your preference or you have allergies, you can easily omit them without making any other changes to the recipe. For those who love them, you can also sprinkle a few extra on top before baking for a pretty finish.
Essential Tools for Your Classic Banana Nut Bread Journey
Having the right tools makes the baking process smoother and more enjoyable. These essentials ensure precision and efficiency from start to finish.
Mixing Bowls and Whisks: Your Prep Powerhouses
You’ll need at least two mixing bowls: one large for wet ingredients and one medium for dry. This allows you to combine similar components thoroughly before integrating them.
A good whisk is essential for aerating the dry ingredients and ensuring they are lump-free, which prevents pockets of unmixed flour in your loaf.
The Perfect Loaf Pan: Ensuring Even Baking
A standard 9×5 inch loaf pan is ideal for this recipe, ensuring the bread bakes evenly and achieves its classic shape. Material can vary, but a light-colored metal pan often promotes even browning.
Properly preparing the pan-greasing and flouring, or lining with parchment paper-is crucial for an easy release and a perfectly intact loaf.
Measuring Tools and Spatulas: Precision for Perfection
Accurate measuring cups and spoons are non-negotiable in baking; they ensure the correct balance of ingredients for optimal results. Rubber spatulas are perfect for gently folding ingredients, especially when combining the wet and dry mixes.
Their flexibility allows you to scrape down the sides of bowls effectively, ensuring no ingredient is left behind.
Bake with Confidence: Your Step-by-Step Guide to Classic Banana Nut Bread
Preparation: Setting the Stage for Success
Mixing the Wet Ingredients: Achieving the Perfect Consistency
Combining Dry and Wet: The Golden Rule of Gentle Mixing
Final Touches and Baking: Watching Your Loaf Come to Life
The Critical Cool Down: Ensuring Lasting Moisture
Begin by preheating your oven to 350°F (175°C). This ensures the oven is at the correct temperature when your batter is ready, promoting proper rise.
Prepare a 9×5 inch loaf pan by either thoroughly greasing and flouring it, or lining it with parchment paper, leaving an overhang on the sides. This simple step guarantees your moist banana bread will release cleanly after baking.
In a large bowl, mash your very ripe bananas with a fork. Aim for a consistency that is mostly smooth but still retains a few small, delightful lumps for texture.
Stir in the melted butter until well combined with the bananas. Then, add the granulated sugar, egg, and vanilla extract, mixing thoroughly until all ingredients are fully incorporated and the mixture is smooth.
In a separate medium bowl, whisk together the all-purpose flour, baking soda, and salt. This ensures these dry leavening agents and flavor enhancers are evenly distributed throughout the flour.
Add the dry ingredients to the wet mixture. This is critical for a tender, moist banana bread: Gently stir with a spatula until just combined. A few streaks of flour are perfectly fine and even desirable at this stage.
Overmixing develops gluten in the flour, which will lead to a tough, dry loaf of banana bread. Stop stirring as soon as the ingredients are barely incorporated.
Carefully fold in the chopped pecans or walnuts. Their crunch offers a wonderful contrast to the soft banana bread.
Pour the batter into your prepared loaf pan. If desired, sprinkle a few extra pecans on top for an appealing presentation. Bake for 55 to 65 minutes.
The Classic Banana Nut Bread is done when a wooden skewer or toothpick inserted into the center comes out clean. If the top begins to brown too quickly, loosely tent the loaf with aluminum foil to prevent burning while the inside finishes cooking.
Once baked, let the banana bread cool in the pan for 10 minutes. This initial cooling period allows the loaf to firm up and prevents it from crumbling when moved.
After 10 minutes, carefully transfer the bread to a wire rack to cool completely. This crucial step helps to retain moisture within the loaf, resulting in that incredibly tender texture, and prevents the bottom from becoming soggy from trapped steam.
Chef’s Secrets: Elevate Your Classic Banana Nut Bread Game
Choosing the Perfect Bananas for Ultimate Sweetness
The Art of Gentle Mixing: Avoiding a Tough Loaf
Preventing Overbrowning: When to Tent Your Bread
Cooling for Optimal Moisture: Don’t Rush This Step!
Customizing Your Loaf: Beyond Pecans
Always opt for very ripe bananas, identifiable by their brown-speckled skin or even entirely dark brown color. Their natural sugars fully develop, providing intense flavor and essential moisture to your Classic Banana Nut Bread.
If your bananas aren’t quite ripe enough, you can speed up the process by baking them unpeeled on a baking sheet at 300°F (150°C) for 15-30 minutes, until their skins are black and shiny.
Once the dry ingredients are added, mix the batter as little as possible. Overmixing activates the gluten in the flour, making your banana bread dense and chewy instead of light and tender.
Stir only until the flour streaks disappear. A few small lumps are perfectly acceptable and actually contribute to a lighter crumb.
If you notice the top of your Classic Banana Nut Bread browning too quickly during baking, usually around the 30-40 minute mark, loosely cover the pan with aluminum foil.
This creates a protective shield, preventing further browning of the crust without steaming the bread or hindering its internal cooking.
The 10-minute cooling period in the pan isn’t just for structural integrity; it’s vital for moisture retention. During this time, residual heat continues to cook the bread gently, and moisture redistributes throughout the loaf.
Moving it too soon can cause the bread to collapse or dry out unevenly. Cooling completely on a wire rack also prevents a soggy bottom by allowing air circulation.
While pecans are classic, feel free to experiment with other add-ins. Chocolate chips, dried cranberries, shredded coconut, or a mix of cinnamon and nutmeg can elevate your banana bread.
You can also try a swirl of cream cheese or a sprinkle of streusel topping for an extra decadent touch. Add about 1/2 to 1 cup of your chosen additions.
Troubleshooting Your Bake: Common Banana Nut Bread Conundrums
My Banana Bread is Dry or Crumbly!
This is often due to overmixing the batter, which develops gluten and results in a tough texture, or overbaking. Ensure you only stir until just combined after adding the dry ingredients.
Also, verify your oven temperature with a thermometer and bake only until a toothpick comes out clean, then remove it promptly. Using very ripe bananas also adds essential moisture.
My Loaf Sank in the Middle!
A sunken center can be caused by opening the oven door too early during baking, a common issue with Classic Banana Nut Bread, or if your baking soda is old and inactive.
It can also indicate too much liquid in the batter or underbaking. Ensure your leavening agents are fresh and avoid peeking into the oven before the last 15-20 minutes of baking.
The Top is Too Brown, But the Inside is Raw!
This typically means your oven temperature is too high, or the loaf is positioned too close to the top heating element. Lower your oven rack if possible.
Utilize the foil tenting technique as soon as you notice the top browning excessively to shield it while the inside catches up. This allows the bread to bake through without burning the crust.
Beyond the Oven: Storing, Serving, and Savoring Your Loaf
Storing Your Classic Banana Nut Bread for Freshness
For optimal freshness, store your completely cooled Classic Banana Nut Bread at room temperature for up to 2-3 days. Wrap it tightly in plastic wrap or aluminum foil, or place it in an airtight container.
If you need to store it longer, it will keep in the refrigerator for up to a week, though it can dry out slightly faster there.
Creative Ways to Serve Your Delicious Loaf
While delicious on its own, your homemade banana bread can be elevated with simple accompaniments. Serve slices with a dollop of whipped cream, a scoop of vanilla ice cream, or a generous smear of cream cheese frosting.
It also pairs wonderfully with a cup of coffee or tea for breakfast, or toasted lightly with a pat of butter or a drizzle of honey.
Can You Freeze Banana Nut Bread? (Yes!)
Absolutely! Banana nut bread freezes beautifully, making it perfect for meal prep or gifts. Wrap the entire cooled loaf tightly in plastic wrap, then again in aluminum foil.
It will keep well in the freezer for up to 3 months. To thaw, simply unwrap and let it sit at room temperature for several hours, or overnight, to retain its moist texture.
Your Banana Nut Bread Questions Answered
What’s the best way to ripen bananas quickly?
If you’re short on time, bake unpeeled bananas on a baking sheet at 300°F (150°C) for 15-30 minutes, until their skins turn black and shiny. Let them cool, then peel and mash.
Alternatively, place them in a paper bag with an apple for 1-2 days; the ethylene gas from the apple speeds up ripening.
Can I make this recipe gluten-free?
Yes, you can often substitute a good quality 1:1 gluten-free all-purpose flour blend in this Classic Banana Nut Bread recipe. Ensure the blend contains xanthan gum for proper structure.
The texture may be slightly different, but it should still yield a delicious loaf. No other major adjustments are typically needed, but always check your specific flour blend’s recommendations.
How long does banana nut bread last?
Your banana nut bread will last 2-3 days at room temperature when stored in an airtight container or tightly wrapped. In the refrigerator, it can stay fresh for up to 5-7 days.
For longer storage, freezing is an excellent option, preserving its quality for up to 3 months.
Can I omit the nuts?
Yes, you can absolutely omit the nuts from this Classic Banana Nut Bread recipe. The texture will be slightly different without the crunch, but the overall flavor and moisture will remain excellent.
No adjustments to the other ingredients or baking time are necessary if you choose to make a nut-free version.
Ready to Bake Your Best Classic Banana Nut Bread Yet?
Armed with these expert tips and a reliable recipe, you’re now ready to bake the most incredibly moist and flavorful Classic Banana Nut Bread you’ve ever tasted. This recipe truly is a game-changer, promising tender perfection every time.
I encourage you to give it a try and discover the joy of homemade banana bread that never disappoints. Share your baking triumphs and tag us with your beautiful, perfectly baked loaves!
Banana Nut Bread
Course: BreadCuisine: AmericanDifficulty: easy1
loaf (approx. 8-10 slices)15
minutes55
minutes550
kcal70
minutesTired of dry, crumbly banana bread? This recipe is your new secret weapon for consistently moist and tender banana nut bread. With simple ingredients and clear steps, you’ll master the art of perfectly baked banana bread every time. Enjoy your new favorite treat!
Ingredients
3 very ripe bananas, mashed
1/2 cup unsalted butter, melted
1 cup granulated sugar
1 large egg
1 teaspoon vanilla extract
1 1/2 cups all-purpose flour
1 teaspoon baking soda
1/2 teaspoon salt
1/2 cup chopped pecans (or walnuts)
Directions
- Preheat your oven to 350°F (175°C). Grease and flour a 9×5 inch loaf pan, or line with parchment paper.
- In a large bowl, mash the very ripe bananas with a fork until mostly smooth but with a few small lumps remaining.
- Add the melted butter to the mashed bananas and stir to combine. Then, stir in the granulated sugar, egg, and vanilla extract until well incorporated.
- In a separate medium bowl, whisk together the all-purpose flour, baking soda, and salt.
- Add the dry ingredients to the wet ingredients. This is key for moisture: Gently stir until just combined. A few streaks of flour are perfectly fine. Overmixing develops gluten, which can make your banana bread tough and dry.
- Fold in the chopped pecans.
- Pour the batter into your prepared loaf pan. You can sprinkle a few more pecans on top if desired.
- Bake for 55 to 65 minutes, or until a wooden skewer or toothpick inserted into the center comes out clean. If the top starts to brown too quickly, you can loosely tent it with foil.
- Let the banana bread cool in the pan for 10 minutes before carefully transferring it to a wire rack to cool completely. This helps retain moisture and prevents the bottom from becoming soggy. Slice and enjoy your perfectly moist banana bread!
Notes
- Avoid overmixing for tender results. Cool in pan for 10 minutes before transferring to a rack for best moisture retention.