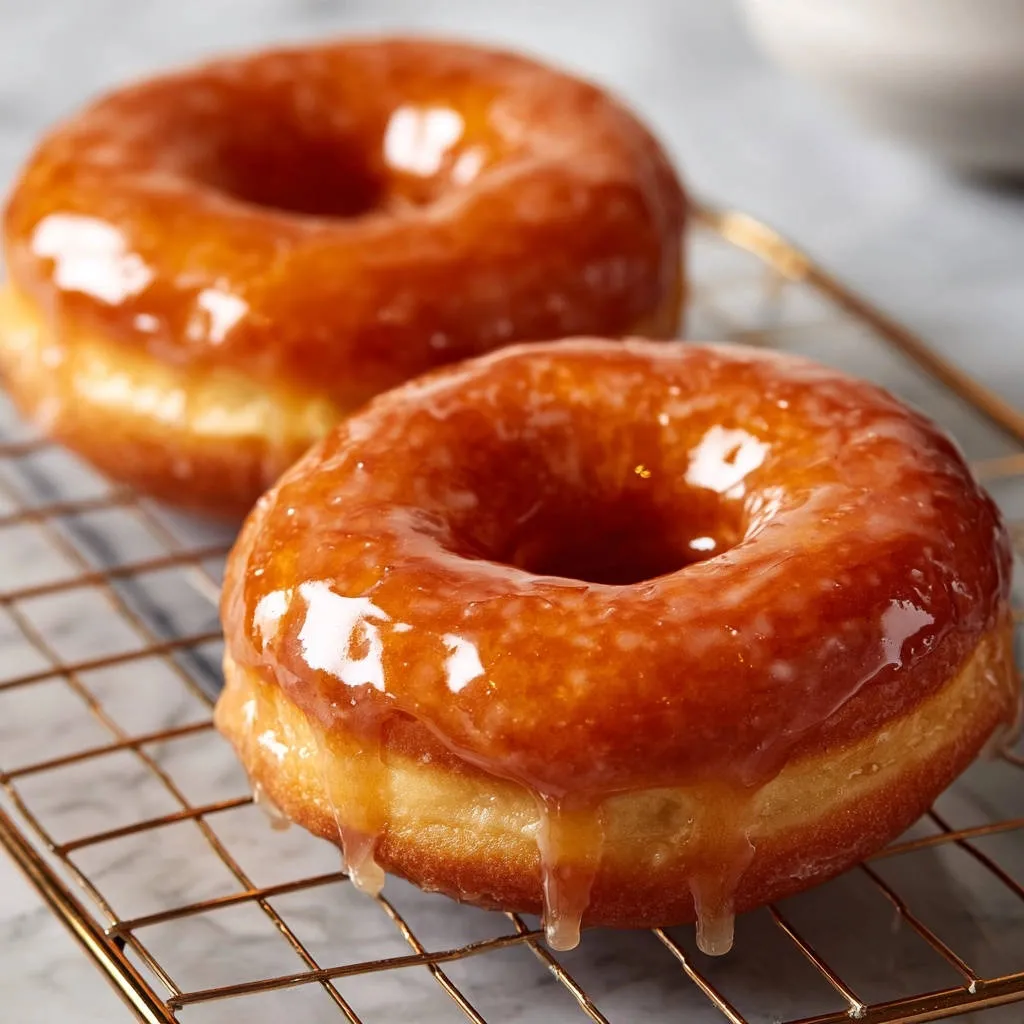
I remember my first attempts at making classic glazed donuts at home – often ending in heavy, disappointingly greasy results. That all changed when I discovered a game-changing trick, transforming my homemade batches into unbelievably light, fluffy, and never-greasy delights.
This recipe for classic glazed donuts isn’t just about recreating a favorite treat; it’s about mastering the perfect texture and flavor, ensuring every bite is a triumph of homemade goodness. Get ready to bake like a pro and experience the pure joy of a truly perfect donut.
Beyond Basic: Why Our Classic Glazed Donuts Truly Shine
The “Never Greasy” Method: A Game-Changer
The number one complaint about homemade donuts is often greasiness. Our secret lies in precise oil temperature control.
By maintaining the oil between 350-375 degrees F, the donuts cook quickly and evenly without absorbing excess oil, resulting in that coveted light texture.
Achieving Unforgettable Fluffiness (Every Time)
The key to fluffy donuts is not just one step, but a combination of precise measurements, proper kneading, and critically, a diligent second rise.
This double proofing allows the yeast to work its magic, creating air pockets that expand during frying for an incredibly tender crumb.
Beginner-Friendly, Expert Results
While making yeast donuts might seem intimidating, this recipe breaks down each step into manageable parts.
With clear instructions and expert tips, even novice bakers can achieve bakery-quality classic glazed donuts, building confidence with every successful batch.
The Building Blocks of Flavor: Essential Glazed Donut Ingredients
Dough Essentials: Flour, Yeast, and More
All-purpose flour provides the essential structure for your donuts, creating a tender, yet pliable dough.
Active dry yeast, when properly activated with warm milk and a touch of sugar, is the leavening agent responsible for the dough’s signature rise and airy texture.
Large eggs and melted unsalted butter contribute richness and moisture, yielding a tender crumb that melts in your mouth.
Vanilla extract and a hint of salt balance the sweetness, enhancing the overall depth of flavor in the dough.
Crafting the Irresistible Glaze
The simple glaze comes together with powdered sugar, creating a smooth, quick-setting coating that’s characteristic of classic glazed donuts.
A few tablespoons of milk or water adjust the glaze’s consistency, ensuring it’s pourable yet thick enough to cling beautifully to the warm donuts.
A touch more vanilla extract in the glaze amplifies its inviting aroma and flavor, making it truly irresistible.
Your Donut Crafting Arsenal: Essential Tools
Deep-Fry Thermometer: Absolutely crucial for achieving the “non-greasy” result by maintaining precise oil temperature.
Donut Cutter (or Alternatives): For perfect shapes and sizes, ensuring even frying. A round cookie cutter and a smaller round cutter (like a piping tip) work well as alternatives.
Large, Deep Pot or Dutch Oven: The ideal vessel for safe and even frying, allowing enough space for the oil and donuts without overcrowding.
Wire Rack with Baking Sheet: Essential for proper draining of excess oil and allowing the glaze to set without pooling.
Parchment Paper: Prevents your delicate shaped donuts from sticking during the crucial second rise, making them easy to transfer to the hot oil.
From Dough to Delight: Your Step-by-Step Glazed Donut Journey
Activating the Magic: Yeast Preparation
In a spacious bowl, combine your warm milk, granulated sugar, and active dry yeast.
Stir gently, then let this mixture rest for 5 to 10 minutes until a foamy layer appears on top. This foam is your visual cue that the yeast is alive and ready to make your donuts wonderfully light.
Crafting the Perfect Dough
Add the lightly beaten eggs, cooled melted butter, vanilla extract, and salt to your active yeast mixture, stirring until well combined.
Gradually incorporate the all-purpose flour, mixing until a shaggy, cohesive dough begins to form. Turn the dough onto a lightly floured surface and knead it for 5 to 7 minutes.
The dough should transform from shaggy to smooth and elastic, indicating proper gluten development for that desirable chewy-soft texture.
The Rise to Perfection: First Proofing
Lightly oil a clean bowl and place your kneaded dough inside, turning it once to coat all surfaces.
Cover the bowl with a clean kitchen towel or plastic wrap, then let it rise in a warm, draft-free spot for 1 to 1.5 hours. The dough is ready when it has visibly doubled in size, feeling soft and puffy.
Shaping Your Donut Masterpieces
Once risen, gently punch down the dough to release the air. On a lightly floured surface, roll the dough evenly to about 1/2 inch thickness.
Use a 3-inch donut cutter or a round cutter with a smaller center cutter to cut out your donut shapes. Don’t worry about the scraps; gently reroll them and cut out more donuts until all dough is used.
The Second Rise: Crucial for Lightness
Carefully transfer your cut donuts to parchment-lined baking sheets, leaving ample space between each.
Loosely cover them and allow them to rise again for 30 to 45 minutes, or until they look noticeably puffy and airy. This crucial second rise ensures an incredibly light, airy final texture and significantly helps prevent the donuts from absorbing too much oil during frying.
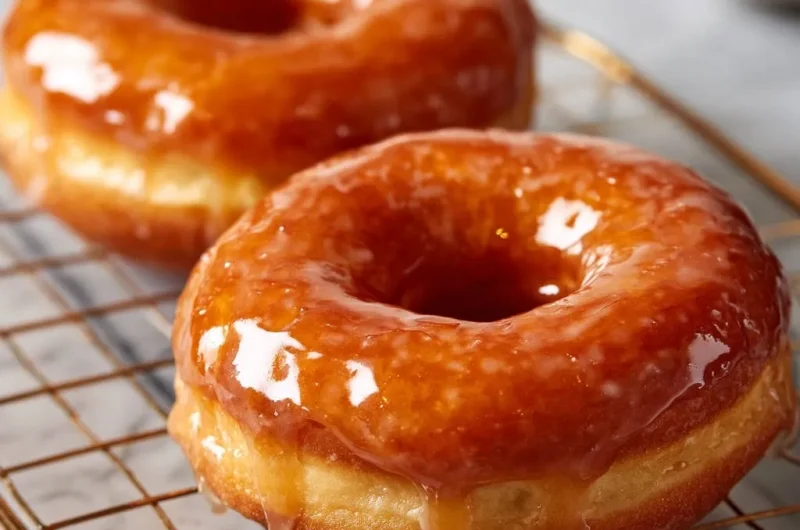
The Non-Greasy Secret: Frying with Precision
Pour your vegetable oil into a large, deep pot or Dutch oven, ensuring it’s at least 3-4 inches deep. Attach a deep-fry thermometer to the side of the pot.
Heat the oil over medium heat until it reaches a consistent temperature of 350 to 375 degrees F. This precise temperature is the absolute key to non-greasy donuts; too cool, and they absorb oil; too hot, and they burn before cooking through.
Carefully lower 2 to 3 donuts at a time into the hot oil, avoiding overcrowding. Overcrowding will cause the oil temperature to drop rapidly, leading to greasy results.
Fry for about 1 to 2 minutes per side, or until each side is beautifully golden brown. They will puff up impressively!
Proper Draining for Optimal Texture
Using a slotted spoon or spider, carefully remove the fried donuts from the oil.
Immediately transfer them to a wire rack that’s set over a baking sheet. This setup allows any excess oil to drip off, ensuring your donuts maintain their light and perfect texture.
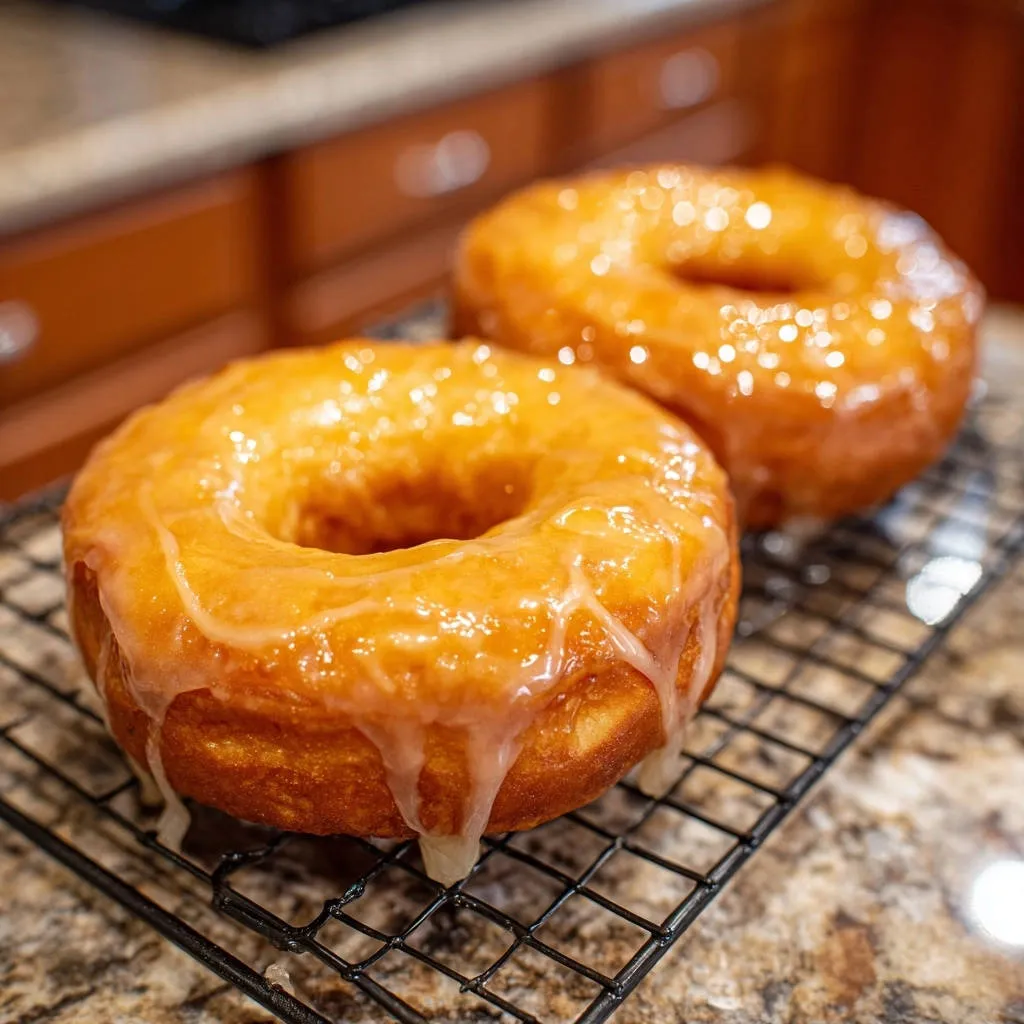
Achieving Glaze Perfection
While your freshly fried donuts are cooling slightly (they should still be warm, not hot), whisk together the powdered sugar, milk or water, and vanilla extract in a medium bowl.
Continue whisking until the glaze is completely smooth and lump-free. Adjust the amount of liquid a tiny bit at a time until you reach your desired consistency – thick enough to coat, but thin enough to drip.
Chef’s Secrets: Elevate Your Homemade Glazed Donuts
Don’t Rush the Rise: Patience truly is a virtue when working with yeast dough. An under-proofed dough will result in dense, heavy donuts.
To create an ideal warm environment, you can preheat your oven to its lowest setting for a few minutes, then turn it off and place your covered dough inside. Just ensure the oven isn’t too hot to begin with!
Mastering Oil Temperature: This cannot be stressed enough: a reliable deep-fry thermometer is your best friend.
Fluctuating oil temperature is the primary culprit behind greasy or burnt donuts. Adjust your heat source as needed to keep the oil within the recommended 350-375°F range, checking frequently.
The Dough Consistency Sweet Spot: After kneading, your dough should feel smooth, elastic, and slightly tacky, but not sticky.
If it’s too sticky, add a tiny bit more flour, a teaspoon at a time. If it feels too stiff, it might have been over-floured, which can lead to dense donuts.
Handling Dough Gently: Once your dough has risen and you’re shaping the donuts, handle it with a light touch.
Rough handling can deflate the precious air bubbles that contribute to a light, airy texture. Use gentle pressure when rolling and cutting.
Glazing While Warm: The best time to glaze your donuts is when they are still warm, but not fresh out of the fryer hot.
This warmth helps the glaze adhere beautifully and absorb just slightly into the donut’s surface, creating that perfect balance of crisp glaze and tender interior.
Donut Dilemmas Solved: Common Issues & Quick Fixes
Why Are My Donuts Dense or Chewy?
Dense donuts are often a sign of insufficient rising time or dough that was overworked during kneading. Ensure your yeast is active and allow enough time for both rises.
Over-kneading can develop too much gluten, resulting in a chewy, bread-like texture rather than a light donut. Knead just until smooth and elastic, then stop.
Dealing with Greasy Donuts
The most common cause of greasy donuts is oil that isn’t hot enough. If the oil temperature drops too low (below 350°F), the donuts will absorb excessive oil.
Avoid overcrowding the pot; fry only a few donuts at a time to maintain consistent oil temperature. Make sure to drain them immediately on a wire rack after frying.
My Donuts Aren’t Rising
If your dough isn’t rising, the culprit is almost always inactive or dead yeast. This can happen if your warm milk was too hot (killing the yeast) or too cold (slowing it down too much).
Ensure your yeast is fresh and your milk is within the 105-115°F range. Look for that foamy activation to confirm your yeast is alive and well.
Glaze Not Sticking or Too Thin/Thick?
If your glaze isn’t sticking, ensure your donuts are still warm, as this helps absorption. If the glaze is too thin, slowly whisk in more powdered sugar until it thickens to your desired consistency.
If it’s too thick, add milk or water, a teaspoon at a time, until it reaches a smooth, dippable texture. Remember, you want it to coat without being runny.
Enjoying & Preserving Your Glazed Donut Delights
Best Ways to Serve Homemade Donuts
There’s nothing quite like a warm, freshly glazed donut straight from the kitchen.
Serve them slightly warm for the ultimate experience, perhaps with a cup of coffee or a glass of cold milk. For those who love variety, you can also explore making fluffy blueberry donuts or other fried treats.
Storing Leftover Glazed Donuts
While classic glazed donuts are undeniably best enjoyed fresh, you can store leftovers in an airtight container at room temperature for up to 1-2 days.
To refresh them slightly, a quick 10-15 second zap in the microwave can work wonders, bringing back some of their initial softness.
Can You Make Donuts Ahead?
You can definitely prepare the donut dough ahead of time!
After the first rise, punch down the dough, wrap it tightly in plastic wrap, and refrigerate it overnight. Allow it to come to room temperature for about 30-60 minutes before rolling, cutting, and proceeding with the second rise and frying for the freshest results.
Your Top Glazed Donut Questions Answered
Can I Use a Deep Fryer Instead of a Pot?
Absolutely! A dedicated deep fryer is excellent for making classic glazed donuts as it often provides more precise temperature control and a safer frying environment.
Just ensure you still monitor the temperature closely and don’t overcrowd the basket.
What if I Don’t Have a Donut Cutter?
No donut cutter? No problem! You can use two round cookie cutters of different sizes (one large for the donut, one small for the hole).
Alternatively, a drinking glass for the outer circle and a large piping tip or even a clean soda bottle cap for the center hole work perfectly.
Can I Bake These Donuts Instead of Frying?
This particular recipe for classic glazed donuts is specifically formulated and optimized for frying, which gives them their signature light, airy, and slightly crisp exterior.
Baking them would result in a very different texture, more akin to a cake donut. If you prefer baked donuts, we recommend seeking out a recipe designed specifically for baking to achieve the best results.
How Do I Know When the Yeast is Active?
Active yeast will produce a visible layer of foam or bubbles on the surface of the warm milk and sugar mixture within 5 to 10 minutes.
If you don’t see any foam after this time, your yeast may be old or the liquid was too hot/cold, and it’s best to start with a new batch of yeast.
Can I Add Flavorings to the Glaze?
Yes, absolutely! The basic vanilla glaze is a perfect canvas for customization. Try adding citrus zest (lemon, orange), a pinch of cinnamon or nutmeg, or even a tablespoon of instant coffee granules for a mocha twist.
You can also use a different extract, like almond, for a subtle flavor variation.
Ready to Impress? Share Your Classic Glazed Donut Masterpiece!
Creating your own classic glazed donuts is an incredibly rewarding experience, filling your home with an aroma that signals pure comfort.
I encourage you to try this recipe, trust the process, and savor every bite of these light, fluffy, and never-greasy delights. Don’t forget to share your donut masterpieces with friends and family!
We’d love to hear about your experience in the comments below, or if you have any questions as you embark on your donut-making journey.
Classic Glazed Donuts: The Secret to Light, Fluffy Bites
I remember my first attempts at making classic glazed donuts at home – often ending in heavy, disappointingly greasy results. That all changed when I discovered a game-changing trick, transforming my homemade batches into unbelievably light, fluffy, and never-greasy delights.
This recipe for classic glazed donuts isn’t just about recreating a favorite treat; it’s about mastering the perfect texture and flavor, ensuring every bite is a triumph of homemade goodness. Get ready to bake like a pro and experience the pure joy of a truly perfect donut.
Beyond Basic: Why Our Classic Glazed Donuts Truly Shine
The “Never Greasy” Method: A Game-Changer
The number one complaint about homemade donuts is often greasiness. Our secret lies in precise oil temperature control.
By maintaining the oil between 350-375 degrees F, the donuts cook quickly and evenly without absorbing excess oil, resulting in that coveted light texture.
If you enjoy the light, fluffy texture of these donuts, you’ll love the crispy, non-greasy perfection of chocolate sprinkle donuts too.
Achieving Unforgettable Fluffiness (Every Time)
The key to fluffy donuts is not just one step, but a combination of precise measurements, proper kneading, and critically, a diligent second rise.
This double proofing allows the yeast to work its magic, creating air pockets that expand during frying for an incredibly tender crumb.
Beginner-Friendly, Expert Results
While making yeast donuts might seem intimidating, this recipe breaks down each step into manageable parts.
With clear instructions and expert tips, even novice bakers can achieve bakery-quality classic glazed donuts, building confidence with every successful batch.
The Building Blocks of Flavor: Essential Glazed Donut Ingredients
Dough Essentials: Flour, Yeast, and More
All-purpose flour provides the essential structure for your donuts, creating a tender, yet pliable dough.
Active dry yeast, when properly activated with warm milk and a touch of sugar, is the leavening agent responsible for the dough’s signature rise and airy texture.
Large eggs and melted unsalted butter contribute richness and moisture, yielding a tender crumb that melts in your mouth.
Vanilla extract and a hint of salt balance the sweetness, enhancing the overall depth of flavor in the dough.
Crafting the Irresistible Glaze
The simple glaze comes together with powdered sugar, creating a smooth, quick-setting coating that’s characteristic of classic glazed donuts.
A few tablespoons of milk or water adjust the glaze’s consistency, ensuring it’s pourable yet thick enough to cling beautifully to the warm donuts.
A touch more vanilla extract in the glaze amplifies its inviting aroma and flavor, making it truly irresistible.
Your Donut Crafting Arsenal: Essential Tools
Deep-Fry Thermometer: Absolutely crucial for achieving the “non-greasy” result by maintaining precise oil temperature.
Donut Cutter (or Alternatives): For perfect shapes and sizes, ensuring even frying. A round cookie cutter and a smaller round cutter (like a piping tip) work well as alternatives.
Large, Deep Pot or Dutch Oven: The ideal vessel for safe and even frying, allowing enough space for the oil and donuts without overcrowding.
Wire Rack with Baking Sheet: Essential for proper draining of excess oil and allowing the glaze to set without pooling.
Parchment Paper: Prevents your delicate shaped donuts from sticking during the crucial second rise, making them easy to transfer to the hot oil.
From Dough to Delight: Your Step-by-Step Glazed Donut Journey
Activating the Magic: Yeast Preparation
In a spacious bowl, combine your warm milk, granulated sugar, and active dry yeast.
Stir gently, then let this mixture rest for 5 to 10 minutes until a foamy layer appears on top. This foam is your visual cue that the yeast is alive and ready to make your donuts wonderfully light.
Crafting the Perfect Dough
Add the lightly beaten eggs, cooled melted butter, vanilla extract, and salt to your active yeast mixture, stirring until well combined.
Gradually incorporate the all-purpose flour, mixing until a shaggy, cohesive dough begins to form. Turn the dough onto a lightly floured surface and knead it for 5 to 7 minutes.
The dough should transform from shaggy to smooth and elastic, indicating proper gluten development for that desirable chewy-soft texture.
The Rise to Perfection: First Proofing
Lightly oil a clean bowl and place your kneaded dough inside, turning it once to coat all surfaces.
Cover the bowl with a clean kitchen towel or plastic wrap, then let it rise in a warm, draft-free spot for 1 to 1.5 hours. The dough is ready when it has visibly doubled in size, feeling soft and puffy.
Shaping Your Donut Masterpieces
Once risen, gently punch down the dough to release the air. On a lightly floured surface, roll the dough evenly to about 1/2 inch thickness.
Use a 3-inch donut cutter or a round cutter with a smaller center cutter to cut out your donut shapes. Don’t worry about the scraps; gently reroll them and cut out more donuts until all dough is used.
The Second Rise: Crucial for Lightness
Carefully transfer your cut donuts to parchment-lined baking sheets, leaving ample space between each.
Loosely cover them and allow them to rise again for 30 to 45 minutes, or until they look noticeably puffy and airy. This crucial second rise ensures an incredibly light, airy final texture and significantly helps prevent the donuts from absorbing too much oil during frying.
The Non-Greasy Secret: Frying with Precision
Pour your vegetable oil into a large, deep pot or Dutch oven, ensuring it’s at least 3-4 inches deep. Attach a deep-fry thermometer to the side of the pot.
Heat the oil over medium heat until it reaches a consistent temperature of 350 to 375 degrees F. This precise temperature is the absolute key to non-greasy donuts; too cool, and they absorb oil; too hot, and they burn before cooking through.
Carefully lower 2 to 3 donuts at a time into the hot oil, avoiding overcrowding. Overcrowding will cause the oil temperature to drop rapidly, leading to greasy results.
Fry for about 1 to 2 minutes per side, or until each side is beautifully golden brown. They will puff up impressively!
Proper Draining for Optimal Texture
Using a slotted spoon or spider, carefully remove the fried donuts from the oil.
Immediately transfer them to a wire rack that’s set over a baking sheet. This setup allows any excess oil to drip off, ensuring your donuts maintain their light and perfect texture.
Achieving Glaze Perfection
While your freshly fried donuts are cooling slightly (they should still be warm, not hot), whisk together the powdered sugar, milk or water, and vanilla extract in a medium bowl.
Continue whisking until the glaze is completely smooth and lump-free. Adjust the amount of liquid a tiny bit at a time until you reach your desired consistency – thick enough to coat, but thin enough to drip.
Chef’s Secrets: Elevate Your Homemade Glazed Donuts
Don’t Rush the Rise: Patience truly is a virtue when working with yeast dough. An under-proofed dough will result in dense, heavy donuts.
To create an ideal warm environment, you can preheat your oven to its lowest setting for a few minutes, then turn it off and place your covered dough inside. Just ensure the oven isn’t too hot to begin with.
Mastering Oil Temperature: This cannot be stressed enough: a reliable deep-fry thermometer is your best friend.
Fluctuating oil temperature is the primary culprit behind greasy or burnt donuts. Adjust your heat source as needed to keep the oil within the recommended 350-375°F range, checking frequently.
The Dough Consistency Sweet Spot: After kneading, your dough should feel smooth, elastic, and slightly tacky, but not sticky.
If it’s too sticky, add a tiny bit more flour, a teaspoon at a time. If it feels too stiff, it might have been over-floured, which can lead to dense donuts.
Handling Dough Gently: Once your dough has risen and you’re shaping the donuts, handle it with a light touch.
Rough handling can deflate the precious air bubbles that contribute to a light, airy texture. Use gentle pressure when rolling and cutting.
Glazing While Warm: The best time to glaze your donuts is when they are still warm, but not fresh out of the fryer hot.
This warmth helps the glaze adhere beautifully and absorb just slightly into the donut’s surface, creating that perfect balance of crisp glaze and tender interior.
Donut Dilemmas Solved: Common Issues & Quick Fixes
Why Are My Donuts Dense or Chewy?
Dense donuts are often a sign of insufficient rising time or dough that was overworked during kneading. Ensure your yeast is active and allow enough time for both rises.
Over-kneading can develop too much gluten, resulting in a chewy, bread-like texture rather than a light donut. Knead just until smooth and elastic, then stop.
Dealing with Greasy Donuts
The most common cause of greasy donuts is oil that isn’t hot enough. If the oil temperature drops too low (below 350°F), the donuts will absorb excessive oil.
Avoid overcrowding the pot; fry only a few donuts at a time to maintain consistent oil temperature. Make sure to drain them immediately on a wire rack after frying.
My Donuts Aren’t Rising
If your dough isn’t rising, the culprit is almost always inactive or dead yeast. This can happen if your warm milk was too hot (killing the yeast) or too cold (slowing it down too much).
Ensure your yeast is fresh and your milk is within the 105-115°F range. Look for that foamy activation to confirm your yeast is alive and well.
Glaze Not Sticking or Too Thin/Thick?
If your glaze isn’t sticking, ensure your donuts are still warm, as this helps absorption. If the glaze is too thin, slowly whisk in more powdered sugar until it thickens to your desired consistency.
If it’s too thick, add milk or water, a teaspoon at a time, until it reaches a smooth, dippable texture. Remember, you want it to coat without being runny.
Enjoying & Preserving Your Glazed Donut Delights
Best Ways to Serve Homemade Donuts
There’s nothing quite like a warm, freshly glazed donut straight from the kitchen.
Serve them slightly warm for the ultimate experience, perhaps with a cup of coffee or a glass of cold milk. For those who love variety, you can also explore making fluffy blueberry donuts or other fried treats.
Storing Leftover Glazed Donuts
While classic glazed donuts are undeniably best enjoyed fresh, you can store leftovers in an airtight container at room temperature for up to 1-2 days.
To refresh them slightly, a quick 10-15 second zap in the microwave can work wonders, bringing back some of their initial softness.
Can You Make Donuts Ahead?
You can definitely prepare the donut dough ahead of time!
After the first rise, punch down the dough, wrap it tightly in plastic wrap, and refrigerate it overnight. Allow it to come to room temperature for about 30-60 minutes before rolling, cutting, and proceeding with the second rise and frying for the freshest results.
Your Top Glazed Donut Questions Answered
Can I Use a Deep Fryer Instead of a Pot?
Absolutely! A dedicated deep fryer is excellent for making classic glazed donuts as it often provides more precise temperature control and a safer frying environment.
Just ensure you still monitor the temperature closely and don’t overcrowd the basket.
What if I Don’t Have a Donut Cutter?
No donut cutter? No problem! You can use two round cookie cutters of different sizes (one large for the donut, one small for the hole).
Alternatively, a drinking glass for the outer circle and a large piping tip or even a clean soda bottle cap for the center hole work perfectly.
Can I Bake These Donuts Instead of Frying?
This particular recipe for classic glazed donuts is specifically formulated and optimized for frying, which gives them their signature light, airy, and slightly crisp exterior.
Baking them would result in a very different texture, more akin to a cake donut. If you prefer baked donuts, we recommend seeking out a recipe designed specifically for baking to achieve the best results.
For a different texture, try these gooey pecan glazed donut holes.
How Do I Know When the Yeast is Active?
Active yeast will produce a visible layer of foam or bubbles on the surface of the warm milk and sugar mixture within 5 to 10 minutes.
If you don’t see any foam after this time, your yeast may be old or the liquid was too hot/cold, and it’s best to start with a new batch of yeast.
Can I Add Flavorings to the Glaze?
Yes, absolutely! The basic vanilla glaze is a perfect canvas for customization. Try adding citrus zest (lemon, orange), a pinch of cinnamon or nutmeg, or even a tablespoon of instant coffee granules for a mocha twist.
You can also use a different extract, like almond, for a subtle flavor variation.
Ready to Impress? Share Your Classic Glazed Donut Masterpiece!
Creating your own classic glazed donuts is an incredibly rewarding experience, filling your home with an aroma that signals pure comfort.
I encourage you to try this recipe, trust the process, and savor every bite of these light, fluffy, and never-greasy delights. Don’t forget to share your donut masterpieces with friends and family!
We’d love to hear about your experience in the comments below, or if you have any questions as you embark on your donut-making journey.
Want More Sweet Treats?
If you enjoyed these light, fluffy donuts, here are a couple more baked goods you might like.
- For another chocolate bake, consider this Moist Chocolate Bundt Cake, which offers a rich flavor.
- You can also explore more fried dough delights with these Glazed New Orleans Style Beignets, sharing a similar preparation method.
Glazed Donuts
Course: PastryCuisine: AmericanDifficulty: medium4
12-15 donuts30
minutes25
minutes450
kcal180
minutesCraving homemade glazed donuts but worried about them being heavy or greasy? This recipe reveals the secret to perfectly light, fluffy, and never-greasy donuts. Get ready for bakery-quality results right in your own kitchen!
Ingredients
Dough:
3 cups all-purpose flour
1/4 cup granulated sugar
2 1/4 teaspoons active dry yeast (1 standard packet)
1/2 cup warm milk (around 105 to 115 degrees F)
2 large eggs, lightly beaten
1/4 cup unsalted butter, melted and cooled
1 teaspoon vanilla extract
1/2 teaspoon salt
6 cups vegetable oil, for frying
Glaze:
2 cups powdered sugar
3 to 4 tablespoons milk or water
1/2 teaspoon vanilla extract
Directions
- Activate Yeast: In a large bowl, combine the warm milk, granulated sugar, and active dry yeast. Stir gently and let it sit for 5 to 10 minutes until foamy, which indicates the yeast is active.
- Prepare Dough: Add the beaten eggs, melted butter, vanilla extract, and salt to the yeast mixture. Stir well. Gradually add the all-purpose flour, mixing until a shaggy dough forms.
- Knead: Turn the dough out onto a lightly floured surface and knead for 5 to 7 minutes until it becomes smooth and elastic.
- First Rise: Place the dough in a lightly oiled bowl, turning once to coat. Cover with a clean kitchen towel or plastic wrap and let it rise in a warm place for 1 to 1.5 hours, or until doubled in size.
- Shape Donuts: Gently punch down the risen dough. On a lightly floured surface, roll the dough to about 1/2 inch thickness. Use a 3-inch donut cutter or a round cutter with a smaller cutter for the center to cut out donut shapes. Reroll scraps as needed.
- Second Rise: Place the cut donuts on parchment-lined baking sheets, leaving some space between each. Cover loosely and let them rise again for 30 to 45 minutes, or until visibly puffy. This second rise is crucial for a light, airy texture and helps prevent oil absorption.
- Fry Donuts (The Non-Greasy Secret!): In a large, deep pot or Dutch oven, pour the vegetable oil. Attach a deep-fry thermometer to the side of the pot. Heat the oil over medium heat until it reaches a consistent temperature of 350 to 375 degrees F. This precise temperature is key to avoiding greasy donuts; if the oil is too cool, the donuts will absorb too much oil, and if it’s too hot, they’ll burn outside before cooking through.
- Carefully lower 2 to 3 donuts at a time into the hot oil, without overcrowding the pot. Overcrowding will drop the oil temperature too much. Fry for about 1 to 2 minutes per side, or until golden brown.
- Drain Properly: Use a slotted spoon or spider to carefully remove the fried donuts and place them immediately on a wire rack set over a baking sheet to drain any excess oil.
- Make Glaze: While the donuts are cooling slightly, whisk together the powdered sugar, milk or water, and vanilla extract in a medium bowl until smooth and lump-free. Adjust the liquid amount as needed for your desired consistency.
- Glaze Donuts: Dip each warm donut into the glaze, turning to coat evenly. Place them back on the wire rack, allowing any excess glaze to drip off. Serve warm and enjoy your perfectly light, non-greasy homemade donuts!
Notes
- The precise oil temperature (350-375°F) and a proper second rise are crucial for light, non-greasy donuts.