I used to dread making empanadas because half of them would inevitably blow open in the fryer, turning dinner into a greasy, frustrating disappointment. After years of testing and failures, I discovered one non-negotiable technique that guarantees a flawless, leak-proof result every single time.
This master recipe ensures your homemade Crispy Beef Empanadas will be golden, crunchy, and perfectly sealed, locking in all the savory, cheesy flavor you crave.
For similar beefy goodness without a watery outcome, check out this creamy beef mac.
Ditch the Blowouts: Why This Empanada Recipe Works Every Time
This recipe’s success centers on the “Clean Edge” sealing method, which directly addresses the single biggest cause of fryer failure: residual grease or moisture on the dough edges.
We combine a precise application of egg wash with an immediate cleaning step and a double crimp, creating an unbreakable, reinforced bond that stands up to high heat. You get professional results without the anxiety of constant blowouts.
By controlling the internal filling moisture and maintaining an exact frying temperature of 350°F, we achieve the ideal texture. The final result is a light, shattering crunch and a non-greasy exterior that highlights the rich, robustly seasoned beef filling.
The Building Blocks: Essential Ingredients for Flavor and Crunch
Achieving the Perfect, Non-Greasy Beef Filling
I recommend using 80/20 lean ground beef because the small amount of fat renders flavor without making the overall mixture excessively greasy. Critically, you must drain the cooked fat completely before moving to the seasoning phase; residual grease compromises the dough seal.

The traditional depth of flavor comes from a balanced blend of chili powder, earthy cumin, and aromatic oregano. Cooking these spices briefly with the tomato paste (blooming) maximizes their aroma and removes any raw flour taste.
Dough Decisions: Store-Bought vs. Homemade Discs
When using store-bought dough, look for discs labeled “para freir” (for frying) or pastry dough that feels slightly thicker and more robust than standard pie crust. Ensure they are cold but pliable before you begin filling, as chilled dough is easier to handle.
If commercial discs are unavailable, high-quality pre-made pie crust dough can be cut into consistent 5-inch circles. This alternative provides excellent flakiness but requires meticulous care during the critical sealing step.
The Golden Standard: Choosing the Right Frying Oil and Temperature
Select a neutral oil with a high smoke point, such as canola, vegetable, or peanut oil, to ensure a clean flavor transfer. The oil needs to reach a minimum depth of two inches to allow the empanadas to float and cook evenly.
Frying at a steady 350°F is absolutely crucial for achieving the desired golden, crispy exterior without absorbing too much grease. This temperature ensures the crust sets instantly while the filling heats through perfectly.
Prepping for Success: Tools and Mise en Place
Frying Thermometer: Absolutely essential for consistent crispy texture and seal integrity. Guessing the temperature leads to either soggy, greasy pastry or burnt shells.
Heavy-Bottomed Pot or Dutch Oven: This equipment provides superior heat retention and distribution, which is necessary for maintaining a steady 350°F and ensuring safety when frying.
The Sealing Duo (Fork & Pastry Brush): These are the tools used specifically for the leak-proof technique, ensuring precise egg wash application and a secure, continuous double crimp.
Cooling Rack: Essential for draining excess oil after frying to maximize crispness. Placing them on paper towels can cause the bottom surface to steam and soften immediately.
From Prep to Plate: The Step-by-Step Empanada Masterclass
Creating the Thick, Moisture-Controlled Filling (Steps 1-3)
-
Sauté Aromatics and Brown the Meat:
Cook the onion until it is completely softened and the garlic is fragrant before adding the beef.
Crucially, once the beef is fully browned, drain off every drop of excess grease thoroughly; residual fat is the enemy of a tight seal.
-
Simmer Until Robustly Thickened:
Stir in the chili powder, cumin, oregano, and tomato paste, cooking for one minute to bloom the spices.
Add the broth or water and simmer actively until the liquid is almost entirely absorbed, creating a thick, firm filling that is moist but not at all wet or sloppy.
-
Mandatory Cooling Time:
Remove the filling from the heat and allow it to cool entirely before attempting to fill the dough.
Using hot filling will soften the dough prematurely, making the seals weak and prone to leakage or blowout.
The Critical Step: Mastering the Leak-Proof Seal (Steps 4-6)
-
Measure and Center the Filling:
Place exactly 2 tablespoons of cooled filling, along with the cheese cube or slice, slightly off-center on one half of the disc.
Do not overfill; too much filling stresses the dough, guarantees a weak closure, and will inevitably lead to a blowout in the fryer.
-
Clean the Edges and Apply Egg Wash:
This is the most critical secret: lightly brush only the perimeter edges of the dough with egg wash, then immediately wipe away ANY trace of filling, grease, or cheese residue with a damp paper towel.
Even a tiny amount of moisture or fat prevents the gluten in the dough from bonding, acting like a release agent instead of glue.
-
Double Seal and Chill:
Fold the dough over into a half-moon shape and press the edges together firmly with your fingers to expel all trapped air pockets.
Immediately follow this manual press with a thorough fork crimp, ensuring a tight, continuous double seal around the entire circumference for maximum protection.
Chill the formed empanadas for a minimum of 15 minutes before frying; this crucial step allows the seals to set firm and the dough to relax.
Frying Fundamentals: Achieving the Golden, Crispy Exterior (Steps 7-9)
-
Heat Oil Accurately:
Use a thermometer to ensure the oil holds steady at exactly 350°F before the first batch goes in.
If the oil is too cool, the empanadas become greasy; if it is too hot, they burn on the outside before the internal filling is heated.
-
Fry in Small Batches:
Carefully lower only 2 to 3 chilled empanadas into the hot oil at a time, ensuring you do not overcrowd the pot.
Overcrowding will drastically drop the oil temperature, leading to heavy oil absorption and a less crispy result.
-
Drain and Season Immediately:
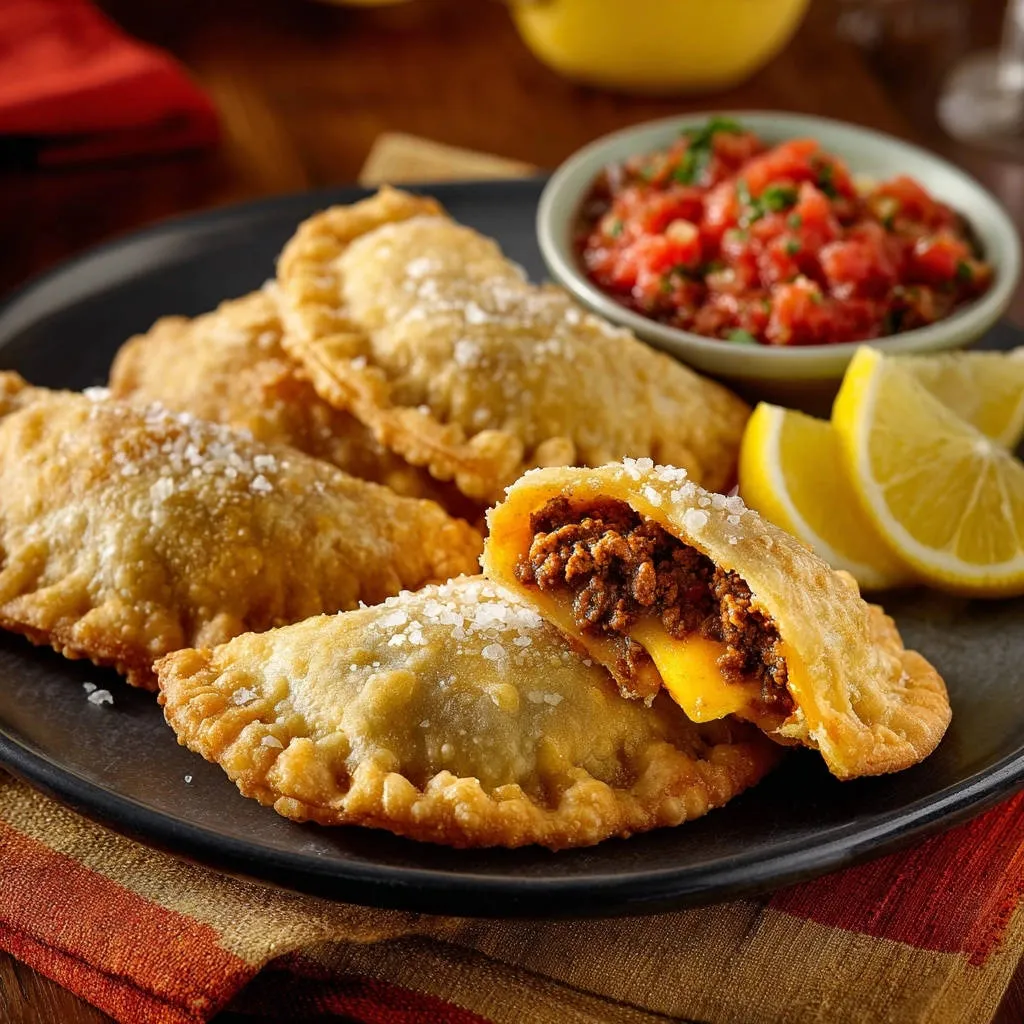
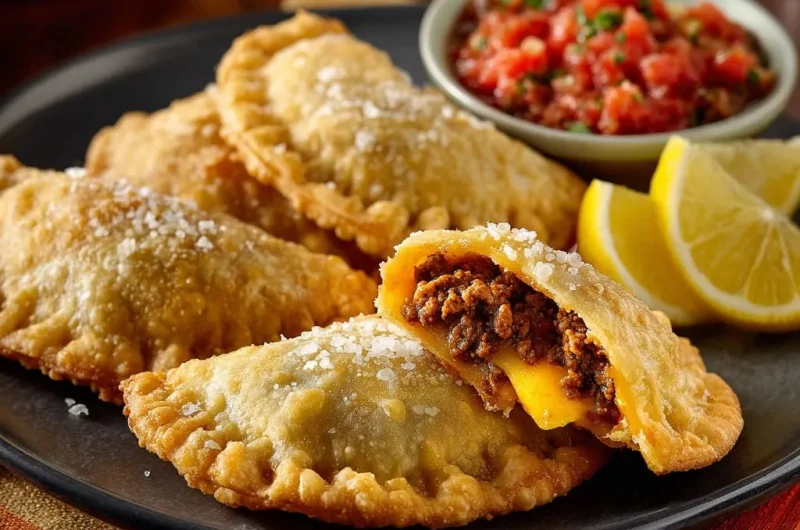
Fry for 3 to 4 minutes, turning once, until they are a deep, uniform golden brown and the crust is blistered and light.
Transfer them to a wire rack (not directly onto paper towels) to drain excess oil, and immediately sprinkle them generously with coarse kosher salt while they are still hot.
Finishing Touch: The Simple Fresh Salsa
This bright, acidic salsa provides the perfect cooling contrast to the richness of the Crispy Beef Empanadas. Quickly combine finely diced Roma tomatoes, onion, cilantro, fresh lime juice, and a pinch of salt.
Elevate Your Recipe: Advanced Frying and Sealing Tips
Troubleshooting: Why Did My Empanadas Blow Out?
The three primary culprits are usually trapped air inside the pocket, wet filling residue preventing the seal from fusing, or oil that wasn’t consistently hot enough.
The Perfect Crimp: Tools Beyond the Fork
For high-volume production or ultimate consistency, consider investing in a dedicated empanada press or a ravioli cutter.
These tools ensure a uniform shape and consistent sealed edge every time, but you still must use the egg wash and cleaning technique.
Baking vs. Air Frying: Can I Skip the Deep Fryer?
Yes, for a healthier option, you can bake the empanadas at 400°F (200°C) or air fry them at 375°F (190°C) until golden brown.
Brush them generously with the egg wash followed by oil before cooking to promote a better crust, but note that the deep-fried texture will always be superior.
Flavor Upgrades for the Filling
For added complexity and traditional flair, try folding in finely chopped green olives, finely diced hard-boiled egg pieces, or fully cooked, small-diced potatoes into the cooled beef mixture before assembly.
Make Ahead & Storage Guide: Freezing Empanadas for Later
Freezing Raw Empanadas (The Best Method)
Place your finished, sealed, un-fried empanadas on a parchment-lined baking sheet and freeze them until they are solid (about 60 to 90 minutes).
Transfer the frozen empanadas to a heavy-duty, freezer-safe bag, minimizing air exposure, where they will keep for up to three months.
When ready to cook, do not thaw them; fry them directly from frozen, increasing the overall frying time by about two minutes per batch.
Reheating Cooked Crispy Beef Empanadas
Avoid the microwave entirely, as it generates steam and ruins the beautiful crispness of the crust.
The best method for reheating leftovers is using an air fryer or placing them on a rack in a 350°F (175°C) oven until they are hot throughout and the crust is fully crisp again.
Frequently Asked Questions About Crispy Beef Empanadas
How do I make a gluten-free version?
Look for pre-made gluten-free pastry sheets in the freezer aisle, often utilizing blends of rice, tapioca, or potato flour.
Ensure the dough is adequately hydrated and pliable to handle the pressure required for the strong, leak-proof crimp.
Can I use ground turkey or pork instead of beef?
Yes, ground turkey or pork make excellent substitutions, provided you still cook the filling down to a very thick consistency.
If using very lean ground turkey, consider adding a tablespoon of extra olive oil during the initial sauté to ensure the filling remains moist.
Golden Crunch Awaits: Share Your Crispy Beef Empanadas Success!
You now possess the insider secret to creating perfect, leak-proof Crispy Beef Empanadas every single time, moving past guesswork into guaranteed culinary success. Go ahead and put the “Clean Edge” method to the test-confidence in the kitchen makes all the difference.
If you master this classic dish, please let me know how they turned out in the comments, or share your golden results with me online. Happy frying!
Beef Empanadas
Course: AppetizerCuisine: MexicanDifficulty: medium4
12 Empanadas45
minutes30
minutes550
kcal60
minutesUsed to dread blowouts? This recipe reveals the one crucial, leak-proof sealing technique that guarantees perfectly golden, crispy beef empanadas every time. Filled with seasoned ground beef and sharp cheddar, these pockets of flavor are served best with fresh salsa.
Ingredients
For the Empanadas:
1 pound ground beef (80/20 lean recommended)
1 tablespoon olive oil
1 medium onion, finely diced
2 cloves garlic, minced
2 tablespoons chili powder
1 teaspoon cumin
1 teaspoon oregano
1/2 teaspoon kosher salt, plus more for garnish
1/4 teaspoon black pepper
1/4 cup tomato paste
1/2 cup water or low-sodium beef broth
12 store-bought empanada dough discs (or pre-made pie crust cut into 5-inch circles)
6 ounces sharp cheddar or American cheese, cut into 12 small cubes or slices
1 large egg, lightly beaten with 1 teaspoon water (Egg Wash)
3 cups neutral frying oil (canola, vegetable, or peanut)
Lemon wedges (for serving)
For the Simple Salsa (As Pictured):
2 large Roma tomatoes, finely diced
1/4 cup finely chopped onion
1 tablespoon chopped cilantro
1 tablespoon lime juice
Pinch of salt
Directions
- Prepare the Filling: In a large skillet, heat 1 tablespoon of olive oil over medium heat. Add the diced onion and cook until softened, about 5 minutes. Add the minced garlic and cook for 1 minute until fragrant.
- Brown the Meat: Increase the heat to medium-high. Add the ground beef, breaking it up with a spoon. Cook until fully browned. Drain off any excess grease thoroughly.
- Season and Simmer: Reduce the heat to medium. Stir in the chili powder, cumin, oregano, salt, pepper, and tomato paste. Cook for 1 minute. Add the water or broth, stirring well to incorporate the spices. Simmer the mixture until the liquid is almost completely absorbed and the filling is thick and moist but not wet, about 5 to 7 minutes. Remove from heat and let cool completely (this is important for sealing).
- The Leak-Proof Sealing Secret (The Highlight Step): Lay out the empanada discs. Place 2 tablespoons of the cooled filling mixture slightly off-center on one half of the disc. Place one small cube or slice of cheese directly on top of the filling.
- Clean the Edges: Crucially, brush the edges of the dough lightly with the egg wash. Ensure absolutely no meat filling, cheese, or grease touches the washed edge; clean any stray debris immediately with a damp paper towel. Wet filling residue is the main cause of blowouts.
- Seal and Crimp: Fold the dough over into a half-moon shape. Press the edges together firmly to eliminate all air pockets (trapped air expands and causes leaks). Immediately use a fork to press and crimp the edges all the way around, creating a tight double seal. Place the sealed empanadas on a baking sheet lined with parchment paper and let them chill in the refrigerator for at least 15 minutes before frying. This chilling step helps the dough set and the seal hold strong.
- Fry the Empanadas: Pour the frying oil into a deep, heavy-bottomed pot or Dutch oven, reaching at least 2 inches deep. Heat the oil to 350 degrees F (use a thermometer for accuracy).
- Cook: Carefully lower 2 or 3 chilled empanadas into the hot oil, ensuring not to crowd the pan. Fry for 3 to 4 minutes, turning once, until they are deep golden brown and the crust is blistered and crispy.
- Finish: Remove the empanadas with a slotted spoon and place them on a rack or paper towel-lined plate to drain excess oil. Immediately sprinkle with coarse kosher salt.
- Serve: Combine all salsa ingredients in a small bowl. Serve the hot empanadas immediately with fresh salsa and lemon wedges.
Notes
- Ensure the filling is completely cool before sealing and chill the assembled empanadas for at least 15 minutes before frying.