I spent years battling exploding taquitos, watching that precious melted cheese leak out into the fryer oil-a truly frustrating experience. I finally solved the structural problem inherent in fried rolled appetizers, developing a foolproof method for achieving perfect results every time. This technique ensures that these savory, deeply satisfying Crispy Chicken and Cheese Rolls stay sealed, guaranteeing a crunchy exterior and a gooey, molten interior.
Beyond the Basic Taquito: Why This Recipe Won’t Explode
Traditional rolled snacks often fail because the tortilla seam loosens when the filling expands rapidly under high heat. This creates internal pressure, forcing the melted cheese to burst through the weakest point during frying.
This recipe combats that structural vulnerability using two non-negotiable steps: a unique flour-based sealing paste and a critical chilling period. Together, they create a robust, leak-proof barrier, making exploding rolls a problem of the past.
The Structural Genius of the Sealing Paste
The simple paste of flour and water works as a highly effective starch adhesive, far superior to relying on the tortilla’s natural stickiness. When heated, this paste hardens quickly, forming a permanent, secure bond along the entire seam.
This structural genius prevents the roll from unraveling even as the interior cheese reaches its bubbling, molten peak. It’s the single most important step for guaranteeing roll integrity through the frying process.
The Power of the Panko Crust and Chill Time
Panko breadcrumbs are essential here, as their large, airy flakes absorb less oil and provide superior, shatteringly crisp texture compared to fine breadcrumbs. They create a rugged, textured armor around the roll.
Chilling the assembled rolls for at least 30 minutes allows the sealing paste to fully dry and the three-layer breading (flour, egg, panko) to solidify. This step is absolutely non-negotiable for preventing the coating from sloughing off prematurely in the hot oil.
The Flavor Foundation: Building the Rolls from the Inside Out
Choosing and Preparing the Chicken Base
You need one pound of cooked, finely shredded chicken for the ideal filling texture. Rotisserie chicken is a great time-saver, but boiled or slow-cooked breasts shred beautifully using two forks.
Ensure the chicken is shredded uniformly, avoiding large chunks that can tear the tortilla during the tight rolling process. The resulting filling should feel dense and pliable enough to stay together.
The Crucial Spice Blend and Fresh Cilantro Pop
Cumin and chili powder are the bedrock of the savory, smoky flavor profile. They transform the simple chicken base into something deeply satisfying and warming.
Fresh, finely chopped cilantro provides a necessary bright, herbaceous counterpoint to the richness of the cheese and the deep flavor of the fried crust. Never skip this fresh finishing touch in the filling.
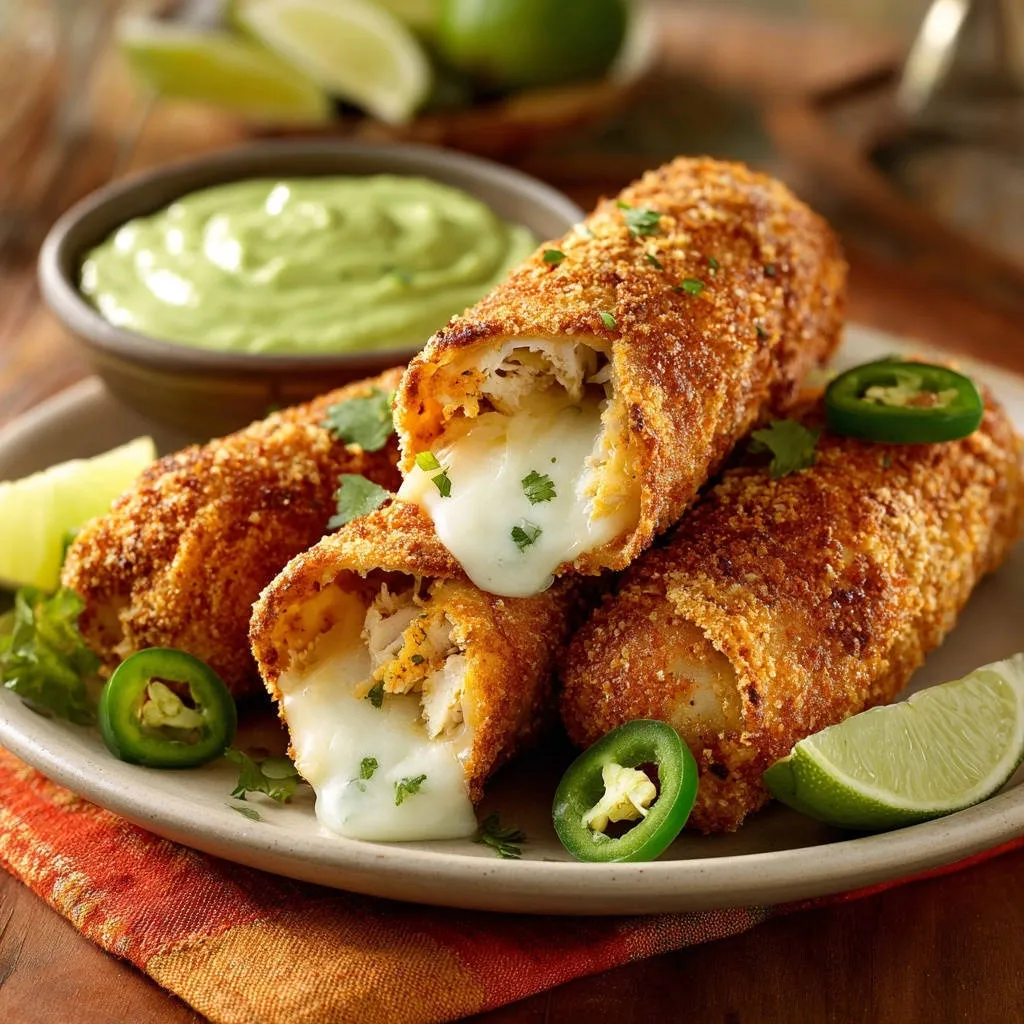
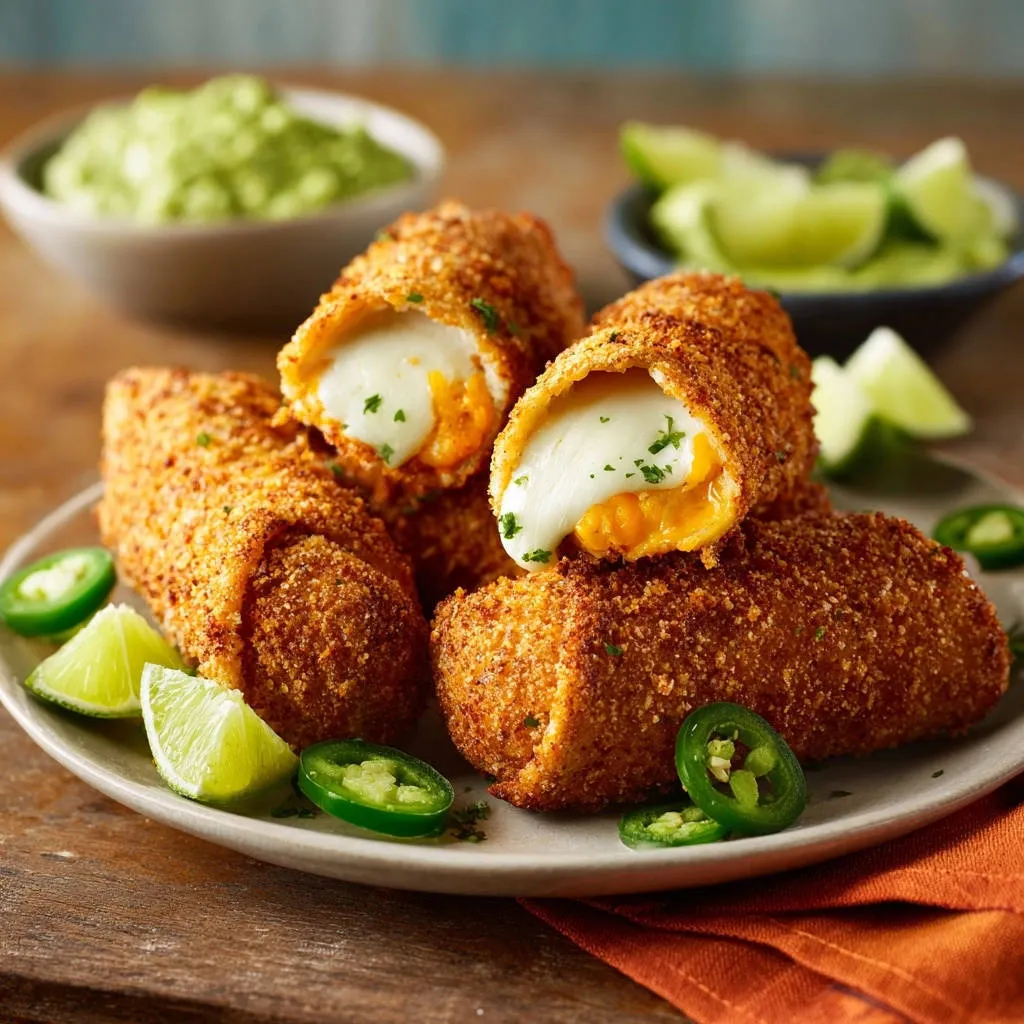
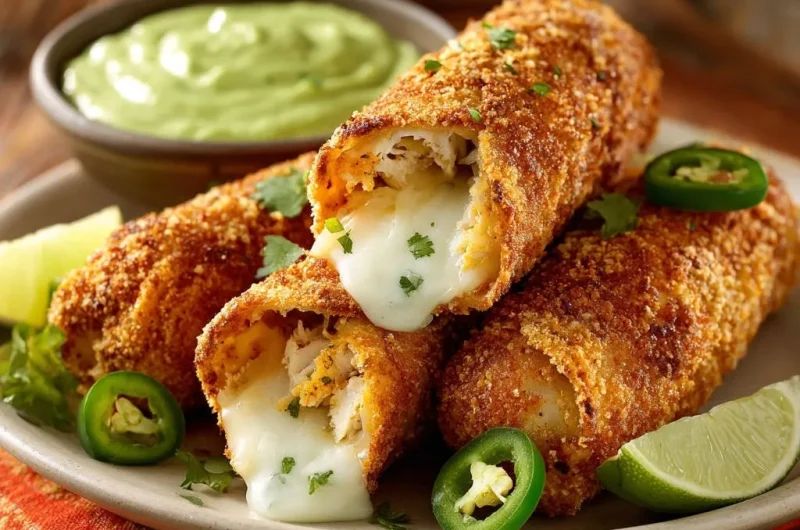
Optimal Cheese Choices for the Ultimate Gooey Center
Monterey Jack is the primary choice due to its phenomenal, stretchy melt factor and mild flavor that blends perfectly with the spices. For best texture, use a block of cheese cut into small sticks or fine shredding.
For a noticeable kick, swap half the Monterey Jack for Pepper Jack cheese, or even use a small amount of sharp cheddar for depth. Avoid hard, dry cheeses, as they will not achieve the necessary gooey internal texture.
Essential Tools for Your Crispy Chicken and Cheese Rolls Adventure
The Perfect Breading Station Setup
Use three shallow, wide dishes-like pie plates or rimmed dinner plates-to hold the plain flour, the beaten egg, and the panko. Organizing this station efficiently minimizes cross-contamination and ensures clean hands for handling the final rolls.
Deep Fryer vs. Dutch Oven: Choosing Your Vessel
A dedicated deep fryer offers precise temperature control and recovery time, but a heavy-bottomed Dutch oven is an excellent alternative. The thick metal of a Dutch oven retains heat exceptionally well, preventing massive temperature drops when food is added.
Using a Thermometer is Non-Negotiable
Maintaining an exact oil temperature of 350°F is crucial for achieving a crispy, non-oily exterior and perfectly cooked center. A clip-on candy or deep-fry thermometer is mandatory for constant monitoring and adjustment.
Mastering the Assembly and Frying: A Detailed Tutorial
Prepping the Flavorful Filling
Combine the cooked chicken, cheese, chili powder, cumin, salt, and cilantro in a medium bowl. Mix thoroughly with your hands or a sturdy spoon to ensure the spices and cheese are distributed evenly throughout the chicken mixture.
Warming the Tortillas for Flexibility
Cold tortillas are stiff and will crack or tear when you attempt a tight roll, guaranteeing structural failure. Warm the tortillas slightly, either wrapped in a damp paper towel in the microwave for 10-15 seconds, or briefly on a dry hot skillet, to increase their pliability.
The Guaranteed Sealing Technique (The Pain Point Fix)
Whisk together the 3 tablespoons of flour and 2 tablespoons of water to form a thick, glue-like paste; this viscous consistency is crucial. Place a modest line of filling just below the center of the tortilla, fold the short side edges inward, and roll tightly away from you.
Once rolled, use a small brush to coat the final edge of the tortilla generously with the prepared sealing paste. Press the seam down firmly for several seconds, and place the roll immediately seam-side down on the plate to allow the seal to set under its own weight.
Achieving the Perfect Panko Crust
Set up your three-stage breading station. First, dredge the sealed roll in plain flour, shaking off all excess; this dry layer helps the subsequent egg wash adhere better. Next, saturate the roll completely in the lightly beaten egg mixture.
Finally, roll the wet roll firmly in the panko breadcrumbs, pressing lightly with your hands to embed the flakes into the egg layer. Aim for a thick, uniform coating that covers the entire surface.
The Critical Chill: Setting the Structure
Place all breaded rolls on a tray and refrigerate for a minimum of 30 minutes. This chilling period allows the flour paste seal to fully dry and the fat in the breading ingredients to firm up, creating a rigid structure.
If you’re enjoying the crispy texture here, you’ll also appreciate the crunch in these easy cheesy chicken taquitos.
This step is essential because it drastically reduces the chance of the roll disintegrating when it hits the hot oil, ensuring maximum crispness and preventing leaks and bursts.
Frying for Golden Perfection (Maintaining 350°F)
Heat at least 2 inches of vegetable oil to precisely 350°F. Carefully place the chilled rolls into the hot oil, ensuring you fry in small batches of four or five to prevent the oil temperature from dropping drastically.
Fry for 4 to 6 minutes, turning often, until the rolls are a deep, uniform golden brown and the cheese is thoroughly melted. Immediately remove the finished Crispy Chicken and Cheese Rolls with a slotted spoon and drain them properly.
Secrets to Flawless Rolls Every Time: Chef’s Corner
Choosing the Right Tortilla Size
Small street taco-sized tortillas result in thicker, snack-sized rolls with less surface area for potential leaks, offering excellent structural integrity. Using larger tortillas makes the rolling process faster but requires extra care to roll them tightly without tearing.
The Oil Drainage Rule: Use Paper Towels
After frying, rolls must immediately drain on a plate lined with paper towels to wick away excess surface oil. After about 60 seconds, transfer them to a wire rack; this prevents the steam trapped underneath from making the bottom side soggy.
Can I Bake or Air Fry These Crispy Chicken and Cheese Rolls?
To air fry, lightly mist the chilled rolls with cooking spray until well-coated. Cook at 375°F (190°C) for 10-14 minutes, flipping halfway through, until deeply golden and crisp.
For baking, place on a greased baking sheet and bake at 400°F (200°C) for 18-22 minutes. While the oven provides a good crunch, the air fryer generally yields a result closer to deep frying.
Troubleshooting Common Frying Challenges
Problem: My Rolls Are Soggy and Oily
This is almost always caused by the oil temperature being too low, ideally below 325°F. Cold oil saturates the breading instead of instantly crisping it, resulting in heavy, greasy rolls.
Ensure you use an accurate thermometer and fry in small batches only; overcrowding cools the oil too quickly. Always allow the temperature to recover to 350°F between batches.
Problem: The Filling is Leaking (Despite the Paste!)
Check that your tortillas were warmed sufficiently; cold tortillas can snap or develop micro-tears during rolling, giving the cheese an escape route. Any tear, no matter how small, is a failure point.
You may also be using too much filling, which places undue pressure on the seal. The filling should form a modest, manageable line, allowing for a very tight, solid roll that won’t bulge.
Problem: The Panko Crust Is Falling Off
This usually means the initial flour dredge was skipped or insufficient, or the rolls were not chilled long enough. The chilling step is essential for solidifying the flour, egg, and Panko layers into a cohesive, sturdy crust before frying.
Serving, Storage, and Make-Ahead Planning
Dips and Sauces That Elevate Your Rolls
Spicy Cilantro-Lime Crema: A blend of sour cream or crema, fresh lime juice, finely chopped cilantro, and a touch of minced jalapeño offers the perfect cool heat and brightness.
Salsa Verde or Tomatillo Sauce: The acidity and fresh, herbaceous flavor of a green salsa cuts through the richness of the fried chicken and cheese beautifully for an authentic pairing.
Best Practices for Preparing Crispy Chicken and Cheese Rolls in Advance
Assembled and breaded rolls can be stored in the refrigerator for up to 24 hours. Keep them tightly covered with plastic wrap to prevent the tortillas from drying out and the breading from absorbing fridge odors.
Ensure they are thoroughly chilled just before frying, even if they have been refrigerated overnight. A quick 15-minute freeze just before frying can be an extra layer of structural protection.
Can I Assemble and Freeze Them Raw?
Yes, assemble and bread the rolls fully, then freeze them on a single layer on a baking sheet until solid (the tray method). Once solid, transfer them to a sturdy, freezer-safe bag or container.
Fry the frozen rolls directly from the freezer, adding 2-3 minutes to the total frying time to ensure the center is heated through completely. Do not attempt to thaw them before cooking, as this will result in a soggy crust.
Best Way to Reheat Leftovers?
Never reheat fried items in the microwave, as it instantly destroys the hard-earned crispness. The oven or air fryer are the only suitable tools for reviving leftovers.
Reheat at 350°F (175°C) for 5-8 minutes in the oven, or 3-5 minutes in the air fryer, until the crust is revived and crunchy to the touch.
Ready to Impress? Share Your Crispy Chicken and Cheese Rolls Masterpiece!
With the structural secrets of the sealing paste and the strategic chill time now in your arsenal, you never have to worry about frustrating kitchen failures again. These Crispy Chicken and Cheese Rolls are designed for maximum flavor and guaranteed success, moving beyond the standard taquito.
Master this recipe, impress your guests with a truly flawless fried appetizer, and transform your kitchen confidence forever. Save this comprehensive guide and let me know your favorite dipping sauce pairing below!
Crispy Chicken Rolls
Course: SnacksCuisine: MexicanDifficulty: medium4
8 rolls20
minutes10
minutes550
kcal60
minutesTired of taquitos unraveling and leaking cheese in the fryer? This recipe introduces one simple, genius sealing technique using a flour paste that ensures these crispy chicken and cheese flavor bombs stay perfectly intact. Rolled in panko and fried until golden, they are guaranteed to be crispy on the outside and gooey on the inside.
Ingredients
1 pound cooked, shredded chicken
8 flour tortillas (small street taco size or medium burrito size, depending on preferred thickness)
8 ounces Monterey Jack cheese, cut into sticks or shredded
1 teaspoon chili powder
1 teaspoon cumin
1/2 teaspoon salt
1/4 cup finely chopped cilantro
3 tablespoons all-purpose flour
2 tablespoons water
1 cup panko breadcrumbs
1/2 cup all-purpose flour (for dredging)
2 eggs, lightly beaten
Vegetable oil, for frying
Lime wedges and sliced jalapenos, for serving
Directions
- Prepare the Filling and Sealing Paste. In a medium bowl, combine the shredded chicken, Monterey Jack cheese, chili powder, cumin, salt, and cilantro. Mix well. In a separate small bowl, whisk together the 3 tablespoons of flour and 2 tablespoons of water to create a thick, glue like sealing paste. This is the key step to prevent unraveling.
- Assemble the Rolls. Warm the tortillas slightly (about 15 seconds in the microwave) to make them pliable. Lay a tortilla flat. Place a spoonful of the chicken and cheese filling in a line just below the center. Fold the short edges in, and then tightly roll the tortilla away from you.
- The Perfect Seal Technique (The Pain Point Fix). Once rolled, brush the end edge of the tortilla thoroughly with the prepared flour and water sealing paste. Press the seam firmly to seal the roll completely. Lay the roll seam-side down immediately on a plate and repeat with the remaining tortillas. This ensures the structural integrity of the roll during the high heat of frying.
- Breading the Rolls. Set up a standard breading station: one dish with 1/2 cup of plain flour, one dish with the beaten eggs, and one dish with the panko breadcrumbs. Take one sealed roll and dredge it first in the plain flour, shaking off excess. Next, dip it completely into the egg mixture. Finally, roll it firmly in the panko breadcrumbs, pressing lightly to ensure a thick, even coating. Repeat for all rolls.
- Chill to Set. For best results (and guaranteed non-bursting), place the breaded rolls on a plate or tray and refrigerate them for at least 30 minutes. This allows the seal and the breading to fully set, guaranteeing they hold their shape when fried.
- Fry and Serve. Fill a deep pot or fryer with 2 inches of vegetable oil and heat to 350 degrees F. Carefully place the chilled rolls into the hot oil, ensuring not to overcrowd the pot. Fry for 4 to 6 minutes, turning occasionally, until they are deep golden brown and the cheese is thoroughly melted. Remove with a slotted spoon and drain on a paper towel lined plate. Serve immediately with fresh lime and jalapenos.
Notes
- Chilling for 30 minutes is critical to ensure the seals and breading fully set before frying.