There’s a specific kind of joy that comes from a truly satisfying comfort meal, and for me, it’s always been about mastering the perfect plate of Crispy Chicken & Creamy Grits. I used to struggle with getting that chicken perfectly crunchy without it turning soggy, but I’ve finally cracked the code to a golden, unwavering crispness.
This recipe isn’t just about delicious flavors; it’s about reliable techniques that ensure every bite delivers that irresistible crunch alongside luxuriously smooth grits, all elevated by a vibrant homemade chili oil. Get ready for a dish that will become a staple in your kitchen, impressing with both its simplicity and its exceptional taste.
Why This Crispy Chicken & Creamy Grits Recipe Will Be Your New Go-To
This isn’t just another recipe; it’s a proven method designed for success. We’ve focused on specific techniques that eliminate common frustrations and maximize flavor and texture.
The “No More Soggy Crust” Promise
The frustration of a beautifully fried chicken turning limp is real, but this recipe tackles it head-on. With critical steps like thoroughly drying the chicken, allowing breading to rest, and using a wire rack for cooling, you’re guaranteed a golden, shatteringly crisp coating that stays that way, even nestled on creamy grits.
Creamy Grits, Every Time: A Comforting Counterpart
Our approach to the grits ensures a smooth, lump-free, and velvety texture. They provide the perfect comforting, savory backdrop, absorbing the rich flavors of the chicken and the zesty chili oil. It’s the ultimate creamy embrace for the crispy star.
That Unexpected Kick: The Homemade Chili Oil Difference
While delicious on its own, the simple addition of a homemade chili oil truly elevates this dish. Infused with garlic and chili flakes, it adds a vibrant, aromatic, and customizable kick that transforms a classic into an unforgettable culinary experience.
Flavor Foundations: The Essential Ingredients List
Understanding the role of each ingredient is key to unlocking the full potential of this incredible dish. Quality matters, and each component plays a vital part in building layers of flavor and texture.
For the Golden, Crunchy Chicken
Boneless, Skinless Chicken Breasts: Our lean protein, expertly pounded for a uniform thickness that ensures even cooking and consistent crispness.
Panko Breadcrumbs: The undisputed champion for airy, extra-crispy coatings, offering a lighter crunch than traditional breadcrumbs.
All-Purpose Flour: Forms the essential first layer, creating a dry surface for the egg wash and Panko to adhere perfectly.
Egg & Milk: Whisked together, they form our crucial egg wash, acting as a binder to secure the Panko firmly onto the chicken.
Salt, Black Pepper, Garlic Powder: These foundational seasonings are rubbed directly onto the chicken, infusing deep flavor into every fiber.
Vegetable Oil (for frying): A neutral-flavored oil with a high smoke point, ideal for frying to achieve that beautiful golden-brown crust without imparting unwanted flavors.
For the Velvety Smooth Grits
Quick-Cooking Grits: Chosen for their efficiency, delivering a deliciously creamy texture without requiring a lengthy cooking time, making this meal weeknight-friendly.
Water or Low-Sodium Chicken Broth: The liquid base for our grits; broth significantly enhances the savory depth, providing a richer overall flavor.
Butter: Stirred in at the very end, it melts into the hot grits, contributing a luxurious richness and an irresistible silky mouthfeel.
Shredded Mild Cheddar Cheese (Optional): A classic, comforting addition that melts beautifully, lending a tangy, savory creaminess to the grits.
For the Zesty, Aromatic Chili Oil & Garnish
Chili Flakes: The heart of our vibrant chili oil, offering a customizable level of heat and a beautiful reddish hue.
Minced Garlic: Infuses the hot oil with a pungent, fragrant aroma, building a complex flavor profile.
Vegetable Oil (for chili oil): This neutral oil acts as the carrier for our spices, transforming into a fragrant, flavor-packed drizzle that ties the dish together.
Fresh Parsley or Scallions (for garnish): A final flourish that adds a burst of fresh color, herbaceous brightness, and a clean finish to the rich flavors.
Gear Up: Your Kitchen Arsenal for Perfect Results
Having the right tools at hand makes all the difference, ensuring a smooth cooking process and contributing to the exceptional outcome of your Crispy Chicken & Creamy Grits.
Pounding & Breading Essentials
Meat Mallet or Rolling Pin: Indispensable for uniformly pounding the chicken to an even thickness, which is crucial for consistent cooking and crispness.
Plastic Wrap: Essential for covering the chicken while pounding, keeping your kitchen clean and hygienic.
Shallow Dishes (3): Crucial for setting up an organized and efficient breading station, allowing for seamless dredging.
Frying & Grits-Making Necessities
Large Skillet: Provides ample surface area to fry chicken without overcrowding, ensuring each piece browns evenly and crisps perfectly.
Wire Rack & Baking Sheet: This duo is your secret weapon; the wire rack allows critical air circulation around the fried chicken, preventing steam and preserving its supreme crispness.
Medium Saucepan: The ideal size for cooking your grits, ensuring they achieve that desired creamy, smooth texture.
Whisk: Your absolute best friend for incorporating grits into the liquid, effectively preventing lumps and ensuring a silky consistency.
Small, Heatproof Bowl & Small Saucepan: Specifically for preparing the homemade chili oil, safely handling the hot oil infusion.
Unlocking the Crispy, Creamy Dream: Your Step-by-Step Guide
Let’s dive into the precise steps that will transform simple ingredients into an extraordinary meal. Pay attention to the ‘why’ behind each action for guaranteed success.
Preparing the Chicken for Optimal Crispness
- Pound and Season:
Place each chicken breast between two sheets of plastic wrap. Using a meat mallet or rolling pin, pound the chicken until it reaches an even 1/2-inch thickness. This step is crucial for uniform cooking and consistent crispness. Season both sides generously with 1/2 teaspoon salt, 1/4 teaspoon black pepper, and garlic powder, building flavor from the inside out.
The Crispy Coating Method: Our Signature Secret
- The Breading Station Setup:
Prepare your three shallow dishes: one with all-purpose flour, a second with the egg whisked with milk (this is your egg wash), and a third with the Panko breadcrumbs combined with the remaining 1/2 teaspoon salt and 1/4 teaspoon black pepper. An organized setup makes the process smooth and efficient.
- The Crucial Dry Pat & Dredging Technique:
Pat the seasoned chicken breasts thoroughly dry with paper towels; this is a non-negotiable step as excess moisture prevents the breading from sticking. First, dredge each chicken piece in the flour, ensuring it’s fully coated, then shake off any excess. Next, dip it into the egg wash, letting any excess drip away. Finally, press the chicken firmly into the seasoned Panko breadcrumbs, making sure every surface is completely coated. Really press down to embed the Panko for maximum crunch.
- Resting for a Rock-Solid Crust:
Transfer the breaded chicken to a clean plate and let it rest, uncovered, for 5-10 minutes. This seemingly minor step is incredibly important: it allows the breading to hydrate and firmly adhere to the chicken, significantly enhancing its crispness and preventing sogginess during frying.
Achieving Golden Perfection: Frying the Chicken
- Heating the Oil:
Heat 1/4 cup vegetable oil in a large skillet over medium-high heat until it shimmers and reaches approximately 350-375°F. Achieving the correct oil temperature is vital for a golden, non-greasy crust; too cool, and it will be oily; too hot, and it will burn before cooking through.
- Frying Technique & Batch Cooking:
Carefully place the breaded chicken breasts into the hot oil. It’s crucial not to overcrowd the pan, as this lowers the oil temperature and leads to soggy chicken; cook in batches if necessary. Fry for 4-5 minutes per side, until they are beautifully golden brown and cooked through, reaching an internal temperature of 165°F.
- The Wire Rack Secret:
As each piece of chicken finishes cooking, immediately transfer it to a wire rack that’s set over a baking sheet. It’s critical not to place the hot chicken directly on paper towels, which traps steam and will make the coating soggy. The wire rack allows air to circulate all around the chicken, preserving that irresistible, signature crispness.
Whipping Up Velvety Creamy Grits
- Boil and Whisk:
While the chicken fries, bring 4 cups of water or low-sodium chicken broth to a boil in a medium saucepan. Once boiling, slowly whisk in the quick-cooking grits, stirring constantly. This continuous whisking is essential to prevent any lumps from forming, ensuring a perfectly smooth, consistent texture.
- Simmer and Stir:
Reduce the heat to low, cover the saucepan, and let the grits simmer for 5-7 minutes, stirring occasionally. During this time, the grits will absorb the liquid, thickening into a wonderfully creamy and tender consistency.
- Finishing Touches:
Remove the saucepan from the heat. Stir in the butter and, if using, the shredded mild cheddar cheese until they are fully melted and incorporated. The butter adds richness, and the cheese melts into a comforting, savory swirl, making the grits truly luxurious.
Crafting the Zesty Chili Oil
- Combining Aromatics:
In a small, heatproof bowl, combine the chili flakes and the minced garlic. These potent aromatics are the foundation for a vibrant, flavorful oil.
- The Hot Oil Pour:
Heat 1/4 cup vegetable oil in a small saucepan until it is very hot, just shimmering, but not smoking. Carefully pour the scorching hot oil directly over the chili flake and garlic mixture in the bowl. It will sizzle dramatically, a sign that the hot oil is properly blooming the flavors and aromas. Let the chili oil cool slightly before using.
Assembling Your Masterpiece
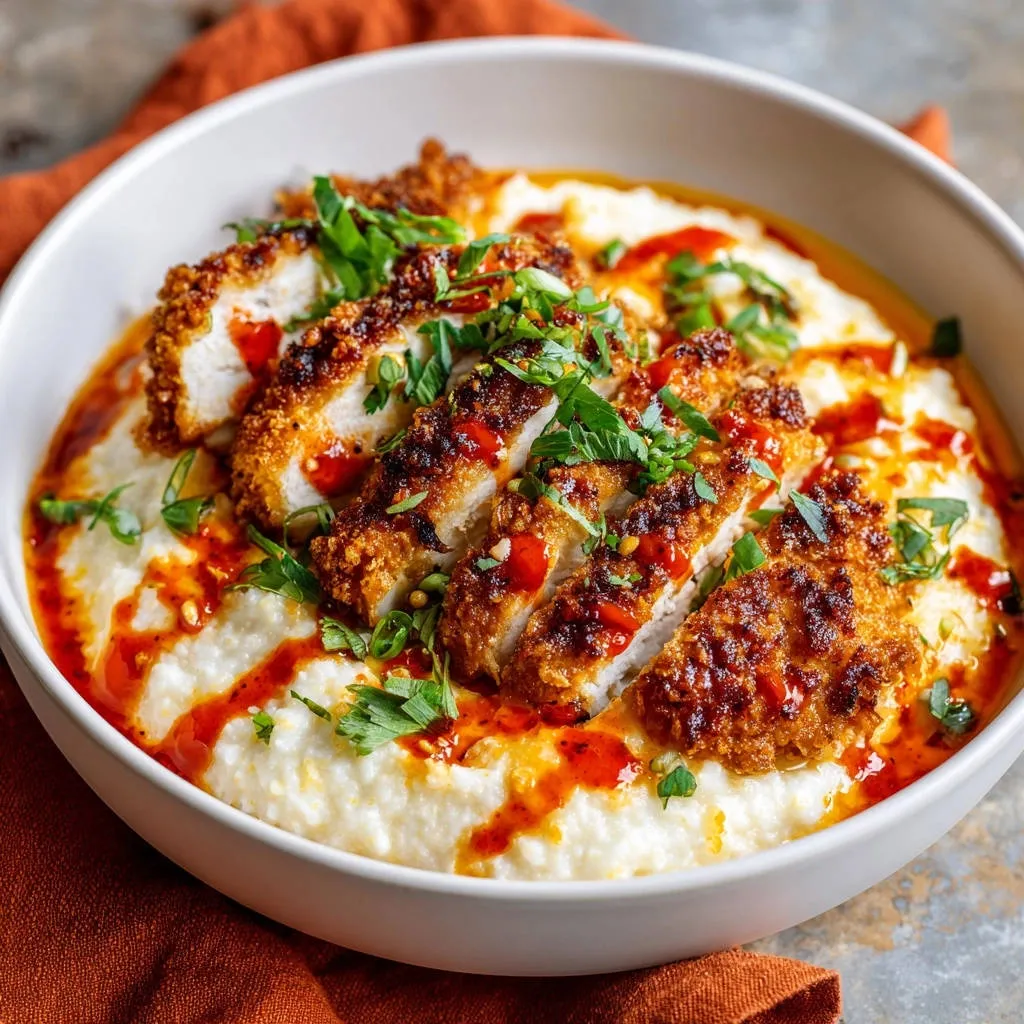
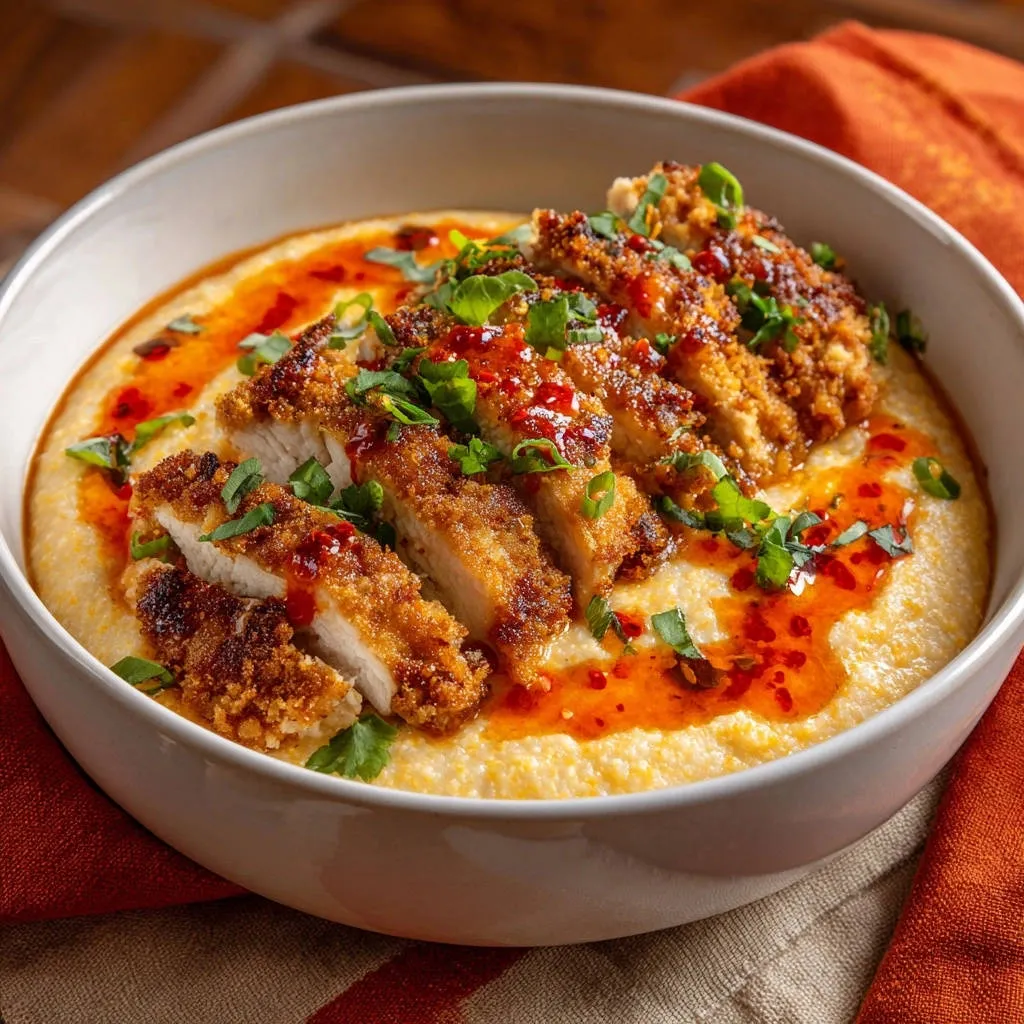
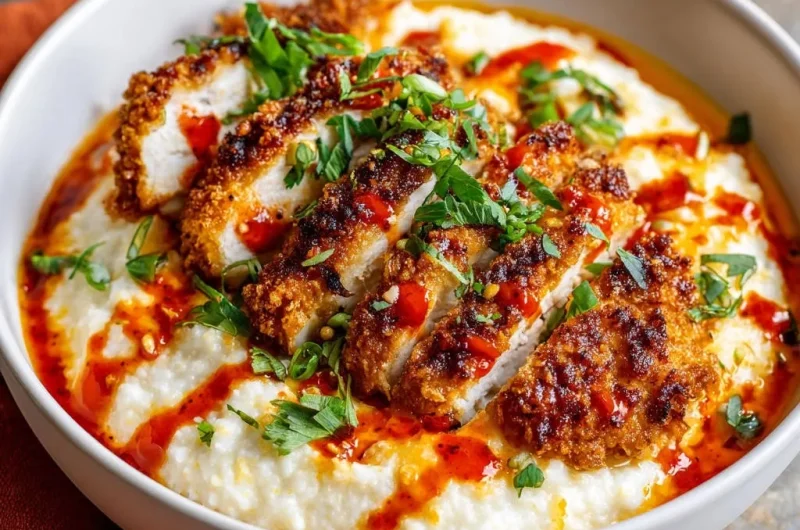
- Slice, Ladle, Arrange:
Slice the perfectly crispy chicken into thick, satisfying pieces, making them easy to enjoy. Ladle generous portions of the hot, creamy grits into individual serving bowls. Then, artfully arrange the sliced chicken over the top of the grits.
- Garnish and Serve:
Drizzle generously with the prepared chili oil, adding that signature zesty kick and beautiful color. Finish with a sprinkle of fresh chopped parsley or scallions for a burst of freshness and visual appeal. Serve immediately and savor every crunchy, creamy, spicy, and utterly delicious bite!
Chef’s Edge: Elevating Your Crispy Chicken & Creamy Grits Game
Take your culinary adventure a step further with these expert tips designed to refine and personalize your Crispy Chicken & Creamy Grits.
Chicken Coating Brilliance
Double Dredge for Extra Crunch: For an exceptionally thick and incredibly crunchy coating, repeat the flour, egg wash, and Panko steps. This creates a more robust crust that stands up even better to the creamy grits.
For an even crispier experience, try these crunchy panko chicken tenders.
Spice Up Your Panko: Don’t just stick to salt and pepper! Incorporate a pinch of smoked paprika for depth, a dash of cayenne for extra heat, or even a touch of dried thyme or oregano for an aromatic twist in your breading mixture.
For an equally satisfying crunch, check out these crispy glazed chicken tenders.
Air Fryer Alternative: For a slightly lighter but still crispy option, bread the chicken as instructed. Then, air fry at 375°F (190°C) for 15-20 minutes, flipping halfway through, until it’s golden brown and cooked through. While not a deep fry, it’s still wonderfully satisfying.
Grits Guru Wisdom
Broth vs. Water: While water produces fine grits, opting for low-sodium chicken broth will dramatically deepen their savory profile. For an even richer, more luxurious texture, consider a half-and-half mixture of broth and whole milk.
Cheese Varieties: Beyond classic cheddar, explore other cheeses to customize your grits. Smoked Gouda adds a beautiful smoky undertone, while Parmesan offers a sharp, nutty kick. A dollop of cream cheese can also be stirred in for an extra boost of silky creaminess.
Beyond Quick-Cooking Grits: If time allows, stone-ground grits offer a more robust, earthy flavor and a delightful chewiness. Just be prepared to adjust cooking times and liquid ratios as they require a longer simmer.
Chili Oil Customization
Adjusting the Heat: Easily tailor the spice level of your chili oil by increasing or decreasing the amount of chili flakes. For a milder oil, use fewer; for a fiery kick, feel free to add more to your preference.
Infusion Ideas: Get creative with additional aromatics. A thin slice of fresh ginger, a star anise pod, or a few Sichuan peppercorns can be added to the bowl with the chili flakes and garlic before pouring the hot oil, introducing fascinating layers of complex flavor.
Common Culinary Conundrums: Troubleshooting Your Crispy Chicken & Creamy Grits
Even seasoned cooks encounter challenges. Here’s how to tackle common issues and ensure your dish is always a success.
“My Chicken Isn’t Crispy!”
The number one culprit is moisture. Always ensure you thoroughly pat the chicken dry before breading. Secondly, verify your oil temperature is within the ideal range of 350-375°F; oil that’s too cool results in greasy, soft chicken. Finally, immediately transfer cooked chicken to a wire rack, not paper towels, to allow air circulation and prevent steam from re-sogging the crust.
“My Grits Are Lumpy or Too Thick/Thin!”
Lumps in grits typically form if they are added too quickly to boiling liquid or not whisked continuously during the initial stirring. If your grits are too thick, slowly whisk in a little more hot water or broth until you achieve your desired creamy consistency. Conversely, if they are too thin, continue to simmer them uncovered for a few extra minutes, stirring frequently, until they thicken to perfection.
“The Chili Oil Lacks Flavor”
For a vibrant chili oil, ensure you’re using fresh, potent chili flakes and freshly minced garlic, as stale ingredients yield weak flavor. The most critical step is ensuring the oil is sufficiently hot (shimmering but not smoking) when poured over the aromatics, as this heat is what “blooms” and infuses their full flavor into the oil.
Maximizing Enjoyment: Serving, Storage & Make-Ahead Strategies
Once you’ve mastered this delicious dish, you’ll want to enjoy it in every way possible – from perfect presentation to effortless leftovers. Here’s how to get the most out of your Crispy Chicken & Creamy Grits.
Perfect Pairings & Serving Suggestions
Green Salad with Vinaigrette: A crisp, light salad dressed with a bright vinaigrette offers a refreshing contrast to the richness of the chicken and grits.
Complementary Dishes
Round out your meal with these chicken and vegetable options.
- For a fresh take on greens, try this Crispy Chicken Kale Cabbage Salad, offering a bright contrast to the creamy grits.
- If you enjoy a similar preparation style, consider the Crispy Herb-Crusted Cauliflower with Pickled Beet Salad for a vegetable-focused pairing.
Steamed Green Beans or Asparagus: Simple, vibrant steamed vegetables add a healthy component and beautiful color, balancing the hearty main course.
Roasted Root Vegetables: For a more substantial side, roasted carrots, parsnips, or sweet potatoes complement the comforting flavors perfectly.
Sparkling Lemonade or Light Lager: A bright, effervescent drink can cut through the richness of the dish, providing a delightful palate cleanser.
Storing Leftovers Like a Pro
To best preserve the quality and texture, store leftover crispy chicken and creamy grits separately in airtight containers. Refrigerate them promptly for up to 3-4 days. This keeps the chicken from becoming soggy and the grits from drying out.
Reheating for Retained Crispness
For the chicken, the best way to regain crispness is to reheat it in an oven or air fryer at 350°F (175°C) for 10-15 minutes, until it’s heated through and gloriously crispy again. Avoid reheating in the microwave, as this will inevitably make the coating soggy. For the grits, gently reheat them on the stovetop over low heat, stirring in a splash of milk or broth to restore their original creamy consistency.
Can You Make Components Ahead?
Absolutely! The homemade chili oil can be prepared several days in advance and stored in an airtight container at room temperature; its flavors actually deepen over time. While the crispy chicken is best when breaded and fried fresh, you can pound and season the chicken breasts a few hours beforehand and keep them refrigerated until you’re ready to bread and fry.
Your Top Questions Answered About This Comfort Classic
Here are answers to some frequently asked questions about making the perfect Crispy Chicken & Creamy Grits.
Can I use bone-in chicken for this recipe?
Yes, you can certainly use bone-in chicken pieces, such as thighs or drumsticks, for this recipe. However, you will need to significantly adjust the cooking time, typically to 20-30 minutes, ensuring the internal temperature reaches 165°F. Be aware that bone-in chicken may not achieve the same uniform crispness as boneless, flattened breasts.
What if I don’t have Panko breadcrumbs?
While Panko is highly recommended for its unmatched light and airy crispness, you can substitute it with regular fine breadcrumbs. The resulting texture won’t be quite as dramatically crispy, but it will still yield a delicious fried chicken. Try to avoid fresh breadcrumbs, as they tend to absorb more oil and can become heavy.
Can this recipe be made gluten-free or dairy-free?
To make this recipe gluten-free, substitute the all-purpose flour with a certified gluten-free all-purpose flour blend for dredging. Also, ensure that your Panko breadcrumbs are gluten-free, or consider using finely crushed gluten-free cornflakes for the coating. For a dairy-free version, replace the milk in the egg wash with a non-dairy milk, and either omit the cheddar cheese in the grits or use a high-quality dairy-free cheese alternative and plant-based butter.
How can I make the grits spicier or richer?
To add more heat to your grits, stir in a pinch of cayenne pepper, a dash of your favorite hot sauce, or even a few extra chili flakes (if you enjoy a bit of textural crunch) directly into the cooked grits. For a richer, more decadent texture, you can increase the amount of butter, add a splash of heavy cream, or incorporate a more robust and flavorful cheese like smoked Gouda or even some cream cheese for extra tang and body. For more savory richness, consider a homemade creamy country gravy as an alternative topping for your grits.
Your Crispy Chicken & Creamy Grits Journey: What’s Next?
You’ve now unlocked the secrets to perfectly crispy chicken and luxuriously creamy grits, all brought together with a zesty, homemade chili oil. This dish is more than just a meal; it’s an experience – a testament to how simple, well-executed techniques can elevate everyday ingredients into something truly extraordinary and deeply satisfying.
We encourage you to embark on this culinary adventure. Don’t be shy about experimenting with the tips and tricks provided, and make this recipe your own. When you do, we’d absolutely love to hear about your triumphs! Share your photos and stories with us in the comments below, or tag us on social media.
Ready for more comfort food creations that truly hit the spot? Explore our collection of ultimate comfort food recipes for your next delicious endeavor!
Crispy Chicken
Course: Main CourseCuisine: AmericanDifficulty: medium2
servings20
minutes20
minutes850
kcal40
minutesUnlock the secret to perfectly crunchy fried chicken that stays crisp, even with creamy grits. This recipe features a crucial trick for a non-soggy, golden crust and juicy interior, plus homemade chili oil for a delicious kick.
Ingredients
2 boneless, skinless chicken breasts
1 cup Panko breadcrumbs
1/2 cup all-purpose flour
1 teaspoon salt, divided
1/2 teaspoon black pepper, divided
1/2 teaspoon garlic powder
1 large egg
2 tablespoons milk
1/4 cup vegetable oil, plus more for frying
1 cup quick-cooking grits
4 cups water or low-sodium chicken broth
2 tablespoons butter
1/4 cup shredded mild cheddar cheese (optional)
2 tablespoons chili flakes (for chili oil)
1 clove garlic, minced (for chili oil)
Fresh parsley or scallions, chopped, for garnish
Directions
- Prepare the chicken: Place each chicken breast between two sheets of plastic wrap. Using a meat mallet or rolling pin, pound chicken to an even 1/2-inch thickness. Season both sides with 1/2 teaspoon salt, 1/4 teaspoon black pepper, and garlic powder.
- Set up breading station: In a shallow dish, add the all-purpose flour. In a second shallow dish, whisk together the egg and milk to create an egg wash. In a third shallow dish, add the Panko breadcrumbs along with remaining 1/2 teaspoon salt and 1/4 teaspoon black pepper.
- The Crispy Coating Secret: Pat the seasoned chicken breasts thoroughly dry with paper towels. This is crucial for the coating to stick! First, dredge each chicken piece in the flour, shaking off any excess. Next, dip into the egg wash, allowing any excess to drip off. Finally, press the chicken firmly into the Panko breadcrumbs, ensuring every surface is completely coated. Really press down to embed the Panko. Let the breaded chicken rest on a plate for 5-10 minutes. This resting time helps the breading adhere firmly and contributes to a crispier crust that resists sogginess.
- Fry the chicken: Heat 1/4 cup vegetable oil in a large skillet over medium-high heat until shimmering, about 350-375 degrees F. Carefully place the breaded chicken breasts into the hot oil, ensuring not to overcrowd the pan (cook in batches if necessary). Fry for 4-5 minutes per side, until golden brown and cooked through (internal temperature reaches 165 degrees F). As each piece finishes cooking, immediately transfer it to a wire rack set over a baking sheet. Do not place directly on paper towels, as this traps steam and makes the coating soggy. The wire rack allows air to circulate, keeping the crust crisp.
- Make the grits: While chicken fries, bring water or broth to a boil in a medium saucepan. Slowly whisk in the grits, stirring constantly to prevent lumps. Reduce heat to low, cover, and simmer for 5-7 minutes, stirring occasionally, until thickened and creamy. Remove from heat, stir in butter and cheddar cheese (if using).
- Prepare chili oil: In a small, heatproof bowl, combine chili flakes and minced garlic. Heat 1/4 cup vegetable oil in a small saucepan until very hot but not smoking. Carefully pour the hot oil over the chili flakes and garlic. It will sizzle. Let cool slightly.
- Assemble: Slice the crispy chicken into thick pieces. Ladle creamy grits into bowls. Arrange sliced chicken over the grits. Drizzle generously with the prepared chili oil and garnish with fresh chopped parsley or scallions. Serve immediately and enjoy that perfect crunch!
Notes
- Key to crispiness: pat chicken dry, press Panko firmly, rest breaded chicken, and use a wire rack after frying.