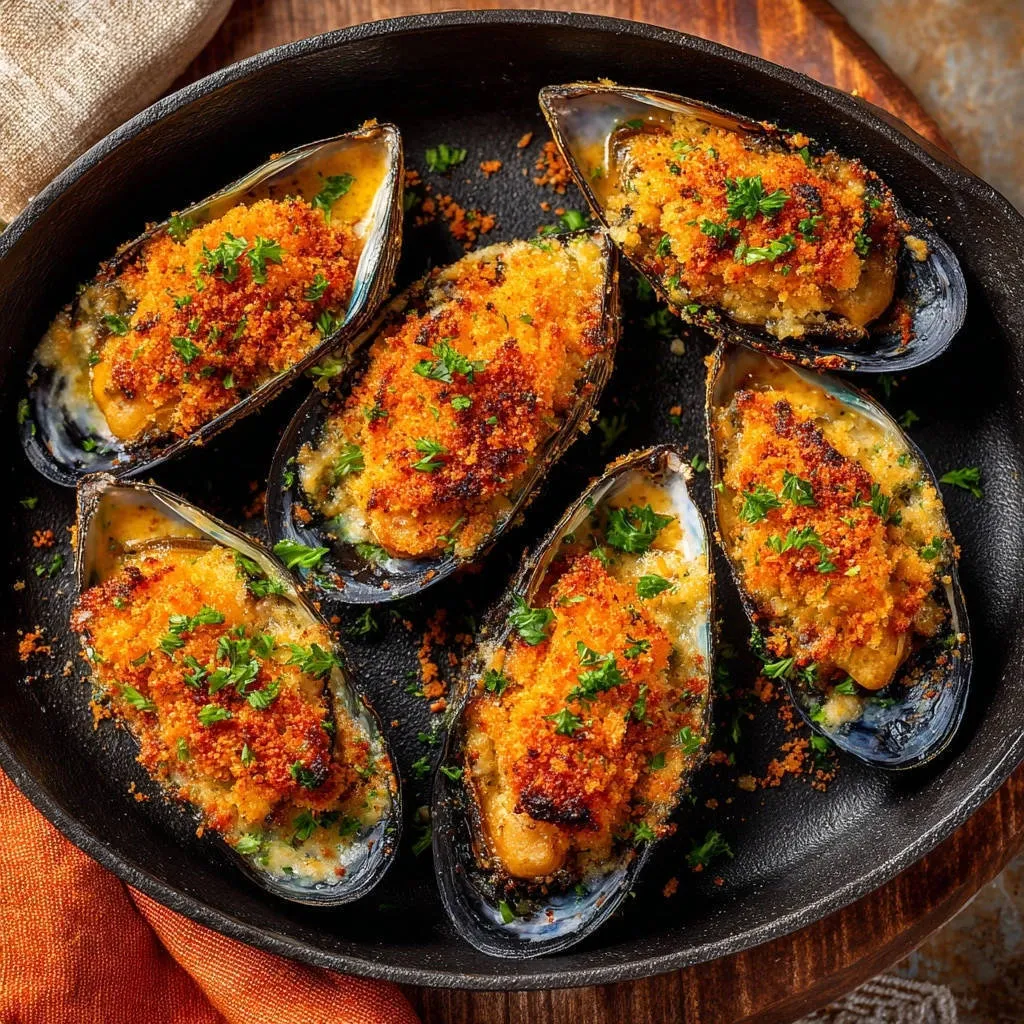
I’ve lost count of the beautiful baked seafood appetizers ruined by a sad, greasy, soggy topping. That struggle ends now. This recipe for Crunchy Baked Mussels with Garlic Butter utilizes a crucial, expert technique-pre-toasting the Panko-that guarantees an incredible, golden crunch that holds up perfectly against the rich, creamy base, delivering restaurant quality with zero failure.
The Secret Weapon: Achieving the Zero-Soggy-Bite Crunch
The biggest challenge in baked seafood appetizers is moisture management. Mussels release liquid as they heat, and creamy sauces contribute steam, turning standard breadcrumbs into damp mush.
For another way to keep seafood tender, try this herb-crusted baked cod.
Our solution is radical: we build the crunch outside the oven first. This simple, two-step method completely seals the topping against moisture, providing the perfect texture contrast every single time.
Why Pre-Toasting Panko Changes Everything
When you toast Panko in melted butter, two things happen simultaneously that guarantee success. First, the butter completely coats the breadcrumbs, creating a lipid barrier that repels water.
Second, browning the Panko beforehand ensures the crumb structure is already crisp and doesn’t need excessive time under the broiler, which minimizes steam exposure.
Appetizer Ready in Under 20 Minutes
Because the mussels are steamed first and the Panko is pre-toasted, the final assembly and broiling phase takes less than five minutes. This speed makes these crunchy baked mussels perfect for last-minute entertaining.
A Restaurant-Quality Appetizer, Simplified
Serving individually portioned, gorgeously golden mussels creates an elegant, high-end feel often found only in seafood restaurants. This recipe demystifies that process, making gourmet flavor accessible to the home cook.
The Building Blocks of Flavor: Key Ingredients Analysis
Choosing and Preparing the Best Fresh Mussels
Mussels must be fresh and alive before cooking. If a shell is open, lightly tap it; if it doesn’t close promptly, discard it.
Thorough scrubbing removes any grit, and proper de-bearding ensures a clean, enjoyable texture.
The Essential Garlic Butter Blend
We use butter in two phases: first, melted with garlic to create the aromatic steam for the mussels. This infuses the meat with flavor immediately.
Second, we use butter as the fat foundation for the Panko coating, which is essential for the superior, moisture-resistant crunch.
The Heavy Cream Base (And Why We Use So Little)
Heavy cream provides the necessary richness and serves as the perfect adhesive layer between the mussel meat and the topping.
Using only a tiny spoonful prevents the sauce from becoming soupy or soaking through the bottom of the delicate topping.
Panko and Parmesan: The Perfect Crispy Duo
Panko breadcrumbs are superior to regular breadcrumbs because their flaky structure absorbs the butter better and maintains a lighter, airier crunch.
For another way to achieve a similar satisfying crunch, check out these crispy parmesan zucchini bites.
Grated Parmesan cheese melts slightly into the butter and Panko while toasting, providing a savory depth and aiding in that beautiful golden browning.
Essential Kitchen Gear for Mussels Perfection
-
Large Skillet or Pot with Lid:
Necessary for the initial steaming phase. Ensure it’s large enough to allow the mussels room to open quickly and evenly.
-
Small Non-Stick Pan:
Crucial for the “Crunch Technique.” Non-stick ensures the butter-coated Panko browns perfectly without scorching or sticking.
-
Baking Sheet or Cast Iron Skillet:
Use a heavy, reliable surface for broiling. Cast iron works exceptionally well for holding heat and providing stability under the broiler.
-
Sturdy Tongs and Oven Mitts:
Essential safety tools, especially when working close to the high heat of a broiler.
From Shell to Table: Mastering the Mussels Baking Process
Step 1: Cleaning and Steaming the Mussels Safely
-
The De-Bearding and Tap Test:
Thoroughly scrub the outside of the shells and pull the beard firmly towards the hinge. The tap test confirms freshness; if a slightly open mussel doesn’t close after a tap, discard it immediately.
-
Creating the Aromatic Steam Base:
Quickly sautéing the garlic prevents bitterness and infuses the steam liquid immediately. Use the broth or white cooking liquid as the base for steaming.
-
Steaming to Perfection:
Steam only until the shells are fully opened (3-5 minutes). Overcooked mussels become tough, so monitor closely.
Step 2: Preparing the Shells and Creamy Base
-
Removing and Arranging the Meat:
Once cool enough, remove the meat and place it back into the reserved half-shells. This presentation is ideal for single-serving appetizers.
-
Applying the Light Cream Layer:
The small spoonful of heavy cream mixture serves as the flavor adhesive, holding the crunchy topping in place without making the mussel meat soggy.
Step 3: The Crunch Technique (Pre-Toasting the Panko)
-
Infusing the Panko with Fat and Heat:
Melt the remaining butter and quickly incorporate the Panko and Parmesan. Stir constantly-this ensures every crumb is coated in butter, which is the key moisture repellent.
-
Achieving the Deep Golden Hue:
Continue stirring for 2-3 minutes until the Panko achieves a deep, even golden color. It should already be crunchy before it hits the broiler, guaranteeing success.
-
The Fresh Herb Finish:
Stir the fresh parsley in after removing the Panko mixture from the heat to maintain its vibrant color and fresh flavor.
Step 4: Assembling and Broiling for the Final Finish
-
Generous Topping Assembly:
Mound the toasted Panko mixture high over the creamy base. The height helps the topping crisp evenly under the broiler without the heat penetrating too quickly to the mussel meat.
-
The Broiler Danger Zone (1-2 Minutes Max):
Use the high broiler setting and position the mussels 6-8 inches away. Broiling is fast; the goal is to heat the cream base and finish browning the Panko, not cook the mussels further. Do not leave the kitchen.
Expert Tips: Troubleshooting and Elevating Your Baked Appetizer
Avoiding Common Mistakes: Broiling Do’s and Don’ts
-
Know Your Broiler Settings:
Every oven is different. If your broiler runs extremely hot, place the rack lower (10 inches) and add 30 seconds to the cooking time to prevent immediate burning. -
Why Broiling Time is Crucial:
Since the Panko is already crispy and the mussels are pre-cooked, the broiling phase is strictly for color and heating the sauce. Anything more than two minutes risks drying out the delicate mussel meat.
Flavor Variations: Expanding Beyond Garlic Butter
-
Adding Spice:
Stir a pinch of red pepper flakes or a drop of chili oil into the Panko mixture before toasting for a subtle kick. -
Herb Alternatives:
Substitute the parsley with fresh chives, dill, or tarragon to complement the seafood. Ensure the herbs are added after the heat source is removed. -
Lemon Zest Boost:
Finely grate lemon zest into the cream base for a brighter, fresher flavor profile that cuts through the richness of the butter.
Make-Ahead Strategy and Proper Storage
-
The Make-Ahead Component:
The mussels can be steamed, de-shelled, and refrigerated (covered) up to 24 hours in advance. Keep the pre-toasted Panko topping stored separately at room temperature in an airtight container to maintain its crunch. Assemble immediately before broiling. -
Storage of Leftovers:
While best eaten fresh, leftovers can be stored refrigerated for 1-2 days. Reheat briefly in a toaster oven or under the broiler to restore some crunch (avoid the microwave).
What to Serve with Crunchy Baked Mussels with Garlic Butter
The Ideal Wine and Beverage Pairings
The rich garlic butter sauce requires something clean and acidic to cut through the richness. A crisp, unoaked Sauvignon Blanc is a classic pairing.
Alternatively, a dry Provençal Rosé provides refreshing minerality and delicate fruit notes that beautifully complement the mussels.
Crusty Bread vs. Light Salads: Complementary Sides
- Crusty Baguette: Essential for soaking up the leftover garlic butter and cream mixture once the mussels are gone.
- A Simple Arugula Salad: Tossed lightly with lemon juice and olive oil, this provides a peppery, acidic contrast to the savory baked seafood.
Creating a Seafood Sampler Platter
These individual Crunchy Baked Mussels with Garlic Butter make a wonderful centerpiece on a larger platter.
Complementary Dishes
Round out your meal with these dishes that share a love for garlic butter and a great texture.
- For a similar garlic butter richness, try these creamy garlic butter corn ribs.
- If you enjoy the crispiness of the mussels, these garlic butter roasted baby potatoes offer a satisfying crunch.
Pair them with chilled shrimp cocktail or smoked salmon bites to create a luxurious and varied appetizer spread for guests.
Your Quick Guide to Common Mussels Questions
How do I know if the mussels are safe to eat?
Before cooking, use the tap test; discard any mussels that stay open. After steaming, discard any mussels that remain tightly clamped shut, as they were likely dead before cooking and are unsafe.
Can I use fresh breadcrumbs instead of Panko?
We strongly discourage using fresh or standard breadcrumbs. They are much denser and absorb moisture quickly, undermining the integrity of the crucial crunchy topping even when pre-toasted.
What is the best way to clean mussels?
Use a stiff brush under cold running water to remove any barnacles or surface debris. The fibrous beard must be pulled out firmly toward the hinge of the mussel before cooking.
I burned the Panko during broiling. How can I prevent this next time?
The key is to pay attention to the Panko’s color during the initial toasting phase-it should only reach a light golden brown. This leaves room for the final, deep golden hue during the quick 60-second burst under the broiler. Never leave the oven.
Ready to Impress? Share Your Crunchy Baked Mussels with Garlic Butter Masterpiece!
This method eliminates the risk of disappointment and ensures your guests are met with the most satisfying textural experience possible. By mastering the pre-toasting of the Panko, you elevate simple mussels into a show-stopping appetizer.
Try the technique today and prove that the best Crunchy Baked Mussels with Garlic Butter are those that maintain their crunch from the first bite to the last. We can’t wait to see your golden results!
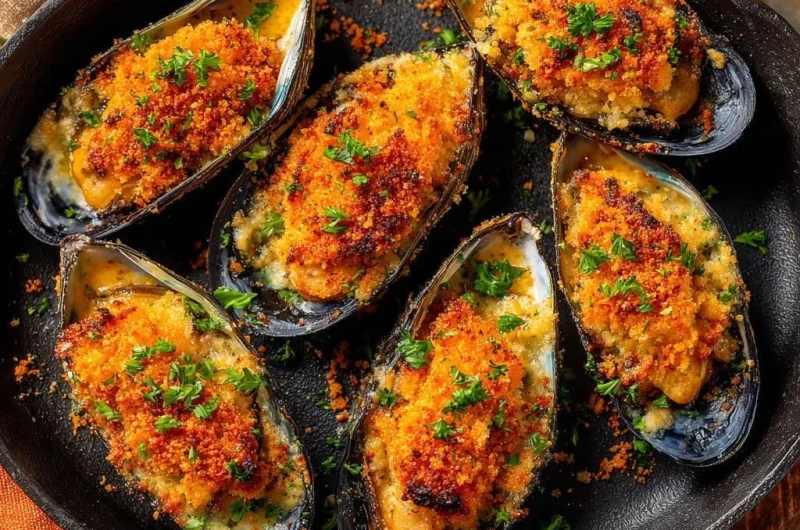
Baked Mussels
Course: AppetizerCuisine: InternationalDifficulty: easy4
servings (appetizer)15
minutes15
minutes240
kcal30
minutesThis recipe guarantees a golden, crispy topping on every bite of baked mussels. By pre-toasting the Panko in garlic butter, you solve the problem of soggy seafood appetizers, locking in flavor and crunch.
Ingredients
1 pound fresh Mussels, cleaned and scrubbed
4 tablespoons unsalted Butter, divided
2 cloves Garlic, minced
1/4 cup dry White Cooking Liquid (non-alcoholic) or Chicken Broth
2 tablespoons heavy Cream
1/2 cup Panko Breadcrumbs
1/4 cup grated Parmesan Cheese
1 tablespoon fresh Parsley, chopped, plus more for garnish
Salt and Black Pepper to taste
Directions
- Prepare the Mussels. Scrub the mussels well and remove the beards (de-beard). Discard any mussels that remain open after being lightly tapped.
- Steam the Mussels. In a large skillet or pot, melt 1 tablespoon of butter over medium heat. Add the minced garlic and cook briefly (about 30 seconds) until fragrant. Add the white cooking liquid or broth and bring to a simmer. Add the mussels, cover the pot, and steam for 3 to 5 minutes until they open. Immediately remove the pot from heat.
- Prepare the Shells and Base Sauce. Once cool enough to handle, remove the mussels from their shells. Reserve one half of the shell for serving and discard the empty half. Place the mussel meat back into the serving shell. In a small bowl, whisk together the heavy cream and a pinch of salt and pepper. Spoon a tiny amount of this cream mixture over the mussel meat in each shell. Preheat your broiler to high.
- The Crunch Technique (Solving the Pain Point). In a separate small, non-stick pan, melt the remaining 3 tablespoons of butter over medium heat. Once melted, stir in the 1/2 cup of Panko breadcrumbs and the parmesan cheese. Stir constantly for 2 to 3 minutes until the Panko is evenly coated and turns a light, deep golden brown. This pre-toasting step is crucial; coating the crumbs in fat and browning them ensures they are already crisp and resistant to moisture released from the sauce, guaranteeing a superior crunch. Stir in the chopped parsley after removing the pan from the heat.
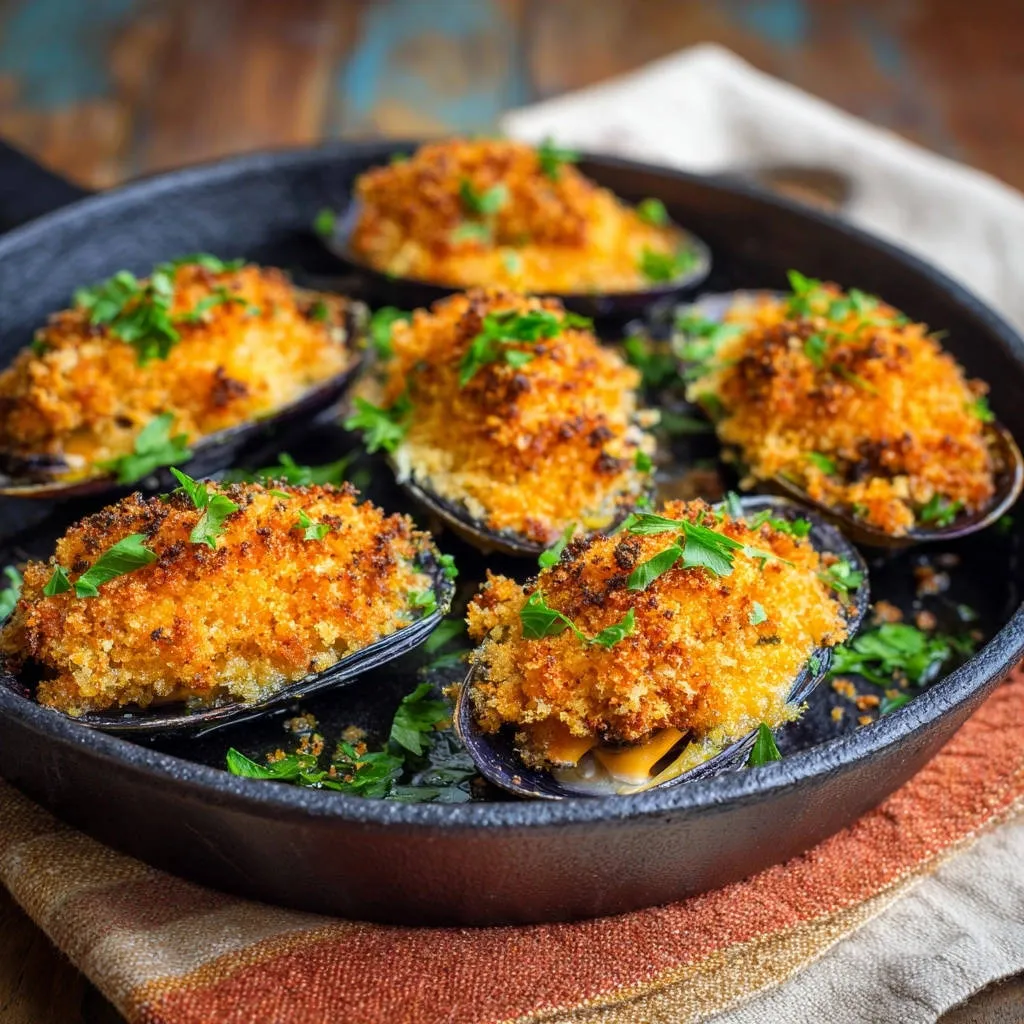
- Assemble and Finish. Spoon a generous amount of the toasted Panko mixture over the creamy base of each prepared mussel shell, patting it gently to create a mound. Arrange the assembled mussels in a cast-iron skillet or on a baking sheet.
- Broil Quickly. Place the skillet under the hot broiler, positioning the rack 6 to 8 inches away from the heat source. Broil for only 1 to 2 minutes, watching carefully until the topping is deeply golden brown and bubbling, and the creamy sauce underneath is hot. Do not walk away, as the Panko can burn quickly.
- Serve immediately, garnished with extra fresh parsley.
Notes
- The pre-toasting of the Panko breadcrumbs is essential for achieving a non-soggy, ultimate crunch.